Spring MVC,JSON数据交互
一、前言
JSON(JavaScript Object Notation, JS 对象标记) 是一种轻量级的数据交换格式,采用完全独立于编程语言的文本格式来存储和表示数据。 易于阅读和编写,同时也易于机器解析和生成,并有效地提升网络传输效率。
通常前台表单提交的数据主要有两种格式,一种是JSON格式的数据,另一种就是普通的key/value对,针对这两种方式,在Controller类中会有不同的解析。
Spring MVC和前台交互主要有两种形式,如下图所示:
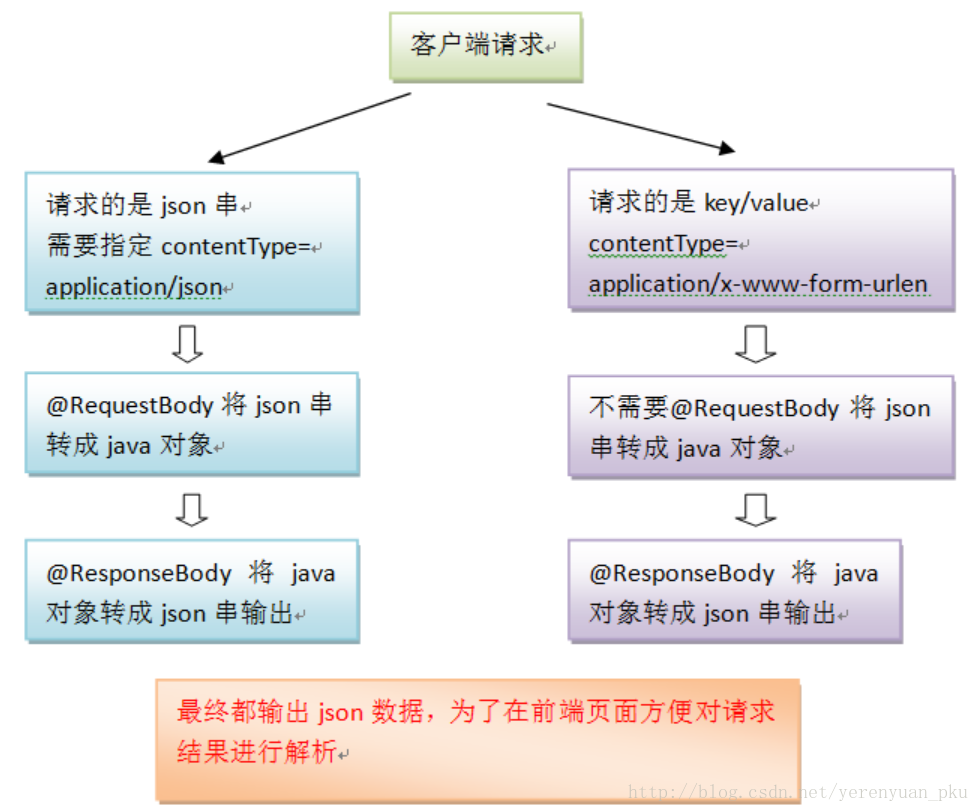
上图参考:https://blog.csdn.net/lch_2016/article/details/81022646
二、具体步骤
假定你已经具备开发环境,读过前几篇文章,具体请参考:Spring MVC,绑定默认数据
步骤一、引用JSON包
SpringMVC默认用MappingJacksonHttpMessageConverter对JSON数据进行转换,需要加入jackson包。包括:
- jackson-annotations-2.12.5.jar JSON转换注解包
- jackson-core-2.12.5.jar JSON转换核心包
- jackson-databind-2.12.5.jar JSON转换的数据绑定包
步骤二、修改springmvc-config.xml
<?xml version="1.0" encoding="UTF-8"?>
<beans xmlns="http://www.springframework.org/schema/beans"
    xmlns:xsi="http://www.w3.org/2001/XMLSchema-instance"
    xmlns:context="http://www.springframework.org/schema/context"
    xmlns:mvc="http://www.springframework.org/schema/mvc"
    xsi:schemaLocation="http://www.springframework.org/schema/beans
       http://www.springframework.org/schema/beans/spring-beans-4.3.xsd
       http://www.springframework.org/schema/context
          http://www.springframework.org/schema/context/spring-context-4.3.xsd
  http://www.springframework.org/schema/mvc http://www.springframework.org/schema/mvc/spring-mvc.xsd">
    <!-- 指定需要扫描的包 -->
    <context:component-scan
        base-package="com.itheima.controller" />
    <mvc:annotation-driven
        conversion-service="conversionService"></mvc:annotation-driven>
    <!--配置静态资源的访问映射,此配置中的文件,将不被前端控制器拦截 -->
    <mvc:resources location="/js/" mapping="/js/**" />

    <!-- 定义视图解析器 -->
    <bean id="viewResolver"
        class="org.springframework.web.servlet.view.InternalResourceViewResolver">
        <!-- 设置前缀 -->
        <property name="prefix" value="/WEB-INF/jsp/" />
        <!-- 设置后缀 -->
        <property name="suffix" value=".jsp" />
    </bean>
</beans>
注意其中<mvc:resources />标签。
步骤三、新建实体类
package com.itheima.po;

/**
 * 用户持久化类
 */
public class User {
    private String username;           // 用户姓名
    private String address;            // 用户地址

    public String getUsername() {
        return username;
    }
    public void setUsername(String username) {
        this.username = username;
    }
    public String getAddress() {
        return address;
    }
    public void setAddress(String address) {
        this.address = address;
    }
}
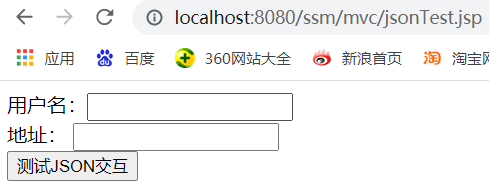
四、新建表单jsonTest.jsp,位于:mvc目录
<%@ page language="java" contentType="text/html; charset=UTF-8"
    pageEncoding="UTF-8"%>
<!DOCTYPE html PUBLIC "-//W3C//DTD HTML 4.01 Transitional//EN"
"http://www.w3.org/TR/html4/loose.dtd">
<html>
<head>
<title>测试JSON交互</title>
<meta http-equiv="Content-Type" content="text/html; charset=UTF-8">
<script type="text/javascript"
      src="${pageContext.request.contextPath }/js/jquery-1.11.3.min.js">
</script>
<script type="text/javascript">
function testJson(){
    // 获取输入的用户名和地址
    var username = $("#username").val();
    var address = $("#address").val();
    $.ajax({
        url : "${pageContext.request.contextPath }/testJson",
        type : "post",
        // data表示发送的数据
        data :JSON.stringify({username:username,address:address}),
        // 定义发送请求的数据格式为JSON字符串
        contentType : "application/json;charset=UTF-8",
        //定义回调响应的数据格式为JSON字符串,该属性可以省略
        dataType : "json",
        //成功响应的结果
        success : function(data){
            if(data != null){
              alert("您输入的用户名为:"+data.username+
                                 "地址为:"+data.address);
            }
        }
    });
}
</script>
</head>
<body>
    <form>
        用户名:<input type="text" name="username" id="username"><br />
        地址:
          <input type="text" name="address" id="address"><br />
         <input type="button" value="测试JSON交互" onclick=" testJson()" />
    </form>
</body>
</html>
注意:本JSP引用jquery-1.11.3.min.js,请自行下载放置于JS目录
步骤五、新建或修改控制器类
package com.itheima.controller;

import java.util.List;

import org.springframework.stereotype.Controller;
import org.springframework.web.bind.annotation.RequestBody;
import org.springframework.web.bind.annotation.RequestMapping;
import org.springframework.web.bind.annotation.ResponseBody;

import com.itheima.po.User;

@Controller
public class UserController {

    /**
     * 接收页面请求的JSON数据,并返回JSON格式结果
     */
    @RequestMapping("/testJson")
    @ResponseBody
    public User testJson(@RequestBody User user) {
        // 打印接收的JSON格式数据
        System.out.println(user);
        // 返回JSON格式的响应
        return user;
    }
}
UserController.java,使用注解方式定义一个控制器类,并编写接收和响应JSON格式数据的testJson文法,在方法中打印接受到的JSON用户数据,然后返回JSON格式的用户对象。
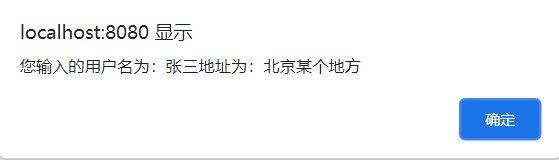
六、启动应用,测试项目,输入地址:http://localhost:8080/ssm/mvc/jsonTest.jsp
输入张三、北京某个地方,提交,页面将显示: