Android之Activity显示原理
一、Activity启动流程
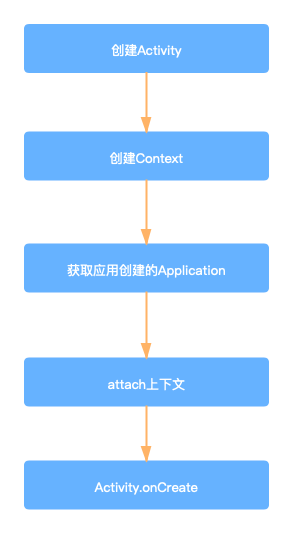
简述Activity启动过程

attach上下文不只是将创建的Context对象设置到Activity中,在attach还做了其它的初始化操作,比如:创建PhoneWindow。
二、Activity作用
Activity主要的作用是管理Activity的生命周期和事件处理。
三、WindowManagerService主要作用
- 分配Surface。
- 管理Surface显示顺序、位置、大小等。
- 控制窗口动画。
- 输入事件分发。
四、PhoneWindow
源码:framworks/base/core/java/com/android/internal/policy/PhoneWindow.java
public class PhoneWindow extends Window implements MenuBuilder.Callback {
    ……
}
五、DecorView是什么
源码:frameworks/base/core/java/com/android/internal/policy/DecorView.java
DecorView就是一个Framelayout,也就是RootView。
public class DecorView extends FrameLayout implements RootViewSurfaceTaker, WindowCallbacks {
    private static final String TAG = "DecorView";

    ……

}
六、ViewRootImpl是什么
源码:frameworks/base/core/java/android/view/ViewRootImpl.java
ViewRootImpl主要作用:
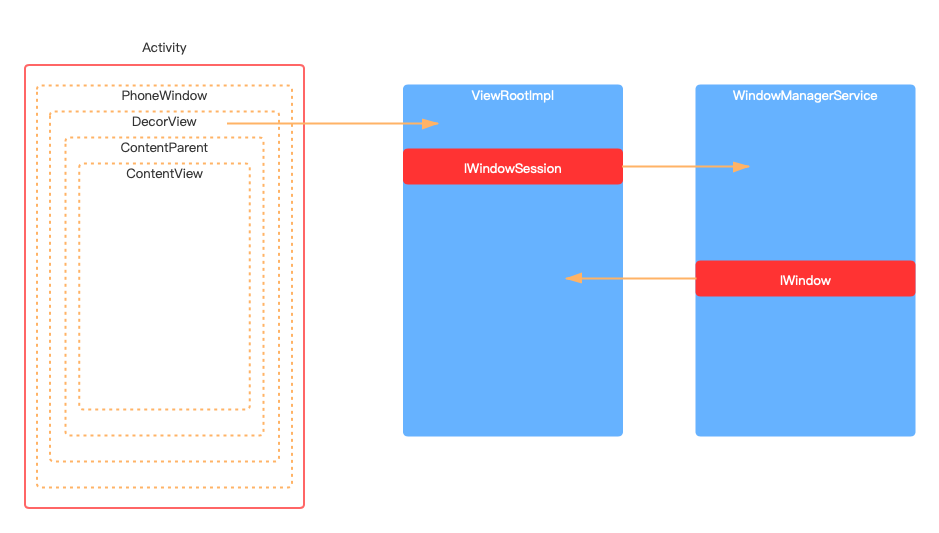
1. 通过ViewRootImpl与WMS双向通信的。在ViewRootImpl通过IWindowSession(Binder对象)与WMS IPC通信,而WMS通过IWindow(Binder对象)与应用IPC通信。
2. 申请Surface对象。
七、DecorView与ViewRootImpl关系
在DecorView中通过mAttachInfo对象获取ViewRootImpl对象。
在Veiw中获取ViewRootImpl实现:
/**
    * Gets the view root associated with the View.
    * @return The view root, or null if none.
    * @hide
    */
@UnsupportedAppUsage
public ViewRootImpl getViewRootImpl() {
    if (mAttachInfo != null) {
        return mAttachInfo.mViewRootImpl;
    }
    return null;
}
mAttachInfo通过View类中dispatchAttachedToWindow(AttachInfo info, int visibility)函数设置。
八、Activity显示原理分析
1. Activity启动生命周期:
attach -> onCreate -> onStart -> onResume
attach()函数:在attach()中做了Context对象赋值、创建PhoneWindow等。
onCreate()函数:设置界面内容View。
onResume()函数:在回调onResume()后显示界面UI。
2. 构建ViewTree
正常在onCreate()回调中会使用setContentView()函数设置界面的内容UI的layoutResId。
/**
    * Set the activity content from a layout resource.  The resource will be
    * inflated, adding all top-level views to the activity.
    *
    * @param layoutResID Resource ID to be inflated.
    *
    * @see #setContentView(android.view.View)
    * @see #setContentView(android.view.View, android.view.ViewGroup.LayoutParams)
    */
public void setContentView(@LayoutRes int layoutResID) {
    getWindow().setContentView(layoutResID);
    initWindowDecorActionBar();
}
在setContentView()函数实现中会调用getWindow().setContentView()函数。
源码:frameworks/base/core/java/android/view/Window.java
/**
    * Convenience for
    * {@link #setContentView(View, android.view.ViewGroup.LayoutParams)}
    * to set the screen content from a layout resource.  The resource will be
    * inflated, adding all top-level views to the screen.
    *
    * @param layoutResID Resource ID to be inflated.
    * @see #setContentView(View, android.view.ViewGroup.LayoutParams)
    */
public abstract void setContentView(@LayoutRes int layoutResID);
在Window类里setContentView()函数是一个抽象函数。实现类又是什么?去看看activity.attach()函数的实现:
源码:framework/base/core/java/android/app/Activity.java
@UnsupportedAppUsage(maxTargetSdk = Build.VERSION_CODES.R, trackingBug = 170729553)
final void attach(Context context, ActivityThread aThread,
        Instrumentation instr, IBinder token, int ident,
        Application application, Intent intent, ActivityInfo info,
        CharSequence title, Activity parent, String id,
        NonConfigurationInstances lastNonConfigurationInstances,
        Configuration config, String referrer, IVoiceInteractor voiceInteractor,
        Window window, ActivityConfigCallback activityConfigCallback, IBinder assistToken) {
    attachBaseContext(context);

    mFragments.attachHost(null /*parent*/);

    mWindow = new PhoneWindow(this, window, activityConfigCallback);
    mWindow.setWindowControllerCallback(mWindowControllerCallback);

    ……

}
在attach函数中,创建的Window是PhoneWindow:
源码:frameworks/base/core/java/com/android/internal/policy/PhoneWindow.java
/**
 * Android-specific Window.
 * <p>
 * todo: need to pull the generic functionality out into a base class
 * in android.widget.
 *
 * @hide
 */
public class PhoneWindow extends Window implements MenuBuilder.Callback {

    ……

}
PhoneWindow是继承自Window的,通过注释解释PhoneWindow是Android特定的Window。
再看看PhoneWindow中setContentView()实现:
@Override
public void setContentView(int layoutResID) {
    // Note: FEATURE_CONTENT_TRANSITIONS may be set in the process of installing the window
    // decor, when theme attributes and the like are crystalized. Do not check the feature
    // before this happens.
    if (mContentParent == null) {
        installDecor();
    } else if (!hasFeature(FEATURE_CONTENT_TRANSITIONS)) {
        mContentParent.removeAllViews();
    }

    if (hasFeature(FEATURE_CONTENT_TRANSITIONS)) {
        final Scene newScene = Scene.getSceneForLayout(mContentParent, layoutResID,
                getContext());
        transitionTo(newScene);
    } else {
        mLayoutInflater.inflate(layoutResID, mContentParent);
    }
    mContentParent.requestApplyInsets();
    final Callback cb = getCallback();
    if (cb != null && !isDestroyed()) {
        cb.onContentChanged();
    }
    mContentParentExplicitlySet = true;
}
看函数第一行,当前mContentParent == null调用installDecor()函数(代码太长了,简化一下):
private void installDecor() {
    mForceDecorInstall = false;
    if (mDecor == null) {
        mDecor = generateDecor(-1);
        ……
    } else {
        mDecor.setWindow(this);
    }
    if (mContentParent == null) {
        mContentParent = generateLayout(mDecor);

        // Set up decor part of UI to ignore fitsSystemWindows if appropriate.
        mDecor.makeFrameworkOptionalFitsSystemWindows();

        ……
    }
}
先看第一段,mDecor == null,调用generateDecor()函数创建mDecor对象。
protected DecorView generateDecor(int featureId) {
    // System process doesn't have application context and in that case we need to directly use
    // the context we have. Otherwise we want the application context, so we don't cling to the
    // activity.
    Context context;
    if (mUseDecorContext) {
        Context applicationContext = getContext().getApplicationContext();
        if (applicationContext == null) {
            context = getContext();
        } else {
            context = new DecorContext(applicationContext, this);
            if (mTheme != -1) {
                context.setTheme(mTheme);
            }
        }
    } else {
        context = getContext();
    }
    return new DecorView(context, featureId, this, getAttributes());
}
通过这上面这段代码可以看出mDecor就是DecorView,DecorView类:
源码:frameworks/base/core/java/com/android/internal/policy/DecorView.java
public class DecorView extends FrameLayout implements RootViewSurfaceTaker, WindowCallbacks {
    private static final String TAG = "DecorView";

    ……

    DecorView(Context context, int featureId, PhoneWindow window,
            WindowManager.LayoutParams params) {
        super(context);

        ……

        setWindow(window);

        ……
    }

    ……
}
通过继承关系,DecorView继承FrameLayout,DecorView也是一个View。那么,DecorView是不是RootView?与ViewRootImpl有什么关联?这个问题先放下,先继续向下看。
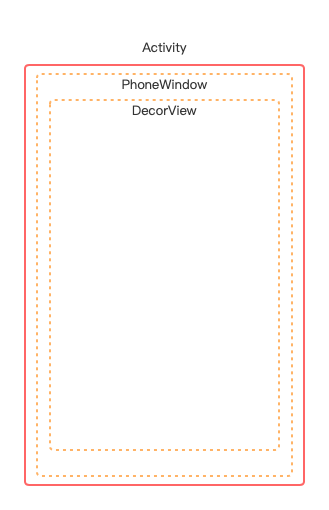
DecorView的构造函数,在创建DecorView时会将Activity的Window对象设置到DecorView。通过setWindow(window)函数。这么看来,DecorView就是PhoneWindow下的View。

从Activity创建到这里,Activity、Window、View关系是这样的。
installDecor()函数的第二段代码:
private void installDecor() {
    ……

    if (mContentParent == null) {
        mContentParent = generateLayout(mDecor);

        // Set up decor part of UI to ignore fitsSystemWindows if appropriate.
        mDecor.makeFrameworkOptionalFitsSystemWindows();

        ……
    }
}
mContentParent对象是什么?
// This is the view in which the window contents are placed. It is either
// mDecor itself, or a child of mDecor where the contents go.
ViewGroup mContentParent;
上面注释大概意思是mContentParent是放置窗口内容的视图,mContentParent要么是mDecor本身,或者是mDecor的子视图。
mContentParent == null时,通过generateLayout(mDecor)函数创建mContentParent对象。看看generateLayout(mDecor)函数实现:
protected ViewGroup generateLayout(DecorView decor) {
    ……

    ViewGroup contentParent = (ViewGroup)findViewById(ID_ANDROID_CONTENT);

    ……

    return contentParent;
}
通过findViewByid(ID_ANDORID_CONTENT)函数获取contentParent对象,最后返回contentParent对象。
Window类findViewById()函数实现:
/**
 * Finds a view that was identified by the {@code android:id} XML attribute
 * that was processed in {@link android.app.Activity#onCreate}.
 * <p>
 * This will implicitly call {@link #getDecorView} with all of the associated side-effects.
 * <p>
 * <strong>Note:</strong> In most cases -- depending on compiler support --
 * the resulting view is automatically cast to the target class type. If
 * the target class type is unconstrained, an explicit cast may be
 * necessary.
 *
 * @param id the ID to search for
 * @return a view with given ID if found, or {@code null} otherwise
 * @see View#findViewById(int)
 * @see Window#requireViewById(int)
 */
@Nullable
public <T extends View> T findViewById(@IdRes int id) {
    return getDecorView().findViewById(id);
}
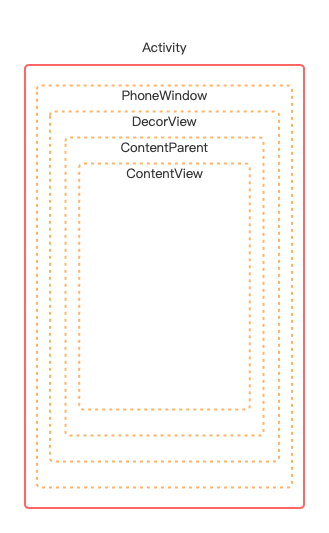
Window.findViewById()函数是通过DecorView.findViewById()函数实现的,结合mContentParent注释的解释,mContetParent是mDecor本身或者mDecor的子级视图。通过上面代码mContentParent就是mDecor的子View。
继续PhoneWindow.setContentView(int layoutResId)函数实现:
@Override
public void setContentView(int layoutResID) {
    ……

    if (hasFeature(FEATURE_CONTENT_TRANSITIONS)) {
        final Scene newScene = Scene.getSceneForLayout(mContentParent, layoutResID,
                getContext());
        transitionTo(newScene);
    } else {
        mLayoutInflater.inflate(layoutResID, mContentParent);
    }

    ……
}
上面这段代码无论是Scene.getSceneForLayout(mContentParent, layoutResID)函数,还是mLayoutInflater.inflate(layoutResID, mContentParent)函数,mContentParent都是设置内容ViewGroup的父级ViewGroup。

在activity setContentView()函数执行完成,Activity界面的ViewTree就构建完成了。但是,这只是ViewTree构建完成,还没有显示到屏幕上。
3. 显示ViewTree
Activity界面显示是在Activity onResume()回调后,那么,在onResume()中做了什么?
源码:frameworks/base/core/java/android/app/ActivityThread.java
handleResumeActivity(...)函数(代码太长,简化一下)是activity在resume阶段调用的函数,是在handleStartActivity(...)函数后调用:
@Override
public void handleResumeActivity(IBinder token, boolean finalStateRequest, boolean isForward, String reason) {
    ……
    // TODO Push resumeArgs into the activity for consideration
    final ActivityClientRecord r = performResumeActivity(token, finalStateRequest, reason);
    ……
    final Activity a = r.activity;
    ……
    // If the window hasn't yet been added to the window manager,
    // and this guy didn't finish itself or start another activity,
    // then go ahead and add the window.
    boolean willBeVisible = !a.mStartedActivity;
    if (!willBeVisible) {
        try {
            willBeVisible = ActivityTaskManager.getService().willActivityBeVisible(
                    a.getActivityToken());
        } catch (RemoteException e) {
            throw e.rethrowFromSystemServer();
        }
    }
    if (r.window == null && !a.mFinished && willBeVisible) {
        r.window = r.activity.getWindow();
        View decor = r.window.getDecorView();
        decor.setVisibility(View.INVISIBLE);
        ViewManager wm = a.getWindowManager();
        WindowManager.LayoutParams l = r.window.getAttributes();
        a.mDecor = decor;
        ……
        if (a.mVisibleFromClient) {
            if (!a.mWindowAdded) {
                a.mWindowAdded = true;
                wm.addView(decor, l);
            } else {
                a.onWindowAttributesChanged(l);
            }
        }

        // If the window has already been added, but during resume
        // we started another activity, then don't yet make the
        // window visible.
    } else if (!willBeVisible) {
        if (localLOGV) Slog.v(TAG, "Launch " + r + " mStartedActivity set");
        r.hideForNow = true;
    }
    ……
    // The window is now visible if it has been added, we are not
    // simply finishing, and we are not starting another activity.
    if (!r.activity.mFinished && willBeVisible && r.activity.mDecor != null && !r.hideForNow) {
        ……
        ViewRootImpl impl = r.window.getDecorView().getViewRootImpl();
        WindowManager.LayoutParams l = impl != null
                ? impl.mWindowAttributes : r.window.getAttributes();
        if ((l.softInputMode
                & WindowManager.LayoutParams.SOFT_INPUT_IS_FORWARD_NAVIGATION)
                != forwardBit) {
            l.softInputMode = (l.softInputMode
                    & (~WindowManager.LayoutParams.SOFT_INPUT_IS_FORWARD_NAVIGATION))
                    | forwardBit;
            if (r.activity.mVisibleFromClient) {
                ViewManager wm = a.getWindowManager();
                View decor = r.window.getDecorView();
                wm.updateViewLayout(decor, l);
            }
        }

        r.activity.mVisibleFromServer = true;
        mNumVisibleActivities++;
        if (r.activity.mVisibleFromClient) {
            r.activity.makeVisible();
        }
    }

    ……

    Looper.myQueue().addIdleHandler(new Idler());
}
在handleResumeActivity(...)函数调用performResumeActivity(...)函数,这个函数实现就是调用Activity.onResume()回调函数:
performResumeActivity()函数:
/**
 * Resume the activity.
 * @param token Target activity token.
 * @param finalStateRequest Flag indicating if this is part of final state resolution for a
 *                          transaction.
 * @param reason Reason for performing the action.
 *
 * @return The {@link ActivityClientRecord} that was resumed, {@code null} otherwise.
 */
@VisibleForTesting
public ActivityClientRecord performResumeActivity(IBinder token, boolean finalStateRequest, String reason) {
    ……
    try {
        ……
        r.activity.performResume(r.startsNotResumed, reason);

        ……
    } catch (Exception e) {
        ……
    }
    return r;
}
在performResumeActivity()函数中调用r.activity.performResume()函数,performResume()函数会回调到Activity的onResume()回调函数。
在performResumeActivity()函数调用后才是ViewTree显示的处理,这就是为什么在onResume()函数做耗时操作会导致渲染卡顿的原因。
在调用performResumeActivity()函数后,返回ActivityClientRecord对象,ActivityClicentRecord是存储在ActivityThread类的成员变量mActivities数据结构里的,mActivities是一个Map,key是Activity对象token,token是一个Binder代理对象。mActivities的put是在performLaunchActivity()函数里实现的,在Activy启动过程一文中有过介绍,这里不再详细说明。
ActivityClientRecord数据结构存储Activity对象、Window对象及相关属性数据。一个Activity对象一个ActivityClientRecord对象。
下面看看ViewTree如何在屏幕显示出来。
在handleResumeAcitivty()函数主要做了三件事:
1. 调用Activity onResume()回调函数,并返回对象的ActivityClientRecord对象。
2. 获取Activity的Window和DecorView,并将Window对象和DecorView对象通过ViewRootImpl与WMS IPC通信,将Window和DecorView数据发送给WMS。让WMS为Acitivty分配Surface对象。
3. 将计算好的ViewTree添加到Surface,WMS将Surface合并排序后,将数据发送给屏幕中缓冲区等待渲染。
下面通过代码分析一下:
1. 通过performResumeActivity()函数获取ActivityClientRecord对象。
2. 申请Surface:
if (r.window == null && !a.mFinished && willBeVisible) {
    r.window = r.activity.getWindow();
    View decor = r.window.getDecorView();
    decor.setVisibility(View.INVISIBLE);
    ViewManager wm = a.getWindowManager();
    WindowManager.LayoutParams l = r.window.getAttributes();
    a.mDecor = decor;
    l.type = WindowManager.LayoutParams.TYPE_BASE_APPLICATION;
    l.softInputMode |= forwardBit;
    if (r.mPreserveWindow) {
        a.mWindowAdded = true;
        r.mPreserveWindow = false;
        // Normally the ViewRoot sets up callbacks with the Activity
        // in addView->ViewRootImpl#setView. If we are instead reusing
        // the decor view we have to notify the view root that the
        // callbacks may have changed.
        ViewRootImpl impl = decor.getViewRootImpl();
        if (impl != null) {
            impl.notifyChildRebuilt();
        }
    }
    if (a.mVisibleFromClient) {
        if (!a.mWindowAdded) {
            a.mWindowAdded = true;
            wm.addView(decor, l);
        } else {
            // The activity will get a callback for this {@link LayoutParams} change
            // earlier. However, at that time the decor will not be set (this is set
            // in this method), so no action will be taken. This call ensures the
            // callback occurs with the decor set.
            a.onWindowAttributesChanged(l);
        }
    }

    // If the window has already been added, but during resume
    // we started another activity, then don't yet make the
    // window visible.
} else if (!willBeVisible) {
    if (localLOGV) Slog.v(TAG, "Launch " + r + " mStartedActivity set");
    r.hideForNow = true;
}
在上面代码主要做了三件事:
1. 通过a.getWindowManager()获取WMS的Binder代理对象,用于应用与WMS IPC通信。
2. ViewRootImpl对象调用notifyChildRebuilt()函数更新UI。
ViewRootImpl impl = decor.getViewRootImpl();
if (impl != null) {
    impl.notifyChildRebuilt();
}
3. 通过WMS的Binder对象将DecorView对象添加到WMS的Window里,通过vm.add(decor, i)函数实现:
if (a.mVisibleFromClient) {
    if (!a.mWindowAdded) {
        a.mWindowAdded = true;
        wm.addView(decor, l);
    } else {
        // The activity will get a callback for this {@link LayoutParams} change
        // earlier. However, at that time the decor will not be set (this is set
        // in this method), so no action will be taken. This call ensures the
        // callback occurs with the decor set.
        a.onWindowAttributesChanged(l);
    }
}
wm.add(jdecor, i)函数实现:
源码:frameworks/base/core/java/android/view/WindowManagerImpl.java
@Override
public void addView(@NonNull View view, @NonNull ViewGroup.LayoutParams params) {
    applyDefaultToken(params);
    mGlobal.addView(view, params, mContext.getDisplayNoVerify(), mParentWindow, mContext.getUserId());
}
mGlobal对象是WindowManagerGlobal的实例对象:
private final WindowManagerGlobal mGlobal = WindowManagerGlobal.getInstance();
在WindowManagerGlobal类中addView()函数实现:
源码:frameworks/base/core/java/android/view/WindowManagerGlobal.java
public void addView(View view, ViewGroup.LayoutParams params, Display display, Window parentWindow, int userId) {
    ……

    ViewRootImpl root;
    View panelParentView = null;

    synchronized (mLock) {
        ……

        root = new ViewRootImpl(view.getContext(), display);

        view.setLayoutParams(wparams);

        mViews.add(view);
        mRoots.add(root);
        mParams.add(wparams);

        // do this last because it fires off messages to start doing things
        try {
            root.setView(view, wparams, panelParentView, userId);
        } catch (RuntimeException e) {
            // BadTokenException or InvalidDisplayException, clean up.
            if (index >= 0) {
                removeViewLocked(index, true);
            }
            throw e;
        }
    }
}
这addView()函数里通过ViewRootImpl.setView()函数实现:
源码:frameworks/base/core/java/android/view/ViewRootImpl.java
/**
 * We have one child
 */
public void setView(View view, WindowManager.LayoutParams attrs, View panelParentView, int userId) {
    synchronized (this) {
        if (mView == null) {
            mView = view;

            ……

            // Schedule the first layout -before- adding to the window
            // manager, to make sure we do the relayout before receiving
            // any other events from the system.
            requestLayout();
            ……
            try {
                ……
                res = mWindowSession.addToDisplayAsUser(mWindow, mSeq, mWindowAttributes,
                        getHostVisibility(), mDisplay.getDisplayId(), userId, mTmpFrame,
                        mAttachInfo.mContentInsets, mAttachInfo.mStableInsets,
                        mAttachInfo.mDisplayCutout, inputChannel,
                        mTempInsets, mTempControls);
                ……
            } catch (RemoteException e) {
                ……
            } finally {
                ……
            }

            ……
        }
    }
}
在ViewRootImpl.setView()函数中主要看上面两段代码:requestLayout()和mWindowSession.addToDisplayAsUser()。
mWindowSession是用来与WMS IPC通信的,mWindowSession是怎么来的?
mWindowSession是在ViewRootImpl实例化传递的:
public ViewRootImpl(Context context, Display display) {
    this(context, display, WindowManagerGlobal.getWindowSession(), false /* useSfChoreographer */);
}
WindowSession是通过WindowManagerGlobal.getWindowSession()函数获取:WindowManagerGlobal.getWindowSession()函数实现:
@UnsupportedAppUsage
public static IWindowSession getWindowSession() {
    synchronized (WindowManagerGlobal.class) {
        if (sWindowSession == null) {
            try {
                // Emulate the legacy behavior.  The global instance of InputMethodManager
                // was instantiated here.
                // TODO(b/116157766): Remove this hack after cleaning up @UnsupportedAppUsage
                InputMethodManager.ensureDefaultInstanceForDefaultDisplayIfNecessary();
                IWindowManager windowManager = getWindowManagerService();
                sWindowSession = windowManager.openSession(
                        new IWindowSessionCallback.Stub() {
                            @Override
                            public void onAnimatorScaleChanged(float scale) {
                                ValueAnimator.setDurationScale(scale);
                            }
                        });
            } catch (RemoteException e) {
                throw e.rethrowFromSystemServer();
            }
        }
        return sWindowSession;
    }
}
WindowSession是通过windowManager.openSession()获取的,windowManager.openSession()函数实现:
源码:frameworks/base/services/core/java/com/android/server/wm/WindowManagerService.java
frameworks/base/services/core/java/com/android/server/wm/Session.java
@Override
public IWindowSession openSession(IWindowSessionCallback callback) {
    return new Session(this, callback);
}
requestLayout()函数实现:
源码:frameworks/base/core/java/android/view/ViewRootImpl.java
在requestLayout()函数执行前这样一段注释:Schedule the first layout -before- adding to the window manager, to make sure we do the relayout before receiving any other events from the system. 意思是在添加到窗口管理器前安排第一个布局,以确保在系统其它任何事件前进行重新布局。
requestLayout()函数主要作用就是触发第一次绘制。
@Override
public void requestLayout() {
    if (!mHandlingLayoutInLayoutRequest) {
        checkThread();
        mLayoutRequested = true;
        scheduleTraversals();
    }
}
在上面这段代码实现里先通过checkThread()函数判断调用requestLayout()函数线程是否与创建ViewRootImpl对象的线程是同一线程,ViewRootImpl是在主线程创建的,也就是requestLayout()一定在主线程调用,不然会抛出异常。最后,调用scheduleTraversals()函数。
scheduleTraversals()函数实现:
@UnsupportedAppUsage(maxTargetSdk = Build.VERSION_CODES.R, trackingBug = 170729553)
void scheduleTraversals() {
    if (!mTraversalScheduled) {
        ……
        mChoreographer.postCallback(Choreographer.CALLBACK_TRAVERSAL, mTraversalRunnable, null);
        ……
    }
}
mChoreographer是Choreographer对象,Choreographer是什么?
Choreographer与Ysync机制配合,统一动画、输入和绘制。
在mChoreographer.postCallback()添加Callback回调,在下一次Ysync信号时执行绘制的回调。
mTraversalRunnable Callback实现:
final class TraversalRunnable implements Runnable {
    @Override
    public void run() {
        doTraversal();
    }
}
final TraversalRunnable mTraversalRunnable = new TraversalRunnable();
在mTraversalRunnable回调中执行doTraversal()函数:
void doTraversal() {
    if (mTraversalScheduled) {
        ……

        performTraversals();

        ……
    }
}
在doTraversal()函数中执行performTraversals()函数:
private void performTraversals() {

    ……

    relayoutResult = relayoutWindow(params, viewVisibility, insetsPending);

    ……

    performMeasure(childWidthMeasureSpec, childHeightMeasureSpec);

    ……

    performLayout(lp, mWidth, mHeight);

    ……

    performDraw();

}
relayoutWindow()函数用来向WMS申请Surface的,在relayoutWindow()函数实现:
private int relayoutWindow(WindowManager.LayoutParams params, int viewVisibility, boolean insetsPending) throws RemoteException {

    ……

    int relayoutResult = mWindowSession.relayout(mWindow, mSeq, params,
            (int) (mView.getMeasuredWidth() * appScale + 0.5f),
            (int) (mView.getMeasuredHeight() * appScale + 0.5f), viewVisibility,
            insetsPending ? WindowManagerGlobal.RELAYOUT_INSETS_PENDING : 0, frameNumber,
            mTmpFrame, mTmpRect, mTmpRect, mTmpRect, mPendingBackDropFrame,
            mPendingDisplayCutout, mPendingMergedConfiguration, mSurfaceControl, mTempInsets,
            mTempControls, mSurfaceSize, mBlastSurfaceControl);
    ……

    mSurface.copyFrom(mSurfaceControl);

    ……

}
在relayoutWindow()函数中通过mWindowSession(WMS的Binder代理对象)调用WMS的relayout(..., mSurfaceControl, ...)函数向WMS申请Surface。再通过mSurface.copyFrom(mSurfaceControl)函数为本地mSurface对象赋值。在调用mWindowSession.relayout()函数前本地mSurface是一个空壳对象。在调用mWindowSession.relayout()函数后mSurface就可以用了。有了mSurface就有了Buffer。这样就可以绘制了。申请Surface是最重要的操作。
下面来看mWindowSession.addToDisplayAsUser(mWindow, )函数:
mWindow是一个Binder代理对象,用于WMS与应用IPC通信,应用使用mWindowSession向WMS发请求,WMS使用mWindow向应用响应请求。
mWindow是 static class W extends IWindow.Stub。
addToDisplayAsUser(mWindow, ) 函数实现:
@Override
public int addToDisplayAsUser(IWindow window, int seq, WindowManager.LayoutParams attrs,
        int viewVisibility, int displayId, int userId, Rect outFrame,
        Rect outContentInsets, Rect outStableInsets,
        DisplayCutout.ParcelableWrapper outDisplayCutout, InputChannel outInputChannel,
        InsetsState outInsetsState, InsetsSourceControl[] outActiveControls) {
    return mService.addWindow(this, window, seq, attrs, viewVisibility, displayId, outFrame,
            outContentInsets, outStableInsets, outDisplayCutout, outInputChannel,
            outInsetsState, outActiveControls, userId);
}
实现中WMS使用mService.addWindow()函数,addWindow()函数在WMS中创建一个与Window相关的对象,然后WMS管理所有的Window的层级、位置、大小。
WMS其实并不关注应用的Window、View,而WMS主要的作用不是为应用分配Surface,并掌管这些Surface的显示顺序、位置、大小(尺寸)。
应用端在WMS分配Surface的绘制完成,SurfaceFlinger会把这些Surface图像数据按WMS中的层级、位置、大小等进行合成,最终写屏幕的缓冲区显示出来。


 浙公网安备 33010602011771号