POCO C++库学习和分析 -- Foundation库SharedLibrary模块分析
POCO C++库学习和分析 -- Foundation库SharedLibrary模块分析
对于一个不熟悉的开源库和模块,我觉的最好的学习方法莫过于:
1. 使用库,看库实现了什么功能和接口;
2. 抛开库,想一想,自己如何实现。可以想出的出来是最好的,想不出其实也没什么关系,至少有了疑问。
3. 看库的内层代码,学习和比较作者思路。
1. SharedLibrary的功能和使用
SharedLibrary的功能一句话可以概括,在运行时动态的加载库和库内的类。也就是说SharedLibrary提供了一个架构或者是约定,供库使用方和库提供方使用。只要满足了模块约定,就可以快速实现调用。
对于库的调用来说,导出函数和导出类是基本的功能,windows和linux下具是如此,因此SharedLibrary也必须实现此功能。
1.1 导出函数
先来看一个例子,说明导出函数是如何使用的。
对于库提供方而言:
// TestLibrary.cpp
#include <iostream>
#if defined(_WIN32)
#define LIBRARY_API __declspec(dllexport)
#else
#define LIBRARY_API
#endif
extern "C" void LIBRARY_API hello();
void hello()
{
       std::cout << "Hello, world!" << std::endl;
}
对于使用方而言:
// LibraryLoaderTest.cpp
#include "Poco/SharedLibrary.h"
using Poco::SharedLibrary;
typedef void (*HelloFunc)(); // function pointer type
int main(int argc, char** argv)
{
        std::string path("TestLibrary");
        path.append(SharedLibrary::suffix()); // adds ".dll" or ".so"
        SharedLibrary library(path); // will also load the library
        HelloFunc func = (HelloFunc) library.getSymbol("hello");
        func();
        library.unload();
        return 0;
}
上述步骤,和调用普通的window dll和linux so文件步骤是如此的类似:第一步加载库文件,第二步获取库中API的函数地址,第三步运行函数。不同是所有的功能从操作系统提供的API变成了封装类SharedLibrary的类操作。
1.2 导出类
再来看一个例子,说明SharedLibrary模块中类是如何导出并被使用的。对于库提供方:
.h文件
// AbstractPlugin.h
//
// This is used both by the class library and by the application.
#ifndef AbstractPlugin_INCLUDED
#define AbstractPlugin_INCLUDED
class AbstractPlugin
{
public:
		AbstractPlugin();
		virtual ~AbstractPlugin();
		virtual std::string name() const = 0;
};
#endif // AbstractPlugin.h
.cpp文件
// AbstractPlugin.cpp
//
// This is used both by the class library and by the application.
#include "AbstractPlugin.h"
AbstractPlugin::AbstractPlugin()
{}
AbstractPlugin::~AbstractPlugin()
{}


// PluginLibrary.cpp
#include "AbstractPlugin.h"
#include "Poco/ClassLibrary.h"
#include <iostream>
class PluginA: public AbstractPlugin
{
public:
		std::string name() const
		{
			return "PluginA";
		}
};
class PluginB: public AbstractPlugin
{
public:
		std::string name() const
		{
			return "PluginB";
		}
};

POCO_BEGIN_MANIFEST(AbstractPlugin)
POCO_EXPORT_CLASS(PluginA)
POCO_EXPORT_CLASS(PluginB)
POCO_END_MANIFEST

// optional set up and clean up functions
void pocoInitializeLibrary()
{
		std::cout << "PluginLibrary initializing" << std::endl;
}
void pocoUninitializeLibrary()
{
		std::cout << "PluginLibrary uninitializing" << std::endl;
}
对于使用方来说:
// main.cpp
#include "Poco/ClassLoader.h"
#include "Poco/Manifest.h"
#include "AbstractPlugin.h"
#include <iostream>
typedef Poco::ClassLoader<AbstractPlugin> PluginLoader;
typedef Poco::Manifest<AbstractPlugin> PluginManifest;
int main(int argc, char** argv)
{
		PluginLoader loader;
		std::string libName("PluginLibrary");
		libName += Poco::SharedLibrary::suffix(); // append .dll or .so
		loader.loadLibrary(libName);
		PluginLoader::Iterator it(loader.begin());
		PluginLoader::Iterator end(loader.end());
		for (; it != end; ++it)
		{
			std::cout << "lib path: " << it->first << std::endl;
			PluginManifest::Iterator itMan(it->second->begin());
			PluginManifest::Iterator endMan(it->second->end());
			for (; itMan != endMan; ++itMan)
			std::cout << itMan->name() << std::endl;
		}
		AbstractPlugin* pPluginA = loader.create("PluginA");
		AbstractPlugin* pPluginB = loader.create("PluginB");
		std::cout << pPluginA->name() << std::endl;
		std::cout << pPluginB->name() << std::endl;
		loader.classFor("PluginA").autoDelete(pPluginA);
		delete pPluginB;
		loader.unloadLibrary(libName);
		return 0;
}
上述例子给出了一个接口类AbstractPlugin的使用。很简单。看了以后,自然会存在一些疑问:
第一, 是否只能导出接口类,在上述例子中类PluginA和PluginB都从AbstractPlugin继承,所有函数都与AbstractPlugin完全一致。
回答这个问题前,可以想一想,c++中的调用方使用被调者的条件(在这里是dll或者so的调用),调用方必须知道被调类的定义(.h文件中给出),即编译器必须知道被调类的内存布局。在上述例子中PluginA和PluginB定义并没有在头文件中给出,因此调用者只能调用AbstractPlugin基类定义的函数。事实上,SharedLibrary模块的框架只支持具有公共基类的类输出。如果调用者需要AbstractPlugin之外的接口,只能重新定义另一个接口类。
对于使用和设计dll的人来说,导出的类千奇百怪,SharedLibrary模块只能导出基类的公共接口,有点不能接受。有一个变通的方法可以让使用dll的人绕过模块的限制,即dll导出时,导出的全部为工厂类,同时把真正需要的类的头文件抛出。
第二, 如果一个dll或者so中存在多个接口类,是否支持输出。
支持
第三, 导出的接口类存在于命名空间中,是否支持输出,如何使用。
支持
2 SharedLibrary模块设计分析
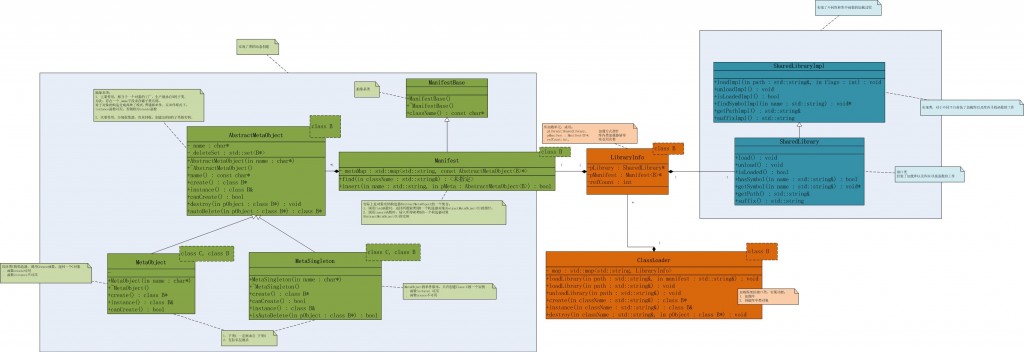
上面我们已经看到了SharedLibrary的使用和功能。我们自己设计的话,跨平台,这个不是问题,只是一些系统API函数的使用。如何实时动态导出各种性质的类,并且不让使用者觉得过于繁琐呢?这个有点难。为了调用者方便,在上面的例子里,我们看到调用者是可以通过类名创建类的,这个看起来实在有点像java和c#里的反射。还是直接看POCO代码吧。先给出这个模块的类图。
还是倒过来看,SharedLibrary即为框架,就必须满足使用者的一般要求。
1. 必须可以加载和卸载多个库多次
2. 支持linux和window不同方式加载
3. 能够加载和创建库内类
为了实现对于上述要求,SharedLibrary抽象了结构体LibraryInfo,来抽象单个库的加载和卸载:
struct LibraryInfo<Base>
{
	SharedLibrary* pLibrary;				// 加载库的方式
	const Manifest<Base> *   pManifest;		        // 单个库的class清单
	int            refCount;				// 库加载次数
};
对于多个类ClassLoader实际上就是LibraryInfo的一个集合,这样就实现多个类加载。
template <class Base> class ClassLoader
{
	std::map<std::string, LibraryInfo>  _map;
}
库加载进去后,如何动态加载和创建类的类型呢。首先看一个库中可能存在多个类,必须对多个类进行管理。这个由Manifest实现。template <class B> class Manifest: public ManifestBase
{
std::map<std::string, const Meta*> _metaMap;
} 而对于每个类而言,如何实现动态创建呢。再来看由MetaObject类。
template <class C, class B>
class MetaObject: public AbstractMetaObject<B>
	/// A MetaObject stores some information
	/// about a C++ class. The MetaObject class
	/// is used by the Manifest class.
	/// A MetaObject can also be used as an object
	/// factory for its class.
{
public:
	MetaObject(const char* name): AbstractMetaObject<B>(name)
	{
	}

	~MetaObject()
	{
	}

	B* create() const
	{
		return new C;
	}

	B& instance() const
	{
		throw InvalidAccessException("Not a singleton. Use create() to create instances of", this->name());
	}

	bool canCreate() const
	{
		return true;
	}
OK。层级结构出来了,它的内部实现其实很简单。对于调用者,其实逻辑就更加简单了。首先调用者创建ClassLoader类,并调用loadLibrary(const std::string& path, const std::string& manifest)函数。
void loadLibrary(const std::string& path, const std::string& manifest)
		/// Loads a library from the given path, using the given manifest.
		/// Does nothing if the library is already loaded.
		/// Throws a LibraryLoadException if the library
		/// cannot be loaded or does not have a Manifest.
		/// If the library exports a function named "pocoInitializeLibrary",
		/// this function is executed.
		/// If called multiple times for the same library,
		/// the number of calls to unloadLibrary() must be the same
		/// for the library to become unloaded.
{
	FastMutex::ScopedLock lock(_mutex);

	typename LibraryMap::iterator it = _map.find(path);
	if (it == _map.end())
	{
		LibraryInfo li;
		li.pLibrary  = new SharedLibrary(path);
		li.pManifest = new Manif();
		li.refCount  = 1;
		try
		{
			std::string pocoBuildManifestSymbol("pocoBuildManifest");
			pocoBuildManifestSymbol.append(manifest);
			if (li.pLibrary->hasSymbol("pocoInitializeLibrary"))
			{
				InitializeLibraryFunc initializeLibrary = (InitializeLibraryFunc) li.pLibrary->getSymbol("pocoInitializeLibrary");
				initializeLibrary();
			}
			if (li.pLibrary->hasSymbol(pocoBuildManifestSymbol))
			{
				BuildManifestFunc buildManifest = (BuildManifestFunc) li.pLibrary->getSymbol(pocoBuildManifestSymbol);
				if (buildManifest(const_cast<Manif*>(li.pManifest)))
					_map[path] = li;
				else
					throw LibraryLoadException(std::string("Manifest class mismatch in ") + path, manifest);
			}
			else throw LibraryLoadException(std::string("No manifest in ") + path, manifest);
		}
		catch (...)
		{
			delete li.pLibrary;
			delete li.pManifest;
			throw;
		}
	}
	else
	{
		++it->second.refCount;
	}
}
看一下过程:
1. 加载库
2. 库初始化,pocoInitializeLibrary
3. BuildManifestFunc, 这是什么?关键之处,这是库内函数的自注册,是它实现了类的创建,这个由库实现者实现。为此POCO提供了一串宏来简化开发者的负担。这个和MFC中宏作用是非常相似,可以认为都是在编译时实现多态。
#define POCO_BEGIN_MANIFEST_IMPL(fnName, base) \
	bool fnName(Poco::ManifestBase* pManifest_)										\
	{																				\
		typedef base _Base;															\
		typedef Poco::Manifest<_Base> _Manifest;									\
		std::string requiredType(typeid(_Manifest).name());							\
		std::string actualType(pManifest_->className());							\
		if (requiredType == actualType)												\
		{																			\
			Poco::Manifest<_Base>* pManifest = static_cast<_Manifest*>(pManifest_);


#define POCO_BEGIN_MANIFEST(base) \
	POCO_BEGIN_MANIFEST_IMPL(pocoBuildManifest, base)


#define POCO_BEGIN_NAMED_MANIFEST(name, base)	\
	POCO_DECLARE_NAMED_MANIFEST(name)			\
	POCO_BEGIN_MANIFEST_IMPL(POCO_JOIN(pocoBuildManifest, name), base)


#define POCO_END_MANIFEST \
			return true;	\
		}					\
		else return false;	\
	}


#define POCO_EXPORT_CLASS(cls) \
    pManifest->insert(new Poco::MetaObject<cls, _Base>(#cls));
至此,所以的环节都被串了起来。 泛型和宏的结合,实现的相当好。
其他:
1. 对于 AbstractMetaObject类除了动态创建类还有其他的一个功能,就是垃圾收集,不过这是个附属品。它通过接口autoDelete实现。

2. MetaSingleton类是个单件类,和MetaObject不能同时存在,这有库的提供者决定。
3. 对操作系统实现的区别被封装在 SharedLibrary类中。类结构如下

(版权所有,转载时请注明作者和出处
http://blog.csdn.net/arau_sh/article/details/8569638)


