
【组件开发笔记】类型检查-函数组件
给Props类型命名的方式 :
组件名+Props (比如BaseFormProps)
声明组件的方式:
1.使用FC类型声明
FC是FunctionComponent的简写, 这个类型定义了默认的 props(如 children)以及一些静态属性(如 defaultProps)
import React, { FC } from 'react';

export const Component: FC<Props> = props => {
  return <div>组件内容</div>;
};
const BaseSelect: React.FC<Props> = (props) => {
……
return (
    <div>组件内容</div>;
)
}
2.直接使用普通函数声明:
export interface ComponentProps {
  ......
}

export function Component(props: ComponentProps) {
  return <div>内容</div>;
}
导出组件方式:
export default Component;
export default function Component(props: {}) {
  return <div>xxx</div>;
}
常用的defaultProps配置方式 :
Component.defaultProps = {
  formType: 'search',
  title:'默认标题'
};
export interface ComponentProps {
  name?: string; // 声明为可选属性
}

// 利用对象默认属性值语法
export const Component: FC<ComponentProps> = ({ name = 'TJ' }) => <div>Hello {name}!</div>;
泛型函数组件:
【泛型就是指定一个表示类型的变量,用它来代替某个实际的类型用于编程,而后通过实际调用时传入或推导的类型来对其进行替换,以达到一段使用泛型程序可以实际适应不同类型的目的。】
copy一段实例用以理解:
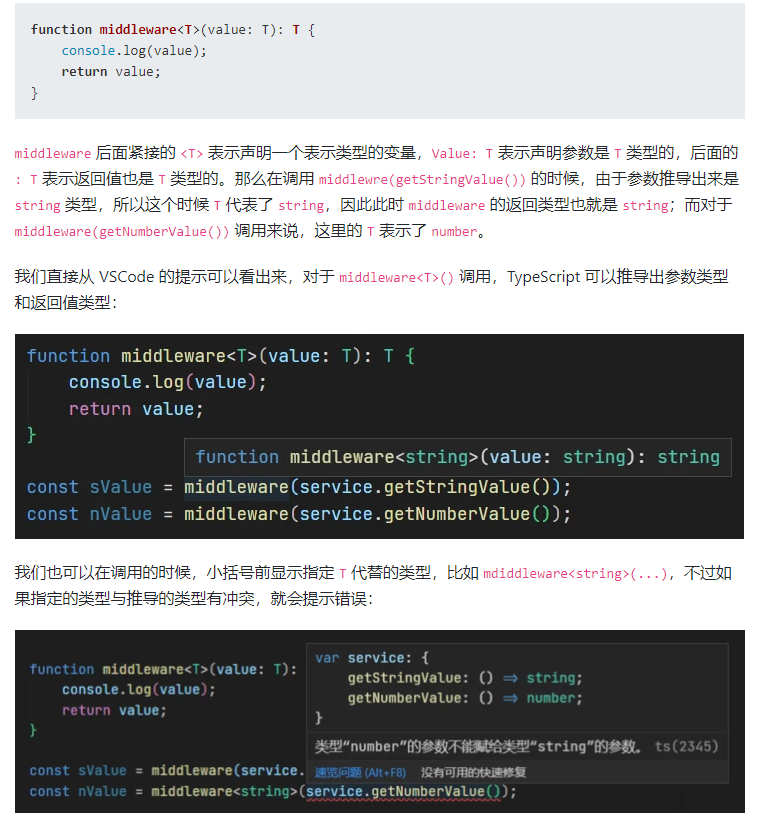
因此泛型常用于列表或容器型的组件。例如我要写一个列表组件,接受到的list里的单项的数据类型,我要直接拿去返回给父组件:
import React from 'react';

export interface ListProps<T> {
  visible: boolean;
  list: T[];
  renderItem: (item: T, index: number) => React.ReactNode;
}

export function List<T>(props: ListProps<T>) {
  return <div />;
}

// Test
function Test() {
  return (
    <List
      list={[1, 2, 3]}
      renderItem={i => {
        /*自动推断i为number类型*/
      }}
    />
  );
}

【本例来自掘金·荒山的文章】
如果要在组件中声明子组件:
比如我写一个弹窗组件,里面要分出header和footer,那么可以在声明组件props的时候一起声明子组件的props,命名采用【ParentChildProps】的方式,例如ComponentHeaderProps;定义组件时也可以直接这么写:
Component.Header = (props: ComponentHeaderProps) => {
    return <div>我是头部</div>
};

// 整体:
<Component>
    <Component.Header>xxxxxx</Component.Header>
</Component>;
Forwarding Refs:
React.forwardRef用于转发 ref, 适用于 HOC(高阶组件) 和函数组件。
函数组件配合 forwardRef 和 useImperativeHandle 可以让函数组件向外暴露方法
举个栗子:
import React, { useRef, useState, useEffect, useImperativeHandle } from 'react';

const TheCreateForm = (props: Props) => {
  // 父级数据
  const {
    cRef,
    ......
  } = props;


  // 表单ref
  const form = useRef<any>();


  // 暴露给父级的方法 前缀都带
  useImperativeHandle(cRef, () => ({
    // 设置表单项
    setFields: (obj: any) => {
      return form.current.setFieldsValue(obj);
    },
    // 重置所有表单项
    resetFilds: () => {
      return form.current.resetFields();
    },
    // 显示表单
    showForm: (id?: number) => {
      if (!id) {
        // 新增表单
        setEdting(false);
        showNewForm('新增');
      } else if (editFormSource) {
        // 从初始化中编辑表单数据
        setEdting(true);
        showNewForm('修改', id);
      } else {
        setEdting(true);
        handleEdit(id);
      }
    },
    // 隐藏表单
    hideForm: () => {
      handeCancel();
    },
  }));
外层父组件就可以在cRef: React.createRef() 以后:
cRef.current.resetFilds();
-------------------------
Context
【提供跨组件间状态共享机制】
【通过组件树提供一个传递数据的方法,避免了在每个层级手动传递 props 属性】
。记一下例子不然记不住
引入useContext :
import React, { FC, useContext } from 'react';
声明【Name+ContextValue格式命名】:
// 声明主题的主色调和副色调属性
export interface Theme {
  primary: string;
  secondary: string;
}

// 声明Context的属性
export interface ThemeContextValue {
  theme: Theme;
  onChange: (theme: Theme) => void;
}
React.createContext 用于创建一个上下文容器(组件)
|---------------------------------------------------------------------------------------
| 小小栗子:
//  defaultValue用于设置共享的默认数据
const {Provider, Consumer} = React.createContext(defaultValue);
| Provider(生产者): 用于生产共享数据的地方。value:放置共享的数据。
<Provider value={/*共享的数据*/}>
    /*里面可以渲染对应的内容*/
</Provider>

<Consumer>
  {value => /*根据上下文  进行渲染相应内容*/}
</Consumer>
|------------------------------------------------------


继续记录大牛的代码:
// 创建Context【以Name+Context命名】并设置默认值

export const ThemeContext = React.createContext<ThemeContextValue>({
  theme: {
    primary: 'red',
    secondary: 'blue',
  },
  onThemeChange: noop,
});

ps 查了一下noop是无操作的意思
创建生产者:
// Name+Provider命名

export const ThemeProvider: FC<{ theme: Theme; onThemeChange: (theme: Theme) => void }> = props => {
  return (
    <ThemeContext.Provider value={{ theme: props.theme, onThemeChange: props.onThemeChange }}>
      {props.children}
    </ThemeContext.Provider>
  );
};
这样通过钩子 useContext(ThemeContext) 就可以拿到里面的共享属性了。
比如在子组件里:
const { theme } = useContext(ThemeContext);
就可以直接使用theme,实现共享。
暴露hooks:
export function useTheme() {
  return useContext(ThemeContext);
}

 浙公网安备 33010602011771号