HashMap的源码解读
多线程环境下,HashMap的任何一个操作都可能会被中断挂起
JDK1.7环境下
transient 属性
被transient修饰的变量不参与序列化和反序列化
java 8:ConcurrentHashMap
数据结构
采取数组加链表的数据结构,俗称哈希表结构
实现了查询和修改效率高,插入和删除效率也高
数组,又可称之为捅
元素结构
-
Node节点
static class Node<K,V> implements Map.Entry<K,V> { final int hash; final K key; V value; Node<K,V> next; } -
TreeNode
static final class TreeNode<K,V> extends LinkedHashMap.Entry<K,V> { TreeNode<K,V> parent; // red-black tree links TreeNode<K,V> left; TreeNode<K,V> right; TreeNode<K,V> prev; // needed to unlink next upon deletion boolean red; TreeNode(int hash, K key, V val, Node<K,V> next) { super(hash, key, val, next); } -
计数变量
    //hashmap内部结构改变的次数,常用语并发操作下安全验证
	transient int modCount;
	//hashmap键值对个数
    transient int size;
	//下次扩展的阈值 capacity*load factor
    int threshold;

	//返回当前节点的根节点
    final TreeNode<K,V> root() {
            for (TreeNode<K,V> r = this, p;;) {
                if ((p = r.parent) == null)
                    return r;
                r = p;
            }
        }

        /**
         * Ensures that the given root is the first node of its bin.
         *
         */
        static <K,V> void moveRootToFront(Node<K,V>[] tab, TreeNode<K,V> root) {
            ......
        }

        /**
		 *
         */
        final TreeNode<K,V> find(int h, Object k, Class<?> kc) {
         	...
        }

        /**
         * Calls find for root node.
         */
        final TreeNode<K,V> getTreeNode(int h, Object k) {
            return ((parent != null) ? root() : this).find(h, k, null);
        }

        static int tieBreakOrder(Object a, Object b) {
            ...
        }

        /**
         * Forms tree of the nodes linked from this node.
         * @return root of tree
         * 第一次循环会将链表中的首节点作为红黑树的根,而后的循环会将链表中的项通过比较hash值然后连接到
         * 相应树节点的左边或者右边,插入可能会破坏树的结构,所以接着执行 balanceInsertion
         */
        final void treeify(Node<K,V>[] tab) {
         	TreeNode<K,V> root = null;
            //以循环的方式遍历我们刚才创建的链表
            for (TreeNode<K,V> x = this, next; x != null; x = next) {
                next = (TreeNode<K,V>)x.next;
                x.left = x.right = null;
                if (root == null) {
                    x.parent = null;
                    //设置根节点,为黑色节点
                    x.red = false;
                    root = x;
                }
                else {
                    //x为当前节
                    int h = x.hash;
                    Class<?> kc = null;
                    //从根节点遍历节点
                    // 此时红黑树已经有了根节点,上面获取了当前加入红黑树的项的key和hash值进入核心                     // 循环。
                    // 这里从root开始,是以一个自顶向下的方式遍历添加。
                    // for循环没有控制条件,由代码内break跳出循环。
                    for (TreeNode<K,V> p = root;;) {
                        int dir, ph;
                        //p为树中节点
                        // dir:directory,比较添加项与当前树中访问节点的hash值判断加入项的路                            径,-1为左子树,+1为右子树。
                        K pk = p.key;
                        if ((ph = p.hash) > h)
                            //遍历节点大于要添加的节点
                            //根据hash值大小判定左右子树
                            dir = -1;
                        else if (ph < h)
                            dir = 1;
                        else if ((kc == null &&
                                  (kc = comparableClassFor(k)) == null) ||
                                 (dir = compareComparables(kc, k, pk)) == 0)
                            dir = tieBreakOrder(k, pk);
                        //xp:x parent
                        TreeNode<K,V> xp = p;
                        if ((p = (dir <= 0) ? p.left : p.right) == null) {
                            x.parent = xp;
                            if (dir <= 0)
                                xp.left = x;
                            else
                                xp.right = x;
                            //维护添加后红黑树的红黑结构
                            root = balanceInsertion(root, x);
                            //跳出循环当前链表中的项成功添加到了红黑树中
                            break;
                        }
                    }
                }
            }
            //保证根节点是给定的二叉树中的第一个节点
            moveRootToFront(tab, root);
        }

        /**
         * Returns a list of non-TreeNodes replacing those linked from
         * this node.
         */
        final Node<K,V> untreeify(HashMap<K,V> map) {
         	...
        }

        /**
         * Tree version of putVal.
         */
        final TreeNode<K,V> putTreeVal(HashMap<K,V> map, Node<K,V>[] tab,
                                       int h, K k, V v) {
         	...
        }

        final void removeTreeNode(HashMap<K,V> map, Node<K,V>[] tab,
                                  boolean movable) {
         	...
        }

        final void split(HashMap<K,V> map, Node<K,V>[] tab, int index, int bit) {
         	...
        }

		/* ------------------------------------------------------------ */
        // Red-black tree methods, all adapted from CLR

        static <K,V> TreeNode<K,V> rotateLeft(TreeNode<K,V> root,
                                              TreeNode<K,V> p) {
            ...
        }

        static <K,V> TreeNode<K,V> rotateRight(TreeNode<K,V> root,
                                               TreeNode<K,V> p) {
            ...
            return root;
        }
		//保证插入后树的平衡结构
        static <K,V> TreeNode<K,V> balanceInsertion(TreeNode<K,V> root,
                                                    TreeNode<K,V> x) {
            // 正如开头所说,新加入树节点默认都是红色的,不会破坏树的结构。
            x.red = true;
            // xp:x parent,代表x的父节点。
            // xpp:x parent parent,代表x的祖父节点
            // xppl:x parent parent left,代表x的祖父的左节点。
            // xppr:x parent parent right,代表x的祖父的右节点。
            for (TreeNode<K,V> xp, xpp, xppl, xppr;;) {
                // 如果x的父节点为null说明只有一个节点,该节点为根节点,根节点为黑色,red = false。
                if ((xp = x.parent) == null) {
                    x.red = false;
                    return x;
                }
                // 进入else说明不是根节点。
                // 如果父节点是黑色,那么大吉大利(今晚吃鸡),红色的x节点可以直接添加到黑色节点后面,返回根就行了不需要任何多余的操作。
                // 如果父节点是红色的,但祖父节点为空的话也可以直接返回根此时父节点就是根节点,因为根必须是黑色的,添加在后面没有任何问题。
                else if (!xp.red || (xpp = xp.parent) == null)
                    return root;
                // 一旦我们进入到这里就说明了两件是情
                // 1.x的父节点xp是红色的,这样就遇到两个红色节点相连的问题,所以必须经过旋转变换。
                // 2.x的祖父节点xpp不为空。

                // 判断如果父节点是否是祖父节点的左节点
                if (xp == (xppl = xpp.left)) {
                    // 父节点xp是祖父的左节点xppr
                    // 判断祖父节点的右节点不为空并且是否是红色的
                    // 此时xpp的左右节点都是红的,所以直接进行上面所说的第三种变换,将两个子节点变成黑色,将xpp变成红色,然后将红色节点x顺利的添加到了xp的后面。
                    // 这里大家有疑问为什么将x = xpp?
                    // 这是由于将xpp变成红色以后可能与xpp的父节点发生两个相连红色节点的冲突,这就又构成了第二种旋转变换,所以必须从底向上的进行变换,直到根。
                    // 所以令x = xpp,然后进行下下一层循环,接着往上走。
                    if ((xppr = xpp.right) != null && xppr.red) {
                        xppr.red = false;
                        xp.red = false;
                        xpp.red = true;
                        x = xpp;
                    }
                    // 进入到这个else里面说明。
                    // 父节点xp是祖父的左节点xppr。
                    // 祖父节点xpp的右节点xppr是黑色节点或者为空,默认规定空节点也是黑色的。
                    // 下面要判断x是xp的左节点还是右节点。
                    else {
                        // x是xp的右节点,此时的结构是:xpp左->xp右->x。这明显是第二中变换需要进行两次旋转,这里先进行一次旋转。
                        // 下面是第一次旋转。
                        if (x == xp.right) {
                            root = rotateLeft(root, x = xp);
                            xpp = (xp = x.parent) == null ? null : xp.parent;
                        }
                        // 针对本身就是xpp左->xp左->x的结构或者由于上面的旋转造成的这种结构进行一次旋转。
                        if (xp != null) {
                            xp.red = false;
                            if (xpp != null) {
                                xpp.red = true;
                                root = rotateRight(root, xpp);
                            }
                        }
                    }
                }
            	// 这里的分析方式和前面的相对称只不过全部在右测不再重复分析。
                else {
                    if (xppl != null && xppl.red) {
                        xppl.red = false;
                        xp.red = false;
                        xpp.red = true;
                        x = xpp;
                    }
                    else {
                        if (x == xp.left) {
                            root = rotateRight(root, x = xp);
                            xpp = (xp = x.parent) == null ? null : xp.parent;
                        }
                        if (xp != null) {
                            xp.red = false;
                            if (xpp != null) {
                                xpp.red = true;
                                root = rotateLeft(root, xpp);
                            }
                        }
                    }
                }
            }
        }

        static <K,V> TreeNode<K,V> balanceDeletion(TreeNode<K,V> root,
                                                   TreeNode<K,V> x) {
         	...
        }

        static <K,V> boolean checkInvariants(TreeNode<K,V> t) {
        	...
        }
下面简述一下前面的两种种幸运的情况
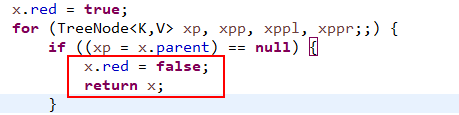
- x本身为根节点返回x。
- x的父节点为黑色或者x的父节点是根节点直接返回不需要变换。
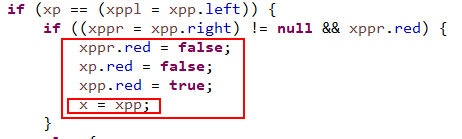
颜色变换
if (xp == (xppl = xpp.left))
            {
                if ((xppr = xpp.right) != null && xppr.red)
                {
                    xppr.red = false;
                    xp.red = false;
                    xpp.red = true;
                    x = xpp;
                }          // ......        }
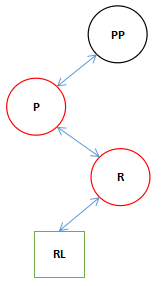
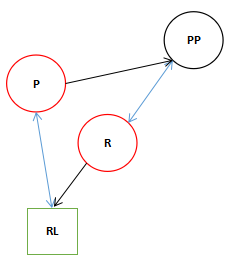
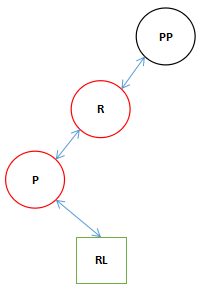
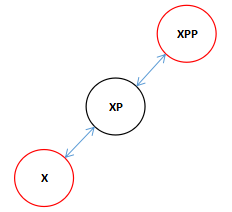
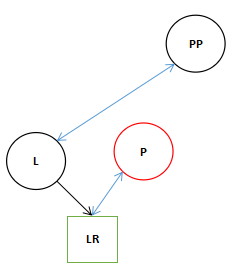
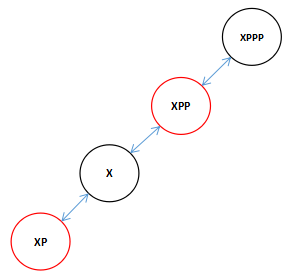
这里是一个典型的一个黑色节点的两个子节点都是红色的所以要进行颜色变换,因为插入的都是红色节点,当检测到祖父节点的左右子节点都是红色的时候两个红色就产生了冲突,所以先将节点进行这种颜色变换,将祖父节点变成红色,然后将祖父的两个子节点变成黑色,这样我们插入的红色节点就不会违背红黑树的规则了。
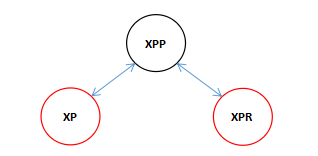


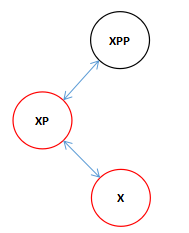
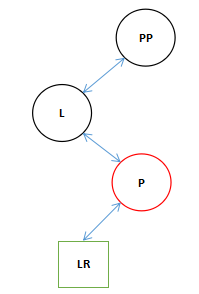
这里有人会有疑问,如果祖父节点是根节点呢,那样的话祖父节点也会变成黑色,因为每次循环进行插入平衡的操作当进行这种颜色变换之后都会将插入节点的引用指向祖父节点,当进行下一轮循环的时候会优先检测当前节点是否是根节点,如果是根节点那就将颜色变成黑色,下面看图:
当将节点指向祖父节点进行下一轮循环时:
两个核心旋转
// 一旦我们进入到这里就说明了两件是情
            // 1.x的父节点xp是红色的,这样就遇到两个红色节点相连的问题,所以必须经过旋转变换。
            // 2.x的祖父节点xpp不为空。

            // 判断如果父节点是否是祖父节点的左节点
            if (xp == (xppl = xpp.left))
            {
                if ((xppr = xpp.right) != null && xppr.red)
                {
            // ......
                }
                // 进入到这个else里面说明。
                // 父节点xp是祖父的左节点xppr。
                // 祖父节点xpp的右节点xppr是黑色节点或者为空,默认规定空节点也是黑色的。
                // 下面要判断x是xp的左节点还是右节点。
                else
                {
                    // x是xp的右节点,此时的结构是:xpp左->xp右->x。这明显是第二中变换需要进行两次旋转,这里先进行一次旋转。
                    // 下面是第一次旋转。
                    if (x == xp.right)
                    {
                        root = rotateLeft(root, x = xp);
                        xpp = (xp = x.parent) == null ? null : xp.parent;
                    }
                    // 针对本身就是xpp左->xp左->x的结构或者由于上面的旋转造成的这种结构进行一次旋转。
                    if (xp != null)
                    {
                        xp.red = false;
                        if (xpp != null)
                        {
                            xpp.red = true;
                            root = rotateRight(root, xpp);
                        }
                    }
                }
            }
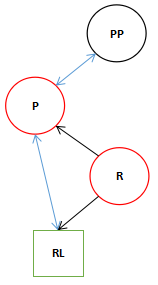
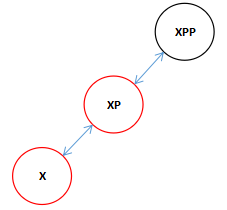
颜色变换完成后进入下面的else块
我们已知xp是xpp的左节点,首先判断了x是xp的左节点还是右节点,如果是右节点的话构成了下面的结构。
这中结构需要进行双旋转,首先先进行一次向左旋转。
左旋转
    static <K, V> TreeNode<K, V> rotateLeft(TreeNode<K, V> root, TreeNode<K, V> p)
    {
        // r:right,右节点。
        // pp:parent parent,父节点的父节点。
        // rl:right left,右节点的左节点。
        TreeNode<K, V> r, pp, rl;
        if (p != null && (r = p.right) != null)
        {
            if ((rl = p.right = r.left) != null)
                rl.parent = p;
            if ((pp = r.parent = p.parent) == null)
                (root = r).red = false;
            else if (pp.left == p)
                pp.left = r;
            else
                pp.right = r;
            r.left = p;
            p.parent = r;
        }
        return root;
    }
1.刚进入方法时,状态如下图。(RL可能是空的)
2.进入了if块后执行到第10行后。
 9             if ((rl = p.right = r.left) != null)
10                 rl.parent = p;

此时如果9行的条件符合的话执行10行RL指向P,如果RL为null的话,P的右节点指向null。
3.接着看11和12行代码。
11             if ((pp = r.parent = p.parent) == null)
12                 (root = r).red = false;
首先我们看11行if里面的赋值语句所造成的影响。
在if里面的表达式不管符不符合条件()内的内容都会执行。
如果符合条件的话会执行12行的代码,变成了下面的结果。
由于PP为空所以只剩下这三个。
4.如果11行的条件为假的话,执行完11行()内的表达式后执行13行
13             else if (pp.left == p)
14                 pp.left = r;
满足条件的话R和PP互相关联。
5.由于进入了13和14行所以不进入15和16行的else语句。
15             else
16                 pp.right = r;
6.看17和18行。
17             r.left = p;
18             p.parent = r;
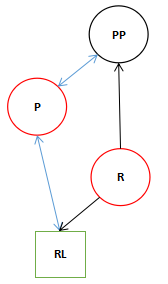
最终执行完了一个旋转变成了我们开始说的第一种旋转的形式,这个结构还需要向右旋转一次。
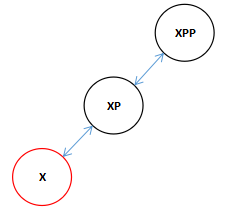
if (x == xp.right)
                    {
                        root = rotateLeft(root, x = xp);
                        xpp = (xp = x.parent) == null ? null : xp.parent;
                    }
xpp = (xp = x.parent) == null ? null : xp.parent;
执行完上面的代码,旋转后调整x,xp,和xpp的关系得到下图。
右旋转
                    if (xp != null)
                    {
                        xp.red = false;
                        if (xpp != null)
                        {
                            xpp.red = true;
                            root = rotateLeft(root, xpp);
                        }
                    }
1.首先让XP变成黑色。
2.如果XPP不为空的话变成红色。
由于我们在rotateLeft(root, xpp),传进来的是XXP所以下面的的旋转中实际上就是对XP和XXP执行了一次与上面的方向相反其他完全相同的旋转。
接着我们看向右旋转的代码
    static <K, V> TreeNode<K, V> rotateRight(TreeNode<K, V> root, TreeNode<K, V> p)
    {
        // l:left,左节点。
        // pp:parent parent,父节点的父节点。
        // lr:left right,左节点的右节点。
        TreeNode<K, V> l, pp, lr;
        if (p != null && (l = p.left) != null)
        {
            if ((lr = p.left = l.right) != null)
                lr.parent = p;
            if ((pp = l.parent = p.parent) == null)
                (root = l).red = false;
            else if (pp.right == p)
                pp.right = l;
            else
                pp.left = l;
            l.right = p;
            p.parent = l;
        }
        return root;
    }
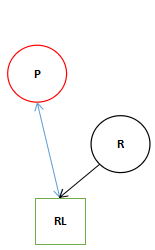
3.刚进来的时候结构是这个样子。
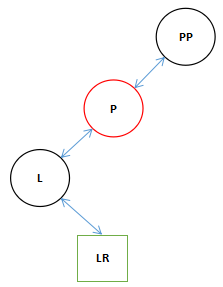
在这里的P就是刚才传进来的XPP。
4.这里我们认为LR是存在的,其实这个不影响主要的旋转,为空就指向null呗,直接执行完9和10行。
9             if ((lr = p.left = l.right) != null)
10                 lr.parent = p;
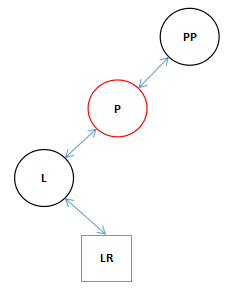

5.在这里我们假使PP是存在的,直接执行完11的表达式不再执行12行。(不再分析不存在的情况)。
11             if ((pp = l.parent = p.parent) == null)
12                 (root = l).red = false;
6.由于11行的条件不符合,现在直接执行13行的表达式,不符合执行15行else,执行16行。
15             else
16                 pp.left = l;
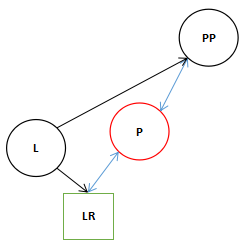
7.最后执行层17和18行。
17             l.right = p;
18             p.parent = l;
疑问
大家可能觉得和刚才接不上其实是这样的,刚才在右旋转前的时候的图像是这个样的。
因为我们传进来的是XPP,所以结合上一次的向左旋转我们在向右旋转的时候看到全图应该是这个样子的。(注:XPPP可能是XPP的左父节点也可能是右父节点这里不影响,而且可以是任意颜色)
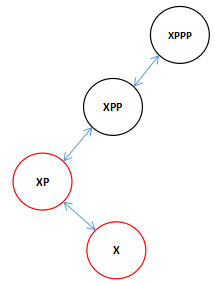
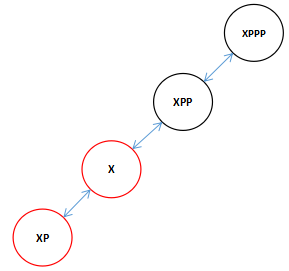
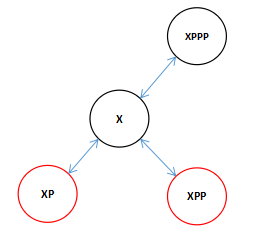
现在知道为什么XPPP可以是任意颜色的了吧,因为旋转过后X是黑色的即便XPPP是红色,此时我们又可以对两个红色的子节点进行颜色变换了,变换后X和XPPP有发生了颜色冲突,接着进行旋转直到根。
static <K, V> TreeNode<K, V> balanceInsertion(TreeNode<K, V> root, TreeNode<K, V> x)
    {
        x.red = true;
        for (TreeNode<K, V> xp, xpp, xppl, xppr;;)
        {
            if ((xp = x.parent) == null)
            {
                x.red = false;
                return x;
            }
            else if (!xp.red || (xpp = xp.parent) == null)
                return root;
            if (xp == (xppl = xpp.left))
            {
               // 插入位置父节点在祖父节点的左边。
            }
            else
            {
         // 插入位置父节点在祖父节点的右边。
            }
        }
    }
我们值分析了插入位置父节点在祖父节点的左边的情况,并没有分析另外一面的对称情况,其实是一样的因为调用的都是相同的方法。
以上就是在1.8中的HashMap新引进的红黑树树化的过程,与原来的链表相比当同一个bucket上存储很多entry的话树形的查找结构明显要比链表线性的的效率要高。
put()过程
    //获取key的hash值
    public V put(K key, V value) {
        return putVal(hash(key), key, value, false, true);
    }
    static final int hash(Object key) {
        int h;
        return (key == null) ? 0 : (h = key.hashCode()) ^ (h >>> 16);
    }
    final V putVal(int hash, K key, V value, boolean onlyIfAbsent,
                   boolean evict) {
        //声明一个Node数组,并构建一个Node节点
        Node<K,V>[] tab; Node<K,V> p; int n, i;
        if ((tab = table) == null || (n = tab.length) == 0)
            //数组为空或长度为0,初始化node数组
            n = (tab = resize()).length;
        if ((p = tab[i = (n - 1) & hash]) == null)
            //通过hash值得数组下标,如果对应数组下标下元素为空,则构建node节点,并将node添加到当前位置
            tab[i] = newNode(hash, key, value, null);
        else {
            //方法内部声明变量,供逻辑过程使用
            Node<K,V> e; K k;
            if (p.hash == hash &&
                //== 或 equals判断
                ((k = p.key) == key || (key != null && key.equals(k))))
                //获取原始数据
                e = p;
            else if (p instanceof TreeNode)
                //如果是树形节点,调用存放树形值方法
                e = ((TreeNode<K,V>)p).putTreeVal(this, tab, hash, key, value);
            else {
                //链表处理过程
                for (int binCount = 0; ; ++binCount) {
                    if ((e = p.next) == null) {
                        //如果节点的next节点为空,构建node节点
                        p.next = newNode(hash, key, value, null);
                        if (binCount >= TREEIFY_THRESHOLD - 1) // -1 for 1st
                            //如果链表长度大于树化因子,则进行树化参数
                            treeifyBin(tab, hash);
                        break;
                    }
                    if (e.hash == hash &&
                        ((k = e.key) == key || (key != null && key.equals(k))))
                        break;
                    //如果节点为空,直接替换
                    p = e;
                }
            }
            if (e != null) { // existing mapping for key
                //如果旧节点不为空,进行旧结点的处理
                V oldValue = e.value;
                if (!onlyIfAbsent || oldValue == null)
                    e.value = value;
                afterNodeAccess(e);
                return oldValue;
            }
        }
        ++modCount;
        if (++size > threshold)
            //添加节点后,判断是否需要扩容
            resize();
        //节点插入之后的操作 evict:建造模式
        afterNodeInsertion(evict);
        return null;
    }
- 树形结构添加节点
        /**
         * Tree version of putVal.
         */
        final TreeNode<K,V>
            putTreeVal(HashMap<K,V> map, Node<K,V>[] tab,
                                       int h, K k, V v) {
            Class<?> kc = null;
            boolean searched = false;
            //寻找红黑树父节点
            TreeNode<K,V> root = (parent != null) ? root() : this;
            //循环父节点
            for (TreeNode<K,V> p = root;;) {
                //声明树的层级;hash值;key
                int dir, ph; K pk;
                //hash值大于当前节点hash值得时候作为当前节点的右节点
                if ((ph = p.hash) > h)
                    dir = -1;
                //hash值小于当前节点的hash值的时候,就会作为当前节点的左节点
                else if (ph < h)
                    dir = 1;
                else if ((pk = p.key) == k || (k != null && k.equals(pk)))
                    return p;
                else if ((kc == null &&
                          //用到comparableClassFor方法来获取该元素键的Class
                          (kc = comparableClassFor(k)) == null) ||
                          //通过compareComparables方法来比较两个对象的大小
                         (dir = compareComparables(kc, k, pk)) == 0) {
                    if (!searched) {
                        TreeNode<K,V> q, ch;
                        searched = true;
                        if (((ch = p.left) != null &&
                             (q = ch.find(h, k, kc)) != null) ||
                            ((ch = p.right) != null &&
                             (q = ch.find(h, k, kc)) != null))
                            return q;
                    }
                    /**
                    * 用这个方法来比较两个对象,返回值要么大于0,要么小于0,不会为0
                    * 也就是说这一步一定能确定要插入的节点要么是树的左节点,要么是右节点,不然就无法继续                     * 满足二叉树结构了
                    *
                    * 先比较两个对象的类名,类名是字符串对象,就按字符串的比较规则
                    * 如果两个对象是同一个类型,那么调用本地方法为两个对象生成hashCode值,再进行比较,                     * hashCode相等的话返回-1
                    */
                    dir = tieBreakOrder(k, pk);
                }

                TreeNode<K,V> xp = p;
                if ((p = (dir <= 0) ? p.left : p.right) == null) {
                    Node<K,V> xpn = xp.next;
                    TreeNode<K,V> x = map.newTreeNode(h, k, v, xpn);
                    if (dir <= 0)
                        xp.left = x;
                    else
                        xp.right = x;
                    xp.next = x;
                    x.parent = x.prev = xp;
                    if (xpn != null)
                        ((TreeNode<K,V>)xpn).prev = x;
                    moveRootToFront(tab, balanceInsertion(root, x));
                    return null;
                }
            }
        }

        /**
         * Returns root of tree containing this node.
         */
        final TreeNode<K,V> root() {
            //声明循环变量
            for (TreeNode<K,V> r = this, p;;) {
                if ((p = r.parent) == null)
                    return r;
                r = p;
            }
        }
- 树化方法
     //允许容器树化的最小容量,
      static final int MIN_TREEIFY_CAPACITY = 64;

     /**
     * Replaces all linked nodes in bin at index for given hash unless
     * table is too small, in which case resizes instead.
     * 将给定hash索引上的关联节点树化,如果太小,重新缩容
     */
    final void treeifyBin(Node<K,V>[] tab, int hash) {
        int n, index; Node<K,V> e;
        //如果hash table的长度大于64,则将指定位置上的所有节点转换为TreeNode;否则只对hash table进行扩容.
        if (tab == null || (n = tab.length) < MIN_TREEIFY_CAPACITY)
            resize();
        else if ((e = tab[index = (n - 1) & hash]) != null) {
            TreeNode<K,V> hd = null, tl = null;
            do {
                //将每个节点包装成TreeNode
                TreeNode<K,V> p = replacementTreeNode(e, null);
                if (tl == null)
                    hd = p;
                else {
                    //将所有TreeNode连接在一起,此时只是链表结构
                    p.prev = tl;
                    tl.next = p;
                }
                tl = p;
            } while ((e = e.next) != null);
            if ((tab[index] = hd) != null)
                //对TreeNode链表进行树化
                hd.treeify(tab);
        }
    }
转为红黑树的时机
JDK1.8中HashMap在出现hash碰撞时链表长度超过8就一定会变成红黑树吗 ?否
实际上转换红黑树有个大前提,就是当前hash table的长度也就是HashMap的capacity(不是size)不能小于64.小于64就只是做个扩容.
get()过程
    public V get(Object key) {
        Node<K,V> e;
        return (e = getNode(hash(key), key)) == null ? null : e.value;
    }

    final Node<K,V> getNode(int hash, Object key) {
        Node<K,V>[] tab; Node<K,V> first, e; int n; K k;
        //首先获取槽位,并赋值给第一节点
        if ((tab = table) != null && (n = tab.length) > 0 &&
            (first = tab[(n - 1) & hash]) != null) {
            //对key进行判断
            if (first.hash == hash && // always check first node
                ((k = first.key) == key || (key != null && key.equals(k))))
                return first;
            //如果key不相等,获取next节点
            if ((e = first.next) != null) {
                if (first instanceof TreeNode)
                    //树节点从树结构中获取
                    return ((TreeNode<K,V>)first).getTreeNode(hash, key);
                do {
                    //链表结构循环从链表中获取节点,知道key相等,获取到节点
                    if (e.hash == hash &&
                        ((k = e.key) == key || (key != null && key.equals(k))))
                        return e;
                } while ((e = e.next) != null);
            }
        }
        return null;
    }

        /**
         * Calls find for root node.
         */
        final TreeNode<K,V> getTreeNode(int h, Object k) {
            return ((parent != null) ? root() : this).find(h, k, null);
        }

		/**
		* 查找树节点
		*/
        final TreeNode<K,V> find(int h, Object k, Class<?> kc) {
            TreeNode<K,V> p = this;
            do {
                int ph, dir; K pk;
                TreeNode<K,V> pl = p.left, pr = p.right, q;
                if ((ph = p.hash) > h)
                    p = pl;
                else if (ph < h)
                    p = pr;
                else if ((pk = p.key) == k || (k != null && k.equals(pk)))
                    //此处为找到对应节点
                    return p;
                else if (pl == null)
                    p = pr;
                else if (pr == null)
                    p = pl;
                //上面的为依次向下层叶子节点查找

                //进入此处,说明key是个对象,且实现了Comparable接口
                else if ((kc != null ||
                          //比较key参数类型
                          (kc = comparableClassFor(k)) != null) &&
                         //比较对象是否相等,其中如果没有实现Comparable 直接返回0
                         (dir = compareComparables(kc, k, pk)) != 0)
                    p = (dir < 0) ? pl : pr;
                //走到此处,代表key所属类没有实现Comparable,固定右边遍历
                else if ((q = pr.find(h, k, kc)) != null)
                    return q;
                // pr.find(h, k, kc)) 为空,固定左边遍历
                else
                    p = pl;
            } while (p != null);
            return null;
        }
transfer()过程
- 扩容操作
    static final int MAXIMUM_CAPACITY = 1 << 30;
	//默认初始化大小
	static final int DEFAULT_INITIAL_CAPACITY = 1 << 4
    static final float DEFAULT_LOAD_FACTOR = 0.75f;
	/*
	* 初始化或2倍扩容数组大小
    */
	final Node<K,V>[] resize() {
        Node<K,V>[] oldTab = table;
        int oldCap = (oldTab == null) ? 0 : oldTab.length;
        int oldThr = threshold;
        int newCap, newThr = 0;
        if (oldCap > 0) {
            if (oldCap >= MAXIMUM_CAPACITY) {
                //到达最大值或不再进行扩容
                threshold = Integer.MAX_VALUE;
                return oldTab;
            }
            else if ((newCap = oldCap << 1) < MAXIMUM_CAPACITY &&
                     oldCap >= DEFAULT_INITIAL_CAPACITY)
                newThr = oldThr << 1; // double threshold
        }
        else if (oldThr > 0) // initial capacity was placed in threshold
            //数组初始值容量为空的话,默认大小为 1<4
            newCap = oldThr;
        else {               // zero initial threshold signifies using defaults
            //数组初始值容量为0的话,初始化数组大小为 1<4,扩容阈值为 0.75 * (1 < 4)
            newCap = DEFAULT_INITIAL_CAPACITY;
            newThr = (int)(DEFAULT_LOAD_FACTOR * DEFAULT_INITIAL_CAPACITY);
        }
        if (newThr == 0) {
            float ft = (float)newCap * loadFactor;
            newThr = (newCap < MAXIMUM_CAPACITY && ft < (float)MAXIMUM_CAPACITY ?
                      (int)ft : Integer.MAX_VALUE);
        }
        threshold = newThr;
        @SuppressWarnings({"rawtypes","unchecked"})
        	//初始化数组
            Node<K,V>[] newTab = (Node<K,V>[])new Node[newCap];
        table = newTab;
        if (oldTab != null) {
            //扩容之前,原始数组存在
            for (int j = 0; j < oldCap; ++j) {
                Node<K,V> e;
                if ((e = oldTab[j]) != null) {
                    oldTab[j] = null;
                    if (e.next == null)
                        //赋值单一元素
                        newTab[e.hash & (newCap - 1)] = e;
                    else if (e instanceof TreeNode)
                        // treeNode 节点的处理
                        ((TreeNode<K,V>)e).split(this, newTab, j, oldCap);
                    else { // preserve order
                        //处理链表的数据
                        //原桶的位置
                        Node<K,V> loHead = null, loTail = null;
                        //新桶的位置,既扩容一倍后的位置
                        Node<K,V> hiHead = null, hiTail = null;
                        //next节点
                        Node<K,V> next;

                        //循环遍历,处理链表中的元素
                        do {
                            //指向下一个节点
                            next = e.next;
                            //判断当前节点的hash值的比hash表容量高一位的二进制位是否为1,如果为0,则节点保持原桶,如果为1,到新桶
                            if ((e.hash & oldCap) == 0) {
                                if (loTail == null)//原捅位置的链表尾
                                    loHead = e;  //将当前节点设置为链表头
                                else
                                    loTail.next = e;  //当前节点追加到尾结点的下一节点
                                loTail = e;	//更新尾结点,将当前节点设置为尾结点
                            }
                            else {
                                if (hiTail == null)//同上,设置
                                    hiHead = e;
                                else
                                    hiTail.next = e;
                                hiTail = e;
                            }
                        } while ((e = next) != null);

                        if (loTail != null) {
                            loTail.next = null;
                            //设置原始数组下标的链表
                            newTab[j] = loHead;
                        }
                        if (hiTail != null) {
                            hiTail.next = null;
                            //设置扩容之后对应下标的链表,当前桶位置+旧的hash表容量
                            newTab[j + oldCap] = hiHead;
                        }
                    }
                }
            }
        }
        return newTab;
    }
为何随机增删、查询效率都很高的原因是?
增删是在链表上完成的,而查询只需扫描部分,则效率高。
HashMap集合的key,会先后调用两个方法,hashCode and equals方法,这这两个方法都需要重写。
为什么放在hashMap集合key部分的元素需要重写equals方法?
64以下不会进行红黑树的转换
因为equals方法默认比较的是两个对象的内存地址

 浙公网安备 33010602011771号