Spring Xml 文件报红第一时间检查set 、get 、构造方法
准备工作
本套Spring教程与其他Spring教程的区别可总结为以下几点:
第一点:手写Spring框架
第二点:手写组件扫描器
第三点:依赖倒置原则DIP
第四点:CGLIB 动态代
§1 Spring启示录
当前项目
dao
UserDao
impl
UserDaoImpl_1
service
UserService
impl
UserServiceimpl_1
web
UserAction
service为了调用dao层方法,有dao层接口的实现类
web为了调用service层方法,有service层接口的实现类
缺点
若用户提出需求,程序员对项目的功能进行拓展时,就需要更改多层已经运行正常的的代码,不符合软件开发的“开闭原则”[OCP],即对扩展开放,对修改关闭
思想与解决方案
违背依赖倒置
上层依赖下层 : 上层因下层的改动而改动
[这样不好,违背依赖倒置原则!!!]
符合依赖倒置:
上不依赖下,"面向接口编程"
依赖倒置原则的目的,降低程序的耦合度,提高扩展力
解决思想:[控制反转]
只保留接口,把创建对象的的权利、以及对象的维护权利交出
- 重点:"让出权利"
- 出现的比较新,没有被纳入GoF23种设计模式中
解决方案:依赖注入[DI]
何如实现控制反转?
- 第一种:set注入(执行set方法给属性赋值)
- 第二种:构造方法注入(执行构造方法给属性赋值)
依赖:A对象和B对象的关系。
注入:是一种手段,通过这种手段,可以让A对象和B对象产生关系。
依赖注入:对象A和对象B之间的关系,靠注入的手段来维护。而注入包括:set注入和构造注入
控制反转是思想。依赖注入是这种思想的具体实现。
Spring是一个实现了IoC思想的容器。
注意术语:
术语
-
-
全称
OCP
开闭原则
开发原则
Open Close Principle
DIP
依赖倒置原则
开发原则
Dependence Inversion Principle
IoC
控制反转思想
一种新型的设计模式
Inversion of Control
DI
依赖注入
控制反转思想的具体实现方式
Dependency Injection
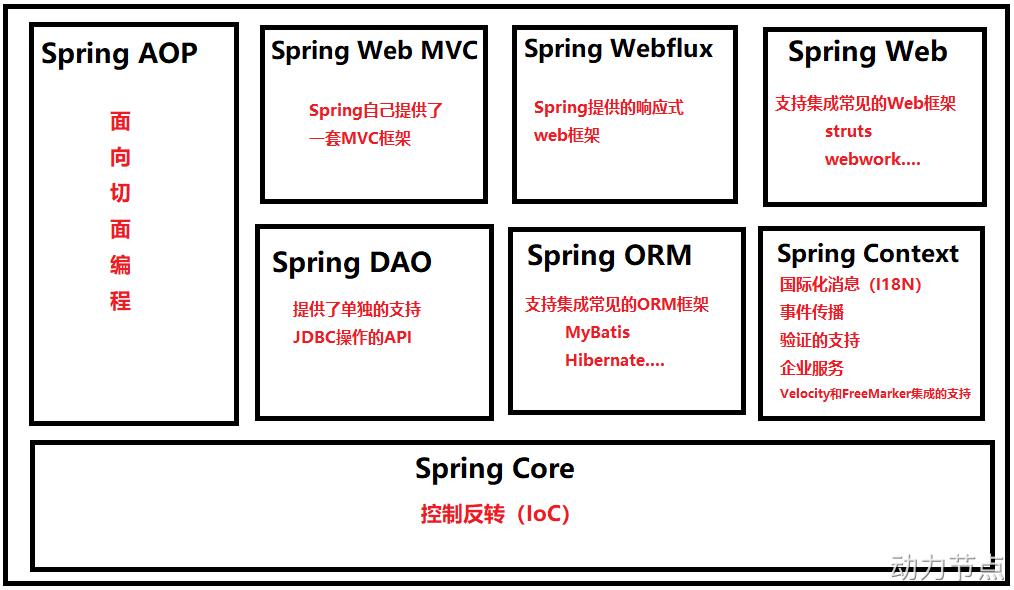
§2 Spring 简述
SSM
面向切面编程:[蓉姐]
§3 Spring 入门程序
1、代码编程步骤
基本结构
1-创建一个maven项目
补充项目结构
resources 并设置为 资源文件夹
同理补充测试资源文件夹
2-修改pom.xml文件
删除build标签
添加 spring框架需要的核心依赖 spring-context
如果没有jutil 包则添加
刷新pom.xml文件
Spring6未正式发布需要添加Spring提供的仓库地址
Add the following to resolve milestone and RC versions – for example, `6.0.0-M2` or `6.0.0-RC1`:
<repository >
<id > repository.spring.milestone</id >
<name > Spring Milestone Repository</name >
<url > https://repo.spring.io/milestone</url >
</repository >
<dependency >
<groupId > org.springframework</groupId >
<artifactId > spring-context</artifactId >
<version > 6.0.0-M2</version >
</dependency >
3-创建项目所需的咖啡豆[无参构造、setXXX方法]
一定得有无参构造,底层使用的是反射机制通过无参构造创建对象
4-applicationContext.xml文件
- 配置文件放在resources类根路径下,可移植性高
- IDEA支持spring配置文件,有模板!!
- 在XML Configuration File → Spring Config
- xml的文件的名字随意
<?xml version="1.0" encoding="UTF-8"?>
<beans xmlns ="http://www.springframework.org/schema/beans"
xmlns:xsi ="http://www.w3.org/2001/XMLSchema-instance"
xsi:schemaLocation ="http://www.springframework.org/schema/beans http://www.springframework.org/schema/beans/spring-beans.xsd" >
<bean id ="" class ="" >
<property name ="" value ="" />
<property name ="" ref ="" />
</bean >
</beans >
㊟:value 为简单类型赋值
ref 为引用类型赋值,且要求当前bean工厂中存在该引用类型对象
5 - 创建测试方法
创建工厂
ApplicationContext ac = new ClassPathXmlApplicationContext ("applicationContext.xml路径" );
User user = (User) applicationContext.getBean("userBean" );
项目文件的修改与导入
1 、删除target文件夹
2 、删除 .iml 文件
3 、修改pom.xml文件中的坐标
<artifactId>MVC_SpringXml</artifactId>
修改为项目名
4 、导入
Project Structure
→ Modules
→ +
→ import Modules
→ 选中项目的根路径
→ import module from external model
→ maven
→ 一直next即可
§4 Spring对IoC的实现
实现依赖注入
set注入是在对象创建之后执行
构造注入是在对象实例化的过程中执行的
set注入
javaBean中存在符合命名规范的set方法
applicationContext.xml文件中进行了配置
<bean id ="userDaoBean" class ="com.nfjh.spring6.dao.UserDao" />
<bean id ="userService" class ="com.nfjh.spring6.service.UserService" >
<property name ="userdao" ref ="userDaoBean" />
</bean >
启动Spring容器,解析spring.xml文件,并且实例化所有的bean对象,放到spring容器当中。
根据bean的id从Spring容器中获取这个对象。
<bean id ="" class ="" >
<property name ="" value ="" />
<property name ="" ref ="" />
</bean >
public class UserDao {
private static final Logger logger = LoggerFactory.getLogger(UserDao.class);
public void insert () {
logger.debug("保存信息到数据库!\n" );
}
}
public class UserService {
private UserDao userdao;
public void setUserdao (UserDao userdao) {
this .userdao = userdao;
}
public void saveUser () {
userdao.insert();
}
@Test
public void testInsert () {
ApplicationContext applicationContext = (ApplicationContext) new ClassPathXmlApplicationContext ("spring-core.xml" );
UserService userService = applicationContext.getBean("userService" , UserService.class);
userService.saveUser();
}
<bean id="userDao" class="com.nfjh.spring6.dao.UserDao" />
<bean id="userService" class="com.nfjh.spring6.service.UserService" >
<property name="userdao" ref="userDao" />
</bean>
构造注入
<bean id ="userDaoBean" class ="com.nfjh.spring6.dao.UserDao" />
<bean id ="customerServiceBean" class ="com.nfjh.spring6.service.CustomerService" >
<constructor-arg index ="0" ref ="userDaoBean" />
</bean >
applicationContext.xml文件中进行了配置
启动Spring容器,解析spring.xml文件,并且实例化所有的bean对象,放到spring容器当中。
根据bean的id从Spring容器中获取这个对象。
set注入的方式
使用set 方法进行注入,一定得有无参构造,不要因为写了有参数的构造方法,
让无参数的方法被覆盖了,这时需要手动添加无参构造
注入方式
类类型
操作记忆 bean[id & class] >
操作对象
外部Bean
简单
property[name & value]
简单类型 attrName;
引用
property[name & ref]
bean[id & class]
内部Bean
---
property[name] > bean[class]
bean[id & class] OR 简单类型 attrName;
级联属性
引用
property[name="注入类的属性名" & ref] + property[name="注入类的属性名.属性名" & value]
bean[id & class]
数组
简单
property[name] > array > value
简单类型[] attrName;
引用
property[name] > array > ref[bean]
引用类型[] attrName;
List/Set
简单
property[name] > list/set > value
List/Set<简单类型> attrName;
引用
property[name] > list/set > ref[bean]
List/Set <引用类型> attrName;
Map
Map
property[name] > map > entry[key/key-ref &value/value-ref]
Map<类型1,类型2> attrName;
Perperties
Perperties
property[name] > props > prop[key]
Map<String,String>
null
---
property[name] > null单标签
bean[id & class] OR 简单类型 attrName;
---
对哪个属性注入null值,就啥都不写
bean[id & class] OR 简单类型 attrName;
空字符串
String
property[name & value=""]
String
String
property[name] > value单标签
String
特殊符号
property[name & value="实体符号"]
property[name] > value{ <![CDATA[值]]>}
注入方式
类类型
操作记忆
操作对象
p 命名空间
简单
bean[id & class & p:属性名="属性值" ]
简单类型 attrName;
引用
bean[id & class & p:属性名-ref="bean的id"]
bean[id & class]
xmlns:p="http://www.springframework.org/schema/p"
c 命名空间
简单_属性名
bean[id & class c:属性名="属性值"]
简单类型 attrName;
简单_下标
bean[id & class c:_0="属性值"] 简单类型 attrName;
引用_属性名
bean[id & class c:属性名-ref="bean的id"]
bean[id & class] OR 简单类型 attrName;
引用_下标
bean[id & class c:_0-ref="bean的id"] bean[id & class] OR 简单类型 attrName;
xmlns:c="http://www.springframework.org/schema/c"
util命名空间
List
bean[id & class] > property[name & ref="util的id"]
util:list[id] > value
util命名空间
Set
-- 同List --
util:set[id] > value
util命名空间
Properties
-- 同List --
util:properties[id] > prop[key]
外部Bean
就是使用ref属性来引入。这就是注入外部Bean
<bean id ="orderDaoBean" class ="com.powernode.spring6.dao.OrderDao" > </bean >
<bean id ="orderServiceBean" class ="com.powernode.spring6.service.OrderService" >
<property name ="orderDao" ref ="orderDaoBean" />
</bean >
内部bean
<bean id ="osBeanIn" class ="com.nfjh.spring6.service.OrderService" >
<property name ="orderDao" >
<bean class ="com.nfjh.spring6.dao.OrderDao" />
</property >
</bean >
内部bean在定义的时候放在 property标签中
property标签中不加 ref
bean标签中不加 id
简单类型注入
<bean id ="userBean" class ="com.nfjh.spring6.bean.User" >
<property name ="username" value ="zhangsan" />
<property name ="passwd" value ="123" />
<property name ="age" value ="20" />
</bean >
哪些是简单类型
基本数据类型 基本数据类型对应的包装类 String或其他的CharSequence子类 Number子类 Date子类 Enum子类 URI URL Temporal子类 Locale Class 另外还包括以上简单值类型对应的数组类型。
简单类型可以用于对数据源信息的注入
级联属性
User
private String username;
private String passwd;
private int age;
以及对应的get set toString方法
Client
private User user;
private String clientName;
以及对应的get set toString方法
<bean id ="userBeanCascade" class ="com.nfjh.spring6.bean.User" />
<bean id ="clientBean" class ="com.nfjh.spring6.bean.Client" >
<property name ="clientName" value ="QQ" />
<property name ="user" ref ="userBeanCascade" />
<property name ="user.username" value ="张三" />
<property name ="user.passwd" value ="123456" />
<property name ="user.age" value ="21" />
</bean >
注入数组
Lseeon
private String [] lessonName ;
以及对应的set toString方法
Student
private String name;
private Lesson [] lessons;
以及对应的set toString方法
<bean id ="lessonBean" class ="com.nfjh.spring6.bean.Lesson" >
<property name ="lessonName" >
<array >
<value > JAVA</value >
<value > MYBATIS</value >
<value > SPRING</value >
</array >
</property >
</bean >
<bean id ="lessonBean2" class ="com.nfjh.spring6.bean.Lesson" >
<property name ="lessonName" >
<array >
<value > MYSQL</value >
<value > JDBC</value >
<value > AJAX</value >
</array >
</property >
</bean >
<bean id ="studentBean" class ="com.nfjh.spring6.bean.Student" >
<property name ="name" value ="张三" />
<property name ="lessons" >
<array >
<ref bean ="lessonBean" />
<ref bean ="lessonBean2" />
</array >
</property >
</bean >
List 和Set集合注入
Person
private List<User> userList;
private Set<User> userSet;
以及对应的set toString方法
<bean id ="personBean" class ="com.nfjh.spring6.bean.Person" >
<property name ="userList" >
<list >
<ref bean ="userBean" />
<ref bean ="userBeanCascade" />
</list >
</property >
</bean >
<bean id ="personBean2" class ="com.nfjh.spring6.bean.Person" >
<property name ="userList" >
<list >
<ref bean ="userBean" />
<ref bean ="userBeanCascade" />
</list >
</property >
<property name ="userSet" >
<set >
<ref bean ="userBean" />
<ref bean ="userBeanCascade" />
</set >
</property >
</bean >
Map 注入
还是person
再加上一个属性
private Map<Integer,User> userMap;
以及对应的set toString方法
<bean id ="personMapBean" class ="com.nfjh.spring6.bean.Person" >
<property name ="userMap" >
<map >
<entry key ="1" value-ref ="userBean" />
<entry key ="2" value-ref ="userBeanCascade" />
</map >
</property >
</bean >
Perperties类型注入
还是person
再加上一个属性
Properties properties ;
以及对应的set toString方法
<bean id ="personProBean" class ="com.nfjh.spring6.bean.Person" >
<property name ="properties" >
<props >
<prop key ="driver" > com.nfjh.hello</prop >
<prop key ="url" > www.baidu.com</prop >
</props >
</property >
</bean >
注入null
User
private String username;
private String passwd;
private int age;
以及对应的get set toString方法
<bean id ="userNullBean" class ="com.nfjh.spring6.bean.User" >
<property name ="username" >
<null />
</property >
<property name ="passwd" value ="null" />
</bean >
注入空字符串
<bean id ="userStrNullBean" class ="com.nfjh.spring6.bean.User" >
<property name ="username" value ="" />
<property name ="passwd" >
<value />
</property >
</bean >
< " ' & > 5个特殊符号的注入
<bean id ="specialSymbolsBean" class ="com.nfjh.spring6.bean.User" >
<property name ="username" value ="2 > 3" />
<property name ="passwd" >
<value > <![CDATA[2<3]]> </value >
</property >
</bean >
小结
外部bean
<property name="orderDao" ref="orderDaoBean" />
p命名空间注入
p命名空间注入的底层还是"set"注入
所以仍然需要提供set方法
只不过这种注入方式会让spring配置更加简单
xmlns:p="http://www.springframework.org/schema/p"
User
private String username;
private String passwd;
private int age;
以及对应的get set toString方法
Client
private User user;
private String clientName;
以及对应的get set toString方法
<bean id ="userBean" class ="com.nfjh.spring6.bean.User" p:age ="0" p:passwd ="haha" p:username ="zhangsan" />
<bean id ="clientBean" class ="com.nfjh.spring6.bean.Client" p:clientName ="QQ" p:user-ref ="userBean" />
c 命名空间注入
c命名空间注入的底层还是"构造"注入
所以仍然需要提供构造方法
只不过这种注入方式会让spring配置更加简单
修改就不说了,上面改p的这里改成 c 就行了
xmlns:c="http://www.springframework.org/schema/c"
Shop
private String address;
private String name;
private Date businessHours;
以及对应的三个参数构造方法
<bean id ="date" class ="java.util.Date" />
<bean id ="shopBean" class ="com.nfjh.spring6.bean.Shop" c:address ="天津市" c:name ="小张水果" c:businessHours-ref ="date" />
util命名空间
简化集合 Map ,提高代码复用率
第一步:和p一样修改
第二步:在第三行的引号中追加
使用
<util:TYPE id ="" >
.....
</util:TYPE >
Book
private List<String> name;
private Set<String> ISBN;
private Properties type;
以及对应的set toString方法
<util:list id ="bookList" >
<value > 三体</value >
<value > 活着</value >
</util:list >
<util:set id ="bookSet" >
<value > 1211121</value >
<value > 22332232</value >
</util:set >
<util:properties id ="bookProp" >
<prop key ="1" > 科幻</prop >
<prop key ="2" > 文学</prop >
</util:properties >
<bean id ="bookBean" class ="com.nfjh.spring6.bean.Book" >
<property name ="name" ref ="bookList" />
<property name ="ISBN" ref ="bookSet" />
<property name ="type" ref ="bookProp" />
</bean >
<util:list id ="bookList2" >
<value > 流浪地球</value >
<value > 诗经</value >
</util:list >
<bean id ="bookBean2" class ="com.nfjh.spring6.bean.Book" >
<property name ="name" ref ="bookList2" />
<property name ="ISBN" ref ="bookSet" />
<property name ="type" ref ="bookProp" />
</bean >
基于XML的自动装配
不管是使用 autowire="byName"
还是autowire="byType"
底层都是使用set方法
User
private String username;
private String passwd;
private int age;
以及对应的get set toString方法
Client
private User user;
private String clientName;
以及对应的get set toString方法
autowire="byName"
<bean id ="clientBean" class ="com.nfjh.spring6.bean.Client" autowire ="byName" >
<property name ="clientName" value ="QQ" />
</bean >
<bean id ="user" class ="com.nfjh.spring6.bean.User" >
<property name ="age" value ="20" />
<property name ="passwd" value ="1221" />
<property name ="username" value ="zhangsan" />
</bean >
autowire="byType"
User 中添加该方法
public void testAutoWire () {
System.out.println("user对象已经实例化" );
}
<bean id ="user" class ="com.nfjh.spring6.bean.User" >
<property name ="age" value ="20" />
<property name ="passwd" value ="1221" />
<property name ="username" value ="zhangsan" />
</bean >
<bean id ="clientBean2" class ="com.nfjh.spring6.bean.Client" autowire ="byType" >
<property name ="clientName" value ="QQ" />
</bean >
spring引入外部属性配置文件
步骤
1、准备jdbc.properties文件
driverClassName =com.mysql.jdbc.Driver
url =jdbc:mysql://localhost:2022/spring6
username =root
password =root
initialSize =5
maxIdle =10
2、在xml文件中添加context命名空间以及约束文件
修改与util命名空间的修改时一样的
只不过把该util的地方该成context即可
3、准备好接收数据的几个属性
JDBC
private String driver;
private String url;
private String passwd;
private String initialSize;
private String maxIdle;
以及对应的set和toString方法
3、引入配置文件
<context:property-placeholder location ="jdbc.properties" />
4、注入数据
<bean id ="jdbcBean" class ="com.nfjh.spring6.bean.JDBC" >
<property name ="driver" value ="${driverClassName}" />
<property name ="url" value ="${url}" />
<property name ="username" value ="${username}" />
<property name ="passwd" value ="${password}" />
<property name ="initialSize" value ="${initialSize}" />
<property name ="maxIdle" value ="${maxIdle}" />
</bean >
${username}加载错误
需要注意的是Spring 的配置文件中有一个坑!!!
Spring 在加载配置文件的时候,会先加载系统的环境变量
此时如果jdbc.properties文件中存在username就会被加载为电脑的用户名
而不是我们的配置
解决的方式有三种
1、直接更换名字
把username换成 user_name 或者 name 或者其他的
但注意,spring在加载时不区分大小写,所以改成 userName是没用滴
还有当使用数据源时,存在无法更改配置文件中的名称,否则无法成功创
建连接的情况,此时建议使用其他的解决方案
2、添加配置信息local-override="true"
<context:property-placeholder local-override ="true" location ="jdbc.properties" />
3、[已过时,但能用]使用另一个标签,并添加p命名空间
<bean class ="org.springframework.beans.factory.config.PropertyPlaceholderConfigurer" p:localOverride ="true" >
<property name ="locations" value ="classpath:jdbc.properties" > </property >
</bean >
§5 Bean的作用域
public class ScopeBean {
public ScopeBean () {
System.out.println("无参构造执行了!" );
}
}
@Test
public void testScopeBean () {
ApplicationContext applicationContext = new ClassPathXmlApplicationContext ("bean-scope.xml" );
System.out.println("-------------" );
ScopeBean scopeBean = applicationContext.getBean("scopeBean" , ScopeBean.class);
System.out.println(scopeBean);
ScopeBean scopeBean2 = applicationContext.getBean("scopeBean" , ScopeBean.class);
System.out.println(scopeBean2);
ScopeBean scopeBean3 = applicationContext.getBean("scopeBean" , ScopeBean.class);
System.out.println(scopeBean3);
<bean id ="scopeBean" class ="com.nfjh.spring6.bean.ScopeBean" scope ="singleton" />
<bean id ="scopeBean" class ="com.nfjh.spring6.bean.ScopeBean" scope ="prototype" />
§6 bean的获取方式
构造方法获取bean
简单工厂获取bean
public class Sweet {
public Sweet () {}
public void getType () {
System.out.println("这是一个水果糖" );
}
}
public class SweetFactory {
public static Sweet get () {
return new Sweet ();
}
}
<bean id ="sweetFactory" class ="com.nfjh.spring6.factory.SweetFactory" factory-method ="get" />
ApplicationContext applicationContext = new ClassPathXmlApplicationContext ("factory.xml" );
Sweet sweet = applicationContext.getBean("sweetFactory" , Sweet.class);
sweet.getType();
Factory-bean获取bean
Sweet还是使用上面的那个,原封不动
public class SweetFactor_Bean {
public Sweet get () {
return new Sweet ();
}
}
<bean id ="sweetFactoryBean" class ="com.nfjh.spring6.factory.SweetFactor_Bean" />
<bean id ="sweetBean" factory-bean ="sweetFactoryBean" factory-method ="get" />
实现FactoryBean接口重写方法获取
还是Sweet不动
FactoryBeanImpl
import org.springframework.beans.factory.FactoryBean;
public class FactroyBeanImpl implements FactoryBean <Sweet> {
@Override
public Sweet getObject () throws Exception {
return new Sweet ();
}
@Override
public Class<?> getObjectType() {
return null ;
}
@Override
public boolean isSingleton () {
return FactoryBean.super .isSingleton();
}
}
<bean id ="sweetFactoryBeanImpl" class ="com.nfjh.spring6.factory.FactroyBeanImpl" />
Con
private Date date;
private String clientLog;
private String clientType;
以及对应的set和toSring方法
import java.text.SimpleDateFormat;
import java.util.Date;
public class DateFactoryBeanImpl implements FactoryBean <Date> {
private String strDate;
public DateFactoryBeanImpl (String strDate) {
this .strDate = strDate;
}
@Override
public Date getObject () throws Exception {
SimpleDateFormat sdf = new SimpleDateFormat ("yyyy-MM-dd" );
return sdf.parse(strDate);
}
@Override
public Class<?> getObjectType() {
return null ;
}
}
<bean id ="date" class ="com.nfjh.spring6.factory.DateFactoryBeanImpl" >
<constructor-arg value ="2001-09-20" />
</bean >
<bean id ="conBean" class ="com.nfjh.spring6.factory.Con" >
<property name ="date" ref ="date" />
<property name ="clientType" value ="QQ" />
<property name ="clientLog" value ="QQ_Log" />
</bean >
<bean id ="conBean2" class ="com.nfjh.spring6.factory.Con" >
<property name ="date" >
<bean class ="com.nfjh.spring6.factory.DateFactoryBeanImpl" >
<constructor-arg value ="2001-09-20" />
</bean >
</property >
<property name ="clientType" value ="WeChat" />
<property name ="clientLog" value ="WeChat_Log" />
</bean >
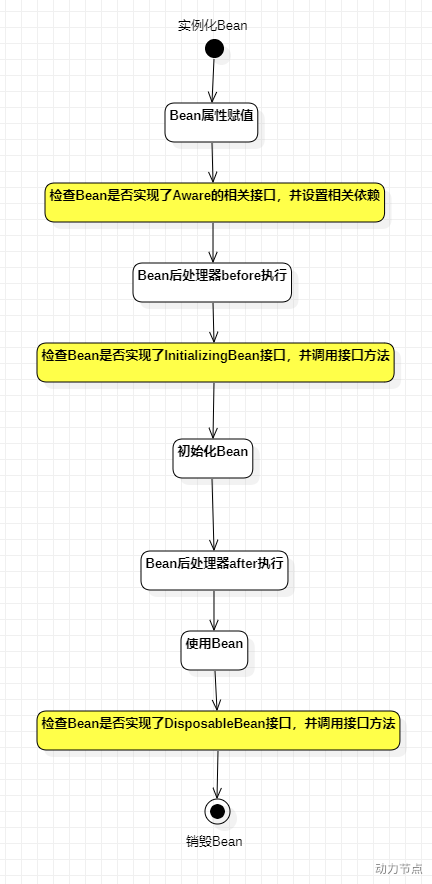
bean的生命周期
Student
public class Student {
private int age;
public Student () {
System.out.println("无参构造执行了!!!" );
}
public void setAge (int age) {
System.out.println("赋值执行了" );
this .age = age;
}
public void init () {
System.out.println("init初始化执行了!!!" );
}
public void sleep () {
System.out.println("bean对象正在使用中!!!" );
}
public void destroy () {
System.out.println("destroy方法执行了!!!" );
}
}
@Test
public void testLifeCycle () {
ApplicationContext applicationContext = new ClassPathXmlApplicationContext ("lifecycle.xml" );
Student student = applicationContext.getBean("lifecycleBean" , Student.class);
student.sleep();
ClassPathXmlApplicationContext context = (ClassPathXmlApplicationContext) applicationContext;
context.close();
}
5步
<bean id ="lifecycleBean" class ="com.nfjh.spring6.life_cycle.Student" init-method ="init" destroy-method ="destroy" >
<property name ="age" value ="21" />
</bean >
7步
添加一个类实现BeanPostProcessor接口
重写其中的两个方法
import org.springframework.beans.BeansException;
import org.springframework.beans.factory.config.BeanPostProcessor;
public class LifeCycleAllBeanPost implements BeanPostProcessor {
@Override
public Object postProcessBeforeInitialization (Object bean, String beanName) throws BeansException {
System.out.println("初始化之前执行" );
return BeanPostProcessor.super .postProcessBeforeInitialization(bean, beanName);
}
@Override
public Object postProcessAfterInitialization (Object bean, String beanName) throws BeansException {
System.out.println("初始化之后执行" );
return BeanPostProcessor.super .postProcessAfterInitialization(bean, beanName);
}
}
<bean id ="postProcessor" class ="com.nfjh.spring6.life_cycle.LifeCycleAllBeanPost" />
<bean id ="lifecycleBean" class ="com.nfjh.spring6.life_cycle.Student" init-method ="init" destroy-method ="destroy" >
<property name ="age" value ="21" />
</bean >
10步
5步
7步 在init的前后添加bean后处理器(BeanPostProcessor)
10步是在
在使用bean之后添加
DisposableBean接口的检查,调用接口方法
Spring容器只对单例(singleton) 的Bean进行完整的生命周期管理。prototype(多例) 作用域的Bean,Spring容器只负责将该Bean初始化完毕。等客户端程序一旦获取到该Bean之后 ,Spring容器就不再管理该对象的生命周期了。
DefaultListableBeanFactory
@Test
public void registerBean () {
Student student = new Student ();
student.setAge(33 );
DefaultListableBeanFactory factory = new DefaultListableBeanFactory ();
factory.registerSingleton("studentBean" ,student);
Object studentBean = factory.getBean("studentBean" );
System.out.println(student);
}
§7 IoC 注解式开发
Spring注解使用
- 第一步:加入aop的依赖
- 第二步:在配置文件中添加context命名空间
- 第三步:在配置文件中指定扫描的包
- 第四步:在Bean类上使用注解
声明Bean
@Component 声明所有类型 Bean
以下三个注解是@Component 注解的别名,可以使用@Component 代替
但是代码的可读性会下降
@Controller 声明界面层的bean
@Service 声明业务逻辑层的bean
@Repository 声明数据访问层的bean
User.java
@Component(value="userBean")
如果注解的属性名是value,那么value是可以省略的@Component("userBean")
如果把value属性彻底去掉,spring会给Bean自动取名吗?会的。并且默认名字的规律是:Bean类名首字母小写即可@Component ==> getBean("user" );
如果是多个包怎么办?有两种解决方案:
第一种:在配置文件中指定多个包,用逗号隔开
第二种:指定多个包的共同父包
我的疑问与测试
@Component
public class User {
}
<context:component-scan base-package ="com.nfjh.bean" />
<bean id ="userBean" class ="com.nfjh.bean.User" />
@Test
@Test
public void testBean () {
ApplicationContext applicationContext = new ClassPathXmlApplicationContext ("Annotation-test.xml" );
Object userBean = applicationContext.getBean("userBean" );
Object userBean2 = applicationContext.getBean("user" );
System.out.println(userBean);
System.out.println(userBean2);
}
指定注解类型生效[过滤]
注入数据
@Value
以前这样注入
<bean id ="userBean" class ="com.nfjh.spring6.bean.User" >
<property name ="username" value ="zhangsan" />
<property name ="passwd" value ="123" />
<property name ="age" value ="20" />
</bean >
使用注解这样注入
@Component("userAnnotation")
public class User {
@Value("张三")
private String username;
@Value("123456")
private String passwd;
@Value("21")
private int age;
@Override
public String toString () {
return "User{" +
"username='" + username + '\'' +
", passwd='" + passwd + '\'' +
", age=" + age +
'}' ;
}
}
2、在set方法上注入
@Component("userAnnotation")
public class User {
private String username;
private String passwd;
private int age;
@Value("张三")
public void setUsername (String username) {
this .username = username;
}
@Value("123456")
public void setPasswd (String passwd) {
this .passwd = passwd;
}
@Value("23")
public void setAge (int age) {
this .age = age;
}
3、在构造方法的参数上进行注入
@Component("userAnnotation")
public class User {
private String username;
private String passwd;
private int age;
public User (@Value("李四") String username, @Value("3012") String passwd, @Value("23") int age) {
this .username = username;
this .passwd = passwd;
this .age = age;
}
自动装配
@AutoWired 类型自动装配
AutoWired根据类型自动装配时,类型需要唯一
autowireTest
dao
UserDao
@Repository
public interface UserDao {
void insert () ;
}
impl
@Repository
public class UserDaoForJK implements UserDao {
@Override
public void insert () {
System.out.println("计科学生信息插入中" );
}
}
service
UserService
@Service
public class UserService {
@Autowired
private UserDao userDao;
public void generate () {
userDao.insert();
}
}
<context:component-scan base-package ="com.nfjh.autowireTest" />
@Test
public void testAnnotationAutoWiredInjection () {
ApplicationContext applicationContext = new ClassPathXmlApplicationContext ("Annotation-test.xml" );
Object userService = applicationContext.getBean("userService" );
UserService service = (UserService) userService;
service.generate();
}
缺点
如何解决同一接口有多个实现类,无法通过类型注入?
如果在impl包下添加实现类
@Repository
public class UserDaoForTX implements UserDao {
@Override
public void insert () {
System.out.println("通信学生信息插入中" );
}
}
如果同一个类型有多个实现类,则Spring无法通过AutoWired直接进行装配
例如下面如果UserDao 的实现类除了UserDaoForJK之外还有一个userDaoForTX的话
在运行测试程序时会报错
org.springframework.beans.factory .UnsatisfiedDependencyException:
Error creating bean with name 'userService' : Unsatisfied dependency expressed through field 'userDao' ; nested exception is org.springframework.beans.factory .NoUniqueBeanDefinitionException: No qualifying bean of type 'com.nfjh.autowireTest.dao.UserDao' available: expected single matching bean but found 2 : userDaoForJK,userDaoForTX
注意:如果UserDao 有多页实现类,但是只有一个实现类添加了@Component 以及他的别名,且
其他实现类也没有在XML文件中进行<bean>的配置
这种只算一个,也是可以正常装配的
@AutoWired + Qualifer名称自动装配
对与以上使用类型无法自动装载的问题,可以使用名称自动装载进行解决
@AutoWired
@Qualifer("userDaoForTX")
private UserDao userDao;
注意@Qualifer 括号中的内容是bean的id
即可指定UserService中装载的对象为userDaoForTX
@AutoWired出现的位置
以下举例以使用@AutoWired类型装配有多个实现类无法解决
属性上,set方法上,构造方法上,构造方法的参数上,省略
1、属性上上面已经出现了,不再举例
2、set方法上
@Autowired
@Qualifier("userDaoForJK")
public void setUserDao (UserDao userDao) {
this .userDao = userDao;
}
3、构造方法上
@Autowired
public UserService (UserDao userDao) {
this .userDao = userDao;
}
需要注意的是,@Qualifier 限定符不适用于构造函数
" @Qualifier is not applicable for constructor"
所以在测试时,我把userDaoForJK类上的@Repository 给注释了
但是虽然@Qualifier 无法在构造方法上使用,但是@Autowired 可以
4、构造方法的参数上
public UserService (@Autowired @Qualifier("userDaoForJK") UserDao userDao) {
this .userDao = userDao;
}
5、不使用@Autowired
当且仅当有参数的构造方法只有一个,@Autowired 注解可以省略
当然如果有多个构造方法,@Autowired 不能省略,即使是无参的构造和有参构造,也不能省
public UserService (UserDao userDao) {
this .userDao = userDao;
}
[OS]最好不要省略,会降低代码的可读性!!
@Resource
使用使用这个注解是需要引入jar包的
<dependency >
<groupId > jakarta.annotation</groupId >
<artifactId > jakarta.annotation-api</artifactId >
<version > 2.1.1</version >
</dependency >
dao
public interface StudentDao {
void delete () ;
}
impl
@Repository
public class StudentDaoImpl implements StudentDao {
@Override
public void delete () {
System.out.println("学生信息删除...." );
}
}
service
@Service
public class StudentService {
@Resource(name="studentDaoImpl")
private StudentDao studentDaoProp;
public void delStu () {
studentDaoProp.delete();
}
1、@Resource 默认使用名称进行装配
当StudentDaoImpl的注解中value是空的
和上面使用@AutoWired 结合@Qualifier 一样名称默认是类名的首字母小写
@Resource(name="studentDaoImpl")
当value不为空时填写的
在使用@Resource 时name="名称"
2、当名称为空时,属性名做为名称进行查找
impl
@Repository("studentDaoProp")
public class StudentDaoImpl implements StudentDao
service
@Resource
private StudentDao studentDaoProp;
3、当名称为空,且根据属性名无法查找到类时,根据类型进行查找
impl
@Repository
public class StudentDaoImpl implements StudentDao
service
@Resource
private StudentDao studentDaoProp;
如果条件符合以上可以查询出结果
总结一下
注解类型
属性上
set
构造方法
构造方法的参数上
来源
@Autowired
✓
✓
✓
✓
Spring
@Qualifier
✓
✓
×
✓
Spring
@Resource
✓
✓
×
×
JDK扩展包
同时,如果只是用@Autowired说明使用类型注入,被注入的类型是唯一的
全注解式开发
通过使用以上的注解,目前我们的配置文件中只有一个包扫描
<context:component-scan base-package ="com.nfjh.bean" />
现在编写一个类,用于代替这个配置文件
@Configuration
@ComponentScan({"com.nfjh.Resource.dao","com.nfjh.Resource.service"})
public class Spring6Config {
}
注意这里的注解 @Configuration 以及 @ComponentScan ,
看清楚不是@ComponentScans ,不是s结尾!!!
注意此时已经没有了xml文件,所以这里的测试程序需要修改
使用"AnnotationConfigApplicationContext" ,传入“配置类”的类名,类名随意起,在这里传入即可
AnnotationConfigApplicationContext annotationConfigApplicationContext
= new AnnotationConfigApplicationContext (Spring6Config.class);
StudentService studentService = annotationConfigApplicationContext.getBean("studentService" , StudentService.class);
studentService.delStu();
§8 jdbcTemplate
这部分看老杜的笔记
AOP 面向切面编程
AOP七大术语
关于面向切面编程我的理解:
将与核心业务逻辑无关的代码进行抽离,形成以横向交叉应用于多个项目的"万金油" 代码
例如事务管理,日志,安全等,提高代码的复用率
AOP面向切面编程是一种编程思想,而JDK动态代理和GBLIB动态代理就是AOP的实现
连接点[Joinpoint]
切点[Pointcut]
通知[Advice]
切面[Aspect]
织入 [Weaving]
代理对象[Proxy]
目标对象[Target]
切点表达式
execution([访问控制权限修饰符] 返回值类型 [全限定类名]方法名(形式参数列表) [异常])
AspectJ
1、使用Spring+AspectJ的AOP需要引入的依赖如下:
2、Spring配置文件中添加context和aop的命名空间和约束文件
AspectJ框架__注解
5个通知类型
<context:component-scan base-package ="com.ndjh.spring6.service" />
<bean id ="logAspect" class ="com.ndjh.spring6.service.LogAspect" />
<bean id ="userService" class ="com.ndjh.spring6.service.UserService" />
<aop:aspectj-autoproxy proxy-target-class ="true" />
service
UserService
public class UserService {
public void login () {
System.out.println("系统正在进行身份验证" );
}
}
LogAspect
@Aspect
public class LogAspect {
@Before("execution(* com.ndjh.spring6.service..*(..))")
public void testBefore () {
System.out.println("前置通知" );
}
@AfterReturning("execution(* com.ndjh.spring6.service..*(..))")
public void testAfterReturning () {
System.out.println("后置通知" );
}
@Around("execution(* com.ndjh.spring6.service..*(..))")
public void testAround (ProceedingJoinPoint joinPoint) throws Throwable {
System.out.println("前环绕通知" );
joinPoint.proceed();
System.out.println("后环绕通知" );
}
@AfterThrowing("execution(* com.ndjh.spring6.service..*(..))")
public void testAfterThrowing () {
System.out.println("异常通知" );
}
@After("execution(* com.ndjh.spring6.service..*(..))")
public void testAfter () {
System.out.println("最终通知" );
}
}
现在修改代码UserService
增加异常
public class UserService {
public void login () {
System.out.println("系统正在进行身份验证" );
throw new RuntimeException ();
}
}
切面的顺序
对于“切面类”可以使用注解@Order进行排序
@Retention(RetentionPolicy.RUNTIME)
@Target({ElementType.TYPE, ElementType.METHOD, ElementType.FIELD})
@Documented
public @interface Order {
int value () default 2147483647 ;
}
通用切点表达式
@Pointcut("execution(* com.ndjh.spring6.service..*(..))")
public void generalExpression () {}
使用@Pointcut 进行标注
当前类进行标注
@Before("generalExpression()")
public void testBefore () {
System.out.println("前置通知" );
}
@Before("com.ndjh.spring6.service.LogAspect.generalExpression()")
public void safetyBefore () {
System.out.println("安全前置通知" );
}
AspectJ框架__XML
Spring事务
spring事务失效的12种场景:
spring集成Mybatis
pom文件
仓库地址
spring-context
spring-jdbc
mybatis
mybatis-spring
jdbc
druid
junit
mapper : 接口
pojo : 普通类
service
接口
接口的实现类
归入Spring管理加上注解 @Service @Transactional
添加Mapper中的属性,加上注解 @Autowired ,需要时再加上 @Qualifer
resources:
mapper
Mapper.xml 编写SQL语句
jdbc.properties
mybatis-config.xml
<settings>
<setting name="logImpl" value="STDOUT_LOGGING" />
<setting name="mapUnderscoreToCamelCase" value="true" />
</settings>
spring-config.xml
1 、组件扫描
2 、引入JDBC配置文件
3 、数据源
4 、sqlSessionFactoryBean配置
mybatis核心配置文件路径
数据源
指定别名 [sql中的resultType]
5 、Mapper扫描mapper包
6 、事务管理器
7 、开启事务
<?xml version="1.0" encoding="UTF-8"?>
<beans xmlns ="http://www.springframework.org/schema/beans"
xmlns:xsi ="http://www.w3.org/2001/XMLSchema-instance"
xmlns:context ="http://www.springframework.org/schema/context"
xmlns:tx ="http://www.springframework.org/schema/tx"
xsi:schemaLocation ="http://www.springframework.org/schema/beans http://www.springframework.org/schema/beans/spring-beans.xsd http://www.springframework.org/schema/context https://www.springframework.org/schema/context/spring-context.xsd http://www.springframework.org/schema/tx http://www.springframework.org/schema/tx/spring-tx.xsd" >
<context:component-scan base-package ="com.nfjh.bank" />
<context:property-placeholder location ="jdbc.properties" />
<bean id ="dataSource" class ="com.alibaba.druid.pool.DruidDataSource" >
<property name ="username" value ="${jdbc.username}" />
<property name ="password" value ="${jdbc.password}" />
<property name ="url" value ="${jdbc.url}" />
<property name ="driverClassName" value ="${jdbc.driver}" />
</bean >
<bean class ="org.mybatis.spring.SqlSessionFactoryBean" >
<property name ="configLocation" value ="mybatis-config.xml" />
<property name ="dataSource" ref ="dataSource" />
<property name ="typeAliasesPackage" value ="com.nfjh.bank" />
</bean >
<bean class ="org.mybatis.spring.mapper.MapperScannerConfigurer" >
<property name ="basePackage" value ="com.nfjh.bank.mapper" />
</bean >
<bean id ="txManager" class ="org.springframework.jdbc.datasource.DataSourceTransactionManager" >
<property name ="dataSource" ref ="dataSource" />
</bean >
<tx:annotation-driven transaction-manager ="txManager" />
</beans >


【推荐】国内首个AI IDE,深度理解中文开发场景,立即下载体验Trae
【推荐】编程新体验,更懂你的AI,立即体验豆包MarsCode编程助手
【推荐】抖音旗下AI助手豆包,你的智能百科全书,全免费不限次数
【推荐】轻量又高性能的 SSH 工具 IShell:AI 加持,快人一步
· DeepSeek 开源周回顾「GitHub 热点速览」
· 物流快递公司核心技术能力-地址解析分单基础技术分享
· .NET 10首个预览版发布:重大改进与新特性概览!
· AI与.NET技术实操系列(二):开始使用ML.NET
· 单线程的Redis速度为什么快?