项目结构
结构简介
-
main
- java
- pojo
咖啡豆 → 数据库表 ㊟1 咖啡豆
- mapper
Mapper接口 → 抽象方法
Mapper.xml → 编写SQL脚本 ㊟2
- resources
SqlMapConfig.xml / mybatis-config.xml → 核心配置文件 ㊟3
jdbc.properties → jdbc配置文件 ㊟4
logback.xml → 日志配置文件
-
test

㊟1 咖啡豆
| 此处一定要对照着数据库表进行创建 |
| 数据库中 StuName |
| javaBean 中 stuName 小驼峰 |
| |
| 如果数据库stu_name 下划线一定要与SQL表中一样 stu_Name |
| 或者写SQL语句时起别名 |
| 或者在核心配置文件中开启Mybatis自带的驼峰转换 |
| |
| |
| 创建get set |
| 创建构造方法 无参 全参 除了主键的构造方法 |
| |
| 咖啡豆中的属性类型使用"包装类" |
| 原因:若在查询时数据库中的数据不存在, |
| 返回值为 Null ,此时在进行赋值时 |
| 会导致类型不兼容,即例如null不能赋值给long |
| 但能赋值给他的包装类Long |
| |
| 当属性值为Boolean类型时 |
| 属性名的命名方式为isXXX |
| 且其get方法为isXXX |
| 即属性与方法同名 |
| |
| getXXX 中的XXX可以与属性名不同 |
| 但一定要和_Mapper.xml中#{XXX}的XXX相同 |
㊟ Mapper.xml
| |
| 当参数个数 > 1 时 |
| parameterType 不用写 |
| 参数使用注解开发 |
| @Param("") |
| |
| 当参数个数 =1 && 参数为简单类型时 |
| parameterType也不用写 |
| |
| 当然注解中的“标识”不一定要和变量名一致 |
| 但要和在Mapper.xml中使用时保持一致 |
| |
| 简单类型 |
| 8种基本(封装) |
| String |
| java.util.Date |
| java.sql.Date |
| |
| 引用类型 |
| 自定义类型 |
| |
| ㊟:日期格式刷 |
| SimpleDateFormat sf = new SimpleDateFormat("yyyy-MM-dd"); |
| |
| <?xml version="1.0" encoding="UTF-8" ?> |
| <!DOCTYPE mapper PUBLIC "-//mybatis.org//DTD Mapper 3.0//EN" |
| "http://mybatis.org/dtd/mybatis-3-mapper.dtd"> |
| <mapper namespace=""> |
| |
| |
| |
| |
| |
| </mapper> |
| |
mybatis-config.xml
| <?xml version="1.0" encoding="UTF-8" ?> |
| <!DOCTYPE configuration PUBLIC "-//mybatis.org//DTD Config 3.0//EN" |
| "http://mybatis.org/dtd/mybatis-3-config.dtd"> |
| <configuration> |
| |
| <properties resource="jdbc.properties"></properties> |
| |
| <settings> |
| |
| |
| <setting name="logImpl" value="STDOUT_LOGGING"/> |
| |
| |
| |
| <setting name="mapUnderscoreToCamelCase" value="true"/> |
| </settings> |
| |
| |
| |
| <typeAliases> |
| <package name="com.nfjh.bean"></package> |
| |
| </typeAliases> |
| |
| <environments default="development"> |
| <environment id="development"> |
| <transactionManager type="JDBC"></transactionManager> |
| <dataSource type="POOLED"> |
| <property name="driver" value="${jdbc.driverClassName}"></property> |
| <property name="url" value="${jdbc.url}"></property> |
| <property name="username" value="${jdbc.username}"></property> |
| <property name="password" value="${jdbc.password}"></property> |
| </dataSource> |
| </environment> |
| </environments> |
| |
| <mappers> |
| |
| |
| |
| |
| |
| <package name="com.nfjh.mapper"></package> |
| </mappers> |
| </configuration> |
jdbc.properties
| jdbc.driverClassName=com.mysql.cj.jdbc.Driver |
| jdbc.url=jdbc:mysql://localhost:2022/ssm?useUnicode=true&characterEncoding=utf8&serverTimezone=GMT%2B8 |
| jdbc.username=root |
| jdbc.password=root |
test.java
| SqlSession sqlSession = null; |
| Mapper mapper = null; |
| |
| SimpleDateFormat sf = new SimpleDateFormat("yyyy-MM-dd"); |
| |
| @Before |
| public void openSession() throws IOException { |
| |
| InputStream in = Resources.getResourceAsStream("核心配置文件"); |
| |
| |
| SqlSessionFactory build = new SqlSessionFactoryBuilder().build(in); |
| |
| |
| sqlSession = build.openSession(); |
| |
| |
| mapper = sqlSession.getMapper(Mapper.class); |
| |
| |
| |
| |
| |
| } |
| |
| @After |
| public void closeSession(){ |
| |
| sqlSession.close(); |
| } |
| |
| |
| @Test |
| public void testUpdate() throws ParseException { |
| Users u = new Users(7,"haha66",sf.parse("2000-01-01"),"2","北京大兴亦庄66"); |
| int num = uMapper.update(u); |
| System.out.println(num); |
| |
| sqlSession.commit(); |
| } |
其他配置[知识点]
logback日志
| 1、在核心配置文件中打开日志设置 |
| |
| <settings> |
| <setting name="logImpl" value="STDOUT_LOGGING"/> |
| </settings> |
| ㊟:注意settings标签的顺序,在dtd中能够查到 |
| |
| 2、在pom.xml中增加依赖 |
| |
| <dependency> |
| <groupId>ch.qos.logback</groupId> |
| <artifactId>logback-classic</artifactId> |
| <version>1.2.11</version> |
| <scope>test</scope> |
| </dependency> |
| |
| 3、在resources下添加logback.xml文件 |
| ㊟:文件名必须叫做logback.xml或logback-test.xml |
| |
logback.xml 文件
| |
| |
| |
| |
| <?xml version="1.0" encoding="UTF-8"?> |
| |
| <configuration debug="false"> |
| |
| <appender name="STDOUT" class="ch.qos.logback.core.ConsoleAppender"> |
| <encoder class="ch.qos.logback.classic.encoder.PatternLayoutEncoder"> |
| |
| <pattern>[%thread] %-5level %logger{50} - %msg%n</pattern> |
| </encoder> |
| </appender> |
| |
| |
| <logger name="com.apache.ibatis" level="TRACE"/> |
| <logger name="java.sql.Connection" level="DEBUG"/> |
| <logger name="java.sql.Statement" level="DEBUG"/> |
| <logger name="java.sql.PreparedStatement" level="DEBUG"/> |
| |
| |
| <root level="DEBUG"> |
| <appender-ref ref="STDOUT"/> |
| <appender-ref ref="FILE"/> |
| </root> |
| |
| </configuration> |
使用
| 当在_Mapper.xml文件、测试文件中不需要使用pojo时,则无需创建pojo |
| |
| 例如 |
| <insert id="insertCar" > |
| INSERT INTO `t_car` (`id`, `car_num`, `brand`, `guide_price`, `produce_time`, `car_type`) |
| VALUES (null, '6666', '丰田霸道2', 32.00, '2020-11-11', '燃油车'); |
| </insert> |
| SqlSession sqlSession = SqlSessionUtil.openSqlSession(); |
| int insertCar = sqlSession.insert("insertCar"); |
| System.out.println(insertCar); |
| sqlSession.commit(); |
| sqlSession.close(); |
| |
| 例如: |
| <delete id="deleteByID" > |
| delete from t_car where id = #{id} |
| </delete> |
| |
| |
| SqlSession sqlSession = SqlSessionUtil.openSqlSession(); |
| sqlSession.delete("deleteByID",177); |
| sqlSession.commit(); |
| sqlSession.commit(); |
| |
| ㊟: |
| 对于查询是一定需要pojo的, |
| 并在_Mapper.xml 指定resultType |
| <select id="selectById" resultType="com.nfjh.pojo.Car"> |
| select * from t_car where id=#{id} |
| </select> |
| |
| 因为Mybatis需要对查询结果集进行封装 |
| |
工具类
| 1、构造方法私有化[防止new对象] |
| 2、所有的方法静态,通过类名直接调用 |
| |
| import org.apache.ibatis.io.Resources; |
| import org.apache.ibatis.session.SqlSession; |
| import org.apache.ibatis.session.SqlSessionFactory; |
| import org.apache.ibatis.session.SqlSessionFactoryBuilder; |
| |
| import java.io.IOException; |
| import java.io.InputStream; |
| |
| public class SqlSessionUtil { |
| |
| static SqlSessionFactory build ; |
| private SqlSessionUtil(){} |
| |
| |
| |
| static{ |
| InputStream resourceAsStream = null; |
| try { |
| resourceAsStream = Resources.getResourceAsStream("mybatis-config.xml"); |
| build = new SqlSessionFactoryBuilder().build(resourceAsStream); |
| |
| } catch (IOException e) { |
| e.printStackTrace(); |
| } |
| |
| } |
| |
| public static SqlSession openSqlSession(){ |
| return build.openSession(); |
| } |
| } |
| |
#{} 与 ${}
| |
| (8种基本(封装)+String) |
| 自定义类型,内容必须是属性名,且区分大小写 |
| |
| ${} 使用模糊查询时使用 |
namespace
| 在同一个项目文件中,存在多个_Mapper.xml文件 |
| 且_Mapper.xml文件中存在相同的id |
| 则在java程序中使用时就不能直接使用id |
| 即例如: |
| sqlSession.selectOne("selectById", 178);是错误的 |
| 需要使用namespace.id |
| Object selectById = sqlSession.selectOne("ghy.selectById", 178); |
| |
| 或者将重复的id中的其中一个重命名即可 |
| |
| namespace的存在是为了防止多个_Mapper.xml 中 id重复 |
核心配置文件解析
标签解读
environment
| 一个 <environment> 环境标签对应一个SqlSessionFactory对象 |
| 一个数据库对应一个SqlSessionFactory对象 |
| |
| <environments default="development"> |
| 默认使用的环境: |
| 使用mybatis创建SqlSessionFactory对象时,没有指定环境的话默认使用的环境 |
| |
| 指定环境的写法,例如指定环境为du_mybatis |
| SqlSessionFactory build = new SqlSessionFactoryBuilder().build(resourceAsStream,"du_mybatis"); |
transactionManage事务管理器
| JDBC : 使用原生的JDBC管理事务 |
| MANAGED : Mybatis不管了,交给容器管理 |
| ㊟:但是在mybatis中没有容器,所以只能使用JDBC |
| 不区分大小写 jdbc managed |
| |
| 在mybatis中提供了一个事务管理器接口:Transaction |
| 该接口下有两个实现类: |
| JdbcTransaction |
| ManagedTransaction |
| 如果type="JDBC",那么底层会实例化JdbcTransaction对象。 |
| 如果type="MANAGED",那么底层会实例化ManagedTransaction |
dataSource 数据源
| 为程序提供Connection对象,为程序提供Connection对象的都是数据源 |
| |
| 数据源其实是一套规范,JDK中有这套规范:javax.sql.DataSource |
| (这个数据源的规范,这套接口实际上是JDK规定的。) |
| |
| 我们自己也可以编写数据源组件,只要实现javax.sql.DataSource接口就行了。 |
| 实现接口当中所有的方法。这样就有了自己的数据源。 |
| |
| type属性用来指定数据源的类型,就是指定具体使用什么方式来获取Connection对象: |
| type属性有三个值:必须是三选一。[unpooled | pooled | jndi] |
| UNPOOLED:不使用数据库连接池技术。每一次请求过来之后,都是创建新的Connection对象。 |
| POOLED:使用mybatis自己实现的数据库连接池。 |
| JNDI:集成其它第三方的数据库连接池。 |
| |
| JNDI是一套规范。谁实现了这套规范呢?大部分的web容器都实现了JNDI规范: |
| 例如:Tomcat、Jetty、WebLogic、WebSphere,这些服务器(容器)都实现了JNDI规范。 |
| JNDI是:java命名目录接口。Tomcat服务器实现了这个规范。 |
| |
| POOLED 的具体配置 |
| |
| <property name="poolMaximumActiveConnections" value="10"/> |
| |
| |
| <property name="poolTimeToWait" value="2000"/> |
| |
| |
| <property name="poolMaximumCheckoutTime" value="10000"/> |
| |
| |
| <property name="poolMaximumIdleConnections" value="5"/> |
| 假设最多的连接数量是:10个。 |
| 最多空闲的数量是:5个。 |
| 假设目前已经空闲5个了。马上第6个要空闲了。 |
| 假设第6个空闲下来了。此时连接池为了保证最多空闲的数量5个,会真正关闭多余的空闲的连接对象。 |
properties
| |
| <properties> |
| |
| <property name="属性名" value="属性值"/> |
| <property name="jdbc.driver" value="com.mysql.cj.jdbc.Driver"/> |
| <property name="jdbc.url" value="jdbc:mysql://localhost:3306/powernode"/> |
| <property name="jdbc.username" value="root"/> |
| <property name="jdbc.password" value="root"/> |
| </properties> |
| |
| |
| <properties resource="jdbc.properties" /> |
| |
| |
| |
手搓Mybatis框架
dom4j 解析xml文件
在WEB中应用Mybatis(MVC架构)
项目结构
| 1、新建项目 maven-archetype-webapp |
| 2、补充结构 |
| src |
| main |
| java |
| web |
| service |
| dao |
| pojo |
| util |
| resources |
| mybatis-config.xml [关联_Mapper.xml] |
| jdbc.properties |
| _Mapper.xml |
| logback.xml |
| webapp |
| WEB-INF |
| web.xml [需要升级版本] |
| pom.xml |
| |
| 3、补充项目依赖 |
三层架构分析
| dao 数据访问层 |
| impl |
| AccuntDaoImpl.java //负责实现接口中的方法 |
| AccuntDao.java [interface] //抽象方法 |
| |
| ㊟:dao只负责数据访问[CRUD]不掺杂业务 |
| |
| service 业务逻辑层 |
| impl |
| AccountServiceImpl |
| AccountService |
| ㊟:service只负责核心业务处理 |
| 此案例中接收数据访问层的数据, |
| 调用数据访问层的方法,进行转账的操作 |
| 所以此处存在数据访问层的对象,私有 |
| |
| web 界面控制层 |
| AccountServlet |
| 界面控制 |
事务问题
video:
71-解决事务问题_哔哩哔哩_bilibili
| 事务的控制交给“业务逻辑层” |
| |
| |
| 为什么不在数据访问层? |
| Mynote: |
| 在Dao层控制的是单个CRUD |
| 在一个事务中包含不同的CRUD操作, |
| 为了保证事务的原子性[要么都成功要么都失败] |
| 需要这些操作对应同一个Connection |
| |
002-java-try语法糖 · 语雀 (yuque.com)
| |
| |
| try(Connection connection = DBUtil.getConnection()){ |
| |
| connection.setAutoCommit(false); |
| |
| 不同的CRUD,传入Connection对象 |
| Dao.update(conn) |
| ..... |
| |
| connection.commit(); |
| }catch(SQLException e){ |
| |
| |
| } |
| 对于以上代码调用Dao层方法都需要传入Connection对象 |
| 太丑陋!!! |
| |
| - 在执行transfer()中,执行Dao层的update等方法时 |
| transfer与update处于同一个线程中 |
| 改进: 将connection对象绑定到线程中 |
| |
| - 为什么DBUtil close()中要移除connection |
| Tomcat服务器内置了一个线程池。 |
| 线程池中很多线程对象:这些线程对象t1 t2 t3都是提前创建好的。 |
| 也就是说 |
| t1t2 t3存在重复使用的现象。 |
| |
| - 操作 |
| 在DBUtil中添加 |
| private static ThreadLocal<SqlSession> local = new ThreadLocal<>(); |
| 获取sqlSession |
| public static SqlSession openSession(){ |
| SqlSession sqlSession = local.get(); |
| if (sqlSession == null) { |
| sqlSession = sqlSessionFactory.openSession(); |
| |
| local.set(sqlSession); |
| } |
| return sqlSession; |
| } |
| |
| 在close()中关闭 |
| public static void close(SqlSession sqlSession){ |
| if (sqlSession != null) { |
| sqlSession.close(); |
| |
| |
| } |
| } |
三大对象作用域
| SqlSessionFactoryBuilder |
| 这个类可以被实例化、使用和丢弃,一旦创建了 SqlSessionFactory,就不再需要它了。 因此 SqlSessionFactoryBuilder 实例的最佳作用域是方法作用域(也就是局部方法变量) |
| |
| SqlSessionFactory 一旦被创建就应该在应用的运行期间一直存在,没有任何理由丢弃它或重新创建另一个实例。 使用 SqlSessionFactory 的最佳实践是在应用运行期间不要重复创建多次,多次重建 SqlSessionFactory 被视为一种代码“坏习惯”。因此 SqlSessionFactory 的最佳作用域是应用作用域。 有很多方法可以做到,最简单的就是使用单例模式或者静态单例模式 |
| |
| SqlSession |
| 每个线程都应该有它自己的 SqlSession 实例。SqlSession 的实例不是线程安全的,因此是不能被共享的,所以它的最佳的作用域是请求或方法作用域。 绝对不能将 SqlSession 实例的引用放在一个类的静态域,甚至一个类的实例变量也不行。 也绝不能将 SqlSession 实例的引用放在任何类型的托管作用域中,比如 Servlet 框架中的 HttpSession。 如果你现在正在使用一种 Web 框架,考虑将 SqlSession 放在一个和 HTTP 请求相似的作用域中。 换句话说,每次收到 HTTP 请求,就可以打开一个 SqlSession,返回一个响应后,就关闭它。 这个关闭操作很重要,为了确保每次都能执行关闭操作,你应该把这个关闭操作放到 finally 块中。 下面的示例就是一个确保 SqlSession 关闭的标准模式: |
| try (SqlSession session = sqlSessionFactory.openSession()) { |
| |
| } |
动态生成实现类源码解析
为什么需要javassist
| 查看项目Dao层实现类(以下代码)发现 |
| 此类中的代码规律性强,考虑使用工具动态生成 |
| 即javassist |
| |
| package com.nfjh.bank.dao.impl; |
| import com.nfjh.bank.dao.AccountDao; |
| import com.nfjh.bank.pojo.Account; |
| import com.nfjh.bank.utils.SqlSessionUtil; |
| import org.apache.ibatis.session.SqlSession; |
| |
| public class AccuntDaoImpl implements AccountDao { |
| @Override |
| public Account selectByActno(String actno) { |
| |
| SqlSession sqlSession = SqlSessionUtil.openSession(); |
| Account account = (Account ) sqlSession.selectOne("accuntspace.selectByActno", actno); |
| |
| |
| |
| return account; |
| } |
| |
| @Override |
| public int updateByActno(Account act) { |
| SqlSession sqlSession = SqlSessionUtil.openSession(); |
| int count = sqlSession.update("accuntspace.updateByActno",act); |
| sqlSession.commit(); |
| |
| return count; |
| } |
| } |
| |
| |
| |
javassist的使用
| import javassist.ClassPool; |
| import javassist.CtClass; |
| import javassist.CtMethod; |
| import javassist.Modifier; |
| |
| import java.lang.reflect.Method; |
| |
| public class JavassistTest { |
| public static void main(String[] args) throws Exception { |
| |
| ClassPool pool = ClassPool.getDefault(); |
| |
| CtClass ctClass = pool.makeClass("com.powernode.javassist.Test"); |
| |
| |
| CtMethod ctMethod = new CtMethod(CtClass.voidType, "execute", new CtClass[]{}, ctClass); |
| |
| ctMethod.setModifiers(Modifier.PUBLIC); |
| |
| ctMethod.setBody("{System.out.println(\"hello world\");}"); |
| |
| ctClass.addMethod(ctMethod); |
| |
| Class<?> aClass = ctClass.toClass(); |
| Object o = aClass.newInstance(); |
| Method method = aClass.getDeclaredMethod("execute"); |
| method.invoke(o); |
| } |
| } |
| |
㊟:
对于高版本的JDK运行时可能会出现问题
需要添加两个参数
| --add-opens java.base/java.lang=ALL-UNNAMED |
| --add-opens java.base/sun.net.util=ALL-UNNAMED |
添加位置

含接口类的创建
| 接口 |
| package com.nfjh; |
| |
| public interface DaoInterface { |
| int insert(String actno); |
| void delete(); |
| int update(String actno,Double balance); |
| String selectByactno(String actno); |
| } |
| |
| |
| |
| 利用javassist创建DaoInterface的 实现类DaoImpl并调用其中的insert方法 |
| @Test |
| public void testGenerateDaoImpl()throws Exception{ |
| |
| ClassPool pool = ClassPool.getDefault(); |
| |
| CtClass ctClass = pool.makeClass("com.nfjh.DaoImpl"); |
| |
| CtClass ctInterface = pool.makeClass("com.nfjh.DaoInterface"); |
| |
| ctClass.addInterface(ctInterface); |
| |
| MethodImpl(ctClass); |
| |
| Class<?> clazz = ctClass.toClass(); |
| |
| DaoInterface di = (DaoInterface) clazz.newInstance(); |
| |
| int act111插入 = di.insert("act111插入"); |
| |
| } |
| |
| public void MethodImpl(CtClass ctClass) throws Exception{ |
| |
| Method[] methods = DaoInterface.class.getDeclaredMethods(); |
| Arrays.stream(methods).forEach(method -> { |
| try{ |
| StringBuilder methodCode = new StringBuilder(); |
| |
| methodCode.append("public "); |
| |
| String typeName = method.getReturnType().getName(); |
| methodCode.append(typeName + " "); |
| |
| String name = method.getName(); |
| methodCode.append(name + "("); |
| |
| Class<?>[] parameterTypes = method.getParameterTypes(); |
| for (int i = 0;i<parameterTypes.length;i++){ |
| methodCode.append(parameterTypes[i].getSimpleName() + " args" + i); |
| if (i!=parameterTypes.length-1) { |
| methodCode.append(","); |
| } |
| } |
| |
| methodCode.append("){"); |
| |
| methodCode.append("System.out.println(\"methodBody Excute!\");"); |
| |
| String returnType = method.getReturnType().getSimpleName(); |
| if (!returnType.equals("void")) { |
| |
| if (returnType.equals("int")) { |
| methodCode.append("return 0;"); |
| }else if (returnType.equals("String")){ |
| methodCode.append("return \"hello world!\";"); |
| } |
| } |
| |
| |
| methodCode.append("}"); |
| System.out.println(methodCode.toString()); |
| |
| CtMethod ctMethod = CtMethod.make(methodCode.toString(), ctClass); |
| |
| ctClass.addMethod(ctMethod); |
| }catch(Exception e){ |
| e.printStackTrace(); |
| } |
| }); |
| } |
| public int update(String args0,Double args1){System.out.println("methodBody Excute!");return 0;} |
| public int insert(String args0){System.out.println("methodBody Excute!");return 0;} |
| public void delete(){System.out.println("methodBody Excute!");} |
| public java.lang.String selectByactno(String args0){System.out.println("methodBody Excute!");return "hello world!";} |
| methodBody Excute! |
“工具类”动态生成实现类
| package com.nfjh.bank.utils; |
| |
| |
| |
| |
| |
| |
| import org.apache.ibatis.javassist.ClassPool; |
| import org.apache.ibatis.javassist.CtClass; |
| import org.apache.ibatis.javassist.CtMethod; |
| import org.apache.ibatis.mapping.SqlCommandType; |
| import org.apache.ibatis.session.SqlSession; |
| |
| import java.lang.reflect.Method; |
| import java.util.Arrays; |
| |
| public class MyGenerateDaoProxy { |
| private static String utilName; |
| private static SqlSession sqlSession; |
| private static Class daoInterface ; |
| |
| private MyGenerateDaoProxy(){} |
| |
| |
| |
| |
| |
| |
| |
| public static Object generate(SqlSession sqlS, Class di,String un){ |
| sqlSession = sqlS; |
| daoInterface = di; |
| utilName = un; |
| |
| |
| ClassPool pool = ClassPool.getDefault(); |
| |
| CtClass ctClass = pool.makeClass(daoInterface.getName() + "Proxy"); |
| |
| CtClass ctInterface = pool.makeClass(daoInterface.getName()); |
| |
| ctClass.addInterface(ctInterface); |
| |
| Object obj = null; |
| try{ |
| |
| MethodImpl(ctClass,ctInterface); |
| |
| Class<?> clazz = ctClass.toClass(); |
| |
| |
| obj = clazz.newInstance(); |
| |
| |
| |
| |
| }catch(Exception e){ |
| e.printStackTrace(); |
| } |
| return obj; |
| |
| |
| } |
| |
| public static void MethodImpl(CtClass ctClass, CtClass ctInterface) throws Exception{ |
| Method[] methods = daoInterface.getDeclaredMethods(); |
| Arrays.stream(methods).forEach(method -> { |
| try{ |
| StringBuilder methodCode = new StringBuilder(); |
| |
| methodCode.append("public "); |
| |
| String typeName = method.getReturnType().getName(); |
| methodCode.append(typeName + " "); |
| |
| String name = method.getName(); |
| methodCode.append(name + "("); |
| |
| Class<?>[] parameterTypes = method.getParameterTypes(); |
| for (int i = 0;i<parameterTypes.length;i++){ |
| methodCode.append(parameterTypes[i].getName() + " arg" + i); |
| if (i!=parameterTypes.length-1) { |
| methodCode.append(","); |
| } |
| } |
| |
| methodCode.append("){"); |
| |
| |
| String methodBody = getMethodBody(method); |
| methodCode.append(methodBody); |
| |
| |
| methodCode.append("}"); |
| System.out.println("->" +methodCode.toString()); |
| |
| CtMethod ctMethod = CtMethod.make(methodCode.toString(), ctClass); |
| |
| ctClass.addMethod(ctMethod); |
| }catch(Exception e){ |
| e.printStackTrace(); |
| } |
| }); |
| } |
| |
| public static String getMethodBody(Method method){ |
| |
| |
| |
| |
| |
| |
| |
| |
| |
| |
| StringBuilder body = new StringBuilder(); |
| body.append("org.apache.ibatis.session.SqlSession sqlSession = "+utilName+".openSession();"); |
| |
| String sqlId = daoInterface.getName() +"." + method.getName(); |
| |
| SqlCommandType sqlCommandType = sqlSession.getConfiguration().getMappedStatement(sqlId).getSqlCommandType(); |
| |
| if (sqlCommandType == SqlCommandType.INSERT) { |
| |
| } if (sqlCommandType == SqlCommandType.DELETE) { |
| |
| } if (sqlCommandType == SqlCommandType.UPDATE) { |
| body.append("return sqlSession.update(\""+sqlId+"\",arg0);"); |
| } |
| if (sqlCommandType == SqlCommandType.SELECT) { |
| String returnType = method.getReturnType().getName(); |
| body.append("return ("+returnType+")sqlSession.selectOne(\""+sqlId+"\", arg0);"); |
| } |
| return body.toString(); |
| } |
| } |
| 工具类的使用 |
| 在业务逻辑层的代码中使用即可: |
| private AccountDao actDao = (AccountDao) MyGenerateDaoProxy.generate( |
| SqlSessionUtil.openSession(), |
| AccountDao.class, |
| "com.nfjh.bank.utils.SqlSessionUtil" |
| ); |
| |
好消息是Mybatis已经写好了工具,我们们只需要使用即可
| 以上的代码可以这样替换 |
| private AccountDao actDao = SqlSessionUtil.openSession().getMapper(AccountDao.class); |
注意!!!
在_Mapper.xml文件中 namespace一定是接口的全限定类名,不要乱写
以上我们写的工具类本质上就是一个代理机制
参数
单个参数
单个参数
| <select id="接口方法名" resultType="返回值类型" parameterType="形参类型"> |
| </select> |
| parameterType 告诉mybatis 框架 |
| 此方法的参数类型是什么 mybatis的框架自带 |
| 类型推断机制 多以大多数情况下parameterType省略不写 |
| 当参数个数大于1时,parameterType也可以不写 |
| 此时的写法看笔记的 参数->多参数 |
| |
| 那些可以自动推断? |
| 简单类型 |
| 8种基本(封装) |
| String |
| java.util.Date |
| java.sql.Date |
| |
Mybatis自带的类型别名 可以查看
mybatis – MyBatis 3 | 配置
当入参个数为1个时,SQL语句中#{}的内容可以用任意内容进行占位,不会报错
| <select id="" resultType="" parameterType="java.util.Long"> |
| 别名基本上满足一下规律: |
| 1、基本数据类型前面加上下划线"_" |
| 例如 int → _int |
| |
| 2、包装类首字母小写 |
| Integer → int/integer |
| Doiuble → double |
| |
| 3、全部小写 |
| Object → object |
| BigDecimal → bigdecimal |
| BigInteger → biginteger |
| Map → map |
| HashMap → hashmap |
| List → list |
| ArrayList → arraylist |
| Collection → collection |
| Iterator → iterator |
| |
Map 集合
| _Mapper接口 |
| int insertStudentByMap(Map<String,Object> map); |
| |
| _Mapper.xml |
| <insert id="insertStudentByMap" parameterType="map"> |
| insert into t_student |
| values(#{ID},#{姓名},#{年龄},#{身高},#{生日},#{性别}); |
| </insert> |
| ㊟:在#{}中填写的是map集合的键(Key) |
| |
| testjava |
| SqlSession sql = SqlSessionUtil.openSession(); |
| StudentMapper mapper = sql.getMapper(StudentMapper.class); |
| Map<String ,Object> map = new HashMap<>(); |
| map.put("ID",7L); |
| map.put("姓名",""); |
| map.put("年龄",22L); |
| map.put("身高",1.86D); |
| map.put("生日",new Date()); |
| map.put("性别",'男'); |
| mapper.insertStudentByMap(map); |
| sql.commit(); |
| SqlSessionUtil.close(sql); |
| |
| |
当参数为实体类时,#{}中填写的属性名
记住这个就行了!
多参数
| 当参数为多个时,不能!!!直接使用pojo类的属性名 |
| |
| 当参数个数为多个时 |
| Mybatis会自动创建一个Map集合 |
| 并且会以在这种方式存储参数 |
| |
| 方式1: |
| 例如: |
| List<Student> selectStudent(String name,Character sex); |
| 底层实现: |
| map.put("arg0",name); |
| map.put("arg1",sex); |
| |
| map.put("param1",name); |
| map.put("param2",sex); |
| |
| ㊟:以上4条put语句都会执行!! |
| 也就是说在#{}中使用时填写arg0/param1效果相同 |
| arg → 从0开始 |
| param → 从1开始 |
| 这两种方式可以混着用,#{arg0},#{param2} |
| 但我认为没必要 |
| |
| 对于低版本的Mybatis直接使用#{0} 表示第一个参数 |
| 现在不用了!!! |
| |
| |
| 方式2: |
| 对于以上方式,即直接使用arg0/param1的方式 |
| 可读性较差,可以使用注解式开发 |
| 在属性名的前面添加 @Param("") |
| 例如: |
| List<Student> selectStudent( |
| @Param("pname") String name, |
| @Param("psex") Character sex); |
| |
| 观看以上写法,想说明的是@Param的内容可以不是属性名 |
| 在Mapper.xml中#{}填写的以@Param中内容为准 |
| |
| ㊟:当时用注解式开发后,arg0的参数方式失效 |
| 但param1的方式仍然有效 |
| |

代理模式
代理工厂
代理对象 中介[代理类]
代理方法 找房子
目标对象 房子
目标方法 找房子
用户 我
代码
| |
| sql = SqlSessionUtil.openSession(); |
| |
| StudentMapper mapper = sql.getMapper(StudentMapper.class); |
| |
| List<Student> students = mapper.selectById(1L); |
关系对照
| 找房子的我 -> 中介所 -> 有找房能力的中介人 -> 中介人找到了房子 |
| |
| UserMapper -> 工厂 -> mapper代理对象 -> 代理对象实现了代理方法 |
分析:
| 代理与我有相同的目标,但是代理对象可以作出更多的操作 |
| |
| 中介所[代理工厂]本身直接无能力代理,但可以造出有代理能力的代理对象 |
| |
| 代理对象 有能力代理,不需要知道需要代理的“目标[抽象方法]”,会由知道“目标”的工厂告诉他 |
代理对象可以不会代理方法 但一定要能够与代理目标建立联系
因此这个方法可以由代理对象实现,也可以由代理目标实现,
Mybatis 查询语句专题
比较简单,直接看PDF文档
文档
动态SQL
if
| 1. if标签中test属性是必须的。 |
| 2. if标签中test属性的值是false或者true。 |
| 3. 如果test是true,则if标签中的sql语句就会拼接。反之,则不会拼接。 |
| 4. test属性中可以使用的是: |
| 当使用了@Param注解,那么test中要出现的是@Param注解指定的参数名。@Param("brand"),那么这里只能使用brand 当没有使用@Param注解,那么test中要出现的是:param1 param2 param3 arg0 arg1 arg2.... 当使用了POJO,那么test中出现的是POJO类的属性名。 |
| List<Car> selectByMultiConditionWithWhere |
| (@Param("brand") String brand, |
| @Param("guidePrice") Double guidePrice, |
| @Param("carType") String carType); |
| 5. 在mybatis的动态SQL当中,不能使用&&,只能使用and。 |
| |
| |
| <select id="selectByMultiCondition" resultType="car"> |
| select * from t_car |
| where 1=1 |
| |
| |
| |
| <if test="brand!=null and brand !=''"> |
| |
| and brand like "%"#{brand}"%" </if> |
| </select> |
| |
| |
where
| 上面写的where语句不够智能,需要手动的添加 |
| where 1=1 才能够使语法正常 |
| |
| 如果使用where标签 |
| 当所有test内的判断条件都为FALSE时 where标签不会生成where子句 |
| 并且会自动去除某些条件"前面"多余的and 或 or |
| 配合if标签使用 |
| |
| <select id="selectByMultiConditionWithWhere"> |
| select * from t_car |
| <where> |
| <if test="brand!=null and brand !=''"> |
| /*添加筛选条件*/ |
| and brand like "%"#{brand}"%" </if> |
| <if test="guidePrice != null and guidePrice != ''"> |
| and guide_price > #{guidePrice} |
| </if> |
| <if test="carType != null and carType != ''"> |
| and car_type = #{carType} |
| </if> |
| </where> |
| </select> |
| |
| ㊟:上面说的是where标签会自动去除 SQL语句中前面的and |
| 也就是说如果SQL语句中的and放在了后面就不会自动去除了 |
| 例如 |
| |
| <if test="carType != null and carType != ''"> |
| car_type = #{carType} and |
| </if> |
| 这样写就在此语句test为最后一个TRUE时将会出现错误 |
| 英雌不要这么写 |
trim标签
| trim标签的属性: |
| prefix:在trim标签中的语句前添加内容 |
| suffix:在trim标签中的语句后添加内容 |
| prefixOverrides:(去掉) 前缀覆盖掉 |
| suffixOverrides:(去掉) 后缀覆盖掉 |
| |
| |
| prefixOverrides和suffixOverrides |
| 会自动根据下几条或上ji条语句的test的值进行 |
| 智能去除 |
| |
| 例如对于下面的案例 |
| suffixOverrides="and|or" |
| 当第一个条件成立 第2、3个条件不成立 |
| 会去除第一个if中SQL语句的 and |
| |
| 当第一个条件不成立 第2成立 3个条件不成立 |
| 会去除第二个if中SQL语句的 and |
| |
| <select id="selectByMultiConditionWithWhere" resultType="car"> |
| select * from t_car |
| <trim prefix="where" suffixOverrides="and|or"> |
| <if test="brand!=null and brand !=''"> |
| /*添加筛选条件*/ |
| brand like "%"#{brand}"%" and |
| </if> |
| <if test="guidePrice != null and guidePrice != ''"> |
| guide_price > #{guidePrice} and |
| </if> |
| <if test="carType != null and carType != ''"> |
| car_type = #{carType} and |
| </if> |
| </trim> |
| </select> |
| |
| |
| List<Car> cars = mapper.selectByMultiConditionWithWhere(null, 2.0, ""); |
| |
| |
| [main] DEBUG c.p.m.m.CarMapper.selectByMultiConditionWithWhere - ==> Preparing: select * from t_car where guide_price > ? |
| |
| |
| |
set标签
| 主要使⽤在update语句当中,⽤来⽣成set关键字,同时去掉最后多余的“,” |
| |
| ⽐如我们只更新提交的不为空的字段,如果提交的数据是空或者"",那么这个字段我们将不更新 |
| |
| |
| <update id="updateBySet"> |
| update t_car |
| <set> |
| <if test="carNum != null and carNum != ''">car_num = #{carNum},</if> |
| <if test="brand != null and brand != ''">brand = #{brand},</if> |
| |
| |
| |
| |
| guide_price = #{guidePrice}, |
| <if test="produceTime != null and produceTime != ''">produce_time = #{produceTime},</if> |
| <if test="carType != null and carType != ''">car_type = #{carType},</if> |
| </set> |
| where |
| id = #{id} </update> |
choose when otherwise
| <choose> |
| <when></when> |
| <when></when> |
| <when></when> |
| <otherwise></otherwise> |
| </choose> |
| |
| ㊟:以上标签中的分支只会执行一个, |
| 也必须执行一个,即条件都不满足也至少会执行一个 |
| 也就是otherwise中的内容 |
| |
| 这三个标签同时使用 |
| 等同于 |
| if(){ } |
| else if(){ } |
| else if(){ } |
| else if(){ } |
| else{ } |
| |
| List<Car> selectWithChoose(@Param("brand") String brand, @Param("guidePrice") Double guidePrice, @Param("produceTime") String produceTime); |
| <select id="selectWithChoose" resultType="car"> |
| select * from t_car |
| <where> |
| <choose> |
| <when test="brand != null and brand != ''"> |
| brand like #{brand}"%" |
| </when> |
| <when test="guidePrice != null and guidePrice != ''"> |
| guide_price >= #{guidePrice} |
| </when> |
| <otherwise> |
| produce_time >= #{produceTime} |
| </otherwise> |
| </choose> |
| </where> |
| </select> |
高级映射
主表与副表的区分
怎么分主表和副表。
原则:谁在前谁是主表。
多对一:多在前,那么多就是主表。
一对多:一在前,那么一就是主表。
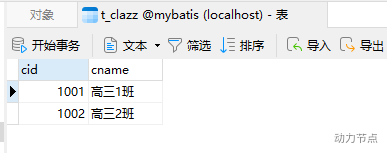
例如在研究多对一时,主表是t_student
[数据库中改名字了t_stu]
又例如
客户和订单就是典型的一对多关联关系.
一个客户名下可以有多个订单.
客户表是一方,订单表是多方.客户一中持有订单的"集合".
订单和客户就是多对一关联.
站在订单的方向查询订单的同时将客户信息查出.
订单是多方,会持有一方的对象.客户是"一方".
多对一

多对一[级联属性映射]
级联属性映射 使用一条SQL语句
| Question: 根据学生的学号查找学生信息,包括班级信息 |
| [StudentMapper.java] |
| Student selectByStudentId(Integer id); |
| |
| [StudentMapper.xml] |
| |
| |
| |
| |
| |
| |
| |
| |
| |
| |
| <resultMap id="student_adv" type="Student"> |
| |
| <id property="sid" column="sid"/> |
| |
| <result property="sname" column="sname"/> |
| <result property="clazz.cid" column="cid"/> |
| <result property="clazz.cname" column="cname"/> |
| </resultMap> |
| |
| |
| |
| |
| |
| |
| |
| |
| <select id="selectByStudentId" resultMap="student_adv" parameterType="int"> |
| select sid ,sname,s.cid,c.cname |
| from t_stu s left join t_clazz c |
| on s.cid = c.cid |
| where sid = #{sdsds} |
| </select> |
多对一[association映射]
association映射使用一条SQL语句
| Question: 根据学生的学号查找学生信息,包括班级信息 |
| |
| [StudentMapper.java] |
| // 使用association关联映射 |
| Student selectByStudentIdAssociation(Integer id); |
| |
| [StudentMapper.xml] |
| |
| <resultMap id="student_adv_association" type="student"> |
| |
| <id property="sid" column="sid"/> |
| |
| <result property="sname" column="sname"/> |
| |
| |
| |
| |
| |
| <association property="clazz" javaType="Clazz"> |
| <id property="cid" column="cid"/> |
| <result property="cname" column="cname"/> |
| </association> |
| </resultMap> |
| |
| |
| <select id="selectByStudentIdAssociation" resultMap="student_adv_association" parameterType="int"> |
| select sid ,sname,s.cid,c.cname |
| from t_stu s left join t_clazz c |
| on s.cid = c.cid |
| where sid = #{sdsds} |
| </select> |
多对一[分步查询]
分步查询使用两条SQL语句,可复用,支持懒加载
| Question: 根据学生的学号查找学生信息,包括班级信息 |
| |
| 使用两条SQL语句: |
| 通过id,查询Student的信息,可以拿到他的cid → 在StudentMapper中写抽象方法 |
| 通过cid 可以获取他的班级信息 → 在ClazzMapper中写抽象方法 |
| |
| |
| ---------Step1--------------- |
| [StudentMapper.java] |
| //通过学生ID查询学生信息 |
| Student selectByStudentStep1(Integer id); |
| |
| |
| |
| |
| [StudentMapper.xml] |
| <resultMap id="resultMapStep1" type="Student"> |
| |
| <id property="sid" column="sid"/> |
| |
| <result property="sname" column="sname"/> |
| |
| |
| |
| |
| |
| |
| <association |
| property="clazz" |
| column="cid" |
| select="com.ts.mapper.ClazzMapper.selectByClazzStep2"/> |
| </resultMap> |
| |
| <select id="selectByStudentStep1" resultMap="resultMapStep1"> |
| select sid,sname,cid |
| from t_stu |
| where sid =#{sid} |
| </select> |
| |
| ---------Step2--------------- |
| [ClazzMapper.java] |
| Clazz selectByClazzStep2(Integer cid); |
| |
| [ClazzMapper.xml] |
| |
| |
| |
| <select id="selectByClazzStep2" resultType="Clazz"> |
| select cid,cname |
| from t_clazz |
| where cid = #{cid} |
| </select> |
| |
| |
| |
| 分步查询的优点: |
| 第一:复用性增强。可以重复利用。(大步拆成N多个小碎步。每一个小碎步更加可以重复利用。) |
| 第二:采用这种分步查询,可以充分利用他们的延迟加载/懒加载机制。 |
| 什么是延迟加载(懒加载),有什么用? |
| 延迟加载的核心原理是:用的时候再执行查询语句。不用的时候不查询。 |
| 作用:提高性能。尽可能的不查,或者说尽可能的少查。来提高效率。 |
| 在mybatis当中怎么开启延迟加载呢? |
| association标签中添加fetchType="lazy" |
| 注意:默认情况下是没有开启延迟加载的。需要设置:fetchType="lazy" |
| 这种在association标签中配置fetchType="lazy",是局部的设置,只对当前的association关联的sql语句起作用。 |
| |
| 在实际的开发中,大部分都是需要使用延迟加载的,所以建议开启全部的延迟加载机制: |
| 在mybatis核心配置文件中添加全局配置: |
| <settings> |
| <!--懒加载--> |
| <setting name="lazyLoadingEnabled" value="true"/> |
| </settings> |
| |
| 实际开发中的模式: |
| 把全局的延迟加载打开。 |
| 如果某一步不需要使用延迟加载,请设置:fetchType="eager" |
| |
| |
| SqlSession sqlSession = SqlSessionUtil.openSession(); |
| StudentMapper mapper = sqlSession.getMapper(StudentMapper.class); |
| Student student = mapper.selectByStudentStep1(1); |
| System.out.println(student.getSname()); |
| sqlSession.close(); |
| |
| |
| |
| |
| |
| |
| |
| |
| |
| |
一对多

一对多[collection]
| [ClazzMapper.java] |
| //根据班级CID查询班内学生 |
| Clazz selectByCollection(Integer cid); |
| |
| [ClazzMapper.xml] |
| |
| |
| |
| |
| |
| |
| <resultMap id="resultMapCollection" type="clazz"> |
| <id property="cid" column="cid"/> |
| <result property="cname" column="cname"/> |
| <collection property="stus" ofType="student"> |
| <id property="sid" column="sid"/> |
| <result property="sname" column="sname"/> |
| </collection> |
| </resultMap> |
| |
| <select id="selectByCollection" resultMap="resultMapCollection"> |
| select c.cid,c.cname ,s.sid,s.sname |
| from t_clazz c left join t_stu s on c.cid = s.cid |
| where c.cid = #{cid} |
| </select> |
| |
| [Test.java] |
| SqlSession sqlSession = SqlSessionUtil.openSession(); |
| ClazzMapper mapper = sqlSession.getMapper(ClazzMapper.class); |
| Clazz clazz = mapper.selectByCollection(1000); |
| System.out.println(clazz); |
| sqlSession.close(); |
| |
| 控制台信息: |
| Clazz{cid=1000, cname='高三一班', stus=[Student{sid=1, sname='张三', clazz=null}, Student{sid=2, sname='李四', clazz=null}, Student{sid=3, sname='王五', clazz=null}]} |
| |
| ㊟:以上信息中的"clazz=null"是正确的 |
| clazz是不能够有值的,否则就会造成student 找Clazz ,Clazz找Student |
一对多[分步查询]
| [ClazzMapper.java] |
| //一对多分步查询Step1 查询 通过cid 查找班级信息[cid,cname] |
| Clazz selectByStep1(Integer cid); |
| |
| [ClazzMapper.xml] |
| |
| <resultMap id="resultMapStep1" type="clazz"> |
| <id property="cid" column="cid"/> |
| <result property="cname" column="cname"/> |
| <collection property="stus" column="cid" select="com.ts.mapper.StudentMapper.selectStudentStept2"/> |
| |
| </resultMap> |
| <select id="selectByStep1" resultMap="resultMapStep1"> |
| select cid,cname |
| from t_clazz |
| where cid =#{cid} |
| </select> |
| |
| [StudentMapper.java] |
| //根据cid查找学生信息 |
| List<Student> selectStudentStept2(Integer cid); |
| |
| [StudentMapper.xml] |
| |
| <select id="selectStudentStept2" resultType="Student"> |
| select sid,sname |
| from t_stu |
| where cid = #{cid} |
| </select> |
| |
| [Test.java] |
| @Test |
| public void selectStudentSteptTest(){ |
| SqlSession sqlSession = SqlSessionUtil.openSession(); |
| ClazzMapper mapper = sqlSession.getMapper(ClazzMapper.class); |
| Clazz clazz = mapper.selectByStep1(1000); |
| // System.out.println(clazz); |
| System.out.println(clazz.getCname()); |
| sqlSession.close(); |
| |
| } |
| |
| 控制台信息:[支持懒查询] |
| [main] DEBUG com.ts.mapper.ClazzMapper.selectByStep1 - ==> Preparing: select cid,cname from t_clazz where cid =? |
| [main] DEBUG com.ts.mapper.ClazzMapper.selectByStep1 - ==> Parameters: 1000(Integer) |
| [main] DEBUG com.ts.mapper.ClazzMapper.selectByStep1 - <== Total: 1 |
| 高三一班 |
| |
总结
| 总结: |
| 无论是什么关联关系,如果某方持有另一方的集合, 则使用`<collection>`标签完成映射, |
| 如果某方持有另一方的对象,则使用`<association>`标签完成映射。 |
| |
| 以上是在resultMap标签中进行的结果映射 |
| 告诉mybatis 数据库的表与Java类的映射关系 |
| |
Mybatis的缓存

| |
| 缓存的作用:通过减少IO的方式,来提高程序的执行效率。 |
| |
| mybatis的缓存:将select语句的查询结果放到缓存(内存)当中,下一次还是这条select语句的话,直接从缓存中取,不再查数据库。一方面是减少了IO。另一方面不再执行繁琐的查找算法。效率大大提升。 |
| |
| mybatis缓存包括: |
| - 一级缓存:将查询到的数据存储到SqlSession中。 |
| - 二级缓存:将查询到的数据存储到SqlSessionFactory中。 |
| - 或者集成其它第三方的缓存:比如EhCache【Java语言开发的】、Memcache【C语言开发的】等。 |
| |
缓存只针对于DQL语句,也就是说缓存机制只对应select语句
笔记部分直接看老杜的即可
此部分了解会用就行
逆向工程


【推荐】国内首个AI IDE,深度理解中文开发场景,立即下载体验Trae
【推荐】编程新体验,更懂你的AI,立即体验豆包MarsCode编程助手
【推荐】抖音旗下AI助手豆包,你的智能百科全书,全免费不限次数
【推荐】轻量又高性能的 SSH 工具 IShell:AI 加持,快人一步
· DeepSeek 开源周回顾「GitHub 热点速览」
· 物流快递公司核心技术能力-地址解析分单基础技术分享
· .NET 10首个预览版发布:重大改进与新特性概览!
· AI与.NET技术实操系列(二):开始使用ML.NET
· 单线程的Redis速度为什么快?