
19_输入子系统
输入子系统
什么是输入子系统?
输入子系统是Linux专门做的一套框架来处理输入事件的,像鼠标,键盘,触摸屏这些都输入设备。但是这些输入设备的类型又都不是一样的,所以为了统一这些输入设备驱动标准应运而生的。
统一了以后,在节点/dev/input下面则是我们输入设备的节点,如下图所示:

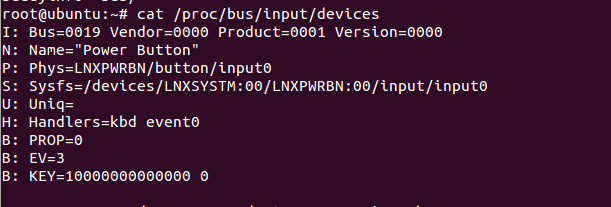
这些节点对应的则是我们当前系统的输入设备,我们要怎么查看当前系统都有哪些输入设备呢?我们可以使用命令来查看:
cat /proc/bus/input/devices
如下图所示:
那么我们要怎么确定哪个设备对应哪个节点呢?这里教大家一个简单的方法,我们可以使用命令hexdump确定,hexdump命令是Linux下查看二进制文本的工具。这里我给大家举一个例子:
比如我想确定键盘对应的是哪个节点,我就可以使用命令:
hexdump /dev/input/event0 或者
hexdump /dev/input/event1 或者
hexdump /dev/input/event1 或者
.....
输入完一条命令以后,我们按键盘的上的按键,如果有数据打印出来,则证明当前我们查看的这个节点是键盘这个设备对应的节点。
比如,我现在在Ubuntu上输入命令:
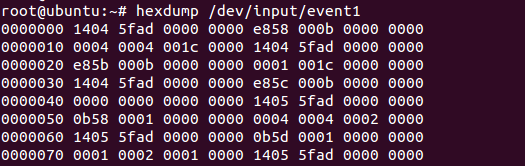
hexdump /dev/input/event1
然后按键盘的按键,这时候有打印信息出现,则证明/dev/input/event1为键盘对应的节点,如下图所示:
那么这些打印的信息都是什么意思呢?
我们上报的数据要按照具体的格式上报给输入子系统的核心层,我们的应用就可以通过设备节点来获得按照具体格式上报来的数据了。
封装数据是输入子系统的核心层来帮我们完成的,我们只需要按照指定的类型和这个类型对应的数据来上报给输入子系统的核心层即可。
那我们要怎么指定类型呢?这个我们就需要先了解一下struct input_event这个结构体,这个结构体在include/uapi/linux/input.h文件中,如下图所示:
struct input_event {
	struct timeval time; //上报事件的时间
	__u16 type; //类型
	__u16 code; //编码
	__s32 value; //值
};
这里我们需要注意的是,当我们的type不同的时候,code和value所代表的意义也是不一样的。
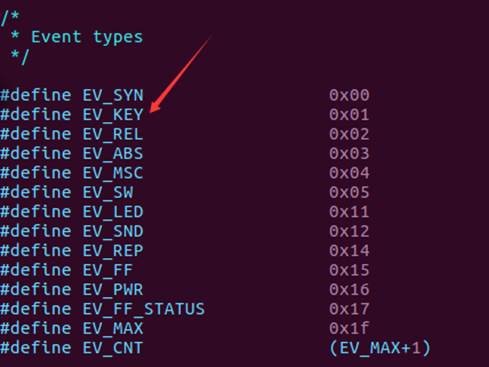
我们可以在这个h文件里面找到tyep的定义,每一个定义都是一个类型,如下图所示:
#define EV_SYN 0x00 /* 同步事件 */
#define EV_KEY 0x01 /* 按键事件 */
#define EV_REL 0x02 /* 相对坐标事件 */
#define EV_ABS 0x03 /* 绝对坐标事件 */
#define EV_MSC 0x04 /* 杂项(其他)事件 */
#define EV_SW 0x05 /* 开关事件 */
#define EV_LED 0x11 /* LED */
#define EV_SND 0x12 /* sound(声音) */
#define EV_REP 0x14 /* 重复事件 */
#define EV_FF 0x15 /* 压力事件 */
#define EV_PWR 0x16 /* 电源事件 */
#define EV_FF_STATUS 0x17 /* 压力状态事件 */
#define BTN_TOUCH 0x14a /* 触摸事件 */
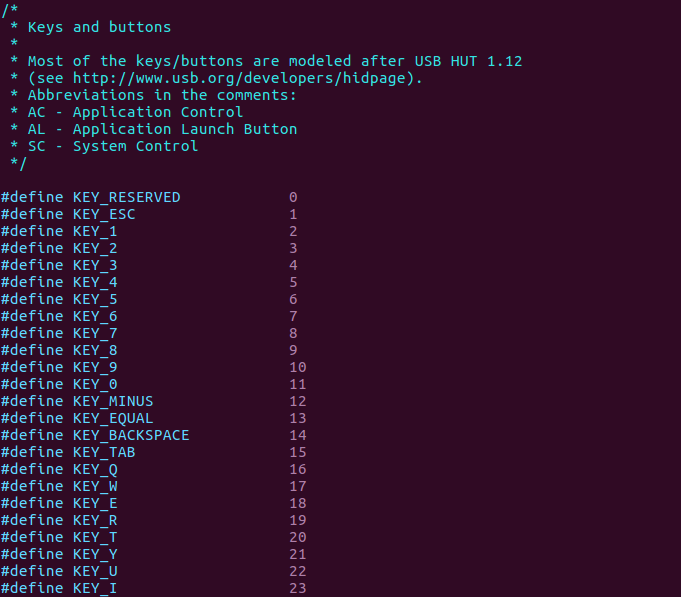
比如当tpye等于EV_KEY的时候,那么code的值就为下面类型中的其中一个。
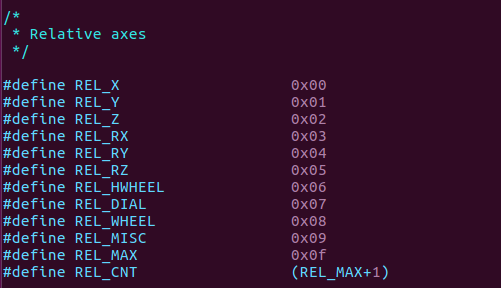
比如当tpye等于EV_REL的时候,那么code的值就为下面类型中的其中一个。
当我们键盘上的按键按下的时候,value如果为1,就代表按下,如果为0,就代表抬起,如果为2,就代码长按。
了解了这些概念以后,我们来看一下这个例子:
当我使用命令 hexdump /dev/input/event1后,按下键盘上的回车按键,打印以下内容:
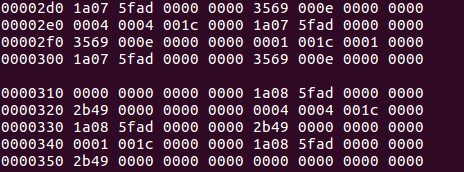
那么在这9条信息里面,只有第3条信息代表的是我们回车按键按下的信息,如下图所示:
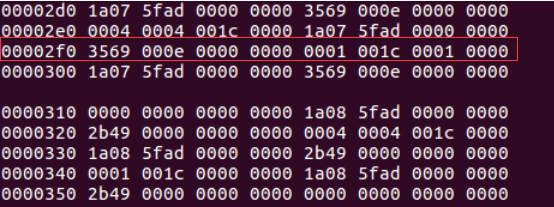
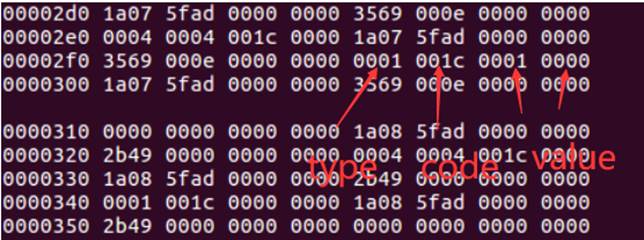
其中0000 0001代表的是value,001c代表的是code,0001代表的是type,如下图所示:
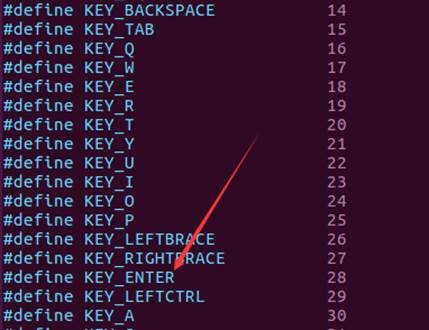
那么tpye等于1,代表的就是按键事件,如下图所示:
code等于1c,我们把它换成10进制,就是28,对应的就是回车按键,如下图所示:
value等于1,代表的就是按下,所以第三条信息代表的是按键按下。那么我们按一下有这么多的打印信息,如果我们只想获得回车按键的打印,我们要怎么做呢?
示例代码
头文件
#include <linux/input.h>
app.c
#include <fcntl.h>
#include <linux/input.h>
#include <stdio.h>
#include <sys/stat.h>
#include <sys/types.h>
#include <unistd.h>
int main(int argc, char *argv[]) {
int fd;
int value;
struct input_event test_event;
fd = open("/dev/input/event1", O_RDWR); // 打开设备节点
if (fd < 0) {
perror("open error \n");
return fd;
}
while (1) {
read(fd, &test_event, sizeof(test_event));
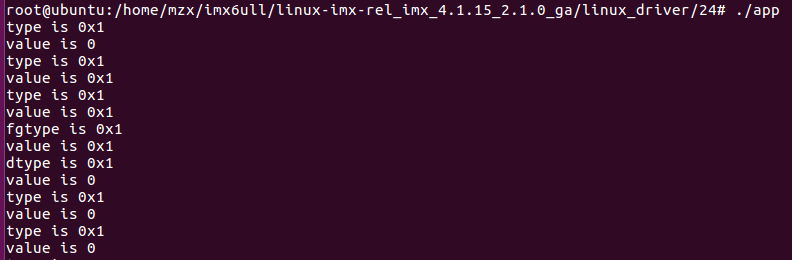
if (test_event.type == EV_KEY) {
printf("type is %#x\n", test_event.type);
printf("value is %#x\n", test_event.value);
}
}
close(fd);
return 0;
}
运行结果
输入子系统API函数
我们可以将开发板上的按键值设置为input.h文件里面的宏定义的任意一个,比如我们本次实验将开发板上的 KEY按键值设置为KEY_0。
在编写input设备驱动的时候我们需要先申请一个input_dev结构体变量
__set_bit
在起始地址为addr的位图中设置第nr位;非原子操作。
static inline void set_bit(unsigned int nr, volatile unsigned long *addr)
input_allocate_device
使用input_allocate_device 函数来申请一个 input_dev。
此函数原型如下所示:
struct input_dev *input_allocate_device(void);
函数参数和返回值含义如下:
参数:无。
返回值: 申请到的 input_dev。
input_free_device
如果要注销的 input 设备的话需要使用 input_free_device 函数来释放掉前面申请到的input_dev,
input_free_device 函数原型如下:
void input_free_device(struct input_dev *dev);
函数参数和返回值含义如下:
dev:需要释放的 input_dev。
返回值: 无。
input_register_device
申请好一个 input_dev 以后就需要初始化这个 input_dev,需要初始化的内容主要为事件类型(evbit)和事件值(keybit)这两种。 input_dev 初始化完成以后就需要向 Linux 内核注册 input_dev了,需要用到 input_register_device 函数,
此函数原型如下:
int input_register_device(struct input_dev *dev);
函数参数和返回值含义如下:
dev:要注册的 input_dev 。
返回值: 0, input_dev 注册成功;负值, input_dev 注册失败。
input_unregister_device
同样的,注销 input 驱动的时候也需要使用 input_unregister_device 函数来注销掉前面注册的 input_dev。
input_unregister_device 函数原型如下:
void input_unregister_device(struct input_dev *dev);
函数参数和返回值含义如下:
dev:要注销的 input_dev 。
返回值: 无。
input_report_key
最终我们需要把事件上报上去,上报事件我们使用的函数要针对具体的事件来上报。比如,按键我们使用input_report_key函数。
void input_report_key(struct input_dev *dev, unsigned int code, int value);
同样的还有一些其他的事件上报函数,函数如下图所示:
void input_report_rel(struct input_dev *dev, unsigned int code, int value)
void input_report_abs(struct input_dev *dev, unsigned int code, int value)
void input_report_ff_status(struct input_dev *dev, unsigned int code, int value)
void input_report_switch(struct input_dev *dev, unsigned int code, int value)
void input_mt_sync(struct input_dev *dev)
input_sync
当我们上报事件以后还需要使用 input_sync 函数来告诉 Linux 内核 input 子系统上报结束,input_sync 函数本质是上报一个同步事件,此函数原型如下所示:
void input_sync(struct input_dev *dev);
函数参数和返回值含义如下:
dev:需要上报同步事件的 input_dev。
input_set_abs_params
函数用于设置上报的数值的取值范围
void input_set_abs_params(struct input_dev *dev, unsigned int axis, int min, int max, int fuzz, int flat);
形参: dev --input_dev结构体
axis --上报的数值
min --最小值
max --最大值
fuzz --数据偏差值
flat --平滑位置
设置触摸屏x坐标范围:
input_set_abs_params(touch_dev,ABS_X,0,800,0,0);//设置x坐标范围
设置触摸屏x坐标范围:
input_set_abs_params(touch_dev,ABS_PRESSURE,0,1,0,0);//设置压力值范围
编写input设备驱动示例代码
driver.c
#include <linux/init.h>            //包含宏定义的头文件
#include <linux/module.h>          //包含初始化加载模块的头文件
#include <linux/platform_device.h> //平台设备所需要的头文件
#include <linux/of.h>              //of函数
#include <linux/of_address.h>      //of_iomap函数
#include <linux/fs.h>
#include <linux/uaccess.h>
#include <linux/io.h>
#include <linux/gpio.h>
#include <linux/of_gpio.h>
#include <linux/interrupt.h>
#include <linux/of_irq.h>
#include <linux/timer.h>
#include <linux/input.h> //输入子系统头文件

static void timer_function(unsigned long data); // 声明超时处理函数

struct device_node *test_device_node; // 节点
struct input_dev *test_dev;           // 输入设备结构体
int gpio_nu;                          // GPIO 编号
int irq;                              // GPIO 对应的中断号

DEFINE_TIMER(test_timer, timer_function, 0, 0); // 静态定义内核定时器结构体并且初始化

static void timer_function(unsigned long data) // 超时处理函数
{
    int value = 0;
    printk("This is timer_function\n");
    value = __gpio_get_value(gpio_nu);        // 获取按键gpio值
    input_report_key(test_dev, KEY_1, value); // 上报按键事件
    input_sync(test_dev);                     // 上报同步事件
}

irqreturn_t test_key(int irq, void *args) // 中断处理函数
{
    printk("test_key is ok\n");
    test_timer.expires = jiffies + msecs_to_jiffies(20); // 将20ms的时间转换成节拍数,并定时
    add_timer(&test_timer);                              // 注册定时器
    return IRQ_RETVAL(IRQ_HANDLED);                      // 正常处理
}

int beep_probe(struct platform_device *pdev)
{
    int ret = 0;

    printk("beep_probe\n");
    test_device_node = of_find_node_by_path("/test_key"); // 查找根节点下的test_key节点
    if (test_device_node == NULL)
    {
        printk("of_find_node_by_path is error\n");
        return -1;
    }
    printk("test_device_node name is %s\n", test_device_node->name);

    gpio_nu = of_get_named_gpio(test_device_node, "gpios", 0); // 获取GPIO标号
    if (gpio_nu < 0)
    {
        printk("of_get_named_gpio is error\n");
        return -1;
    }
    printk("of_get_named_gpio is ok\n");
    ret = gpio_request(gpio_nu, "key0"); // 申请一个 GPIO 管脚
    if (ret != 0)
    {
        printk("gpio_request is error\n");
        return -1;
    }
    printk("gpio_request is ok\n");
    ret = gpio_direction_input(gpio_nu); // 设置GPIO为输入
    if (ret < 0)
    {
        printk("gpio_direction_input is error\n");
        return -1;
    }
    printk("gpio_direction_input is ok\n");

    // irq = gpio_to_irq(gpio_nu); // 获取 gpio 对应的中断号
    irq = irq_of_parse_and_map(test_device_node, 0); // 从 interupts 属性中提取到对应的设备号
    if (irq < 0)
    {
        printk("gpio_to_irq is error\n");
        return -1;
    }
    printk("irq is %d\n", irq);

    ret = request_irq(irq, test_key, IRQF_TRIGGER_FALLING | IRQF_TRIGGER_RISING, "test_key", NULL); // 申请中断, 双边沿触发
    if (ret < 0)
    {
        printk("request_irq is error\n");
        return -1;
    }
    printk("request_irq is ok\n");
    test_dev = input_allocate_device();    // 申请输入设备
    test_dev->name = "test_key";           // 设备名
    __set_bit(EV_KEY, test_dev->evbit);    // 使test_dev支持按键事件
    __set_bit(KEY_1, test_dev->keybit);    // 使test_dev支持KEY_1这个按键
    ret = input_register_device(test_dev); // 初始化输入设备
    if (ret < 0)
    {
        printk("input_register_device is error\n");
        goto error_input_register;
        return -1;
    }
    printk("input_register_device is ok\n");
    return 0;
error_input_register:
    input_unregister_device(test_dev); // 注销输入设备
}

int beep_remove(struct platform_device *platform_device)
{
    printk("beep_remove\n");
    return 0;
}

struct platform_device_id beep_id_table = {
    .name = "123"};

struct of_device_id of_match_table_test[] = { // 与设备树的 compatible 匹配
    {
        .compatible = "keys"},
    {

    }};

/* platform 驱动结构体 */
struct platform_driver beep_platform_driver = {
    .probe = beep_probe,
    .remove = beep_remove,
    .driver = {
        .owner = THIS_MODULE,
        .name = "beep_test",                   // 匹配优先级3
        .of_match_table = of_match_table_test, // 中的.compatible匹配优先级1
    },
    .id_table = &beep_id_table // 中的.name匹配优先级2
};

static int beep_driver_init(void)
{
    int ret = 0;
    printk("hello world\n");
    ret = platform_driver_register(&beep_platform_driver); // 注册平台驱动
    if (ret < 0)
    {
        printk("platform_driver_register is error\n");
        return ret;
    }
    printk("platform_driver_register is ok\n");
    return 0;
}

static void beep_driver_exit(void)
{
    printk("byby\n");
    gpio_free(gpio_nu);                                // 释放GPIO
    free_irq(irq, NULL);                               // 释放中断
    input_unregister_device(test_dev);                 // 注销输入设备
    platform_driver_unregister(&beep_platform_driver); // 卸载 platform 驱动
    del_timer(&test_timer);                            // 删除定时器
}

module_init(beep_driver_init); // 驱动模块的入口
module_exit(beep_driver_exit); // 驱动模块的出口

MODULE_LICENSE("GPL"); // 声明模块拥有开源许可证
app.c
#include <fcntl.h>
#include <linux/input.h>
#include <stdio.h>
#include <sys/stat.h>
#include <sys/types.h>
#include <unistd.h>

int main(int argc, char *argv[]) {
  int fd;
  int value;

  struct input_event test_event;

  fd = open("/dev/input/event4", O_RDWR); // 打开设备节点
  if (fd < 0) {
    perror("open error \n");
    return fd;
  }
  while (1) {
    read(fd, &test_event, sizeof(test_event));
    if (test_event.type == EV_KEY) {
      printf("type is %#x\n", test_event.type);
      printf("code is %#x\n", test_event.code);
      printf("value is %#x\n", test_event.value);
    }
  }
  close(fd);
  return 0;
}
Makefile
obj-m +=driver.o
KDIR:=/home/mzx/imx6ull/linux-imx-rel_imx_4.1.15_2.1.0_ga
PWD?=$(shell pwd)

all:
	make -C $(KDIR) M=$(PWD) modules
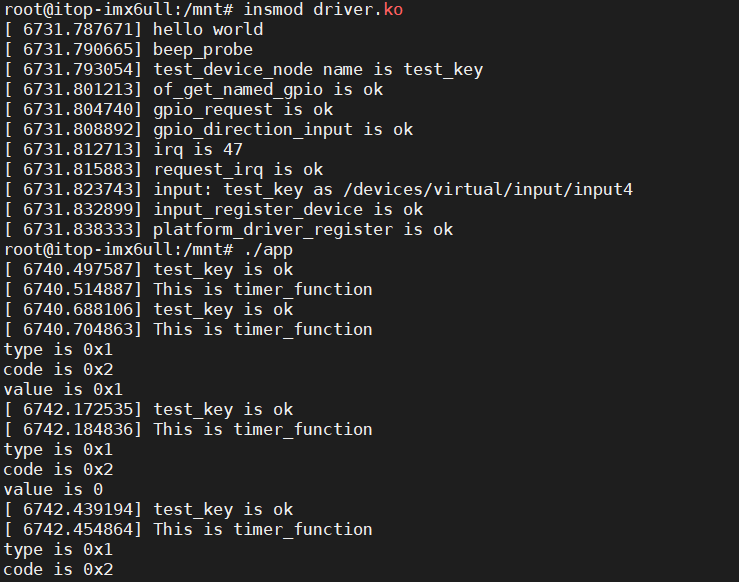
运行效果


【推荐】国内首个AI IDE,深度理解中文开发场景,立即下载体验Trae
【推荐】编程新体验,更懂你的AI,立即体验豆包MarsCode编程助手
【推荐】抖音旗下AI助手豆包,你的智能百科全书,全免费不限次数
【推荐】轻量又高性能的 SSH 工具 IShell:AI 加持,快人一步
· 全程不用写代码,我用AI程序员写了一个飞机大战
· DeepSeek 开源周回顾「GitHub 热点速览」
· 记一次.NET内存居高不下排查解决与启示
· 物流快递公司核心技术能力-地址解析分单基础技术分享
· .NET 10首个预览版发布:重大改进与新特性概览!