Nginx安装及使用
一、使用CentOS7自带Yum安装Nginx
#1、在安装Nginx前,先执行以下命令更新Yum源:
yum update
#2、使用以下命令安装Nginx:
yum install nginx
#3、安装完成后,使用以下命令启动Nginx:
systemctl start nginx
二、手动编译安装Nginx
1、下载Nginx源码包:
wget http://nginx.org/download/nginx-1.18.0.tar.gz
2、解压源码包:
tar zxvf nginx-1.18.0.tar.gz
3、进入解压后的目录:
cd nginx-1.18.0
4、执行以下命令编译Nginx:
(1)gcc
yum install gcc gcc-c++ -y
(2)prce
sudo yum install pcre pcre-devel
(3)zlib-devel
 yum install -y zlib-devel

./configure --prefix=/usr/local/nginx
###输出nginx文件位置
 nginx path prefix: "/usr/local/nginx"
  nginx binary file: "/usr/local/nginx/sbin/nginx"
  nginx modules path: "/usr/local/nginx/modules"
  nginx configuration prefix: "/usr/local/nginx/conf"
  nginx configuration file: "/usr/local/nginx/conf/nginx.conf"
  nginx pid file: "/usr/local/nginx/logs/nginx.pid"
  nginx error log file: "/usr/local/nginx/logs/error.log"
  nginx http access log file: "/usr/local/nginx/logs/access.log"
  nginx http client request body temporary files: "client_body_temp"
  nginx http proxy temporary files: "proxy_temp"
  nginx http fastcgi temporary files: "fastcgi_temp"
  nginx http uwsgi temporary files: "uwsgi_temp"
  nginx http scgi temporary files: "scgi_temp"
make
make install
5、安装完成后,使用以下命令启动Nginx:
/usr/local/nginx/sbin/nginx
netstat -ntlp|grep 80 # 查看是否已启动
三、配置Nginx
1、Nginx默认的配置文件 可见 上面输出的【输出nginx文件位置】。
2.常见操作
四、日志配置
nginx access.log配置主要包括以下几个方面:
- 日志格式
在nginx配置文件中,可以通过设置log_format来定义日志格式。常用的日志格式包括:
-
combined:包含常见的访问信息,如客户端IP、访问时间、请求方法、请求URL、HTTP协议版本、响应状态码、响应大小、来源页面、用户代理等;
-
main:包含客户端IP、访问时间、请求方法、请求URL、HTTP协议版本、响应状态码、响应大小;
-
custom:自定义日志格式,可以根据需要添加或删除字段。
默认配置为
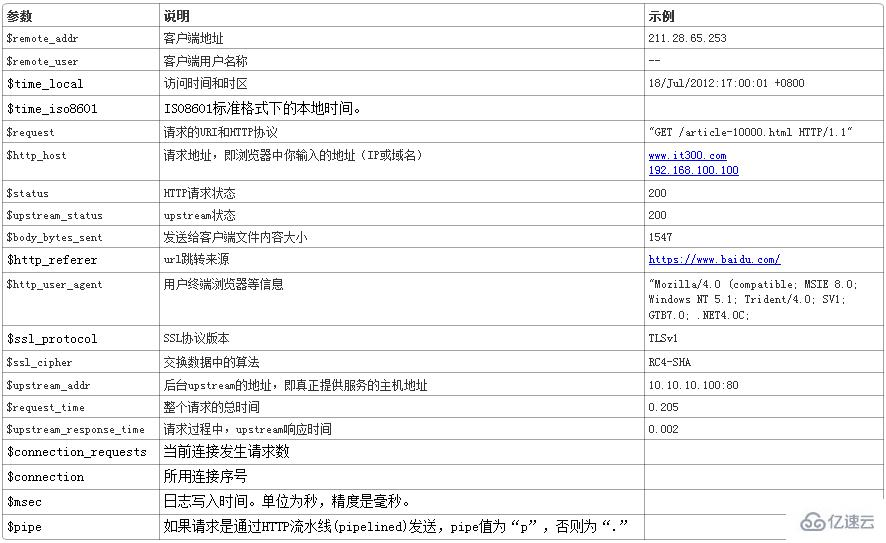
  log_format  main  '$remote_addr - $remote_user [$time_local] "$request" '
                      '$status $body_bytes_sent "$http_referer" '
                      '"$http_user_agent" "$http_x_forwarded_for"';
可配置项有
修改后的配置,显示被代理服务ip
  log_format  main  '$remote_addr - $remote_user [$time_local] "$request" '
                      '$status $body_bytes_sent "$http_referer" '
                      '"$http_user_agent" "$http_x_forwarded_for"'
                       '[$upstream_addr]' ;
- 日志存储位置
在nginx配置文件中,可以通过设置access_log来指定日志存储的位置。常用的存储位置包括:
access_log /var/log/nginx/access.log main;
- 日志按天切割
http下

map $time_iso8601 $logdate {
		'~^(?<ymd>\d{4}-\d{2}-\d{2})' $ymd;
		default 'date-not-found';
}
 access_log  /usr/local/nginx/logs/access-$logdate.log  main;
- 日志过滤
在nginx配置文件中,可以通过设置access_log来过滤一些不需要记录的请求。常用的过滤方式包括:
-
不记录某些请求:可以通过设置if语句来判断请求是否需要记录;
-
记录某些请求:可以通过设置if语句来判断请求是否需要记录,并将不需要记录的请求使用access_log off禁止记录。
例如,不记录某些请求的配置如下:
location /health {
access_log off;
...
}
五、测试Nginx是否运行正常
1、使用以下命令检查Nginx是否在运行:
ps aux | grep nginx
2、使用浏览器访问服务器IP或域名,如果出现“Welcome to nginx!”的页面,代表Nginx已安装成功。
六、Nginx常用命令
1、启动Nginx:
/usr/local/nginx/sbin/nginx
2、重新加载配置:
/usr/local/nginx/sbin/nginx -s reload
3、停止Nginx:
/usr/local/nginx/sbin/nginx -s stop
4、查看Nginx版本号:
/usr/local/nginx/sbin/nginx -v
5、查看Nginx的详细信息:
/usr/local/nginx/sbin/nginx -V
6.检查nginx配置
/usr/local/nginx/sbin/nginx -t
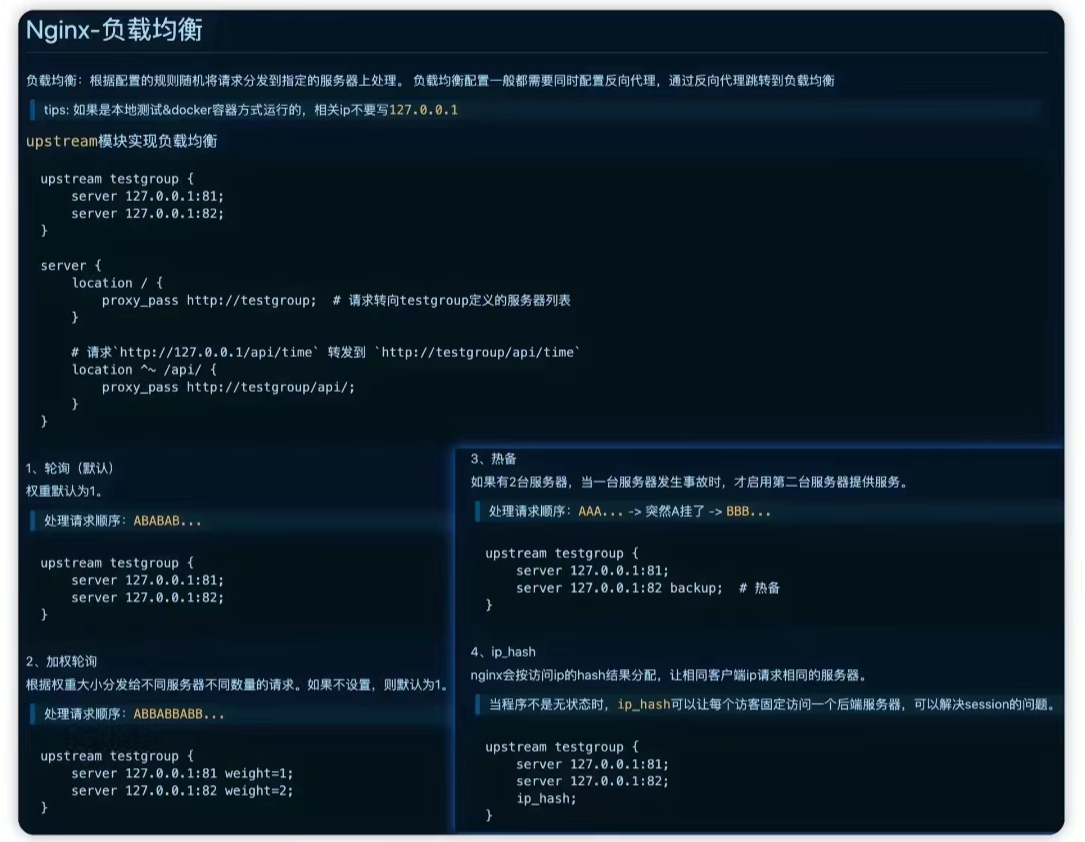
七、windchill 中负载均衡配置
使用centos7 做代理服务器
其nginx.conf 配置如下
worker_processes  1;

events {
    worker_connections  1024;
}

http {
    include       mime.types;
    default_type  application/octet-stream;

  map $time_iso8601 $logdate {
    '~^(?<ymd>\d{4}-\d{2}-\d{2})' $ymd;
    default    'date-not-found';
  }

    log_format  main  '$remote_addr - $remote_user [$time_local] "$request" '
                      '$status $body_bytes_sent "$http_referer" '
                      '"$http_user_agent" "$http_x_forwarded_for"'
                      '[$upstream_addr]';

        upstream windchill{
                server 192.168.179.179;
                server 192.168.179.180;
        }
    access_log  /usr/local/nginx/logs/access-$logdate.log  main;
  sendfile        on;

    keepalive_timeout  65;


    server {
        listen       80;
     server_name  localhost;

        location / {
            proxy_pass http://windchill;
        }


        error_page   500 502 503 504  /50x.html;
        location = /50x.html {
            root   html;
        }
    }

}
这里我们用了三台服务器模拟
- 192.168.179.9 代理服务器
- 192.168.179.179 windchill服务1
- 192.168.179.180 windchill服务2
具体的日志路径配置 access_log
具体的被代理服务器配置 upstream windchill
需要在客户端hosts配置
192.168.179.9 plm666.com

 浙公网安备 33010602011771号