
智能小车
刚学单片机的时候做的一个智能小车,现在把当时的一些资料整理了一下,希望对刚入门的童鞋有帮助!
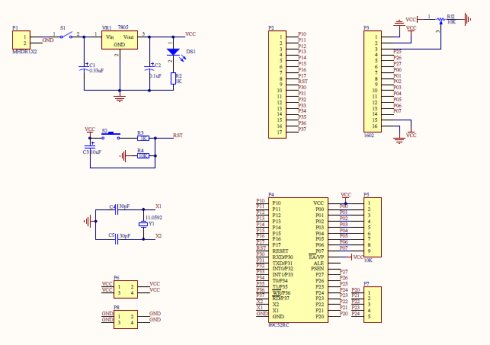
1、下图为单片机的最小系统,可以自己用万用板焊接,顺便练练焊接能力也不错的。本设计采用了51单片机,网上关于51单片机的资料有一大堆,大伙可以从它来入门,推荐郭天祥的视频(我就是跟着他学的),讲的挺详细的。
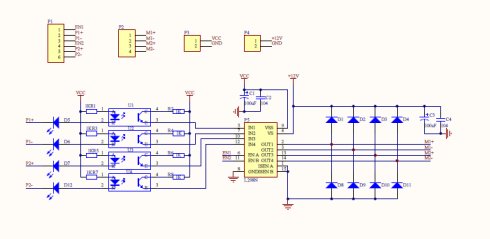
2、这一部分来介绍下驱动电路,如下图所示为驱动电路的原理图,采用的是L298驱动芯片,一般的智能小车这个芯片用的比较多,控制起来也比较简单:芯片两个使能端输入高电平(有效电平),再给其余的两个引脚(比如P1+,P1-)输入一高一低就能让电机正反转从而控制小车的前进后退,当然也可以在EN端输入PWM信号来控制小车的速度,PWM信号可以由芯片的相应引脚输出,51单片机不能直接输出PWM信号,可以用定时器来实现也很方便的。
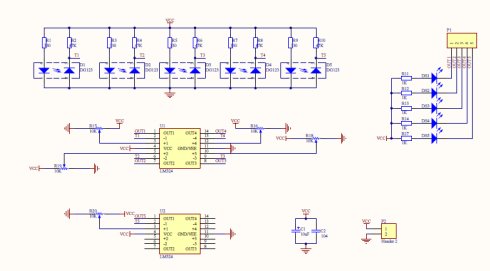
3、下面来介绍下循迹传感器。循迹模块用的是红外对管,正常情况下发射端发出的光线可以被接收端接收到接收端导通输出低电平,而当遇到黑线后,黑线吸收了发射端发射的光线,输出高电平;输出的高低电平经过电压比较器比较输出后来判断小车的哪个传感器在黑线之上,得到小车的位置信息(看起来很简单大家要动手做才有意思
 )。
)。
4、下面我把源代码贴出来,感兴趣的童鞋可以看看希望有豪帮助!
- 以下是“CarDrive.c”文件中的源程序:
#include "CarDrive.h"
//左电机正转
void LeftMotorCorotation(void)
{
LeftMotor_1 = 1;
LeftMotor_2 = 0;
}
//左电机反转
void LeftMotorRollback(void)
{
LeftMotor_1 = 0;
LeftMotor_2 = 1;
}
//右电机正转
void RightMotorCorotation(void)
{
RightMotor_1 = 1;
RightMotor_2 = 0;
}
//右电机反转
void RightMotorRollback(void)
{
RightMotor_1 = 0;
RightMotor_2 = 1;
}
//小车前进
void CarGoAhead(void)
{
LeftMotorCorotation();
RightMotorRollback();
}
//小车慢速左拐
void CarTurnLeft_Low(void)
{
LeftMotor_1 = 0;
LeftMotor_2 = 0;
RightMotorRollback();
}
//小车慢速右拐
void CarTurnRight_Low(void)
{
RightMotor_1 = 0;
RightMotor_2 = 0;
LeftMotorCorotation();
}
//小车快速左拐
void CarTurnLeft_High(void)
{
LeftMotorRollback();
RightMotorRollback();
}
//小车快速右拐
void CarTurnRight_High(void)
{
LeftMotorCorotation();
RightMotorCorotation();
}
//小车道路判断
void CarRoadJudge(void)
{
if(LeftPhotoelectricCell_1&&(!LeftPhotoelectricCell_2)&&(!RightPhotoelectricCell_2)&&RightPhotoelectricCell_1)
CarGoAhead();
if(LeftPhotoelectricCell_1&&(!LeftPhotoelectricCell_2)&&RightPhotoelectricCell_2&&RightPhotoelectricCell_1)
CarGoAhead();
if(LeftPhotoelectricCell_1&&LeftPhotoelectricCell_2&&(!RightPhotoelectricCell_2)&&RightPhotoelectricCell_1)
CarGoAhead();
if((!LeftPhotoelectricCell_1)&&(!LeftPhotoelectricCell_2)&&RightPhotoelectricCell_2&&RightPhotoelectricCell_1)
CarTurnLeft_Low();
if(LeftPhotoelectricCell_1&&LeftPhotoelectricCell_2&&(!RightPhotoelectricCell_2)&&(!RightPhotoelectricCell_1))
CarTurnRight_Low();
if((!LeftPhotoelectricCell_1)&&LeftPhotoelectricCell_2&&RightPhotoelectricCell_2&&RightPhotoelectricCell_1)
CarTurnLeft_High();
if(LeftPhotoelectricCell_1&&LeftPhotoelectricCell_2&&RightPhotoelectricCell_2&&(!RightPhotoelectricCell_1))
CarTurnRight_High();
if(LeftPhotoelectricCell_1&&LeftPhotoelectricCell_2&&RightPhotoelectricCell_2&&RightPhotoelectricCell_1)
//CarTurnRight_Low();
CarGoAhead();
if((!LeftPhotoelectricCell_1)&&(!LeftPhotoelectricCell_2)&&(!RightPhotoelectricCell_2)&&(!RightPhotoelectricCell_1))
CarGoAhead();
}
- 以下是“CarDrive.h”文件中的源程序:
#ifndef _CarDrive_H_
#define _CarDrive_H_
#include
#define uint unsigned int
#define uchar unsigned char
sbit LeftMotor_1 = P0^0;
sbit LeftMotor_2 = P0^1;
sbit RightMotor_1 = P0^2;
sbit RightMotor_2 = P0^3;
sbit LeftPhotoelectricCell_1 = P3^0;
sbit LeftPhotoelectricCell_2 = P3^1;
sbit RightPhotoelectricCell_2 = P3^2;
sbit RightPhotoelectricCell_1 = P3^3;
void CarGoAhead(void);
//void CarBackOff(void);
void CarTurnLeft_Low(void);
void CarTurnRight_Low(void);
void CarTurnLeft_High(void);
void CarTurnRight_High(void);
//void CarBrake(void);
void CarRoadJudge(void);
#endif
- 以下是“main.h”中的程序:
#ifndef _main_H_
#define _main_H_
#include
#include "CarDrive.h"
#define uint unsigned int
#define uchar unsigned char
#endif
- 以下是“main.c”中的程序:
#include "main.h"
void main(void)
{
while(1)
{
CarRoadJudge();
}
}
