headscale 和 derp 部署
禁用日志
host 文件配置
127.0.0.1 log.tailscale.com
1. 服务端用户注册
headscale users create ${userName}
2. 客户端命令行申请节点注册
tailscale login --login-server http://ip:port {--advertise-routes=192.168.10.0/24,192.168.11.0/24 在需要转发的电脑的执行(一般是内网电脑),然后在服务端启动子网转发}
3. 网页输入
http://ip:port/register/mkey:${mkey}
4. 服务端确认节点注册
headscale nodes register --user ${userName} --key mkey:${mkey}
服务端 运行 子网转发
headscale routes list
headscale routes enable -r ${id}
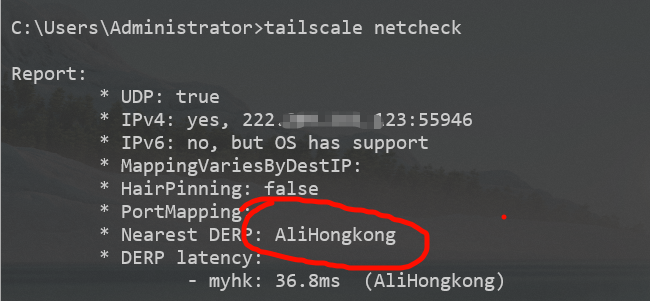
客户端网络监测
tailscale netcheck
搭建 纯ip的 derp
直接启动docker
docker run --restart always --net host --name derper -e DERP_ADDR=:20184 -e DERP_HTTP_PORT=20185 -d ghcr.io/yangchuansheng/ip_derper
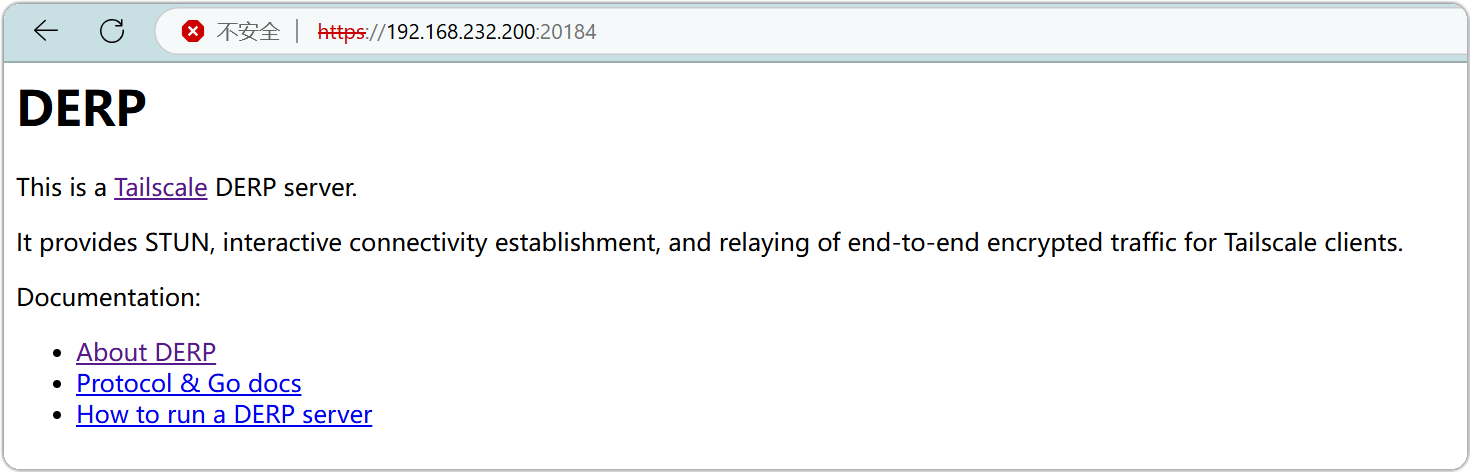
这样就安装成功了
新建 derp.json
{
  "Regions": {
    "901": {
      "RegionID": 901,
      "RegionCode": "随意取一个名字",
      "RegionName": "随意取一个名字",
      "Nodes": [
        {
          "Name": "901a",
          "RegionID": 901,
          "DERPPort": 启动docker时DERP_ADDR映射的端口 (20184),
          "HostName": "部署derp的IP地址",
          "IPv4": "部署derp的IP地址",
          "InsecureForTests": true
        }
      ]
    }
  }
}
用ng代理json文件,然后在 /etc/headscale/config.yaml 引用
    urls:
    - http://192.168.232.200:28080/derp.json
搭建 域名的 derp
申请证书
前提是 先把域名指向服务器
https://certbot.eff.org/instructions?ws=other&os=ubuntufocal
sudo snap install --classic certbot
sudo ln -s /snap/bin/certbot /usr/bin/certbot
sudo certbot certonly --standalone
sudo certbot renew --dry-run
mkdir -p /etc/headscale/derpcert/
cp /etc/letsencrypt/live/derp.xxx.cc/fullchain.pem   /etc/headscale/derpcert/derp.xxx.cc.crt
cp /etc/letsencrypt/live/derp.xxx.cc/privkey.pem     /etc/headscale/derpcert/derp.xxx.cc.key
启动docker
docker run --restart always \
  --name derper -p 22345:12345 -p 23478:3478/udp \
  -v /etc/headscale/derpcert/:/app/certs \
  -e DERP_CERT_MODE=manual \
  -e DERP_ADDR=:12345 \
  -e DERP_DOMAIN=derp.xxx.com \
  -d ghcr.io/yangchuansheng/derper:latest
需要保证
/etc/headscale/derpcert/ 下面有 derp.xxx.com.crt 和 derp.xxx.com.key
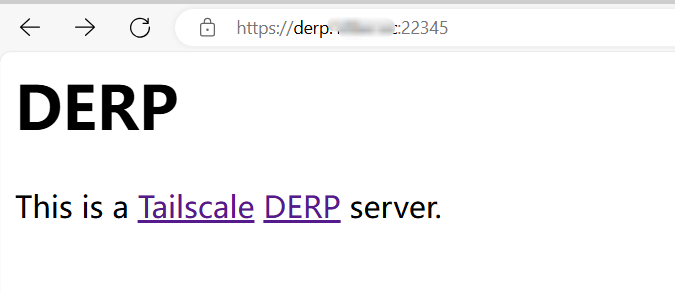
安装好后,访问域名,应该如图所示:
在 /etc/headscale 下 新建 derp.yaml
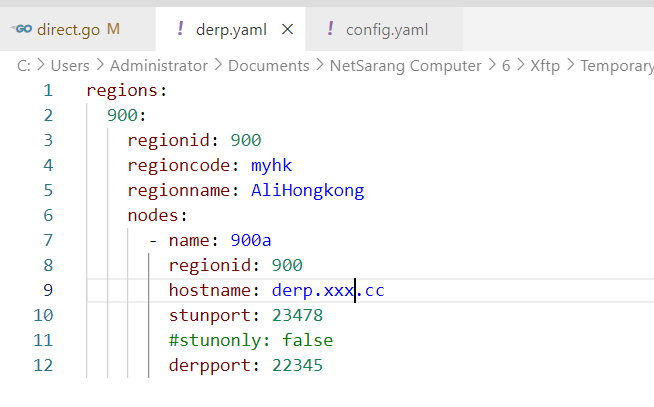
regions:
  900:
    regionid: 900
    regioncode: myhk
    regionname: AliHongkong
    nodes:
      - name: 900a
        regionid: 900
        hostname: derp.xxx.cc
        stunport: 23478
        #stunonly: false
        derpport: 22345
在 /etc/headscale/config.yaml 引用
  urls:
  # paths:
  #   - /etc/headscale/derp-example.yaml
  paths:
   - /etc/headscale/derp.yaml
  auto_update_enabled: true
  update_frequency: 24h
重启服务端的 headscale
使用 tailscale netcheck | tailscale status | tailscale ping ip 检测
服务端配置文件(不搭建derp)
vim /etc/headscale/config.yaml
需要修改的地方只有 server_url 和 ip_prefixes
---
# headscale will look for a configuration file named `config.yaml` (or `config.json`) in the following order:
#
# - `/etc/headscale`
# - `~/.headscale`
# - current working directory

# The url clients will connect to.
# Typically this will be a domain like:
#
# https://myheadscale.example.com:443
#
server_url: http://${服务端公网ip}:11941

# Address to listen to / bind to on the server
#
# For production:
# listen_addr: 0.0.0.0:8080
listen_addr: 0.0.0.0:11941

# Address to listen to /metrics, you may want
# to keep this endpoint private to your internal
# network
#
metrics_listen_addr: 0.0.0.0:11942

# Address to listen for gRPC.
# gRPC is used for controlling a headscale server
# remotely with the CLI
# Note: Remote access _only_ works if you have
# valid certificates.
#
# For production:
# grpc_listen_addr: 0.0.0.0:50443
grpc_listen_addr: 0.0.0.0:11943

# Allow the gRPC admin interface to run in INSECURE
# mode. This is not recommended as the traffic will
# be unencrypted. Only enable if you know what you
# are doing.
grpc_allow_insecure: false

# Private key used to encrypt the traffic between headscale
# and Tailscale clients.
# The private key file will be autogenerated if it's missing.
#
private_key_path: /var/lib/headscale/private.key

# The Noise section includes specific configuration for the
# TS2021 Noise protocol
noise:
  # The Noise private key is used to encrypt the
  # traffic between headscale and Tailscale clients when
  # using the new Noise-based protocol. It must be different
  # from the legacy private key.
  private_key_path: /var/lib/headscale/noise_private.key

# List of IP prefixes to allocate tailaddresses from.
# Each prefix consists of either an IPv4 or IPv6 address,
# and the associated prefix length, delimited by a slash.
# It must be within IP ranges supported by the Tailscale
# client - i.e., subnets of 100.64.0.0/10 and fd7a:115c:a1e0::/48.
# See below:
# IPv6: https://github.com/tailscale/tailscale/blob/22ebb25e833264f58d7c3f534a8b166894a89536/net/tsaddr/tsaddr.go#LL81C52-L81C71
# IPv4: https://github.com/tailscale/tailscale/blob/22ebb25e833264f58d7c3f534a8b166894a89536/net/tsaddr/tsaddr.go#L33
# Any other range is NOT supported, and it will cause unexpected issues.
ip_prefixes:
        #  - fd7a:115c:a1e0::/48
        #        - 100.64.0.0/10
          - 192.168.10.0/24

# DERP is a relay system that Tailscale uses when a direct
# connection cannot be established.
# https://tailscale.com/blog/how-tailscale-works/#encrypted-tcp-relays-derp
#
# headscale needs a list of DERP servers that can be presented
# to the clients.
derp:
  server:
    # If enabled, runs the embedded DERP server and merges it into the rest of the DERP config
    # The Headscale server_url defined above MUST be using https, DERP requires TLS to be in place
    enabled: false

    # Region ID to use for the embedded DERP server.
    # The local DERP prevails if the region ID collides with other region ID coming from
    # the regular DERP config.
    region_id: 999

    # Region code and name are displayed in the Tailscale UI to identify a DERP region
    region_code: "headscale"
    region_name: "Headscale Embedded DERP"

    # Listens over UDP at the configured address for STUN connections - to help with NAT traversal.
    # When the embedded DERP server is enabled stun_listen_addr MUST be defined.
    #
    # For more details on how this works, check this great article: https://tailscale.com/blog/how-tailscale-works/
    stun_listen_addr: "0.0.0.0:3478"

  # List of externally available DERP maps encoded in JSON
  urls:
    - https://controlplane.tailscale.com/derpmap/default

  # Locally available DERP map files encoded in YAML
  #
  # This option is mostly interesting for people hosting
  # their own DERP servers:
  # https://tailscale.com/kb/1118/custom-derp-servers/
  #
  # paths:
  #   - /etc/headscale/derp-example.yaml
  paths: []

  # If enabled, a worker will be set up to periodically
  # refresh the given sources and update the derpmap
  # will be set up.
  auto_update_enabled: true

  # How often should we check for DERP updates?
  update_frequency: 24h

# Disables the automatic check for headscale updates on startup
disable_check_updates: false

# Time before an inactive ephemeral node is deleted?
ephemeral_node_inactivity_timeout: 30m

# Period to check for node updates within the tailnet. A value too low will severely affect
# CPU consumption of Headscale. A value too high (over 60s) will cause problems
# for the nodes, as they won't get updates or keep alive messages frequently enough.
# In case of doubts, do not touch the default 10s.
node_update_check_interval: 10s

# SQLite config
db_type: sqlite3

# For production:
db_path: /var/lib/headscale/db.sqlite

# # Postgres config
# If using a Unix socket to connect to Postgres, set the socket path in the 'host' field and leave 'port' blank.
# db_type: postgres
# db_host: localhost
# db_port: 5432
# db_name: headscale
# db_user: foo
# db_pass: bar

# If other 'sslmode' is required instead of 'require(true)' and 'disabled(false)', set the 'sslmode' you need
# in the 'db_ssl' field. Refers to https://www.postgresql.org/docs/current/libpq-ssl.html Table 34.1.
# db_ssl: false

### TLS configuration
#
## Let's encrypt / ACME
#
# headscale supports automatically requesting and setting up
# TLS for a domain with Let's Encrypt.
#
# URL to ACME directory
acme_url: https://acme-v02.api.letsencrypt.org/directory

# Email to register with ACME provider
acme_email: ""

# Domain name to request a TLS certificate for:
tls_letsencrypt_hostname: ""

# Path to store certificates and metadata needed by
# letsencrypt
# For production:
tls_letsencrypt_cache_dir: /var/lib/headscale/cache

# Type of ACME challenge to use, currently supported types:
# HTTP-01 or TLS-ALPN-01
# See [docs/tls.md](docs/tls.md) for more information
tls_letsencrypt_challenge_type: HTTP-01
# When HTTP-01 challenge is chosen, letsencrypt must set up a
# verification endpoint, and it will be listening on:
# :http = port 80
tls_letsencrypt_listen: ":http"

## Use already defined certificates:
tls_cert_path: ""
tls_key_path: ""

log:
  # Output formatting for logs: text or json
  format: text
  level: info

# Path to a file containg ACL policies.
# ACLs can be defined as YAML or HUJSON.
# https://tailscale.com/kb/1018/acls/
acl_policy_path: ""

## DNS
#
# headscale supports Tailscale's DNS configuration and MagicDNS.
# Please have a look to their KB to better understand the concepts:
#
# - https://tailscale.com/kb/1054/dns/
# - https://tailscale.com/kb/1081/magicdns/
# - https://tailscale.com/blog/2021-09-private-dns-with-magicdns/
#
dns_config:
  # Whether to prefer using Headscale provided DNS or use local.
  override_local_dns: true

  # List of DNS servers to expose to clients.
  nameservers:
    - 1.1.1.1

  # NextDNS (see https://tailscale.com/kb/1218/nextdns/).
  # "abc123" is example NextDNS ID, replace with yours.
  #
  # With metadata sharing:
  # nameservers:
  #   - https://dns.nextdns.io/abc123
  #
  # Without metadata sharing:
  # nameservers:
  #   - 2a07:a8c0::ab:c123
  #   - 2a07:a8c1::ab:c123

  # Split DNS (see https://tailscale.com/kb/1054/dns/),
  # list of search domains and the DNS to query for each one.
  #
  # restricted_nameservers:
  #   foo.bar.com:
  #     - 1.1.1.1
  #   darp.headscale.net:
  #     - 1.1.1.1
  #     - 8.8.8.8

  # Search domains to inject.
  domains: []

  # Extra DNS records
  # so far only A-records are supported (on the tailscale side)
  # See https://github.com/juanfont/headscale/blob/main/docs/dns-records.md#Limitations
  # extra_records:
  #   - name: "grafana.myvpn.example.com"
  #     type: "A"
  #     value: "100.64.0.3"
  #
  #   # you can also put it in one line
  #   - { name: "prometheus.myvpn.example.com", type: "A", value: "100.64.0.3" }

  # Whether to use [MagicDNS](https://tailscale.com/kb/1081/magicdns/).
  # Only works if there is at least a nameserver defined.
  magic_dns: true

  # Defines the base domain to create the hostnames for MagicDNS.
  # `base_domain` must be a FQDNs, without the trailing dot.
  # The FQDN of the hosts will be
  # `hostname.user.base_domain` (e.g., _myhost.myuser.example.com_).
  base_domain: example.com

# Unix socket used for the CLI to connect without authentication
# Note: for production you will want to set this to something like:
unix_socket: /var/run/headscale/headscale.sock
unix_socket_permission: "0770"
#
# headscale supports experimental OpenID connect support,
# it is still being tested and might have some bugs, please
# help us test it.
# OpenID Connect
# oidc:
#   only_start_if_oidc_is_available: true
#   issuer: "https://your-oidc.issuer.com/path"
#   client_id: "your-oidc-client-id"
#   client_secret: "your-oidc-client-secret"
#   # Alternatively, set `client_secret_path` to read the secret from the file.
#   # It resolves environment variables, making integration to systemd's
#   # `LoadCredential` straightforward:
#   client_secret_path: "${CREDENTIALS_DIRECTORY}/oidc_client_secret"
#   # client_secret and client_secret_path are mutually exclusive.
#
#   # The amount of time from a node is authenticated with OpenID until it
#   # expires and needs to reauthenticate.
#   # Setting the value to "0" will mean no expiry.
#   expiry: 180d
#
#   # Use the expiry from the token received from OpenID when the user logged
#   # in, this will typically lead to frequent need to reauthenticate and should
#   # only been enabled if you know what you are doing.
#   # Note: enabling this will cause `oidc.expiry` to be ignored.
#   use_expiry_from_token: false
#
#   # Customize the scopes used in the OIDC flow, defaults to "openid", "profile" and "email" and add custom query
#   # parameters to the Authorize Endpoint request. Scopes default to "openid", "profile" and "email".
#
#   scope: ["openid", "profile", "email", "custom"]
#   extra_params:
#     domain_hint: example.com
#
#   # List allowed principal domains and/or users. If an authenticated user's domain is not in this list, the
#   # authentication request will be rejected.
#
#   allowed_domains:
#     - example.com
#   # Note: Groups from keycloak have a leading '/'
#   allowed_groups:
#     - /headscale
#   allowed_users:
#     - alice@example.com
#
#   # If `strip_email_domain` is set to `true`, the domain part of the username email address will be removed.
#   # This will transform `first-name.last-name@example.com` to the user `first-name.last-name`
#   # If `strip_email_domain` is set to `false` the domain part will NOT be removed resulting to the following
#   user: `first-name.last-name.example.com`
#
#   strip_email_domain: true

# Logtail configuration
# Logtail is Tailscales logging and auditing infrastructure, it allows the control panel
# to instruct tailscale nodes to log their activity to a remote server.
logtail:
  # Enable logtail for this headscales clients.
  # As there is currently no support for overriding the log server in headscale, this is
  # disabled by default. Enabling this will make your clients send logs to Tailscale Inc.
  enabled: false

# Enabling this option makes devices prefer a random port for WireGuard traffic over the
# default static port 41641. This option is intended as a workaround for some buggy
# firewall devices. See https://tailscale.com/kb/1181/firewalls/ for more information.
randomize_client_port: true
windows 受限网络环境下 tailscale 客户端注册方法
- 打开一个 cmd 窗口,设置代理,停止默认服务
set ALL_PROXY=socks5://127.0.0.1:2225
net stop tailscale
cd D:\Program Files\Tailscale
tailscaled.exe
- 打开另外一个cmd窗口注册
tailscale login --login-server=http://ip:port --accept-routes --accept-dns=false --advertise-routes=192.168.104.0/24
参考链接
有问题请联系hudcan@sina.com
个人网站:http://ext.123cc.cc

 浙公网安备 33010602011771号