基于注解的环境搭建
一、创建Maven项目
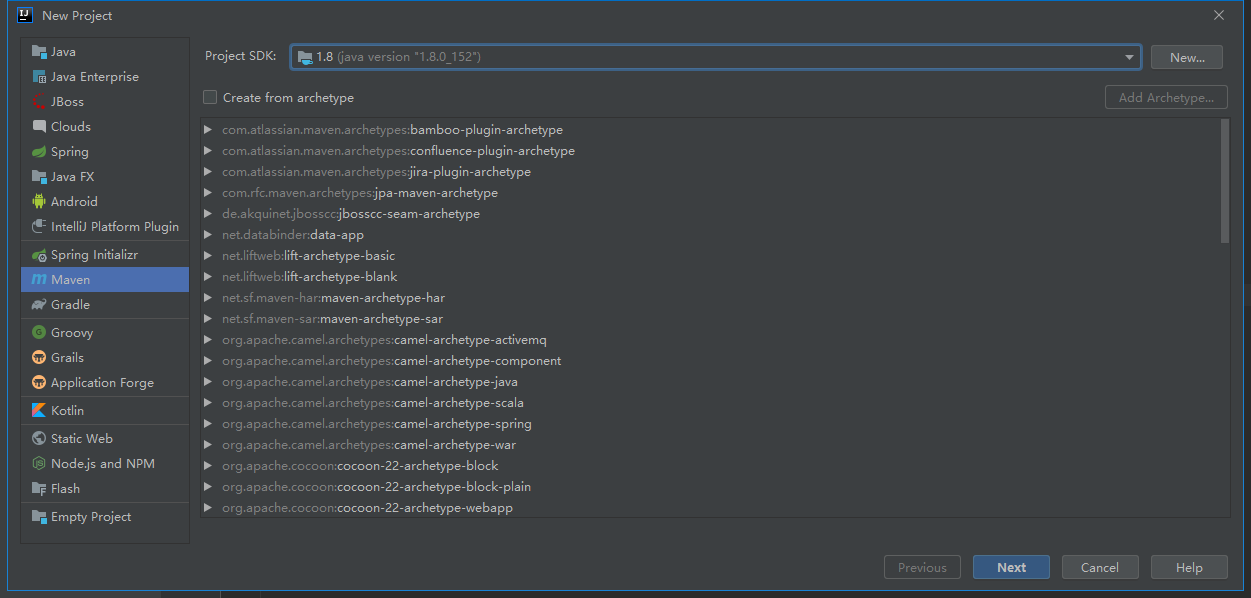
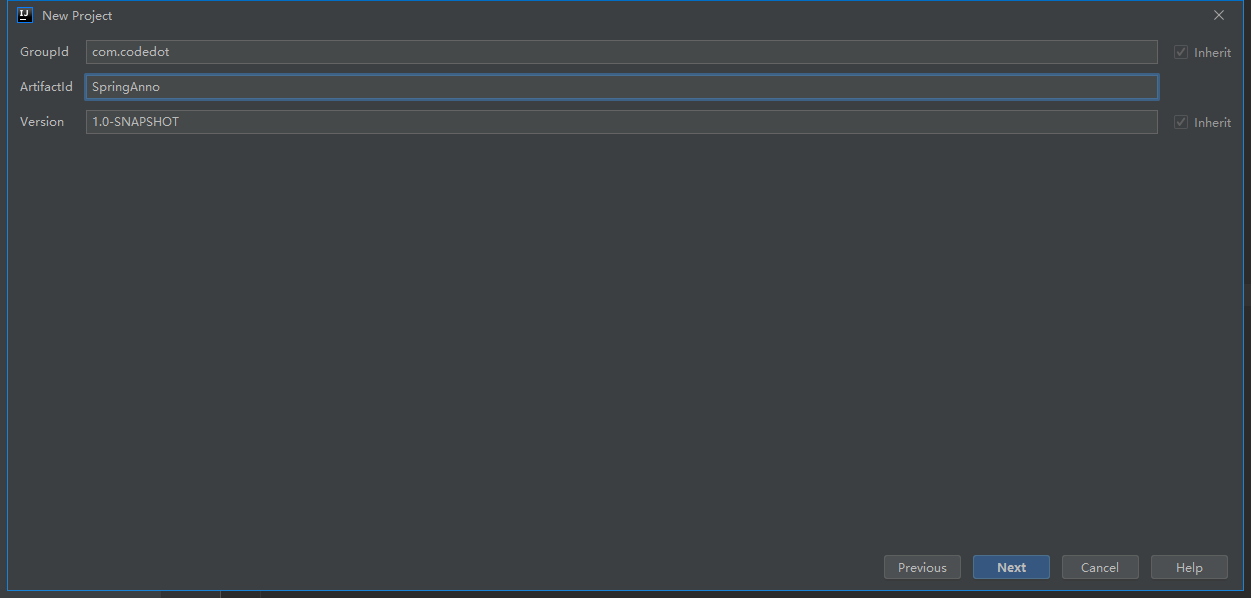
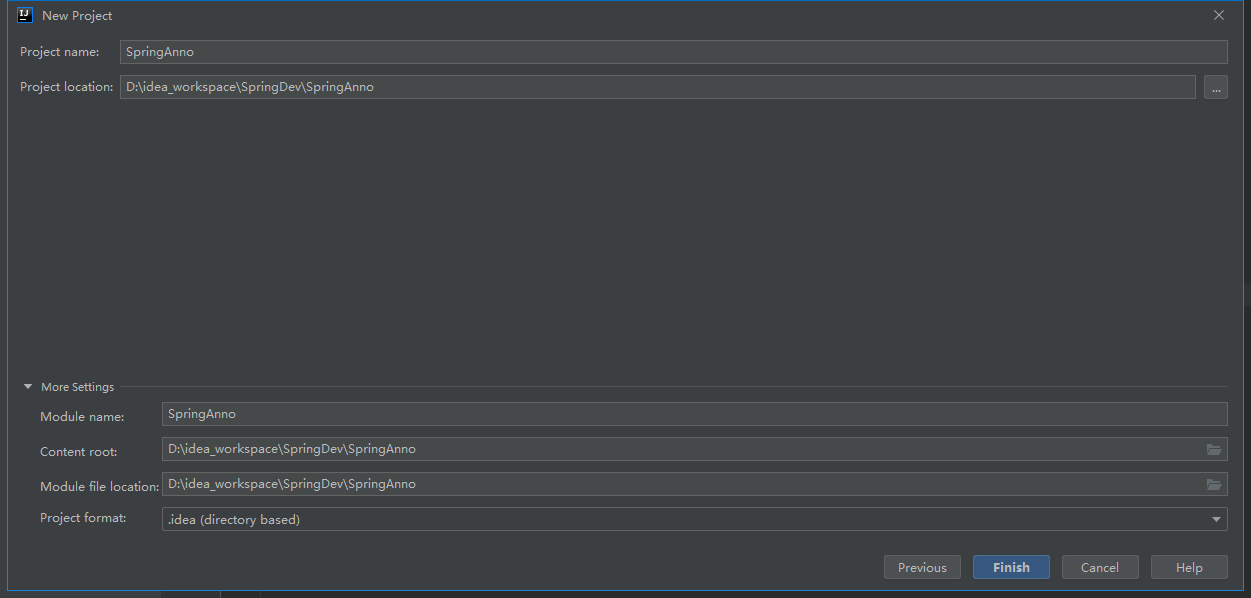
配置webapp(SpringMVC)
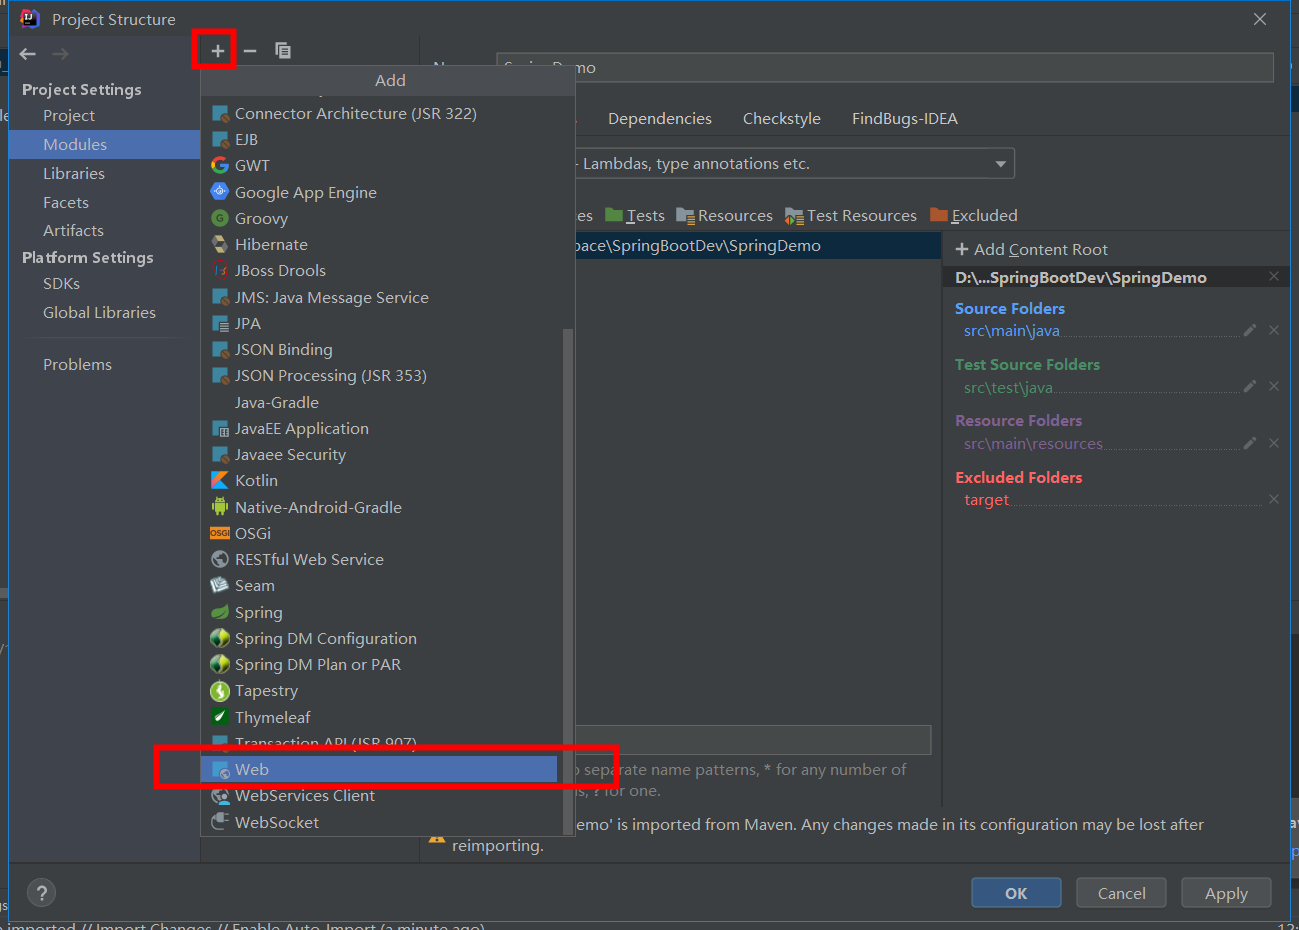
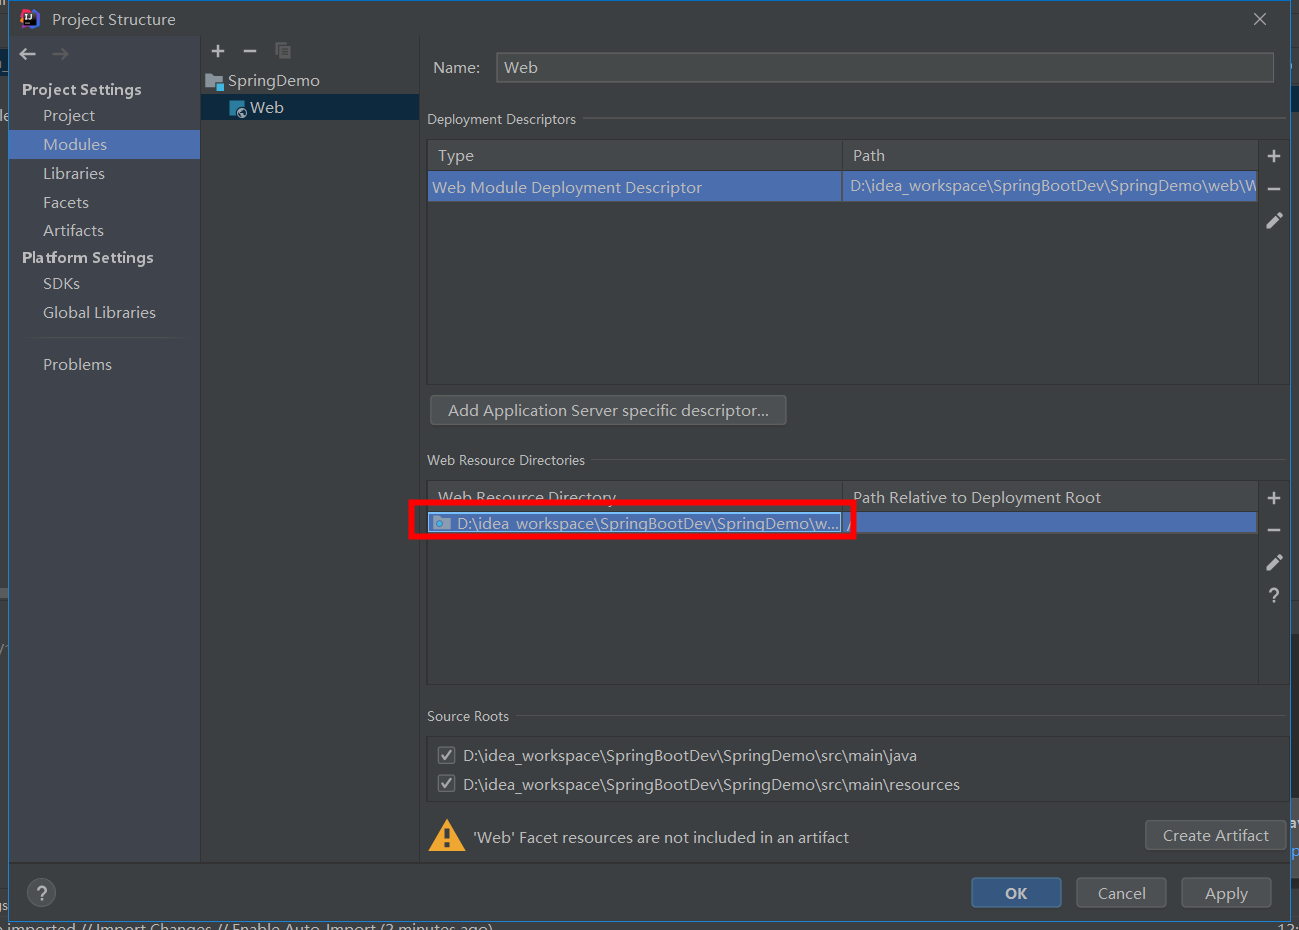
选中这个之后出现这个页面(设置web资源的目录,也就是我们属性的webapp所在的位置,它默认的位置并不正确,所有我们要修改一下),修改为 src\main\webapp(没有这个文件夹就新建)
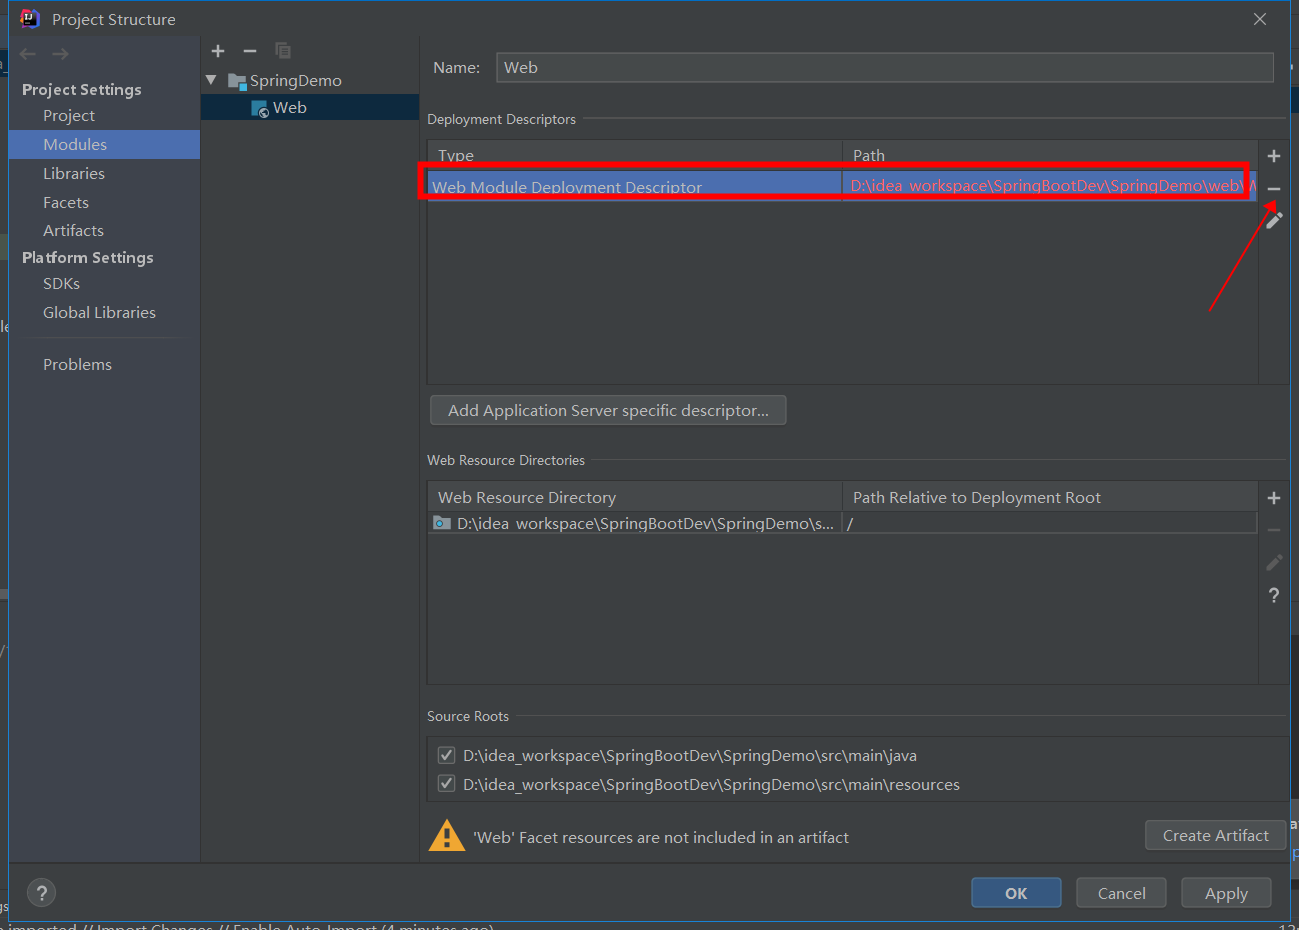
因为我们现在搭建的注解版,所以就不需要web.xml(点击-号把默认的删除)
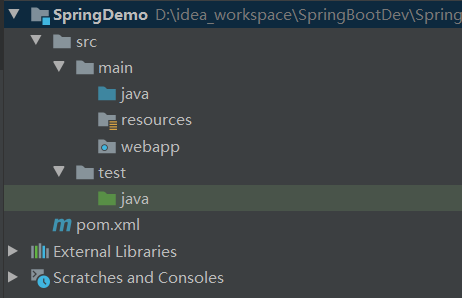
最终的项目目录
二、pom.xml依赖配置
<?xml version="1.0" encoding="UTF-8"?>
<project xmlns="http://maven.apache.org/POM/4.0.0"
         xmlns:xsi="http://www.w3.org/2001/XMLSchema-instance"
         xsi:schemaLocation="http://maven.apache.org/POM/4.0.0 http://maven.apache.org/xsd/maven-4.0.0.xsd">
    <modelVersion>4.0.0</modelVersion>

    <groupId>com.codedot</groupId>
    <artifactId>SpringAnno</artifactId>
    <version>1.0-SNAPSHOT</version>
    <packaging>war</packaging>

    <properties>
        <!-- JDK版本 -->
        <java.version>1.8</java.version>
        <project.build.sourceEncoding>UTF-8</project.build.sourceEncoding>
        <!-- Spring 5.1.6 要求JDK必须是1.8以上-->
        <spring.version>5.1.16.RELEASE</spring.version>
    </properties>

    <dependencies>
        <!-- 核心容器 之 spring-core -->
        <dependency>
            <groupId>org.springframework</groupId>
            <artifactId>spring-core</artifactId>
            <version>${spring.version}</version>
        </dependency>
        <!-- 核心容器 之 spring-beans -->
        <dependency>
            <groupId>org.springframework</groupId>
            <artifactId>spring-beans</artifactId>
            <version>${spring.version}</version>
        </dependency>
        <!-- 核心容器 之 spring-context -->
        <dependency>
            <groupId>org.springframework</groupId>
            <artifactId>spring-context</artifactId>
            <version>${spring.version}</version>
        </dependency>
        <!-- 核心容器 之 spring-context-support -->
        <dependency>
            <groupId>org.springframework</groupId>
            <artifactId>spring-context-support</artifactId>
            <version>${spring.version}</version>
        </dependency>
        <!-- 核心容器 之 spring-expression -->
        <dependency>
            <groupId>org.springframework</groupId>
            <artifactId>spring-expression</artifactId>
            <version>${spring.version}</version>
        </dependency>

        <!-- Spring Web -->
        <dependency>
            <groupId>org.springframework</groupId>
            <artifactId>spring-web</artifactId>
            <version>${spring.version}</version>
        </dependency>
        <dependency>
            <groupId>org.springframework</groupId>
            <artifactId>spring-webmvc</artifactId>
            <version>${spring.version}</version>
        </dependency>

        <!-- 否则 Error:(9,7) java: 错误: 无法访问ServletException-->
        <dependency>
            <groupId>javax.servlet</groupId>
            <artifactId>javax.servlet-api</artifactId>
            <version>3.0.1</version>
            <scope>provided</scope>
        </dependency>

        <!-- Spring Test -->
        <dependency>
            <groupId>org.springframework</groupId>
            <artifactId>spring-test</artifactId>
            <version>${spring.version}</version>
        </dependency>

        <!-- Junit -->
        <dependency>
            <groupId>junit</groupId>
            <artifactId>junit</artifactId>
            <version>4.12</version><!--此处需要注意的是,spring5 及以上版本要求 junit 的版本必须是 4.12 及以上,否则用不了-->
            <scope>test</scope>
        </dependency>

    </dependencies>

    <build>
        <plugins>
            <plugin>
                <groupId>org.apache.maven.plugins</groupId>
                <artifactId>maven-compiler-plugin</artifactId>
                <version>2.3</version>
                <configuration>
                    <source>1.8</source>
                    <target>1.8</target>
                    <encoding>${project.build.sourceEncoding}</encoding>
                </configuration>
            </plugin>
            <!-- 没有web.xml文件的情况下构建WAR, 否则打包时会报错 -->
            <plugin>
                <groupId>org.apache.maven.plugins</groupId>
                <artifactId>maven-war-plugin</artifactId>
                <version>2.6</version>
                <configuration>
                    <!--如果想在没有web.xml文件的情况下构建WAR,请设置为false。-->
                    <failOnMissingWebXml>false</failOnMissingWebXml>
                </configuration>
            </plugin>
        </plugins>
    </build>

</project>
要使用spring的事务,需要引入:
<!-- Spring 事务支持 -->
<dependency>
    <groupId>org.springframework</groupId>
    <artifactId>spring-tx</artifactId>
    <version>${spring.version}</version>
</dependency>
要使用spring的JdbcTemplate等功能,需要引入:
<!-- Spring JDBC -->
<dependency>
    <groupId>org.springframework</groupId>
    <artifactId>spring-jdbc</artifactId>
    <version>${spring.version}</version>
</dependency>
三、搭建Spring和SpringMVC环境
继承AbstractAnnotationConfigDispatcherServletInitializer,创建启动器
import org.springframework.web.servlet.support.AbstractAnnotationConfigDispatcherServletInitializer;

/**
 * @Description AbstractAnnotationConfigDispatcherServletInitializer 是在spring-webmvc包下的
 */
public class SpringInitializer extends AbstractAnnotationConfigDispatcherServletInitializer {

    //Spring容器:等同于applicationContext.xml
    @Override
    protected Class<?>[] getRootConfigClasses() {
        return new Class[]{SpringConfig.class};
    }

    //SpringMVC容器 :等同于springmvc.xml
    @Override
    protected Class<?>[] getServletConfigClasses() {
        return new Class[]{SpringMVCConfig.class};
    }

    // SpringMVC 的DispatcherServlet拦截规则
    @Override
    protected String[] getServletMappings() {
        return new String[]{"/"};
    }
}
Spring容器配置
import org.springframework.context.annotation.ComponentScan;
import org.springframework.context.annotation.Configuration;
import org.springframework.context.annotation.FilterType;
import org.springframework.stereotype.Controller;
import org.springframework.web.bind.annotation.RestController;

/**
 * 这个是Spring容器,相当于ApplicationContext.xml,负责扫描相关的service和dao,排除controller的扫描
 * 数据源、事务等均在这里配置
 */
@ComponentScan(value = {"com.codedot"},
        excludeFilters = {@ComponentScan.Filter(type = FilterType.ANNOTATION,value = {Controller.class}),
                @ComponentScan.Filter(type = FilterType.ANNOTATION,value = {RestController.class})})
@Configuration
public class SpringConfig {

}
SpringMVC容器配置
import org.springframework.context.annotation.ComponentScan;
import org.springframework.context.annotation.Configuration;
import org.springframework.context.annotation.FilterType;
import org.springframework.stereotype.Controller;
import org.springframework.web.bind.annotation.RestController;
import org.springframework.web.servlet.config.annotation.EnableWebMvc;
import org.springframework.web.servlet.config.annotation.ViewResolverRegistry;
import org.springframework.web.servlet.config.annotation.WebMvcConfigurer;
/**
 * SpringMVC容器,负责扫描controller,声明视图解析规则、静态资源处理规则、拦截器等.
 * 在Spring5.0后,原来继承WebMvcConfigurerAdapter过期,提供了替代类 WebMvcConfigurationSupport, 但是在使用
 * WebMvcConfigurationSupport的时候,自定义的视图解析器不能正常使用。
 * 所以改成实现 WebMvcConfigurer 接口,spring 5.0后要使用Java8,而在Java8中接口是可以有default方法的,不用非得实现,
 * 所以这个类就没必要了。
 */
@EnableWebMvc
@ComponentScan(value = {"com.codedot.ctrl"},
        includeFilters={@ComponentScan.Filter(type= FilterType.ANNOTATION,value={Controller.class}),
                @ComponentScan.Filter(type= FilterType.ANNOTATION,value={RestController.class})},useDefaultFilters = false)
@Configuration
public class SpringMVCConfig implements WebMvcConfigurer{

    @Override
    public void configureViewResolvers(ViewResolverRegistry registry) {
        registry.jsp("/WEB-INF/views/", ".jsp");
    }
}
在webapp/WEB-INF/views目录下创建index.jsp
<%@ page contentType="text/html;charset=UTF-8" language="java" %>
<html>
<head>
    <title>首页</title>
</head>
<body>
    Hello World!!!
</body>
</html>
新建controller
import org.springframework.stereotype.Controller;
import org.springframework.web.bind.annotation.GetMapping;

@Controller
public class HelloController {

    @GetMapping("fromIndex")
    public String helloIndex(){
        return "index";
    }
}
配置tomcat部署项目,访问http://ip:port/上下文/fromIndex
注意:这里要特别注意上下文的设置。
四、原理解析
为什么ServletContainerInitializer取代web.xml实现零配置?
tomcat自动扫描web项目的WEB-INF/classes或WEB-INF/lib/*.jar的META-INF/services/javax.servlet.ServletContainerInitializer文件,调用其onStartup方法,参数webAppInitializerClasses为@HandlesTypes指定接口的所有实现类。因为spring-web.jar,所以开发过程中,只需定义一个类实现org.springframework.web.WebApplicationInitializer接口就可以了。
javax.servlet.ServletContainerInitializer接口
在基于注解的servlet开发中,ServletContainerInitializer接口用于代替web.xml。它只有一个方法:onStartup,可以在其中注册servlet、拦截器(Filter)、监听器(Listener)这三大组件。另外,ServletContainerInitializer还可以使用@HandlesTypes在onStartup方法的参数列表中注入感兴趣的类。servlet容器启动时,会扫描每个jar包的项目根目录下的/META-INF/services/javax.servlet.ServletContainerInitializer文件,执行这个文件中指定的ServletContainerInitializer接口的实现类的onStartup方法。
org.springframework.web包提供的ServletContainerInitializer实现类
org.springframework.web包的/META-INF/services/javax.servlet.ServletContainerInitializer文件指定了ServletContainerInitializer接口的实现类:SpringServletContainerInitializer。源码如下:
package org.springframework.web;

@HandlesTypes(WebApplicationInitializer.class)  //(1)
public class SpringServletContainerInitializer implements ServletContainerInitializer {

    @Override
    public void onStartup(Set<Class<?>> webAppInitializerClasses, ServletContext servletContext)
            throws ServletException {

        List<WebApplicationInitializer> initializers = new LinkedList<WebApplicationInitializer>();

        if (webAppInitializerClasses != null) {
            for (Class<?> waiClass : webAppInitializerClasses) {
                // Be defensive: Some servlet containers provide us with invalid classes,
                // no matter what @HandlesTypes says...
                if (!waiClass.isInterface() && !Modifier.isAbstract(waiClass.getModifiers()) &&
                        WebApplicationInitializer.class.isAssignableFrom(waiClass)) {
                    try {
                        initializers.add((WebApplicationInitializer) waiClass.newInstance());  //(2)
                    }
                    catch (Throwable ex) {
                        throw new ServletException("Failed to instantiate WebApplicationInitializer class", ex);
                    }
                }
            }
        }

        if (initializers.isEmpty()) {
            servletContext.log("No Spring WebApplicationInitializer types detected on classpath");
            return;
        }

        servletContext.log(initializers.size() + " Spring WebApplicationInitializers detected on classpath");
        AnnotationAwareOrderComparator.sort(initializers);
        for (WebApplicationInitializer initializer : initializers) {
            initializer.onStartup(servletContext);  //(3)
        }
    }

}
(1) 通过@HandlesType注解在onStartup方法的参数列表中注入感兴趣的类,即WebApplicationInitializer;
(2) 将WebApplicationInitializer的每个实现类,都新建一个实例,并放入initializers列表中;
(3) 遍历initializers列表,对每个WebApplicationInitializer实例执行其onStartup方法。
那么问题来了:WebApplicationInitializer有哪些实现类,是用来干什么的?
WebApplicationInitializer的实现类及其功能
WebApplicationInitializer的实现类有很多,重点看一下AbstractAnnotationConfigDispatcherServletInitializer
package org.springframework.web.servlet.support;

public abstract class AbstractAnnotationConfigDispatcherServletInitializer
        extends AbstractDispatcherServletInitializer {

    @Override
    @Nullable
    protected WebApplicationContext createRootApplicationContext() {
        Class<?>[] configClasses = getRootConfigClasses();
        if (!ObjectUtils.isEmpty(configClasses)) {
            AnnotationConfigWebApplicationContext context = new AnnotationConfigWebApplicationContext();
            context.register(configClasses);
            return context;
        }
        else {
            return null;
        }
    }

    @Override
    protected WebApplicationContext createServletApplicationContext() {
        AnnotationConfigWebApplicationContext context = new AnnotationConfigWebApplicationContext();
        Class<?>[] configClasses = getServletConfigClasses();
        if (!ObjectUtils.isEmpty(configClasses)) {
            context.register(configClasses);
        }
        return context;
    }

    @Nullable
    protected abstract Class<?>[] getRootConfigClasses();

    @Nullable
    protected abstract Class<?>[] getServletConfigClasses();

}
这个类提供了两个方法的实现,以及两个抽象方法供子类继承
(1) createRootApplicationContext:创建根容器;
(2) createServletApplicationContext:创建servlet容器;
(3) getRootConfigClasses:抽象类,用于注册根容器的配置类,相当于applicationContext.xml;
(4) getServletConfigClasses:抽象的类,用于注册servlet容器的配置类,相当于springmvc.xml;
另外,它还从AbstractDispatcherServletInitializer类继承了getServletMappings方法,用于注册servlet的映射。
因此,我们可以自定义一个WebApplicationInitializer的实现类,继承AbstractAnnotationConfigDispatcherServletInitializer;在servlet容器启动时,会创建spring根容器和servlet容器,代替web.xml配置文件。同时,我们可以看到,在基于注解的springmvc开发中,真正用于代替web.xml的是WebApplicationInitializer,而并不是ServletContainerInitializer,这与本文开头提到的基于注解的servlet开发有些区别。
根容器和servlet容器
根容器用于管理@Service、@Repository等业务逻辑层和数据库交互层组件;
servlet容器用于管理@Controller、视图解析器、拦截器等跟页面处理有关的组件。


