SpringBoot整合JSP
注意:springboot不推荐使用jsp。
一、引入依赖
<!-- 核心启动器, 包括auto-configuration、logging and YAML -->
<dependency>
    <groupId>org.springframework.boot</groupId>
    <artifactId>spring-boot-starter</artifactId>
</dependency>
<!-- building web, including RESTful, applications using Spring MVC.
使用Tomcat作为嵌入式容器, @RestController由这个starter提供-->
<dependency>
    <groupId>org.springframework.boot</groupId>
    <artifactId>spring-boot-starter-web</artifactId>
</dependency>
<!-- springboot不推荐使用jsp,所以在spring-boot-starter-web启动器中并没有包括这两个,
    需要单独引入jstl和tomcat-embed-jasper的依赖支持-->
<!-- jstl -->
<dependency>
    <groupId>javax.servlet</groupId>
    <artifactId>jstl</artifactId>
</dependency>
<!-- jasper:jsp引擎 -->
<dependency>
    <groupId>org.apache.tomcat.embed</groupId>
    <artifactId>tomcat-embed-jasper</artifactId>
    <scope>provided</scope>
</dependency>
二、application.properties
在src/main/resources目录下创建application.properties,添加jsp的视图映射
# 端口
server.port=9080
# 应用上下文
spring.mvc.servlet.path=/jsp-demo
# jsp视图配置, 不能写成/WEB-INF/pages
spring.mvc.view.prefix=/WEB-INF/pages/
spring.mvc.view.suffix=.jsp
三、编写Controller
@RestController
public class UserController {

    /**
     * 直接在页面输出json字符串
     */
    @RequestMapping("/hello")
    public Object hello(){
        Map<String,Object> um = new HashMap<String,Object>();
        um.put("userId", 1);
        um.put("userName", "lin@j");
        um.put("age", 21);
        return um;
    }

    /**
     * @MethodName listUsers
     * @Description 获取用户列表
     * @param request 请求时会自带这个参数,如果确实不需要,入参可以不写
     * @param response 请求时会自带这个参数,如果确实不需要,入参可以不写
     */
    @RequestMapping("/listUsers")
    public ModelAndView listUsers(HttpServletRequest request, HttpServletResponse response, Model model){
        //1. 数据准备
        List<Map<String,Object>> userList = new ArrayList<Map<String, Object>>();
        Map<String,Object> um = new HashMap<String,Object>();
        um.put("userId", 1);
        um.put("userName", "lin@j");
        um.put("age", 21);
        userList.add(um);
        model.addAttribute("list", userList);
        //2. 视图准备
        //因为使用@RestController注解,所以如果要返回视图,必须使用ModelAndView
        ModelAndView view = new ModelAndView();
        view.addObject(model);
        view.setViewName("userList");//视图名称
        return view;
    }
}
四、 在src/main下创建webapp
前面在application.properties中,已添加了jsp的视图映射,所以在webapp目录下创建WEB-INF/pages,并创建userList.jsp
<%@ page language="java" contentType="text/html; charset=utf-8"
         pageEncoding="utf-8"%>
<%@ taglib uri="http://java.sun.com/jsp/jstl/core" prefix="c"%>
<!DOCTYPE html PUBLIC "-//W3C//DTD HTML 4.01 Transitional//EN" "http://www.w3.org/TR/html4/loose.dtd">
<html>
<head>
    <meta http-equiv="Content-Type" content="text/html; charset=utf-8">
    <title>用户列表</title>
</head>
<body>
<table>
    <thead>
    <tr>
        <th>Id</th>
        <th>Name</th>
        <th>Age</th>
    </tr>
    </thead>
    <tbody>
    <c:forEach items="${list}" var="user">
        <tr>
            <td>${user.userId }</td>
            <td>${user.userName }</td>
            <td>${user.age }</td>
        </tr>
    </c:forEach>
    </tbody>
</table>
</body>
</html>
执行启动类的main方法,启动成功后,访问浏览器:http://localhost:9080/jsp-demo/listUsers, 效果如下:
![]()
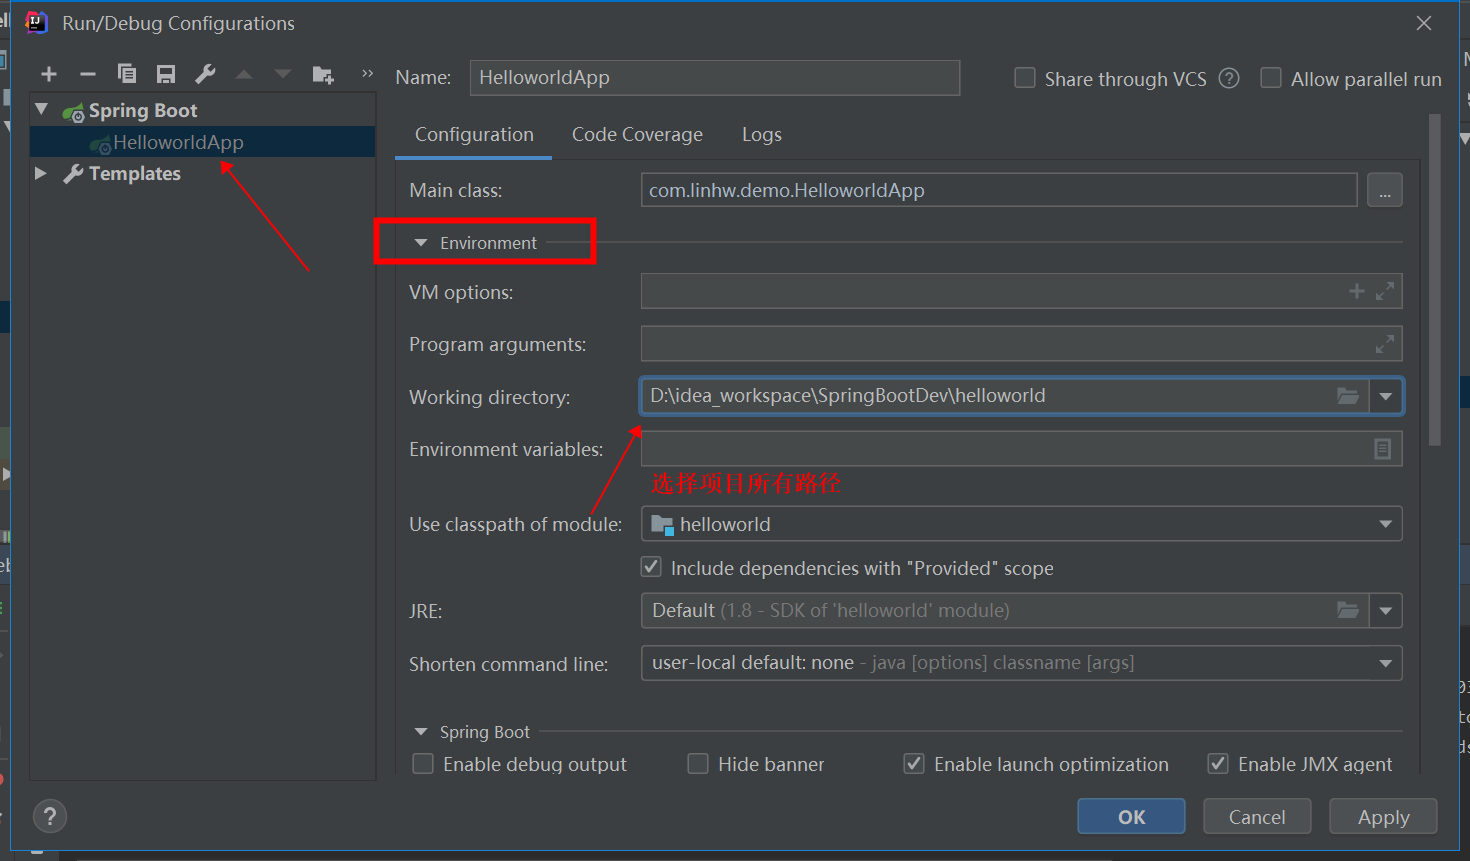
注意事项:大家用的是IDEA,需要特别注意其中一个项目配置,否则可能找不到jsp页面。

时刻与技术进步,每天一点滴,日久一大步!!!
本博客只为记录,用于学习,如有冒犯,请私信于我。


