css模块化(二)
上一篇讲了几个概念,这次,我们讲讲实例,描述常见的一些设计模式。
如果熟读了鬼哥的css模块化的内容,你就会发现,他的文章系列中的好几篇我们之前就已经讲过,所以就不赘述了。
那么,我们为毛要进行模块化呢?肯定是有好处的,没好处,追求它干啥?
在研究这个问题之前,我们先看问题,思考问题,然后解决问题。
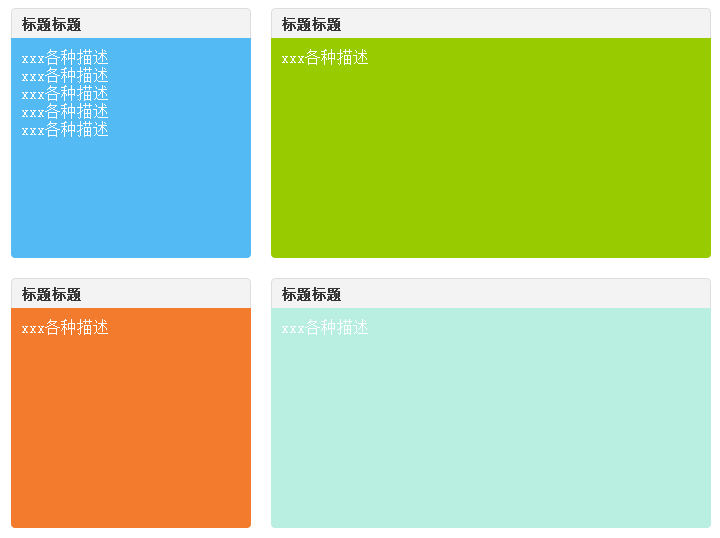
如下图:

像这样的设计,你该怎么办?
我们尽可能给出所有的正经的css+html设计方案。
方案一:基类和原子类(面向属性)的拼接
html:
<div id="wrapper">
    <div class="module w240">
        <header>
            <h1>标题标题</h1>
        </header>
        <div class="bd bg54BAF3">
            <p>xxx各种描述</p>
            <p>xxx各种描述</p>
            <p>xxx各种描述</p>
            <p>xxx各种描述</p>
            <p>xxx各种描述</p>
        </div>
    </div>
    <div class="module w440">
        <header>
            <h1>标题标题</h1>
        </header>
        <div class="bd bg9C0">
            <p>xxx各种描述</p>
        </div>
    </div>
    <div class="module w240">
        <header>
            <h1>标题标题</h1>
        </header>
        <div class="bd bgF27B2E">
            <p>xxx各种描述</p>
        </div>
    </div>
    <div class="module w440">
        <header>
            <h1>标题标题</h1>
        </header>
        <div class="bd bgb8efe1">
            <p>xxx各种描述</p>
        </div>
    </div>
</div>
css:
* { margin:0; padding:0; }
#wrapper { margin:20px auto; width:724px; overflow:hidden; zoom:1; }
/*这尼玛就是原子类啊*/
.w240 { width:240px; }
.w440 { width:440px; }
.bg54BAF3 { background:#54BAF3;}
.bg9C0 { background:#9C0; }
.bgF27B2E { background:#F27B2E; }
.bgb8efe1 { background:#b8efe1; }
/*基类*/
.module { float:left; margin:0 20px 20px 0;   }
.module header { height:30px; line-height:30px;color:#333; font-size:14px; }
.module header h1 { font-size:14px; text-indent:10px; background:rgba(238,238,238,0.7); border:1px solid #ddd; border-radius:4px 4px 0 0; }
.module .bd { height:200px; padding:10px; border-radius:0 0 4px 4px; color:#fff;  }
.module .bd p { }
在线demo:http://jsfiddle.net/xmlovecss/EbuqG/
方案二:就是四个模块,同一样式属性,在css中进行合并
html:
<div id="wrapper">
  <div class="module1">
    <header>
       <h1>标题标题</h1>

    </header>
    <div class="bd">
      <p>xxx各种描述</p>
      <p>xxx各种描述</p>
      <p>xxx各种描述</p>
      <p>xxx各种描述</p>
      <p>xxx各种描述</p>
    </div>
  </div>
  <div class="module2">
    <header>
       <h1>标题标题</h1>

    </header>
    <div class="bd">
      <p>xxx各种描述</p>
    </div>
  </div>
  <div class="module3">
    <header>
       <h1>标题标题</h1>

    </header>
    <div class="bd">
      <p>xxx各种描述</p>
    </div>
  </div>
  <div class="module4">
    <header>
       <h1>标题标题</h1>

    </header>
    <div class="bd">
      <p>xxx各种描述</p>
    </div>
  </div>
</div>
css:
* { margin:0; padding:0; }
#wrapper { margin:20px auto; width:724px; overflow:hidden; zoom:1; }
/*公用样式*/
.module1, .module2, .module3, .module4 { float:left; margin:0 20px 20px 0; }
.module1 header,.module2 header,.module3 header,.module4 header { height:30px; line-height:30px;color:#333; font-size:14px; }
.module1 header h1,.module2 header h1,.module3 header h1,.module4 header h1 { font-size:14px; text-indent:10px; background:rgba(238,238,238,0.7); border:1px solid #ddd; border-radius:4px 4px 0 0; }
.module1 .bd,.module2 .bd,.module3 .bd,.module4 .bd { height:200px; padding:10px; border-radius:0 0 4px 4px; color:#fff;  }
.module1 .bd p,.module2 .bd p,.module3 .bd p,.module4 .bd p { }
/*私有样式*/
.module1,.module3 { width:240px; }
.module2,.module4 { width:440px; }
.module1 .bd { background:#54BAF3; }
.module2 .bd { background:#9C0; }
.module3 .bd { background:#F27B2E; }
.module4 .bd { background:#b8efe1; }
在线demo:http://jsfiddle.net/xmlovecss/Pd6GX/
方案三:基类和扩展类(面向对象命名)
html:
<div id="wrapper">
    <div class="module extend_mod1">
        <header>
            <h1>标题标题</h1>
        </header>
        <div class="bd">
            <p>xxx各种描述</p>
            <p>xxx各种描述</p>
            <p>xxx各种描述</p>
            <p>xxx各种描述</p>
            <p>xxx各种描述</p>
        </div>
    </div>
    <div class="module extend_mod2">
        <header>
            <h1>标题标题</h1>
        </header>
        <div class="bd">
            <p>xxx各种描述</p>
        </div>
    </div>
    <div class="module extend_mod3">
        <header>
            <h1>标题标题</h1>
        </header>
        <div class="bd">
            <p>xxx各种描述</p>
        </div>
    </div>
    <div class="module extend_mod4">
        <header>
            <h1>标题标题</h1>
        </header>
        <div class="bd">
            <p>xxx各种描述</p>
        </div>
    </div>
</div>
css:
* { margin:0; padding:0; }
#wrapper { margin:20px auto; width:724px; overflow:hidden; zoom:1; }
/*基类*/
.module { float:left; margin:0 20px 20px 0;   }
.module header { height:30px; line-height:30px;color:#333; font-size:14px; }
.module header h1 { font-size:14px; text-indent:10px; background:rgba(238,238,238,0.7); border:1px solid #ddd; border-radius:4px 4px 0 0; }
.module .bd { height:200px; padding:10px; border-radius:0 0 4px 4px; color:#fff;  }
.module .bd p { }
/*扩展类*/
.extend_mod1,.extend_mod3 { width:240px; }
.extend_mod2,.extend_mod4 { width:440px; }
.extend_mod1 .bd { background:#54BAF3; }
.extend_mod2 .bd { background:#9C0; }
.extend_mod3 .bd { background:#F27B2E; }
.extend_mod4 .bd { background:#b8efe1; }
当然,这个示例中,也有人会把结构中的扩展类改成id来做区分。
在线demo:http://jsfiddle.net/xmlovecss/YZFPV/
在分析上面的实例时,有一点必须说明,我给出的三种方案里,都是扩展,没有重写。如果要涉及到重写,第一种方案就最糟糕了,样式权重会成为一个灾难。
我们分析一下上面三种方案的可行性:
-
第一种:如果整个项目中就出现一次这样的界面,并且忽略语义化,那无可厚非,还可以。改动起来不是很费事儿。如果还要增加其它的个性属性(样式),那么得制造多少原子类啊!
如果不止一次地出现这样的界面,次数越多,你想想,pd驱动设计改界面,到时候,面向属性的原子类命名,不止一个页面的html修改,哭去吧,骚年。
-
第二种:尽管有人会觉得,第二种方案好像比较傻逼。事实上,第二种方案也是比较聪明的方案,可扩展性强,维护代价低,语义好。尽管折腾吧,毫无惧色。
-
第三种:第三种方案的出现,其实是为了规避第一种方案的命名不语义化,规避第二种的重复属性声明。好处不言自明,不拿id做区分的话,样式声明需要有先后的顺序,共性module样式声明在前,个性样式extend_module声明在后。
好了,分析完啦。这只是一个简单的示例,没有使用覆盖,而用的都是扩展,不会造成重绘的问题,因而提高了页面渲染效率。
给个小练习吧:

再来个复杂点的:


