Step by Step WebMatrix网站开发之二:使用WebMatrix(3)
要学好用好一个工具,最好的办法是从模板入手,因而今天的任务就是从模板建立一个网站,然后分析一下模板的构成。
在WebMatrix开始页,单击“从模板创建网站”,然后选择“面包店”,在网站名称中输入“我的面板店”,最后单击“确定”完成操作。
创建过程完成后,单击运行按钮,会在浏览器看到如图1所示的页面。
图1
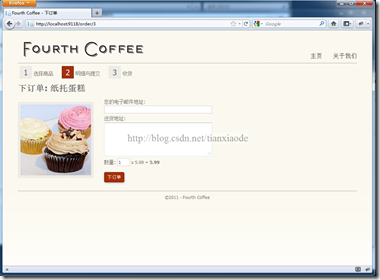
单击“立即订购”,将看到图2所示的页面。
图2
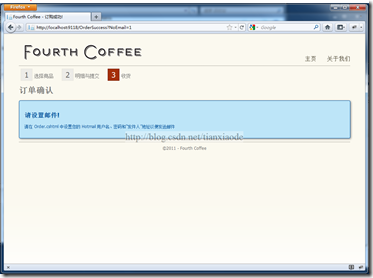
随便输入电子邮件和地址,然后单击“下订单”将看到如图3所示的页面。
图3
除了关心页面的流程,还应留意一下页面的地址:
http://localhost:9118
http://localhost:9118/order/3
http://localhost:9118/OrderSuccess?NoEmail=1
IIS不用设置也可以实现跳转了。现在会WebMatrix,看看是如何做到的。
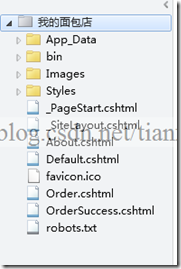
单击文件菜单,看到如图4所示的文件和文件目录。可以看到,WebMatrix使用的Razor引擎,其文件扩展名是cshtml。
图4
打开bin目录,会看到一个名称为Microsoft.Web.Helpers.dll的库文件,这就是微软新的Razor引擎库。
熟悉ASP.NET开发的应该知道,APP_Data目录是放置数据库用的。Images目录不用说也知道是存放图片的,Styles是存放样式文件。
先打开首页Default.cshtml文件,可看到以下代码:
| 1 | @{ |
| 2 | Page.Title = "主页"; |
| 3 | |
| 4 | var db = Database.Open("bakery"); |
| 5 | var products = db.Query("SELECT * FROM PRODUCTS").ToList(); |
| 6 | var featured = products[new Random().Next(products.Count)]; |
| 7 | } |
| 8 | |
| 9 | <h1>欢迎光临 Fourth Coffee!</h1> |
| 10 | |
| 11 | <div id="featuredProduct"> |
| 12 | <img alt="特色产品" src="@Href("~/Images/Products/" + featured.ImageName)" /> |
| 13 | <div id="featuredProductInfo"> |
| 14 | <div id="productInfo"> |
| 15 | <h2>@featured.Name</h2> |
| 16 | <p class="price">$@string.Format("{0:f}", featured.Price)</p> |
| 17 | <p class="description">@featured.Description</p> |
| 18 | </div> |
| 19 | <div id="callToAction"> |
| 20 | <a class="order-button" href="@Href("~/order", featured.Id)" title="订购 @featured.Name">立即订购</a> |
| 21 | </div> |
| 22 | </div> |
| 23 | </div> |
| 24 | |
| 25 | <ul id="products"> |
| 26 | @foreach (var p in products) { |
| 27 | <li class="product"> |
| 28 | <div class="productInfo"> |
| 29 | <h3>@p.Name</h3> |
| 30 | <img class="product-image" src="@Href("~/Images/Products/Thumbnails/"+ p.ImageName)" alt="@p.Name 图像" /> |
| 31 | <p class="description">@p.Description</p> |
| 32 | </div> |
| 33 | <div class="action"> |
| 34 | <p class="price">$@string.Format("{0:f}", p.Price)</p> |
| 35 | <a class="order-button" href="@Href("~/order", p.Id)" title="订购 @p.Name">立即订购</a> |
| 36 | </div> |
| 37 | </li> |
| 38 | } |
| 39 | </ul> |
居然看不到通常页面需要Head和Body定义。语法也有点怪,呵呵,这是新的Razor语法,从下篇开始介绍。Head部分和body的定义其实还是有的。Razor引擎引入了ASP.NET母板页的概念,因而这些代码其实都在母板页里,文件名是_SiteLayout.cshtml,打开该文件将看到以下代码:
| 1 | <!DOCTYPE html> |
| 2 | <html lang="en"> |
| 3 | <head> |
| 4 | <meta http-equiv="Content-Type" content="text/html; charset=utf-8"/> |
| 5 | <meta charset="utf-8" /> |
| 6 | <title>Fourth Coffee - @Page.Title</title> |
| 7 | <link href="@Href("~/Styles/Site.css")" rel="stylesheet" /> |
| 8 | <link href="@Href("~/favicon.ico")" rel="shortcut icon" type="image/x-icon" /> |
| 9 | </head> |
| 10 | <body> |
| 11 | <div id="page"> |
| 12 | <div id="header"> |
| 13 | <p class="site-title"><a href="@Href("~/")">Fourth Coffee</a></p> |
| 14 | <ul id="menu"> |
| 15 | <li><a href="@Href("~/")">主页</a></li> |
| 16 | <li><a href="@Href("~/About")">关于我们</a></li> |
| 17 | </ul> |
| 18 | </div> |
| 19 | <div id="body"> |
| 20 | @RenderBody() |
| 21 | </div> |
| 22 | <div id="footer"> |
| 23 | ©@DateTime.Now.Year - Fourth Coffee |
| 24 | </div> |
| 25 | </div> |
| 26 | </body> |
| 27 | </html> |
这就是页面的框架部分了,内容页的插入位置是语句“@RenderBody”,单词已经说明是干什么的了,渲染body。好处不用多说,页面中的共同部分通过模板页可重复使用,不用每个页面都修改一次。
有一点要注意,带下划线(_)的文件是不能在页面直接访问的,例如你在浏览器打开_SiteLayout.cshtml文件,会看到如图5所示的错误页面。
图5
_PageStart.cshtml文件的作用是在在页面运行前做一些初始化工作,例如,当前网站的_PageStart会知道模板页是那个:
| 1 | @{ |
| 2 | Layout = "~/_SiteLayout.cshtml"; |
| 3 | } |
这样,页面显示时就会将模板页和实际页面结合起来再显示。
Razor引擎还要一个特殊文件_AppStart.cshtml,其作用是在网站启动的时候做一些初始化工作,与ASP.NET的Global.asax文件的Application_Start事件是一样。
今天的介绍就到此。下次开始介绍Razor语法。


