SpringBoot框架 之 Thymeleaf
目录
Thymeleaf
介绍
	SpringBoot并不推荐使用jsp
	Thymeleaf 是一个跟 Velocity、FreeMarker 类似的模板引擎,它可以完全替代 JSP

特点
	动静结合
		Thymeleaf 在有网络和无网络的环境下皆可运行
		它可以让美工在浏览器查看页面的静态效果,也可以让程序员在服务器查看带数据的动态页面效果
		这是由于它支持 html 原型,然后在 html 标签里增加额外的属性来达到模板+数据的展示方式
		浏览器解释 html 时会忽略未定义的标签属性,所以 thymeleaf 的模板可以静态地运行
		当有数据返回到页面时,Thymeleaf 标签会动态地替换掉静态内容,使页面动态显示

	开箱即用
		它提供标准和spring标准两种方言,可以直接套用模板实现JSTL、 OGNL表达式效果,避免每天套模板、该jstl、改标签的困扰。
		同时开发人员也可以扩展和创建自定义的方言。

	多方言支持
		Thymeleaf 提供spring标准方言和一个与 SpringMVC 完美集成的可选模块,可以快速的实现表单绑定、属性编辑器、国际化等功能。

	与SpringBoot完美整合
		与SpringBoot完美整合,SpringBoot提供了Thymeleaf的默认配置
		并且为Thymeleaf设置了视图解析器,我们可以像以前操作jsp一样来操作Thymeleaf。
添加启动器
<dependency>
    <groupId>org.springframework.boot</groupId>
    <artifactId>spring-boot-starter-thymeleaf</artifactId>
</dependency>
创建模板文件夹
-
SpringBoot会自动为Thymeleaf注册一个视图解析器ThymeleafViewResolver
-
还配置了模板文件(html)的位置,与jsp类似的前缀+ 视图名 + 后缀风格:
-
与解析JSP的InternalViewResolver类似,Thymeleaf也会根据前缀和后缀来确定模板文件的位置:
@ConfigurationProperties(prefix="spring.thymeleaf")
public class ThymeleafProperties{
	private static final Charset DEFAULT_ENCODING=StandardCharsets.UTF_8;
	public static final String DEFAULT_PREFIX="classpath:/templates/";
	public static final String DERAULT_SUEEIX=". html";
	......
}
-
在配置文件中配置缓存,编码
spring:
  thymeleaf:
    cache: false
    mode: HTML5
    encoding: UTF-8
基本使用
引入名称空间
	<html lang="en" xmlns:th="http://www.thymeleaf.org">

表达式
	${}:变量表达式
	*{} :选择变量表达式,取出hero对象中的属性
		<div th:object="${hero}">
            <p th:text="*{username}"></p>
            <p th:text="*{phone}"></p>
            <p th:text="*{id}"></p>
            <p th:text="${hero.username}"></p>
        </div>
	#{...} : Message 表达式

URL
	绝对网址
		绝对URL用于创建到其他服务器的链接,它们需要指定一个协议名称(http://或https://)开头
		<a th:href="@{https://www.itlike.com/}">

	上下文相关URL
		与Web应用程序根相关联URL
		<a th:href="@{/hello}">跳转</a>

	与服务器相关URL
		服务器相关的URL与上下文相关的URL非常相似
		<a th:href="@{~/hello}">跳转</a>

	携带参数
		<a th:href="@{/hero/detail(id=3,action='show_all')}">aa</a>

字面值
	有的时候,我们需要在指令中填写基本类型如:字符串、数值、布尔等,并不希望被Thymeleaf解析为变量,这个时候称为字面值。(也就是原样输出)
	字符串字面值
		<p>
			内容:<span th:text=”'thymeleaf'+1">template</span>
		</p>

	数字字面值
		<p>
			内容:<span th:text=”2+1">template</span>
		</p>

    布尔字面值
        布尔类型的字面值是true或false

拼接
	普通字符串与表达式拼接的情况
		<span th:text=”'欢迎您:'+${hero.username}+'!'"></span>

	字符串字面值需要用'',拼接起来非常麻烦,Thymeleaf对此进行了简化,使用一对|即可
		<span th:text="|欢迎您:${hero.username}|"></span>

运算符
	算术操作符
		+ - * / %
  	比较运算
        > , <, >= and <=
        但是>和<不能直接使用,因为xml会解析为标签
        >  gt
        <  lt
        >= ge
        <= le
        <!-- 返回值为true -->
        <h1 th:text=" 1 lt 2"></h1>
        <!-- 返回值为假 -->
		<h1 th:text="1 gt 2 ? '真' : '假'"></h1>

    三元运算
        condition ? then : else
        	<span th:text="${false}?'男':'女'"></span〉
        简写
            <!--
    默认表达式
    变量值为空  就显示默认值
    否则就显示变量本身
    -->
    <h1 th:text="${hero.username}?:'我是空值'"></h1>
    <h1 th:text="${hero.username} != null ? ${hero.username} : '我是空值'"></h1>

内联写法
    <!--原样输出-->
    <p>pppp-------—-[(${hero.username})]</p>
    <!--解析内部标签-->
    <p>pppp-------—-[[${hero.username}]]</p>


局部变量
    <div th:with="heroN = ${allHero[0]}">
        <h1 th:text="${heroN.username}"></h1>
        <h1 th:text="${heroN.phone}"></h1>
    </div>

判断
    th:if
        <!--当条件满足时, 才会显示标签-->
        <h1 th:if="${1 lt 2}">内容1</h1>

    th:unless
        <!--
        unless是与if相反
        不满足条件时,才会显示标签
        -->
        <h1 th:unless="${1 gt 2}">内容2</h1>

    th:switch
        <div th:switch="${hero.username}">
            <p th:case="'itlike'">itlike</p>
            <p th:case="'gxq'">gxq</p>
            <p th:case="*">*为默认的值,相当于default</p>
        </div>

迭代
    <div>
        <p th:each="heroItem:${allHero}">
            <span th:text="${heroItem.username}"></span>
            <span th:text="${heroItem.phone}"></span>
            <span th:text="${#dates.format(heroItem.onlinetime,'yyyy-MM-dd')}"></span>
        </p>
    </div>

    <hr>
    <div>
        <p th:each="heroItem,stat:${allHero}">
            <span th:text="${heroItem.username}"></span>
            <span th:text="${heroItem.phone}"></span>
            <span th:text="${stat.index}"></span>
        </p>
    </div>


    stat对象包含以下属性
        index,从0开始的角标
        count,当前遍历到第几个元素,从1开始
        size,总元素个数
        current,当前遍历到的元素信息
        odd/even,返回是否为奇偶,boolean值
        first/last,返回是否为第一或最后,boolean值
内置对象
	环境相关对象
		${#ctx} 上下文对象,可用于获取其它内置对象。
		${#vars}:    上下文变量。
		${#locale}:上下文区域设置。
		${#request}: HttpServletRequest对象。
		${#response}: HttpServletResponse对象。
		${#session}: HttpSession对象。
		${#servletContext}:  ServletContext对象。

	全局对象功能
		#strings:字符串工具类
		#lists:List 工具类
		#arrays:数组工具类
		#sets:Set 工具类
		#maps:常用Map方法。
		#objects:一般对象类,通常用来判断非空
		#bools:常用的布尔方法。
		#execInfo:获取页面模板的处理信息。
		#messages:在变量表达式中获取外部消息的方法,与使用#{...}语法获取的方法相同。
		#uris:转义部分URL / URI的方法。
		#conversions:用于执行已配置的转换服务的方法。
		#dates:时间操作和时间格式化等。
		#calendars:用于更复杂时间的格式化。
		#numbers:格式化数字对象的方法。
		#aggregates:在数组或集合上创建聚合的方法。
		#ids:处理可能重复的id属性的方法。

	示例
		${#strings.abbreviate(str,10)}  str截取0-10位,后面的全部用…这个点代替,注意,最小是3位
		${#strings.toUpperCase(name)}
		判断是不是为空:null:
		<span th:if="${name} != null">不为空</span>
		<span th:if="${name1} == null">为空</span>

		判断是不是为空字符串: “”
		<span th:if="${#strings.isEmpty(name1)}">空的</span>

		判断是否相同:
		<span th:if="${name} eq 'jack'">相同于jack,</span>
		<span th:if="${name} eq 'ywj'">相同于ywj,</span>
		<span th:if="${name} ne 'jack'">不相同于jack,</span>


		不存在设置默认值:
		<span th:text="${name2} ?: '默认值'"></span>

		是否包含(分大小写):
		<span th:if="${#strings.contains(name,'ez')}">包ez</span>
		<span th:if="${#strings.contains(name,'y')}">包j</span>

		是否包含(不分大小写)
		<spanth:if="${#strings.containsIgnoreCase(name,'y')}">包</span>
		${#strings.startsWith(name,'o')}
		${#strings.endsWith(name, 'o')}
		${#strings.indexOf(name,frag)}// 下标
		${#strings.substring(name,3,5)}// 截取
		${#strings.substringAfter(name,prefix)}// 从 prefix之后的一位开始截取到最后,比如 (ywj,y) = wj, 如果是(abccdefg,c) = cdefg//里面有2个c,取的是第一个c
		${#strings.substringBefore(name,suffix)}// 同上,不过是往前截取
		${#strings.replace(name,'las','ler')}// 替换
		${#strings.prepend(str,prefix)}// 拼字字符串在str前面
		${#strings.append(str,suffix)}// 和上面相反,接在后面
		${#strings.toUpperCase(name)}
		${#strings.toLowerCase(name)}
		${#strings.trim(str)}
		${#strings.length(str)}
		${#strings.abbreviate(str,10)}//  str截取0-10位,后面的全部用…这个点代替,注意,最小是3位

布局
	方式1
		hello.html
        <nav th:fragment="header">
            <h1>头部</h1>
        </nav>
        base.html
		<div th:include="{common/base::header}"></div>

	方式2
		hello.html
		<footer id="footer">
            <h1  th:class="${active == 'footer' ? 'red' : ''}" >尾部---</h1>
            <p>aaaaaa</p>
        </footer>
        base.html
		<div th:insert="{common/base::#footer}"></div>

	引入方式
		th:insert
			将公共的标签及内容插入到指定标签当中
		th:replace
			将公共的标签替换指定的标签
		th:include
			将公共标签的内容包含到指定标签当中

	传值
		hello.html
		<div th:include="~{base::#footer(active='footers')}"></div>

		base.html
		<footer id="footer">
            <h1 th:class="${active == 'footer' ? 'red' : ''}" >尾部---</h1>
            <p>aaaaaa</p>
        </footer>

js模板
	模板引擎不仅可以渲染html,也可以对JS中的进行预处理。而且为了在纯静态环境下可以运行
	在script标签中通过th:inline="javascript"来声明这是要特殊处理的js脚本
	取值要采用注释的形式
	<script th:inline="javascript">
        var username = /*[[${name}]]*/ "myxq";
        console.log(username);
    </script>
综合使用
导入资源
引入bootstrap
    <dependency>
        <groupId>org.webjars</groupId>
        <artifactId>bootstrap</artifactId>
        <version>4.0.0</version>
    </dependency>

在页面中引入资源文件
    <link rel="stylesheet" href="js/bootstrap/dist/css/bootstrap.css" th:href="@{/webjars/bootstrap/4.0.0/css/bootstrap.css}">
    <link rel="stylesheet" href="js/font-awesome/css/font-awesome.css" th:href="@{/css/font-awesome/css/font-awesome.css}">
    <link rel="stylesheet" href="css/index.css" th:href="@{/css/index.css}">
    <script  th:href="@{/webjars/bootstrap/4.0.0/js/bootstrap.js}"></script>
设置默认主页
@Configuration
public class WebMvcConfig implements WebMvcConfigurer {
    @Override
    public void addInterceptors(InterceptorRegistry registry) {
        registry.addVievController("/")).setViewName("login");
        registry.addVievController("/index.html")).setViewName("login");
    }
}
国际化
1.编写国际化配置文件
在资源文件夹resources下,创建一个国际化文件夹i18n
在i18n文件夹中创建一个login.properties文件
创建中文/英文国际化文件
在i18n文件夹中创建一个login_en_US.properties文件
在i18n文件夹中创建一个login_zh_CN.properties文件
点击Resource Bundle,新建property key name为login.username
在login.properties窗口下输入用户名
login_en_US.properties窗口中输入username
login_zh_CN.properties窗口中输入用户
注意
要更改文件编码
idea中,设置->编译器->文本编码属性文件(*.properties)
设置属性文件的默认编码为UTF-8
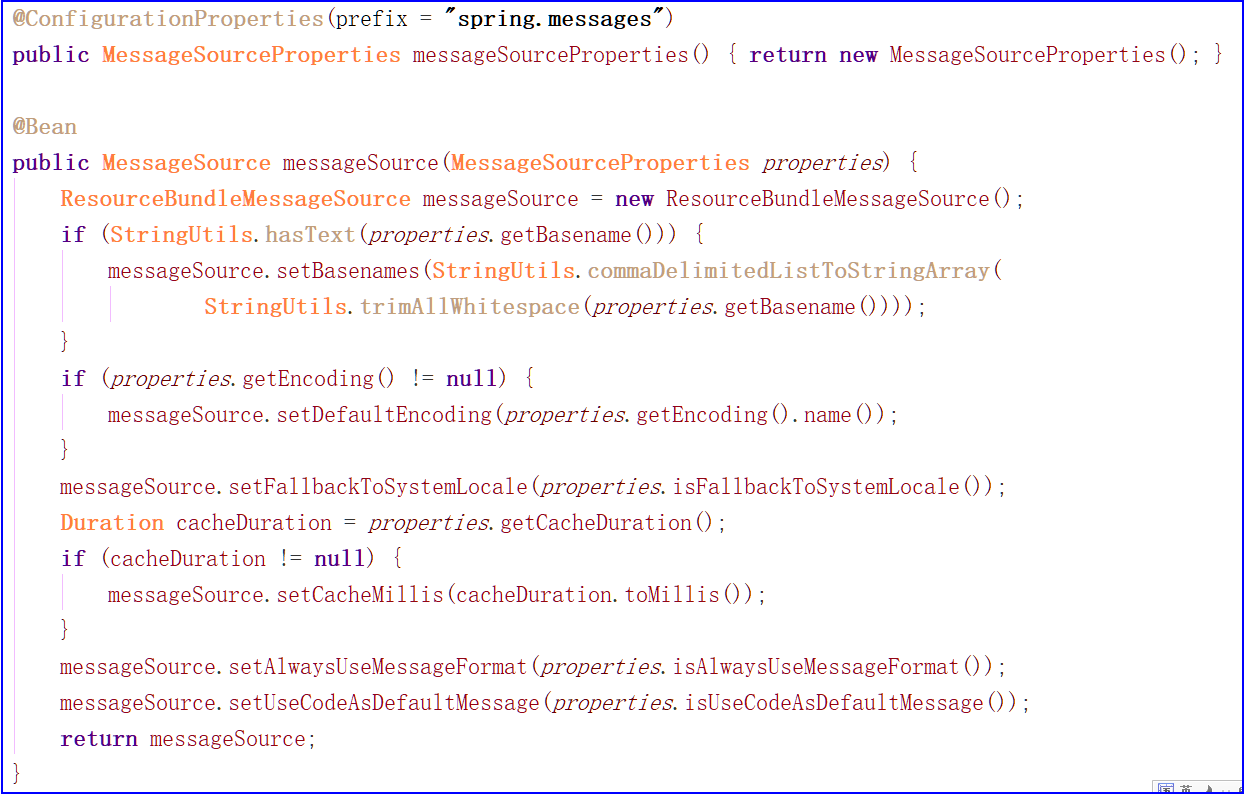
2.在springboot中有一个messageSourceAutoConfiguration
会自动管理国际化资源文件
在全局配置文件中设置基础名
spring:
messages:
basename: i18n.login
3.在页面中获取国际化的值
<!-- 登录 -->
<div class="login">
<div class="login-wrap">
<div class="avatar">
<img src="./images/logo.jpg" class="img-circle" alt="">
</div>
<form action="" class="col-md-offset-1 col-md-10">
<div class="input-group input-group-lg">
<span class="input-group-addon">
<i class="fa fa-id-card-o"></i>
</span>
<input type="text" class="form-control" name="username" th:placeholder="#{login.username}">
</div>
<div class="input-group input-group-lg">
<span class="input-group-addon">
<i class="fa fa-key"></i>
</span>
<input type="password" class="form-control" name="password" th:placeholder="#{login.password}">
</div>
<button type="submit" class="btn btn-lg btn-danger btn-block" th:text="#{login.btn}">登 录</button>
<a class="language" th:href="@{/login(lan='zh_CN')}">中文</a>|<a class="language" th:href="@{/login(lan='en_US')}">English</a>
</form>
</div>
</div>
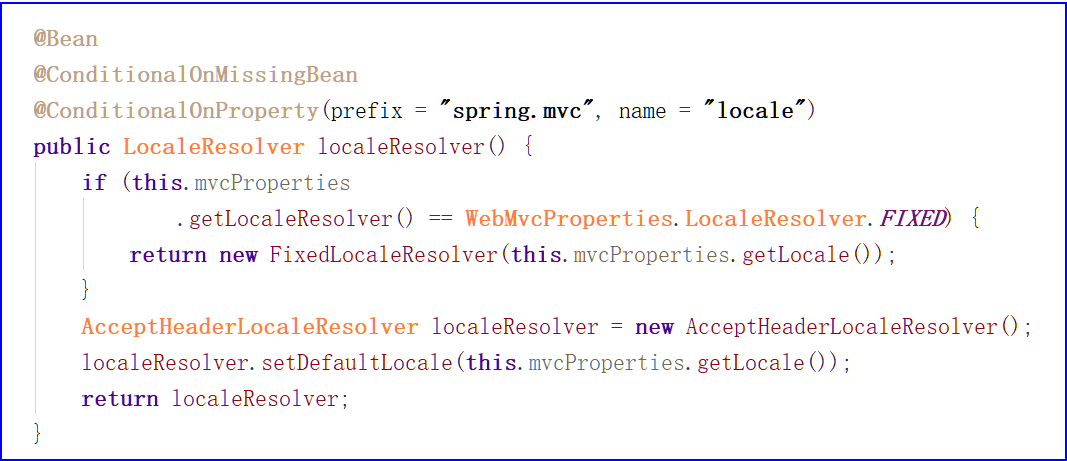
4.切换中英文
默认
自定义
public class MyLocaleResolver implements LocaleResolver {
@Override
public Locale resolveLocale(HttpServletRequest request){
String lan=request.getParameter("lan");
Locale locale=Locale.getDefault();
if(!StringUtils.isEmpty(lan)){
String[] split=lan.split("_");
locale=new Locale(split[0],split[1]);
}
return locale;
}
@Override
public void setLocale(HttpServletRequest request, HttpServletResponse response, Locale locale){
}
}
@Configuration
public class WebMvcConfig implements WebMvcConfigurer {
@Bean
public LocaleResolver localeResolver() {
return new MyLocaleResolver();
}
}
MessageSourceAutoConfiguration(自动管理国际化资源文件)
默认切换中英文
登录
界面处理
<!-- 登录 -->
<div class="login">
	<div class="login-wrap">
		<div class="avatar">
			<img src="./images/logo.jpg" class="img-circle" alt="">
		</div>
		<form action="" class="col-md-offset-1 col-md-10">
			<div class="input-group input-group-lg">
					<span class="input-group-addon">
						<i class="fa fa-id-card-o"></i>
					</span>
				<input type="text" class="form-control" name="username" th:placeholder="#{login.username}">
			</div>
			<div class="input-group input-group-lg">
					<span class="input-group-addon">
						<i class="fa fa-key"></i>
					</span>
				<input type="password" class="form-control" name="password" th:placeholder="#{login.password}">
			</div>

			<button type="submit" class="btn btn-lg btn-danger btn-block" th:text="#{login.btn}">登 录</button>
			<a class="language" th:href="@{/login(lan='zh_CN')}">中文</a>|<a class="language" th:href="@{/login(lan='en_US')}">English</a>
		</form>
	</div>
</div>
接收请求
@PostMapping("/login")
public String login(@RequestParam("username") String username,@RequestParam("password")String password,Model model,HttpSession session){
	if(!StringUtils.isEmpty(username)&& "123456".equals(password)){
		//登陆成功,防止表单重复提交,可以重定向到主页
		session.setAttribute("loginUser",username);
		return "redirect:/main.html";
	}else{
		//登陆失败
		model.addAttribute("msg","用户名密码错误");
		return "login";
	}
}
登录错误处理
<!--判断-->
<p style="color:red;margin-left:60px;font-size:18px" th:text="${msg}" th:if="${not #strings.isEmpty(msg)}"></p>
登录状态处理
public class LoginHandlerInterceptor implements HandlerInterceptor {
    @Override
    public boolean preHandle(HttpServletRequest request, HttpServletResponse response, Object handler) throws ServletException, IOException {
        Object user=request.getSession().getAttribute("loginUser");
        if(user==null){
            //未登陆,返回登陆页面
            request.setAttribute("msg","没有权限请先登陆");
            request.getRequestDispatcher("/login").forward(request,response);
            return false;
        }
        else{
            //已登陆,放行请求
            return true;
        }
    }
}
springBoot2.0之后添加拦截器时,要自己添加静态资源文件路径(2.0之前是自动添加静态资源文件路径)
@Configuration
public class WebMvcConfig implements WebMvcConfigurer {
    @Override
    public void addInterceptors(InterceptorRegistry registry) {
        registry.addInterceptor(new LoginHandlerInterceptor()).addPathPatterns("/**")
                .excludePathPatterns("/","/1ogin","/main.html","login","/static/**");
    }

    @Override
    public void addResourceHandlers(ResourceHandlerRegistry registry) {
        registry.addResourceHandler("/static/**").addResourceLocations("classpath:/static/**");
        WebMvcConfigurer.super.addResourceHandlers(registry);
    }
}
列表
列表数据获取
public interface HeroMapper extends Mapper<Hero> {
}
@Autowired
private MainService mainService;
@RequestMapping("/main")
public String main(Model mode){
	List<Hero> herolist=mainService.getHeroList();
	model.addAttribute("heroList",heroList);
	return"main";
}
列表展示
<tr th:each="hero:${heroList}">
	<td th:text="${hero.id}"></td>
	<td th:text="${hero.profession}"></td>
	<td th:text="${hero.username}"></td>
	<td th:text="${hero.email}"></td>
	<td th:text="${#dates.format(hero.onlinetime,'yyyy-MM-dd HH:mm')}"></td>
	<td>
		<a th:href="@{/edit}" class="btn btn-danger btn-sm">编辑</a>
		<a href="javascript:;" class="btn btn-warning btn-sm">删除</a>
	</td>
</tr>
添加
跳转到添加页面
<div class="panel-body">
	<a href="@{/addPage}" class="btn btn-primary">添加英雄</a>
</div>

添加按钮点击
<form th:action="@{/addHero}" class="form-horizontal" method="post">

	<input type="hidden" name="_method" value="put" th:if="${hero!=null}"/>
	<input type="hidden" name="id" th:if="${hero!=null}" th:value="${hero.id}">

	<div class="form-group">
		<label  class="col-md-2 control-label">名称</label>
		<div class="col-md-6">
			<input type="text" name="username" th:value="${hero!=null}?${hero.username}" class="form-control">
		</div>
	</div>
	<div class="form-group">
		<label  class="col-md-2 control-label">职业</label>
		<div class="col-md-6">
			<input type="text" name="profession" th:value="${hero!=null}?${hero.profession}" class="form-control">
		</div>
	</div>
	<div class="form-group">
		<label  class="col-md-2 control-label">电话</label>
		<div class="col-md-6">
			<input type="text" name="phone" th:value="${hero!=null}?${hero.phone}"  class="form-control">
		</div>
	</div>
	<div class="form-group">
		<label  class="col-md-2 control-label">邮箱</label>
		<div class="col-md-6">
			<input type="text" name="email" th:value="${hero!=null}?${hero.email}"  class="form-control">
		</div>
	</div>
	<div class="form-group">
		<label  class="col-md-2 control-label">上线日期</label>
		<div class="col-md-6">
			<input type="text" name="onlinetime" th:value="${hero!=null}?${#dates.format(hero.onlinetime,'yyyy-MM-dd')}"  class="form-control">
		</div>
	</div>
	<div class="modal-footer">
		<input type="submit" class="btn btn-danger"   th:value="${hero!=null}?'修改':'添加'">
	</div>
</form>

日期处理(写在控制器中)
@InitBinder
public void InitBinder(WebDataBinder dataBinder){
        dataBinder.registerCustomEditor(Date.class,new PropertyEditorSupport(){
        public void setAsText(String value){
            try{
                setValue(new SimpleDateFormat("yyyy-MM-dd").parse(value));
            }
            catch(ParseException e){
                setValue(null);
            }
        }

        public String getAsText(){
            return new SimpleDateFormat("yyyy-MM-dd").format((Date)getValue());
        }
    });
}
