SpringMVC(二)
SpringMVC(二)
@RequestMapping相关属性
Value属性
- 用来设置请求路径
- 值是一个字符串数组
- 可以设置多个路径共同访问对应方法
示例
<a href="${pageContext.request.contextPath}/first.action">第一个请求</a>
<a href="${pageContext.request.contextPath}/second.action">第二个请求</a>
@RequestMapping(value = {"first","second"})
public String testquest(){
	System.out.println("testquest--------------");
	return "/result.jsp";
}
method属性
- 用来设置映射的请求方式
- 值是RequestMethod类型的数组
- 如果没有写,则没有限制,post与get都可以请求到对应的方法
- 如果指定了请求类型,则必须得是相应的请求才能访问到对应的方法
示例
<form action="${pageContext.request.contextPath}/testMethod" method="post">
    <input type="submit" value="测试testMethod">
</form>
@RequestMapping(
    value = {"testMethod"},
    method = {RequestMethod.POST,RequestMethod.GET}
)
public String testrestDELETE(Model model){
	model.addAttribute("msg","请求"+id);
	return "/result.jsp";
}
params属性
- 必须设置对应的请求参数和请求值才能访问到对应的内容
示例
<a href="${pageContext.request.contextPath}/testMethod.action?name=le&age=22" method="post">请求
</a>
@RequestMapping(
    value = {"testMethod"},
    method = {RequestMethod.POST,RequestMethod.GET},
    params={"name=le","age!=2"}
)
public String testrestPOST(Model model){
	model.addAttribute("msg","请求"+id);
	return "/result.jsp";
}
headers属性
- 发送的请求头必须要与设置的请求相同时,才能够访问到对应的方法
示例
@RequestMapping(
    value = {"testMethod"},
    method = {RequestMethod.POST,RequestMethod.GET},
    params = {"name=le","age!=2"},
    headers = {"Host=localhost:8080","Referer:http://localhost:8080/index.jsp"}
)
public String testrestPOST(Model model){
	model.addAttribute("msg","请求"+id);
	return "/result.jsp";
}
Ant风格地址
Ant风格
请求路径的一种匹配方法
通配符
?
一个?匹配一个字符
<a href="${pageContext.request.contextPath}/ant/a/testAnt.action" method="post">请求ant路径
</a>
@RequestMapping("/ant/?/testAnt")
public String testAnt(Model model){
	return "/result.jsp";
}
<a href="${pageContext.request.contextPath}/ant/ab/testAnt.action" method="post">请求ant路径
</a>
@RequestMapping("/ant/??/testAnt")
public String testAnt(Model model){
	return "/result.jsp";
}
*
匹配任意字符
<a href="${pageContext.request.contextPath}/ant/abc/testAnt.action" method="post">请求ant路径
</a>
@RequestMapping("/ant/*/testAnt")
public String testAnt(Model model){
	return "/result.jsp";
}
**
匹配多重路径
<a href="${pageContext.request.contextPath}/ant/a/b/ccc/testAnt.action" method="post">请求ant路径
</a>
@RequestMapping("/ant/**/testAnt")
public String testAnt(Model model){
	return "/result.jsp";
}
@PathVariable
rest风格
- 资源定位及资源操作的风格
- 不是协议,可以遵循,也可以不遵循
REST风格请求
- REST 即 Representational State Transfer (资源)表现层状态转化
- 用URL定位资源,用HTTP描述操作
- 是目前最流行的一种互联网软件架构
- 它结构清晰、符合标准、易于理解、扩展方便,所以正得到越来越多网站的采用
- 使用POST, DELETE, PUT, GET 分别对应 CRUD
- Spring3.0 开始支持 REST 风格的请求
传统的操作资源
- http://localhost:8080/get.action?id=10 查询 get
- http://localhost:8080/add.action 新增 post
- http://localhost:8080/update.action 修改 post
- http://localhost:8080/delete.action?id=10 删除 post
restful操作资源
- http://localhost:8080/goods/1 查询GET
- http://localhost:8080/goods 新增POST
- http://localhost:8080/goods 更新PUT
- http://localhost:8080/goods/1 删除DELETE
使用@PathVariable接收RestFul风格参数
<a href="${pageContext.request.contextPath}/restful/2.action" method="post">请求ant路径
</a>
@RequestMapping("/restful/{id}")
public String testRestful(@PathVariable int id){
	System.out.println(id);
	return "/result.jsp";
}
发送put与delete请求
- 默认情况下Form表单是不支持PUT请求和DELETE请求的
- spring3.0添加了一个过滤器HiddenHttpMethodFilter
- 可以将post请求转换为PUT或DELETE请求
配置过滤器
- HiddenHttpMethodFilter必须作用于dispatcher前,所以在web.xml中配置HiddenHttpMethodFilter
Spring MVC过滤器-HiddenHttpMethodFilter
介绍
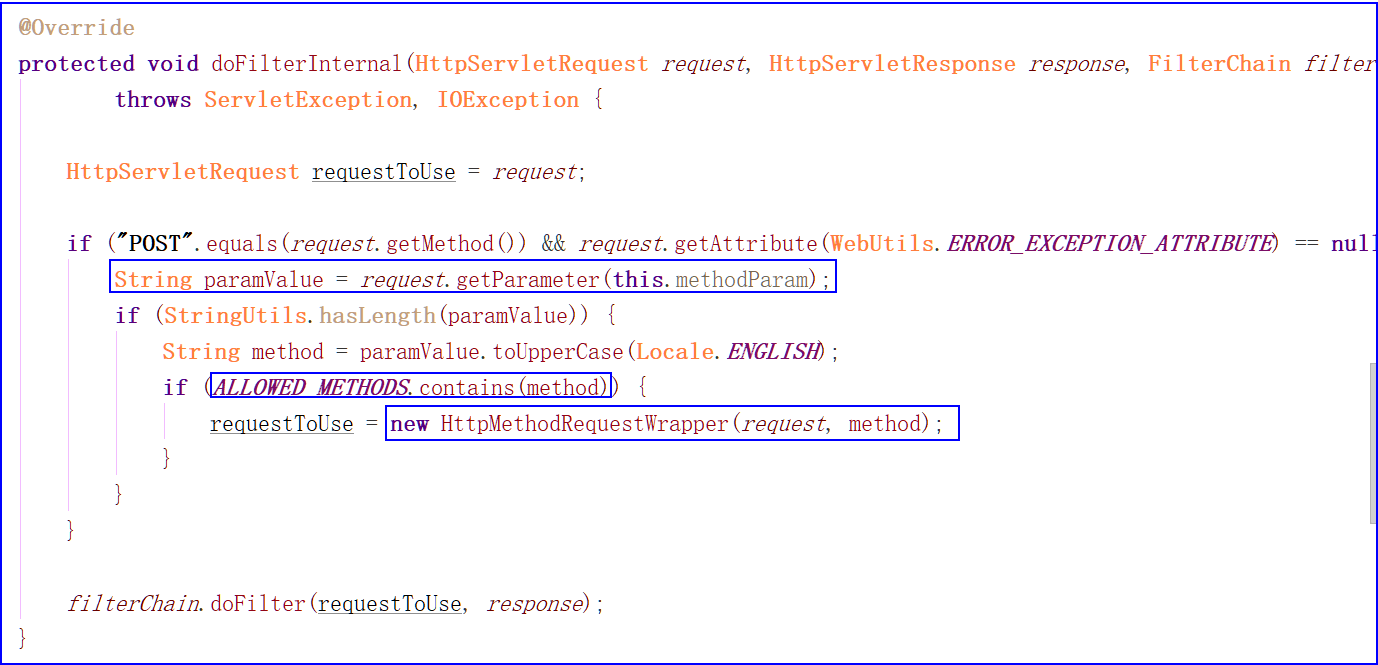
- HiddenHttpMethodFilter的父类是OncePerRequestFilter,它继承了父类的doFilterInternal方法,工作原理是将jsp页面的form表单的method属性值在doFilterInternal方法中转化为标准的Http方法,即GET,、POST、 HEAD、OPTIONS、PUT、DELETE、TRACE
- 然后到Controller中找到对应的方法。
- 例如,在使用注解时我们可能会在Controller中用于@RequestMapping(value = "list", method = RequestMethod.PUT),所以如果你的表单中使用的是< form method="put" >,那么这个表单会被提交到标了Method="PUT"的方法中。
问题
- 浏览器form表单只支持GET与POST请求,而对DELETE、PUT等method请求并不支持
- spring3.0添加了一个过滤器,可以将这些请求转换为标准的http方法,使得支持GET、POST、PUT与DELETE请求,该过滤器为HiddenHttpMethodFilter
<filter>
	<filter-name>hiddenmethod</filter-name>
	<filter-class>org.springframework.web.filter.HiddenHttpMethodFilter</filter-class>
</filter>

<filter-mapping>
	<filter-name>hiddenmethod</filter-name>
	<url-pattern>/*</url-pattern>
</filter-mapping>

<!-- 配置SpringMVC前端控制器 -->
<servlet>
	<servlet-name>mySpringMVC</servlet-name>
	<servlet-class>org.springframework.web.servlet.DispatcherServlet</servlet-class>
	<!-- 指定SpringMVC配置文件 -->
	<!-- SpringMVC的配置文件的默认路径是/WEB-INF/${servlet-name}-servlet.xml -->
	<init-param>
		<param-name>contextConfigLocation</param-name>
		<param-value>classpath:springmvc.xml</param-value>
	</init-param>
	<load-on-startup>1</load-on-startup>
</servlet>
<servlet-mapping>
	<servlet-name>mySpringMVC</servlet-name>
	<!-- 拦截所有,不包括jsp,包含.js .png.css     建议使用  -->
	<url-pattern>/</url-pattern>
</servlet-mapping>
发送请求
<form action="${pageContext.request.contextPath}/restful/1.action" method="post">
    <input type="hidden" name="_method" value="put">
    <input type="submit" value="测试testRestForm">
</form>
服务器接收处理(必须重定向,否则会报错;视图渲染返回的时候,由于不支持这两种方法,就会报出异常页面)
@RequestMapping(value = "/restful/{id}",method = RequestMethod.PUT)
public String testRestful(@PathVariable int id){
	System.out.println(id);
	return "redirect:/result.action";
}

@RequestMapping("result")
public String re(){
	System.out.println(id);
	return "/result.jsp";
}
注意事项
- 从tomcat8开始,如果直接返回jsp页面,会报405错误 JSPs only permit GET POST or HEAD
- 使用重定向的形式跳转到对应jsp
- 或者是直接把对应jsp的 isErrorPage="true"
- 在tomcat8上面是不支持delete和post请求的,因此以上只能在tomcat7上面执行
- tomcat8运行时可以进入到相应的控制器,但是视图渲染返回的时候,由于不支持这两种方法,就会报出异常页面
过滤器HiddenHttpMethodFilter源码分析


@RequestHeader
作用
- 在方法中接收请求头当中的信息
示例
@RequestMapping("testHeader")
public String testHeader(
	@RequestHeader("Host") String host,
	@RequestHeader("Referer") String referer,
	@RequestHeader("Cookie") String cookie){
	System.out.println(host);
	System.out.println(referer);
	System.out.println(cookie);
	return "/result.jsp";
}
@CookieValue
作用
- 用来接收浏览发送过来的cookies值
示例
@RequestMapping("testHeader")
public String testHeader(
	@CookieValue("JSESSIONID") String sessionid){
	System.out.println(sessionid);
	return "/result.jsp";
}
传值方式
ModelMap
- ModelMap对象主要用于传递控制方法处理数据到结果页面
- 也就是说我们把结果页面上需要的数据放到ModelMap对象中即可
- request对象的setAttribute方法的作用: 用来在一个请求过程中传递处理的数据。
- 使用方法与model一样
Model
- Model 和 ModelMap 的实例都是spirng mvc框架来自动创建并作为控制器方法参数传入,用户无需自己创建
- 可以简单地将model的实现类理解成一个Map
- Request级别的模型数据
- Model 是一个接口, 其实现类为ExtendedModelMap,继承了ModelMap类
方法介绍
@RequestMapping("testModel")
public String testModel(Model model){
	//Model addAttribute(String attributeName, Object attributeValue);
	//添加键值属性对
	model.addAttribute("name","le");

	//Map<String, Object> asMap();
	//将当前的model转换成Map
	System.out.println(model.asMap());

	User user = new User();
	user.setName("le");

	//Model addAttribute(Object attributeValue);
	//以属性的类型为键添加属性
	model.addAttribute(user);
	System.out.println("以属性的类型为键添加属性后:"+model.asMap());

	Map map = new HashMap();
	map.put("name","le");

	//Model addAllAttributes(Map<String, ?> attributes);
	//将attributes中的内容复制到当前的model中
	//如果当前model存在相同内容,会被覆盖
	model.addAllAttributes(map);
	System.out.println("在addAllAttributes中添加map后:"+model.asMap());

	ArrayList collection = new ArrayList<>();
	collection.add("le001");
	collection.add("le001");
	collection.add(123);

	//Model addAllAttributes(Collection<?> attributeValues);
	//以集合中数据的类型做为key
	//将所提供的Collection中的所有属性复制到这个Map中
	//如果有同类型会存在覆盖现象
	model.addAllAttributes(collection);
	System.out.println("在addAllAttributes中添加collection后:"+model.asMap());

	//Model mergeAttributes(Map<String, ?> attributes);
	//将attributes中的内容复制到当前的model中
	//如果当前model存在相同内容,不会被覆盖
	model.mergeAttributes(map);
	System.out.println("mergeAttributes后"+model.asMap());

	//boolean containsAttribute(String attributeName);
	//判断当前model是否存在属性名为attributeName的属性
	//存在返回true,否则返回false
	System.out.println(model.containsAttribute("le"));

	return "/result.jsp";
}
ModelAndView
- 需要自己创建
- 既包含模型也包含视图
@SessionAttributes注解
- 将模型中的某个属性暂存到 HttpSession 中,以便多个请求之间可以共享这个属性
- value(把model当中key为指定值的模型数据存到session域当中)
- type(把model当中指定的属性类型的模型数据放到session域当中 )
@Controller
//value 把model当中key为name存到session
//types 把model当中的指定类型全部写到session
//@SessionAttributes(value = {"name","name2"})
//@SessionAttributes(types = String.class)
//@SessionAttributes(types = {User.class,Product.class},value={“attr1”,”attr2”})
@SessionAttributes(value = "sessionGoodsKey")
public class MyController {
    @RequestMapping("testModelandView")
	public ModelAndView testModelandView(){
		ModelAndView modelAndView = new ModelAndView();
		//把数据写到request域
		modelAndView.addObject("name","le");
		modelAndView.setViewName("result.jsp");
		return modelAndView;
    }
}
使用@SessionAttribute来访问预先存在的全局会话属性
@Controller
@SessionAttributes(value = {"user"})
public class MyController {
	//使用@SessionAttribute来访问预先存在的全局会话属性
	//如果不存在,则报错
    @RequestMapping("testModel")
	public String testModel(@SessionAttributes("user") User user){
		System.out.println("user = "+user);
		return "/result.jsp";
    }
}
@ModelAttribute
作用
- 修改处理方法的参数时,自动把该参数放到model当中
- key值为@ModelAttribute("modelGoods")当中的参数
- 在方法定义上使用 @ModelAttribute 注解,Spring MVC 在调用目标处理方法前,会先逐个调用在方法级上标注了@ModelAttribute 的方法
//此注释会将此方法在对应的RequestMapping映射方法执行之前自动调用
@ModelAttribute
public String testModelAttribute(){
	System.out.println("ModelAttribute执行了");
	return "result.jsp";
}

//会自动的对应的模型存放在model
@RequestMapping("testFormModel")
public String testModelAttribute(@ModelAttribute("modelGoods") Goods mygoods,Model model){
	System.out.println(model.asMap());
	return "result.jsp";
}

//会自动的对应的模型存放在model
//传入参数后,参数会自动传入model当中
//key值为类型名,但是要首字母小写
@RequestMapping("testFormModel2")
public String testModelAttribute2(Goods mygoods){
	System.out.println(model.asMap());
	return "result.jsp";
}
数据的访问过程
- 浏览器
- 学习接收参数
- 前端控制器
- 写数据到页面(通过Model)
- JSP
