
android AlarmManagerService深入分析
AlarmManager深入分析
转载地址http://blog.csdn.net/codefly/article/details/17058425,自己补充了一些代码分析
1.概述
在Android系统中,闹钟和唤醒功能都是由Alarm Manager Service控制并管理的。我们所熟悉的RTC闹钟以及定时器都和它有莫大的关系。为了便于称呼,我常常也把这个service简称为ALMS。
另外,ALMS还提供了一个AlarmManager辅助类。在实际的代码中,应用程序一般都是通过这个辅助类来和ALMS打交道的。就代码而言,辅助类只不过是把一些逻辑语义传递给ALMS服务端而已,具体怎么做则完全要看ALMS的实现代码了。
ALMS的实现代码并不算太复杂,主要只是在管理“逻辑闹钟”。它把逻辑闹钟分成几个大类,分别记录在不同的列表中。然后ALMS会在一个专门的线程中循环等待闹钟的激发,一旦时机到了,就“回调”逻辑闹钟对应的动作。
以上只是一些概要性的介绍,下面我们来看具体的技术细节。
先看下具体ALMS在应用中的使用
- 1. Intent intent = new Intent(this, OneShotAlarm.class);
- 2. PendingIntent sender = PendingIntent.getBroadcast(this, 0, intent, 0);
- 3.
- 4. // 设置警报时间
- 5. Calendar calendar = Calendar.getInstance();
- 6. calendar.setTimeInMillis(System.currentTimeMillis());
- 7. calendar.add(Calendar.SECOND, 30);
- 8.
- 9. // 设置警报时间,除了用Calendar之外,还可以用
- 10. long firstTime = SystemClock.elapsedRealtime();
- 11.
- 12. AlarmManager am = (AlarmManager) getSystemService(ALARM_SERVICE);
- 13. // 只会警报一次
- 14. am.set(AlarmManager.RTC_WAKEUP, calendar.getTimeInMillis(), sender);
- 15. // 会重复警报多次
- 16. am.setRepeating(AlarmManager.ELAPSED_REALTIME_WAKEUP, firstTime, 15*1000, sender);
- 17.
- 18. // 要取消这个警报,只要通过PendingIntent就可以做到
- 19. am.cancel(sender);
2.AlarmManager
前文我们已经说过,ALMS只是服务端的东西。它必须向外提供具体的接口,才能被外界使用。在Android平台中,ALMS的外部接口为IAlarmManager。其定义位于frameworks\base\core\java\android\app\IAlarmManager.aidl脚本中,定义截选如下:
interface IAlarmManager { void set(int type, long triggerAtTime, in PendingIntent operation); void setRepeating(int type, long triggerAtTime, long interval, in PendingIntent operation); void setInexactRepeating(int type, long triggerAtTime, long interval, in PendingIntent operation); void setTime(long millis); void setTimeZone(String zone); void remove(in PendingIntent operation); }在一般情况下,service的使用者会通过Service Manager Service接口,先拿到它感兴趣的service对应的代理I接口,然后再调用I接口的成员函数向service发出请求。所以按理说,我们也应该先拿到一个IAlarmManager接口,然后再使用它。可是,对Alarm Manager Service来说,情况略有不同,其最常见的调用方式如下:
manager = (AlarmManager)context.getSystemService(Context.ALARM_SERVICE);
其中,getSystemService()返回的不再是IAlarmManager接口,而是AlarmManager对象。
2.1 AlarmManager的成员函数
AlarmManager的成员函数有:
publicvoid set(int type,long triggerAtTime, PendingIntent operation)
publicvoid setRepeating(int type,long triggerAtTime,long interval,
PendingIntent operation)
publicvoid setInexactRepeating(int type,long triggerAtTime,long interval,
PendingIntent operation)
publicvoid cancel(PendingIntent operation)
publicvoid setTime(long millis)
publicvoid setTimeZone(String timeZone)即1个构造函数,6个功能函数。基本上完全和IAlarmManager的成员函数一一对应。
另外,AlarmManager类中会以不同的公共常量来表示多种不同的逻辑闹钟,在Android 4.0的原生代码中有4种逻辑闹钟:
1) RTC_WAKEUP
2) RTC
3) ELAPSED_REALTIME_WAKEUP
4) ELAPSED_REALTIME
应用侧通过调用AlarmManager对象的成员函数,可以把语义传递到AlarmManagerService,并由它进行实际的处理。
3.AlarmManagerService
ALMS的重头戏在AlarmManagerService中,这个类继承于IAlarmManager.Stub,所以是个binder实体。它包含的重要成员如下:
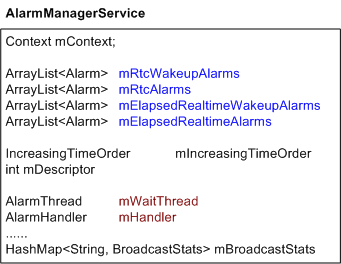
其中,mRtcWakeupAlarms等4个ArrayList<Alarm>数组分别对应着前文所说的4种“逻辑闹钟”。为了便于理解,我们可以想象在底层有4个“实体闹钟”,注意,是4个,不是4类。上面每一类“逻辑闹钟”都会对应一个“实体闹钟”,而逻辑闹钟则可以有若干个,它们被存储在ArrayList中,示意图如下:

当然,这里所说的“实体闹钟”只是个概念而已,其具体实现和底层驱动有关,在frameworks层不必过多关心。
Frameworks层应该关心的是那几个ArrayList<Alarm>。这里的Alarm对应着逻辑闹钟。
3.1 逻辑闹钟
Alarm是AlarmManagerService的一个内嵌类Alarm,定义截选如下:
- private static class Alarm {
- public int type;
- public int count;
- public long when;
- public long repeatInterval;
- public PendingIntent operation;
- public int uid;
- public int pid;
- . . . . . .
其中记录了逻辑闹钟的一些关键信息。
- type域:记录着逻辑闹钟的闹钟类型,比如RTC_WAKEUP、ELAPSED_REALTIME_WAKEUP等;
- count域:是个辅助域,它和repeatInterval域一起工作。当repeatInterval大于0时,这个域可被用于计算下一次重复激发alarm的时间,详细情况见后文;
- when域:记录闹钟的激发时间。这个域和type域相关,详细情况见后文;
- repeatInterval域:表示重复激发闹钟的时间间隔,如果闹钟只需激发一次,则此域为0,如果闹钟需要重复激发,此域为以毫秒为单位的时间间隔;
- operation域:记录闹钟激发时应该执行的动作,详细情况见后文;
- uid域:记录设置闹钟的进程的uid;
- pid域:记录设置闹钟的进程的pid。
总体来说还是比较简单的,我们先补充说明一下其中的count域。这个域是针对重复性闹钟的一个辅助域。重复性闹钟的实现机理是,如果当前时刻已经超过闹钟的激发时刻,那么ALMS会先从逻辑闹钟数组中摘取下Alarm节点,并执行闹钟对应的逻辑动作,然后进一步比较“当前时刻”和“Alarm理应激发的理想时刻”之间的时间跨度,从而计算出Alarm的“下一次理应激发的理想时刻”,并将这个激发时间记入Alarm节点,接着将该节点重新排入逻辑闹钟列表。这一点和普通Alarm不太一样,普通Alarm节点摘下后就不再还回逻辑闹钟列表了。
“当前时刻”和“理应激发时刻”之间的时间跨度会随实际的运作情况而变动。我们分两步来说明“下一次理应激发时刻”的计算公式:
1) count = (时间跨度 / repeatInterval ) + 1 ;
2) “下一次理应激发时刻” = “上一次理应激发时刻”+ count * repeatInterval ;
我们画一张示意图,其中绿色的可激发时刻表示“上一次理应激发时刻”,我们假定“当前时刻”分别为now_1处或now_2处,可以看到会计算出不同的“下一次理应激发时刻”,这里用桔红色表示。

可以看到,如果当前时刻为now_1,那么它和“上一次理应激发时刻”之间的“时间跨度”是小于一个repeatInterval的,所以count数为1。而如果当前时刻为now_2,那么“时间跨度”与repeatInterval的商取整后为2,所以count数为3。另外,图中那两个虚线箭头对应的可激发时刻,只是用来做刻度的东西。
3.2 主要行为
接下来我们来看ALMS中的主要行为,这些行为和AlarmManager辅助类提供的成员函数相对应。
3.2.1 设置alarm
外界能接触的设置alarm的函数是set():publicvoid set(int type,long triggerAtTime, PendingIntent operation)
type:表示要设置的alarm类型。如前文所述,有4个alarm类型。triggerAtTime:表示alarm“理应激发”的时间。
operation:指明了alarm闹铃激发时需要执行的动作,比如执行某种广播通告。
设置alarm的动作会牵扯到一个发起者。简单地说,发起者会向Alarm Manager Service发出一个设置alarm的请求,而且在请求里注明了到时间后需要执行的动作。由于“待执行的动作”一般都不会马上执行,所以要表达成PendingIntent的形式。(PendingIntent的详情可参考其他文章)
另外,triggerAtTime参数的意义也会随type参数的不同而不同。简单地说,如果type是和RTC相关的话,那么triggerAtTime的值应该是标准时间,即从1970 年 1 月 1 日午夜开始所经过的毫秒数。而如果type是其他类型的话,那么triggerAtTime的值应该是从本次开机开始算起的毫秒数。
3.2.2 重复性alarm
另一个设置alarm的函数是setRepeating():
- public void setRepeating(int type, long triggerAtTime, long interval,PendingIntent operation)
其参数基本上和set()函数差不多,只是多了一个“时间间隔”参数。事实上,在Alarm Manager Service一侧,set()函数内部也是在调用setRepeating()的,只不过会把interval设成了0。
setRepeating()的实现函数如下:
- public void setRepeating(int type, long triggerAtTime, long interval,
- PendingIntent operation)
- {
- if (operation == null) {
- Slog.w(TAG, "set/setRepeating ignored because there is no intent");
- return;
- }
- synchronized (mLock) {
- Alarm alarm = new Alarm();
- alarm.type = type;
- alarm.when = triggerAtTime;
- alarm.repeatInterval = interval;
- alarm.operation = operation;
- // Remove this alarm if already scheduled.
- removeLocked(operation);
- if (localLOGV) Slog.v(TAG, "set: " + alarm);
- int index = addAlarmLocked(alarm);
- if (index == 0) {
- setLocked(alarm);
- }
- }
- }
代码很简单,会创建一个逻辑闹钟Alarm,而后调用addAlarmLocked()将逻辑闹钟添加到内部逻辑闹钟数组的某个合适位置。
- private int addAlarmLocked(Alarm alarm) {
- ArrayList<Alarm> alarmList = getAlarmList(alarm.type);
- int index = Collections.binarySearch(alarmList, alarm, mIncreasingTimeOrder);
- if (index < 0) {
- index = 0 - index - 1;
- }
- if (localLOGV) Slog.v(TAG, "Adding alarm " + alarm + " at " + index);
- alarmList.add(index, alarm);
- . . . . . .
- return index;
- }
逻辑闹钟列表是依据alarm的激发时间进行排序的,越早激发的alarm,越靠近第0位。所以,addAlarmLocked()在添加新逻辑闹钟时,需要先用二分查找法快速找到列表中合适的位置,然后再把Alarm对象插入此处。

如果所插入的位置正好是第0位,就说明此时新插入的这个逻辑闹钟将会是本类alarm中最先被激发的alarm,而正如我们前文所述,每一类逻辑闹钟会对应同一个“实体闹钟”,此处我们在第0位设置了新的激发时间,明确表示我们以前对“实体闹钟”设置的激发时间已经不准确了,所以setRepeating()中必须重新调整一下“实体闹钟”的激发时间,于是有了下面的句子:
- if (index == 0) {
- setLocked(alarm);
- }
setLocked()内部会调用native函数set():
- private native void set(int fd, int type, long seconds, long nanoseconds);
重新设置“实体闹钟”的激发时间。这个函数内部会调用ioctl()和底层打交道。具体代码可参考frameworks/base/services/jni/com_android_server_AlarmManagerService.cpp文件:
- static void android_server_AlarmManagerService_set(JNIEnv* env, jobject obj, jint fd,
- jint type, jlong seconds, jlong nanoseconds)
- {
- struct timespec ts;
- ts.tv_sec = seconds;
- ts.tv_nsec = nanoseconds;
- int result = ioctl(fd, ANDROID_ALARM_SET(type), &ts);
- if (result < 0)
- {
- ALOGE("Unable to set alarm to %lld.%09lld: %s\n", seconds, nanoseconds, strerror(errno));
- }
- }
我们知道,PendingIntent只是frameworks一层的概念,和底层驱动是没有关系的。所以向底层设置alarm时只需要type信息以及激发时间信息就可以了。
在AlarmManagerService中真正设置alarm的函数是setImplLocked函数,在这个函数中把alarm添加到mAlarmBatchs中,mAlarmBatchs会把触发时间相近的Alarm放在同一个bach中,然后每个bach根据时间排序放在mAlarmBatchs中,前面的就是先要触发的alarm。
- private void setImplLocked(int type, long when, long whenElapsed, long maxWhen, long interval,
- PendingIntent operation, boolean isStandalone, boolean doValidate,
- WorkSource workSource) {
- /**创建一个alarm,其中各参数的含义如下:
- * type 闹钟类型 ELAPSED_REALTIME、RTC、RTC_WAKEUP等
- * when 触发时间 UTC类型,绝对时间,通过System.currentTimeMillis()得到
- * whenElapsed 相对触发时间,自开机算起,含休眠,通过SystemClock.elapsedRealtime()得到
- * maxWhen 最大触发时间
- * interval 触发间隔,针对循环闹钟有效
- * operation 闹钟触发时的行为,PendingIntent类型
- */
- Alarm a = new Alarm(type, when, whenElapsed, maxWhen, interval, operation, workSource);
- //根据PendingIntent删除之前已有的同一个闹钟
- removeLocked(operation);
- boolean reschedule;
- //尝试将alarm加入到合适的batch中,如果alarm是独立的或者无法找到合适的batch去容纳此alarm,返回-1
- int whichBatch = (isStandalone) ? -1 : attemptCoalesceLocked(whenElapsed, maxWhen);
- if (whichBatch < 0) {
- //没有合适的batch去容纳alarm,则新建一个batch
- Batch batch = new Batch(a);
- batch.standalone = isStandalone;
- //将batch加入mAlarmBatches中,并对mAlarmBatches进行排序:按开始时间升序排列
- reschedule = addBatchLocked(mAlarmBatches, batch);
- } else {
- //如果找到合适了batch去容纳此alarm,则将其加入到batch中
- Batch batch = mAlarmBatches.get(whichBatch);
- //如果当前alarm的加入引起了batch开始时间和结束时间的改变,则reschedule为true
- reschedule = batch.add(a);
- if (reschedule) {
- //由于batch的起始时间发生了改变,所以需要从列表中删除此batch并重新加入、重新对batch列表进行排序
- mAlarmBatches.remove(whichBatch);
- addBatchLocked(mAlarmBatches, batch);
- }
- }
- if (DEBUG_VALIDATE) {
- if (doValidate && !validateConsistencyLocked()) {
- Slog.v(TAG, "Tipping-point operation: type=" + type + " when=" + when
- + " when(hex)=" + Long.toHexString(when)
- + " whenElapsed=" + whenElapsed + " maxWhen=" + maxWhen
- + " interval=" + interval + " op=" + operation
- + " standalone=" + isStandalone);
- rebatchAllAlarmsLocked(false);
- reschedule = true;
- }
- }
- if (reschedule) {
- rescheduleKernelAlarmsLocked();
- }
- }
- rescheduleKernelAlarmsLocked函数主要用来选取alarm的触发时间设置到RTC中去。
- private void rescheduleKernelAlarmsLocked() {
- // Schedule the next upcoming wakeup alarm. If there is a deliverable batch
- // prior to that which contains no wakeups, we schedule that as well.
- if (mAlarmBatches.size() > 0) {
- //查找第一个有wakeup类型alarm的batch
- final Batch firstWakeup = findFirstWakeupBatchLocked();
- //查找第一个batch
- final Batch firstBatch = mAlarmBatches.get(0);
- 判断条件是为了防止重复设置
- if (firstWakeup != null && mNextWakeup != firstWakeup.start) {
- //将第一个有wakeup类型alarm的batch的时间设置到rtc中
- mNextWakeup = firstWakeup.start;
- setLocked(ELAPSED_REALTIME_WAKEUP, firstWakeup.start);
- }
- if (firstBatch != firstWakeup && mNextNonWakeup != firstBatch.start) {
- mNextNonWakeup = firstBatch.start;
- setLocked(ELAPSED_REALTIME, firstBatch.start);
- }
- }
- }
3.2.3 取消alarm
用户端是调用AlarmManager对象的cancel()函数来取消alarm的。这个函数内部其实是调用IAlarmManager的remove()函数。所以我们只来看AlarmManagerService的remove()就可以了。
- public void remove(PendingIntent operation)
- {
- if (operation == null) {
- return;
- }
- synchronized (mLock) {
- removeLocked(operation);
- }
- }
注意,在取消alarm时,是以一个PendingIntent对象作为参数的。这个PendingIntent对象正是当初设置alarm时,所传入的那个operation参数。我们不能随便创建一个新的PendingIntent对象来调用remove()函数,否则remove()是不会起作用的。PendingIntent的运作细节不在本文论述范围之内,此处我们只需粗浅地知道,PendingIntent对象在AMS(Activity Manager Service)端会对应一个PendingIntentRecord实体,而ALMS在遍历逻辑闹钟列表时,是根据是否指代相同PendingIntentRecord实体来判断PendingIntent的相符情况的。如果我们随便创建一个PendingIntent对象并传入remove()函数的话,那么在ALMS端势必找不到相符的PendingIntent对象,所以remove()必然无效。
remove()中调用的removeLocked()如下:
- public void removeLocked(PendingIntent operation)
- {
- removeLocked(mRtcWakeupAlarms, operation);
- removeLocked(mRtcAlarms, operation);
- removeLocked(mElapsedRealtimeWakeupAlarms, operation);
- removeLocked(mElapsedRealtimeAlarms, operation);
- }
简单地说就是,把4个逻辑闹钟数组都遍历一遍,删除其中所有和operation相符的Alarm节点。removeLocked()的实现代码如下:
- private void removeLocked(ArrayList<Alarm> alarmList,
- PendingIntent operation)
- {
- if (alarmList.size() <= 0) {
- return;
- }
- // iterator over the list removing any it where the intent match
- Iterator<Alarm> it = alarmList.iterator();
- while (it.hasNext()) {
- Alarm alarm = it.next();
- if (alarm.operation.equals(operation)) {
- it.remove();
- }
- }
- }
请注意,所谓的取消alarm,只是删除了对应的逻辑Alarm节点而已,并不会和底层驱动再打什么交道。也就是说,是不存在针对底层“实体闹钟”的删除动作的。所以,底层“实体闹钟”在到时之时,还是会被“激发”出来的,只不过此时在frameworks层,会因为找不到符合要求的“逻辑闹钟”而不做进一步的激发动作。
3.2.4 设置系统时间和时区
AlarmManager还提供设置系统时间的功能,设置者需要具有android.permission.SET_TIME权限。
- public void setTime(long millis)
- {
- mContext.enforceCallingOrSelfPermission("android.permission.SET_TIME", "setTime");
- SystemClock.setCurrentTimeMillis(millis);
- }
另外,还具有设置时区的功能:
- public void setTimeZone(String tz)
相应地,设置者需要具有android.permission.SET_TIME_ZONE权限。
3.3 运作细节
3.3.1 AlarmThread和Alarm的激发
AlarmManagerService内部是如何感知底层激发alarm的呢?首先,AlarmManagerService有一个表示线程的mWaitThread成员:
- private final AlarmThread mWaitThread = new AlarmThread();
在AlarmManagerService构造之初,就会启动这个专门的“等待线程”。
- public AlarmManagerService(Context context)
- {
- mContext = context;
- mDescriptor = init();
- . . . . . .
- . . . . . .
- if (mDescriptor != -1)
- {
- mWaitThread.start(); // 启动线程!
- }
- else
- {
- Slog.w(TAG, "Failed to open alarm driver. Falling back to a handler.");
- }
- }
3.3.1.1 AlarmThread中的run()
AlarmThread本身是AlarmManagerService中一个继承于Thread的内嵌类:
- private class AlarmThread extends Thread
其最核心的run()函数的主要动作流程图如下:

我们分别来阐述上图中的关键步骤。
3.3.1.2 waitForAlarm()
首先,从上文的流程图中可以看到,AlarmThread线程是在一个while(true)循环里不断调用waitForAlarm()函数来等待底层alarm激发动作的。waitForAlarm()是一个native函数:
- private native int waitForAlarm(int fd);
其对应的C++层函数是android_server_AlarmManagerService_waitForAlarm():
【com_android_server_AlarmManagerService.cpp】
- static jint android_server_AlarmManagerService_waitForAlarm(JNIEnv* env, jobject obj, jint fd)
- {
- int result = 0;
- do
- {
- result = ioctl(fd, ANDROID_ALARM_WAIT);
- } while (result < 0 && errno == EINTR);
- if (result < 0)
- {
- ALOGE("Unable to wait on alarm: %s\n", strerror(errno));
- return 0;
- }
- return result;
- }
3.3.1.3 triggerAlarmsLocked()
一旦等到底层驱动的激发动作,AlarmThread会开始遍历相应的逻辑闹钟列表:
- ArrayList<Alarm> triggerList = new ArrayList<Alarm>();
- . . . . . .
- final long nowRTC = System.currentTimeMillis();
- final long nowELAPSED = SystemClock.elapsedRealtime();
- . . . . . .
- if ((result & RTC_WAKEUP_MASK) != 0)
- triggerAlarmsLocked(mRtcWakeupAlarms, triggerList, nowRTC);
- if ((result & RTC_MASK) != 0)
- triggerAlarmsLocked(mRtcAlarms, triggerList, nowRTC);
- if ((result & ELAPSED_REALTIME_WAKEUP_MASK) != 0)
- triggerAlarmsLocked(mElapsedRealtimeWakeupAlarms, triggerList, nowELAPSED);
- if ((result & ELAPSED_REALTIME_MASK) != 0)
- triggerAlarmsLocked(mElapsedRealtimeAlarms, triggerList, nowELAPSED);
triggerAlarmsLocked函数主要将要发送的alarm降入triggerlist中
- private void triggerAlarmsLocked(ArrayList<Alarm> triggerList, long nowELAPSED, long nowRTC) {
- // batches are temporally sorted, so we need only pull from the
- // start of the list until we either empty it or hit a batch
- // that is not yet deliverable
- while (mAlarmBatches.size() > 0) {
- //获取第一个batch
- Batch batch = mAlarmBatches.get(0);
- if (batch.start > nowELAPSED) {
- // Everything else is scheduled for the future
- break;
- }
- // We will (re)schedule some alarms now; don't let that interfere
- // with delivery of this current batch
- //将第一个batch去除
- mAlarmBatches.remove(0);
- final int N = batch.size();
- for (int i = 0; i < N; i++) {
- Alarm alarm = batch.get(i);
- alarm.count = 1;
- //遍历加入triggerList
- triggerList.add(alarm);
- // Recurring alarms may have passed several alarm intervals while the
- // phone was asleep or off, so pass a trigger count when sending them.
- //如果有重复类型的,计算时间重新设置
- if (alarm.repeatInterval > 0) {
- // this adjustment will be zero if we're late by
- // less than one full repeat interval
- alarm.count += (nowELAPSED - alarm.whenElapsed) / alarm.repeatInterval;
- // Also schedule its next recurrence
- final long delta = alarm.count * alarm.repeatInterval;
- final long nextElapsed = alarm.whenElapsed + delta;
- setImplLocked(alarm.type, alarm.when + delta, nextElapsed, alarm.windowLength,
- maxTriggerTime(nowELAPSED, nextElapsed, alarm.repeatInterval),
- alarm.repeatInterval, alarm.operation, batch.standalone, true,
- alarm.workSource);
- }
- }
- }
- }
接下来,只需遍历一遍triggerList就可以了:
- Iterator<Alarm> it = triggerList.iterator();
- while (it.hasNext())
- {
- Alarm alarm = it.next();
- . . . . . .
- alarm.operation.send(mContext, 0,
- mBackgroundIntent.putExtra(Intent.EXTRA_ALARM_COUNT, alarm.count),
- mResultReceiver, mHandler);
- // we have an active broadcast so stay awake.
- if (mBroadcastRefCount == 0) {
- setWakelockWorkSource(alarm.operation);
- mWakeLock.acquire();
- }
- mInFlight.add(alarm.operation);
- mBroadcastRefCount++;
- mTriggeredUids.add(new Integer(alarm.uid));
- BroadcastStats bs = getStatsLocked(alarm.operation);
- if (bs.nesting == 0) {
- bs.startTime = nowELAPSED;
- } else {
- bs.nesting++;
- }
- if (alarm.type == AlarmManager.ELAPSED_REALTIME_WAKEUP
- || alarm.type == AlarmManager.RTC_WAKEUP) {
- bs.numWakeup++;
- ActivityManagerNative.noteWakeupAlarm(alarm.operation);
- }
- }
PendingIntent的send()函数代码是:
- public void send(Context context, int code, Intent intent,
- OnFinished onFinished, Handler handler) throws CanceledException
- {
- send(context, code, intent, onFinished, handler, null);
- }
调用了下面的send()函数:
- public void send(Context context, int code, Intent intent,
- OnFinished onFinished, Handler handler, String requiredPermission)
- throws CanceledException
- {
- try
- {
- String resolvedType = intent != null
- ? intent.resolveTypeIfNeeded(context.getContentResolver())
- : null;
- int res = mTarget.send(code, intent, resolvedType,
- onFinished != null
- ? new FinishedDispatcher(this, onFinished, handler)
- : null,
- requiredPermission);
- if (res < 0)
- {
- throw new CanceledException();
- }
- }
- catch (RemoteException e)
- {
- throw new CanceledException(e);
- }
- }
mTarget是个IPendingIntent代理接口,它对应AMS(Activity Manager Service)中的某个PendingIntentRecord实体。需要说明的是,PendingIntent的重要信息都是在AMS的PendingIntentRecord以及PendingIntentRecord.Key对象中管理的。AMS中有一张哈希表专门用于记录所有可用的PendingIntentRecord对象。
相较起来,在创建PendingIntent对象时传入的intent数组,其重要性并不太明显。这种intent数组主要用于一次性启动多个activity,如果你只是希望启动一个activity或一个service,那么这个intent的内容有可能在最终执行PendingIntent的send()动作时,被新传入的intent内容替换掉。
AMS中关于PendingIntentRecord哈希表的示意图如下:

AMS是整个Android平台中最复杂的一个核心service了,所以我们不在这里做过多的阐述,有兴趣的读者可以参考其他相关文档。
3.3.1.4 进一步处理“唤醒闹钟”
在AlarmThread.run()函数中while循环的最后,会进一步判断,当前激发的alarm是不是“唤醒闹钟”。如果闹钟类型为RTC_WAKEUP或ELAPSED_REALTIME_WAKEUP,那它就属于“唤醒闹钟”,此时需要通知一下AMS:
- if (alarm.type == AlarmManager.ELAPSED_REALTIME_WAKEUP
- || alarm.type == AlarmManager.RTC_WAKEUP)
- {
- bs.numWakeup++;
- ActivityManagerNative.noteWakeupAlarm(alarm.operation);
- }
这两种alarm就是我们常说的0型和2型闹钟,它们和我们手机的续航时间息息相关。
AMS里的noteWakeupAlarm()比较简单,只是在调用BatteryStatsService服务的相关动作,但是却会导致机器的唤醒:
- public void noteWakeupAlarm(IIntentSender sender)
- {
- if (!(sender instanceof PendingIntentRecord))
- {
- return;
- }
- BatteryStatsImpl stats = mBatteryStatsService.getActiveStatistics();
- synchronized (stats)
- {
- if (mBatteryStatsService.isOnBattery())
- {
- mBatteryStatsService.enforceCallingPermission();
- PendingIntentRecord rec = (PendingIntentRecord)sender;
- int MY_UID = Binder.getCallingUid();
- int uid = rec.uid == MY_UID ? Process.SYSTEM_UID : rec.uid;
- BatteryStatsImpl.Uid.Pkg pkg = stats.getPackageStatsLocked(uid, rec.key.packageName);
- pkg.incWakeupsLocked();
- }
- }
- }
好了,说了这么多,我们还是画一张AlarmThread示意图作为总结:

3.3.2 说说AlarmManagerService中的mBroadcastRefCount
下面我们说说AlarmManagerService中的mBroadcastRefCount,之所以要说它,仅仅是因为我在修改AlarmManagerService代码的时候,吃过它的亏。
我们先回顾一下处理triggerList列表的代码,如下:
- Iterator<Alarm> it = triggerList.iterator();
- while (it.hasNext())
- {
- Alarm alarm = it.next();
- . . . . . .
- alarm.operation.send(mContext, 0,
- mBackgroundIntent.putExtra(Intent.EXTRA_ALARM_COUNT, alarm.count),
- mResultReceiver, mHandler);
- // we have an active broadcast so stay awake.
- if (mBroadcastRefCount == 0) {
- setWakelockWorkSource(alarm.operation);
- mWakeLock.acquire();
- }
- mInFlight.add(alarm.operation);
- mBroadcastRefCount++;
- . . . . . .
- . . . . . .
- }
可以看到,在AlarmThread.run()中,只要triggerList中含有可激发的alarm,mBroadcastRefCount就会执行加一操作。一开始mBroadcastRefCount的值为0,所以会进入上面那句if语句,进而调用mWakeLock.acquire()。
后来我才知道,这个mBroadcastRefCount变量,是决定何时释放mWakeLock的计数器。AlarmThread的意思很明确,只要还有处于激发状态的逻辑闹钟,机器就不能完全睡眠。那么释放这个mWakeLock的地方又在哪里呢?答案就在alarm.operation.send()一句的mResultReceiver参数中。
mResultReceiver是AlarmManagerService的私有成员变量:
- private final ResultReceiver mResultReceiver = newResultReceiver();
类型为ResultReceiver,这个类实现了PendingIntent.OnFinished接口:
- class ResultReceiver implements PendingIntent.OnFinished
当send()动作完成后,框架会间接回调这个对象的onSendFinished()成员函数。
- public void onSendFinished(PendingIntent pi, Intent intent, int resultCode,
- String resultData, Bundle resultExtras)
- {
- . . . . . .
- . . . . . .
- if (mBlockedUids.contains(new Integer(uid)))
- {
- mBlockedUids.remove(new Integer(uid));
- }
- else
- {
- if (mBroadcastRefCount > 0)
- {
- mInFlight.removeFirst();
- mBroadcastRefCount--;
- if (mBroadcastRefCount == 0)
- {
- mWakeLock.release();
- }
- . . . . . .
- }
- . . . . . .
- }
- . . . . . .
- }
我一开始没有足够重视这个mBroadcastRefCount,所以把alarm.operation.send()语句包在了一条if语句中,也就是说在某种情况下,程序会跳过alarm.operation.send()一句,直接执行下面的语句。然而此时的mBroadcastRefCount还在坚定不移地加一,这直接导致mBroadcastRefCount再也减不到0了,于是mWakeLock也永远不会释放了。令人头痛的是,这个mWakeLock虽然不让手机深睡眠下去,却也不会点亮屏幕,所以这个bug潜藏了好久才被找到。还真是应了我说的那句话:“魔鬼总藏在细节中。”
也许一些使用alarmmanager做定时任务的同学遇到过这样的问题:设定alarm后,进入设置-->应用程序管理-->强行停止app后,定时任务就失效了。
简单的讲就是:force stop会导致alarm失效。
最典型的例子就是我碰到过的一个bug,使用android手机的时钟app设置一个闹钟,然后进入设置-->应用程序管理里面,将时钟这个app force stop掉,结果闹钟就不响了。
其实这不是bug,这是android系统的新加入的机制。下面我来详细分析一下来龙去脉。
1. 在设置的应用程序管理里面强行停止app:
这里会最终会调用到 ActivityManagerService的forceStopPackageLocked()
- private void forceStopPackageLocked(final String packageName, int uid) {
- forceStopPackageLocked(packageName, uid, false, false, true, false);
- Intent intent = new Intent(Intent.ACTION_PACKAGE_RESTARTED,
- Uri.fromParts("package", packageName, null));
- if (!mProcessesReady) {
- intent.addFlags(Intent.FLAG_RECEIVER_REGISTERED_ONLY);
- }
- intent.putExtra(Intent.EXTRA_UID, uid);
- broadcastIntentLocked(null, null, intent,
- null, null, 0, null, null, null,
- false, false, MY_PID, Process.SYSTEM_UID);
- }
代码里面发送了一个广播:ACTION_PACKAGE_RESTARTED,这个广播大有文章。
最后来看UninstallReceiver,当AlarmManagerService接受到这个广播后,会把其那些alarm的包名传过来的给删除了。
- class UninstallReceiver extends BroadcastReceiver {
- public UninstallReceiver() {
- IntentFilter filter = new IntentFilter();
- filter.addAction(Intent.ACTION_PACKAGE_REMOVED);
- filter.addAction(Intent.ACTION_PACKAGE_RESTARTED);
- filter.addAction(Intent.ACTION_QUERY_PACKAGE_RESTART);
- filter.addDataScheme("package");
- mContext.registerReceiver(this, filter);
- // Register for events related to sdcard installation.
- IntentFilter sdFilter = new IntentFilter();
- sdFilter.addAction(Intent.ACTION_EXTERNAL_APPLICATIONS_UNAVAILABLE);
- sdFilter.addAction(Intent.ACTION_USER_STOPPED);
- mContext.registerReceiver(this, sdFilter);
- }
- @Override
- public void onReceive(Context context, Intent intent) {
- synchronized (mLock) {
- String action = intent.getAction();
- String pkgList[] = null;
- if (Intent.ACTION_QUERY_PACKAGE_RESTART.equals(action)) {
- pkgList = intent.getStringArrayExtra(Intent.EXTRA_PACKAGES);
- for (String packageName : pkgList) {
- if (lookForPackageLocked(packageName)) {
- setResultCode(Activity.RESULT_OK);
- return;
- }
- }
- return;
- } else if (Intent.ACTION_EXTERNAL_APPLICATIONS_UNAVAILABLE.equals(action)) {
- pkgList = intent.getStringArrayExtra(Intent.EXTRA_CHANGED_PACKAGE_LIST);
- } else if (Intent.ACTION_USER_STOPPED.equals(action)) {
- int userHandle = intent.getIntExtra(Intent.EXTRA_USER_HANDLE, -1);
- if (userHandle >= 0) {
- removeUserLocked(userHandle);
- }
- } else {
- if (Intent.ACTION_PACKAGE_REMOVED.equals(action)
- && intent.getBooleanExtra(Intent.EXTRA_REPLACING, false)) {
- // This package is being updated; don't kill its alarms.
- return;
- }
- Uri data = intent.getData();
- if (data != null) {
- String pkg = data.getSchemeSpecificPart();
- if (pkg != null) {
- pkgList = new String[]{pkg};
- }
- }
- }
- if (pkgList != null && (pkgList.length > 0)) {
- for (String pkg : pkgList) {
- //将这个pkg的alarm从AlarmManagerService中去除
- removeLocked(pkg);
- mBroadcastStats.remove(pkg);
- }
- }
- }
- }
- }
为什么google要加入这样的机制呢?
应该是出于系统安全的考虑,google在4.0系统中在安全方面做了很多努力。
很多病毒程序都不希望自己的进程被用户强行停止,希望自己的病毒程序可以一直运行,而常见的方式就是通过设置alarm,在病毒进程被杀死后,通过定时发送广播来拉起病毒进程,来实现病毒进程的重新启动。
google也正是看到了这个一点,所以加入了forceStopPackage的这一机制,让用户能够有机会干掉病毒进程。
android系统的安全性一直是android系统的短板,google在提升系统安全性方面也在不断努力,在之后的文章中,我会再进行介绍。

