原型链—— javascript
目录
js面向对象编程
js面向对象编程不同于 java 的类和对象
JavaScript 不区分类和实例的概念,而是通过原型(prototype)来实现面向对象编程。
js声明的构造函数,类似于普通函数的声明,但又不同,
实例对象时,如果不写new,就是一个普通函数,它返回 undefined。
但是,如果写了new,它就变成了一个构造函数,它绑定的 this 指向新创建的对象,
并默认返回 this,也就是说,不需要在最后写return this;。
js原型链
代码段一:
function Student(name){
    this.name = name;
    this.say = function(){
        console.log('my name:', this.name);
    }
}

let student1 = new Student('student1');
let student2 = new Student('student2');

console.log(student1.constructor === Student.prototype.constructor) // true
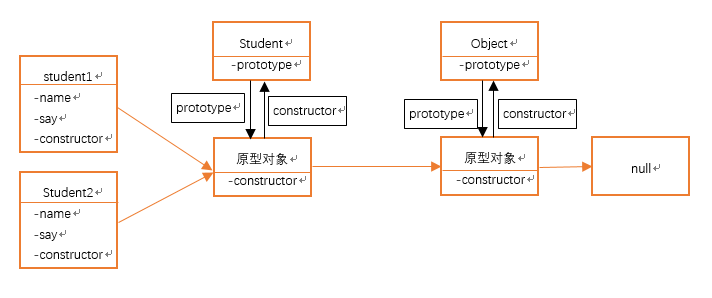
橙色箭头表示原型链,其原型链为:
student1 --> Student.prototype --> Object.prototype --> null
当我们用 obj.xx 访问一个对象的属性时,JavaScript引擎先在当前对象上查找该属性,
如果没有找到,就到其原型对象上找,如果还没有找到,就一直上溯到Object.prototype对象,
最后,如果还没有找到,就只能返回undefined。
共享方法
代码段二:
function Student2(){
    this.say = function(){
        console.log('hi')
    }
}
console.log(new Student2().say === new Student2().say)
结果:
false
实例化的对象方法,虽然方法名称和代码完全一样,但是不同对象指向的不是同一个方法
需要创建一个共享的方法,
根据原型链图,需要将这个共享方法声明在 Student2 的原型对象上,
xxx.prototype.xxx = function(){}
function Student2(){
    this.say = function(){
        console.log('hi')
    }
}

Student2.prototype.publicSay = function(){
    console.log('public say');
}

console.log(new Student2().say === new Student2().say)
console.log(new Student2().publicSay === new Student2().publicSay)
结果:
false
true
原型继承
学过 java 的都知道,类的继承通过 extends 会很容易实现,
但是 javascript 的原型继承有点麻烦,不过 class继承就很方便
function Father(name){
    this.say = function(){
        console.log(name)
    }
}
function Son(name){
    Father.call(this, name)
}

console.log(Son.prototype.__proto__)   // Object
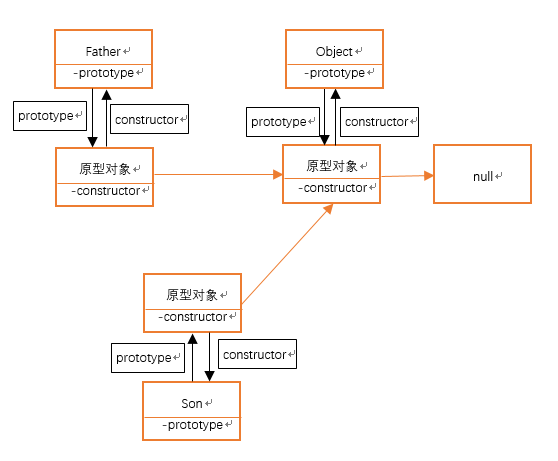
这样看似继承了,但是其原型链的指向并没有改变
其原型链图为:

要实现原型继承,看图的话很容易,只需要将 Son 的原型对象的原型指向 Father 的原型对象

要实现原型继承,这里有三种方法,
法一:
这个方法简介明了,但是不推荐直接通过 __proto__ 直接改变原型
function Father(name){
    this.say = function(){
        console.log(name)
    }
}
function Son(name){
    Father.call(this, name)
}

Son.prototype.__proto__ = Father.prototype;
console.log(Son.prototype.__proto__)    // Father
法二:
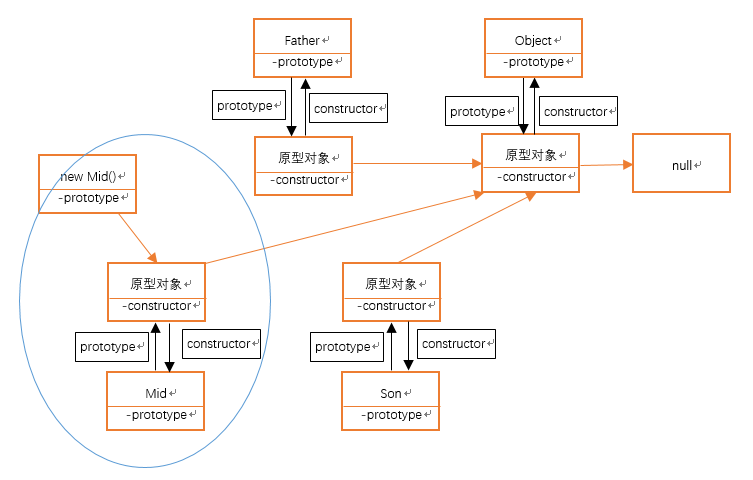
通过实例化 Father 生成一个对象,
new Father() 的原型会默认指向 Father 的原型
通过修改 Son 的 prototype 属性和 new Father() 的 constructor 属性,
来绑定 Son 和 new Father() 之间的关系

function Father(name){
    this.say = function(){
        console.log(name)
    }
}
function Son(name){
    Father.call(this, name)
}

Son.prototype = new Father();
Son.prototype.constructor = Son;

console.log(Son.prototype.__proto__)    // Father
法三:
类似法二,声明一个中间对象来改变指向

Mid.prototype = Father.prototype;
Son.prototype = new Mid();
Son.prototype.constructor = Son;
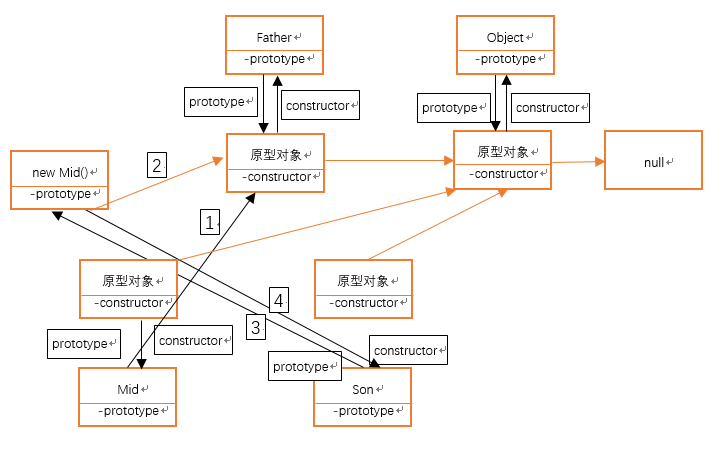
第一步,将 Mid 的原型对象指向 Father 的原型对象,
第二步,将 Son 的属性 prototype 指向 Mid,
此时代码上的 new Mid(),实际上是 new Father(),
第三步,将 Son.prototype.constructor 也就是 Mid.prototype.constructor 指向 Son

看起来有点乱,看数字步骤,方便理解
function Father(name){
    this.say = function(){
        console.log(name)
    }
}
function Son(name){
    Father.call(this, name)
}

Mid.prototype = Father.prototype;
Son.prototype = new Mid();
Son.prototype.constructor = Son;

console.log(Son.prototype.__proto__)  // Father
class继承
ES6 提供了关键字 class,定义类变得更便捷
共享方法
class Father{
    // 构造方法
    constructor(name){
        this.name = name;
    }
    hello(){
        console.log("hello", this.name)
    }
}

console.log(new Father("f").hello === new Father("f").hello)
// true,共享方法
class继承
class Father{
    // 构造方法
    constructor(name){
        this.name = name;
    }
    hello(){
        console.log("hello", this.name)
    }
}

class Son extends Father{
    constructor(name){
        super(name);
    }
}

console.log(Son.prototype.__proto__)    // Father


 浙公网安备 33010602011771号