CDH的安装和设置
采用伪分布模式安装和设置CDH,前提是已经安装了Java和SSH。
1. 下载hadoop-2.6.0-cdh5.9.0,复制到/opt/下,再解压;
2. 进入/opt/hadoop-2.6.0-cdh5.9.0/etc/hadoop/,在hadoop-env.sh中添加:
export JAVA_HOME=/opt/jdk1.8.0_121
export HADOOP_HOME=/opt/hadoop-2.6.0-cdh5.9.0
修改配置文件core-tite.xml:
<?xml version="1.0" encoding="UTF-8"?>
<?xml-stylesheet type="text/xsl" href="configuration.xsl"?>
<!--
  Licensed under the Apache License, Version 2.0 (the "License");
  you may not use this file except in compliance with the License.
  You may obtain a copy of the License at

    http://www.apache.org/licenses/LICENSE-2.0

  Unless required by applicable law or agreed to in writing, software
  distributed under the License is distributed on an "AS IS" BASIS,
  WITHOUT WARRANTIES OR CONDITIONS OF ANY KIND, either express or implied.
  See the License for the specific language governing permissions and
  limitations under the License. See accompanying LICENSE file.
-->

<!-- Put site-specific property overrides in this file. -->

<configuration>
    <property>
        <name>hadoop.tmp.dir</name>
        <value>/home/hadoop/tmp</value>
    </property>
    <property>
        <name>fs.default.name</name>
        <value>hdfs://192.168.1.104:9000</value>
    </property>
</configuration>
其中hadoop.tmp.dir最好自己设置,不要采用默认的设置,因为默认的设置是在/tmp/下面,机器重启以后会被删除掉,造成Hadoop不能运行,要再次格式化NameNode才能运行。
hdfs-site.xml:
<?xml version="1.0" encoding="UTF-8"?>
<?xml-stylesheet type="text/xsl" href="configuration.xsl"?>
<!--
  Licensed under the Apache License, Version 2.0 (the "License");
  you may not use this file except in compliance with the License.
  You may obtain a copy of the License at

    http://www.apache.org/licenses/LICENSE-2.0

  Unless required by applicable law or agreed to in writing, software
  distributed under the License is distributed on an "AS IS" BASIS,
  WITHOUT WARRANTIES OR CONDITIONS OF ANY KIND, either express or implied.
  See the License for the specific language governing permissions and
  limitations under the License. See accompanying LICENSE file.
-->

<!-- Put site-specific property overrides in this file. -->

<configuration>
    <property>
        <name>dfs.replication</name>
        <value>1</value>
    </property>
    <property>
        <name>dfs.name.dir</name>
        <value>/opt/hdfs/name</value>
    </property>
    <property>
        <name>dfs.data.dir</name>
        <value>/opt/hdfs/data</value>
    </property>
    <property>
            <name>dfs.tmp.dir</name>
            <value>/opt/hdfs/tmp</value>
    </property>
</configuration>
mapred-site.xml:
<?xml version="1.0"?>
<?xml-stylesheet type="text/xsl" href="configuration.xsl"?>
<!--
  Licensed under the Apache License, Version 2.0 (the "License");
  you may not use this file except in compliance with the License.
  You may obtain a copy of the License at

    http://www.apache.org/licenses/LICENSE-2.0

  Unless required by applicable law or agreed to in writing, software
  distributed under the License is distributed on an "AS IS" BASIS,
  WITHOUT WARRANTIES OR CONDITIONS OF ANY KIND, either express or implied.
  See the License for the specific language governing permissions and
  limitations under the License. See accompanying LICENSE file.
-->

<!-- Put site-specific property overrides in this file. -->

<configuration>
    <property>
        <name>mapreduce.framework.name</name>
        <value>yarn</value>
    </property>
    <property>
        <name>mapred.job.tracker</name>
        <value>hdfs://192.168.1.104:9001</value>
    </property>
</configuration>
3. 在/etc/profile后面加上:
export HADOOP_HOME=/opt/hadoop-2.6.0-cdh5.9.0
export PATH=$PATH:$HADOOP_HOME/bin
并且输入命令:
source /etc/profile
使设置生效。
4. 输入命令:
hadoop namenode -format
格式化NameNode,如果结果提示Successful表明格式化成功。
5. 进入/opt/hadoop-2.6.0-cdh5.9.0/etc/hadoop/sbin,输入命令:
./start-all.sh
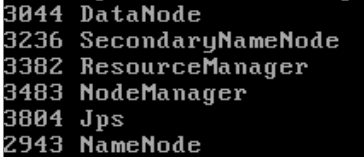
启动Hadoop。为了检验是否启动成功,输入命令:
jps
如果结果包含了以下几个进程,则表明启动成功:

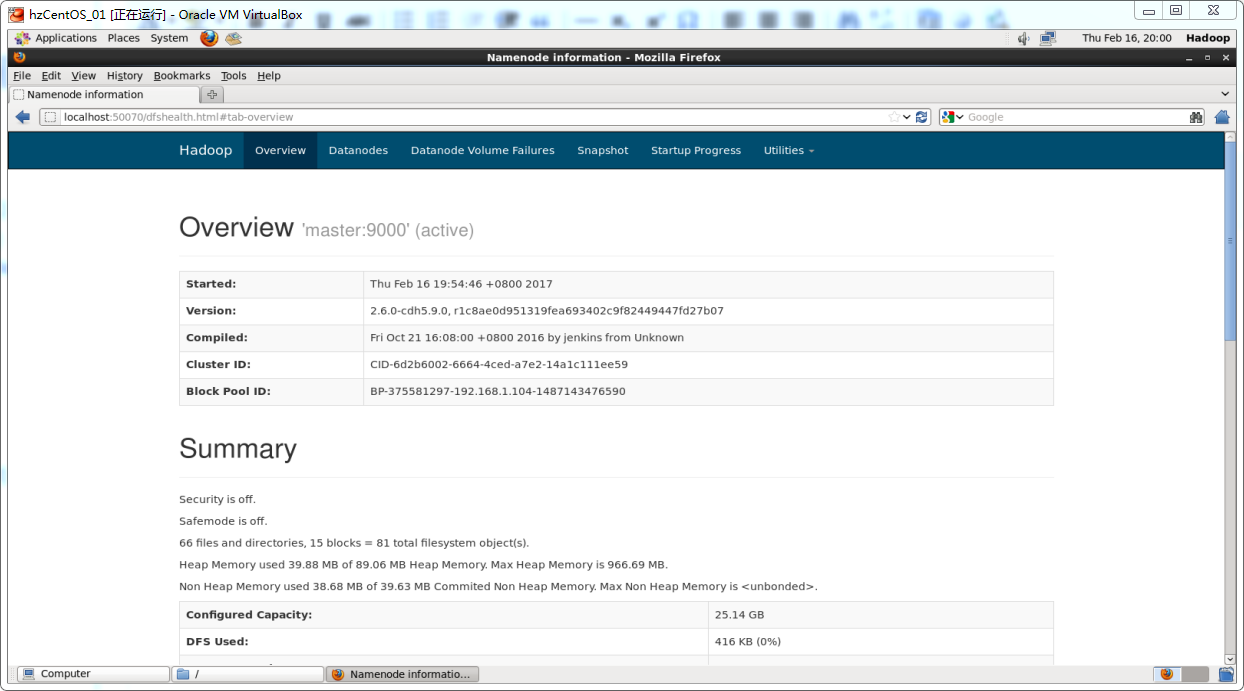
也可以在浏览器里面输入地址http://localhost:50070,检验是否启动成功:


