

XIB方式view的封装
1.为什么要view的封装
注意:
1.外界创建了XIb自定义的View,如果没有设置尺寸的话,其默认的尺寸是xib中描述尺寸,位置是(0, 0)
2.布局内部的自控件的时候尽量使用Autolayou方式布局
- l如果一个view内部的子控件比较多,一般会考虑自定义一个view,把它内部子控件的创建屏蔽起来,不让外界关心
-
l外界可以传入对应的模型数据给view,view拿到模型数据后给内部的子控件设置对应的数
2.封装的步骤
- 在initWithFrame:方法中添加子控件,提供便利构造方法 注意:这里不是重写-init方法,外界通过alloc init创建,系统会在内部调用initWithFrame
- 在layoutSubviews方法中设置子控件的frame(一定要调用super的layoutSubviews)
- 增加模型属性,在模型属性set方法中设置数据到子控
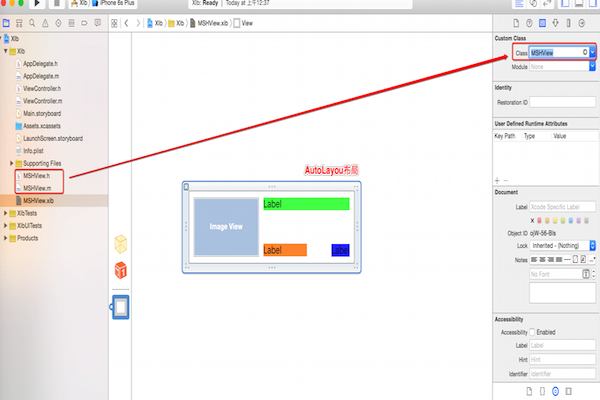
4.使用xib自定义view的步骤
1.创建一个继承与UIView的View
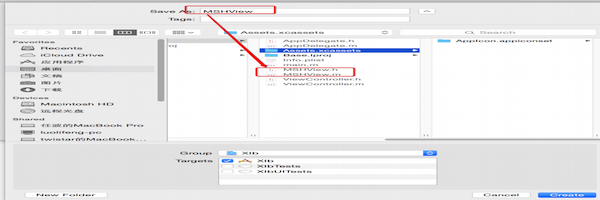
2.创建一个xib的文件
3.将View中控件添加到自定义的View中引用着,用这个类来管理Xib中描述的控件
4.在自定义View类的.h文件中提供一个模型属性,然后重写模型的set方法,在set方法中拿到传递进来的模型数据,赋值给内部的子控件
#import <UIKit/UIKit.h>

@class MSHTg; 这里用的是Class
@interface MSHTgCell : UITableViewCell

/** 团购模型*/
@property (nonatomic ,strong)MSHTg *tg;
@end
重写模型的set方法
#import "MSHTgCell.h"
#import "MSHTg.h"

@interface MSHTgCell ()
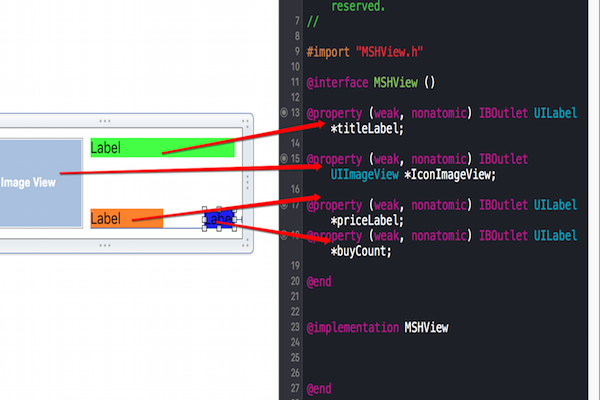
自定义view内部通过拖线的方式,引用着XIb内部描述的子控件
@property (weak, nonatomic) IBOutlet UIImageView *iconImageView;
@property (weak, nonatomic) IBOutlet UILabel *titleLabel;

@property (weak, nonatomic) IBOutlet UILabel *priceLabel;

@property (weak, nonatomic) IBOutlet UILabel *buyCountLabel;
@end
@implementation XMGTgCell


/**
 *  设置数据
 */
- (void)setTg:(XMGTg *)tg
{
    _tg = tg; 记得一定要给属性赋值,不然会出现未知错误
    self.iconImageView.image = [UIImage imageNamed:tg.icon];
    self.titleLabel.text = tg.title;
    self.priceLabel.text = [NSString stringWithFormat:@"¥ %@",tg.price]; 拼接字符串
    self.buyCountLabel.text = [NSString stringWithFormat:@"%@人已购买",tg.buyCount];
}

@en
在外界,直接拿自定义的view创建
#import "ViewController.h"
#import "MSHProduct.h" 拷贝自定义view的头文件
#import "MSHProductView.h"

@interface ViewController ()

// 购物车的View
@property (weak, nonatomic) IBOutlet UIView *shopCartView;

// 添加商品和移除商品的按钮
@property (weak, nonatomic) IBOutlet UIButton *removeProductBtn;
@property (weak, nonatomic) IBOutlet UIButton *addProductBtn;

// 商品的数据
@property (nonatomic, strong) NSArray *products;

@end

@implementation ViewController

- (void)viewDidLoad {
    [super viewDidLoad];
}

#pragma mark - 添加和移除商品
#pragma mark 添加商品
- (IBAction)addProduct:(UIButton *)sender {
    /********************** 1.常亮 *****************************/
    // 1.1.定义一些常亮
    CGFloat width = 70;
    CGFloat height = 100;

    // 1.2.计算常亮
    CGFloat hMargin = (self.shopCartView.frame.size.width - 3 * width) / 2;
    CGFloat vMargin = (self.shopCartView.frame.size.height - 2 * height) / 1;
    NSInteger index = self.shopCartView.subviews.count;
    CGFloat x = index % 3 * (hMargin + width);
    CGFloat y = index / 3 * (vMargin + height);


    /********************** 2.添加商品的View *****************************/
    // 1.创建商品的View
    MSHProductView *productView = [[MSHProductView alloc] init];
    productView.frame = CGRectMake(x, y, width, height);
    [self.shopCartView addSubview:productView];

    // 2.设置数据
    /*
    MSHProduct *product = self.products[index];
    [productView setIcon:product.icon];
    [productView setTitle:product.title];
     */
    /* 直接用直接创建的view创建对象
    MSHProduct *product = self.products[index];
    productView.product = product;
     */
    productView.product = self.products[index];

    /********************** 3.判断按钮的状态 *****************************/
    // 3.1.判断添加商品的按钮状态
    sender.enabled = self.shopCartView.subviews.count != 6;
    // 3.2.让移除按钮可以点击
    self.removeProductBtn.enabled = YES;
}

#pragma mark 移除商品
- (IBAction)removeProduct:(UIButton *)sender {
    // 1.取出最后一个商品,并且移除掉
    UIView *lastProduct = [self.shopCartView.subviews lastObject];
    [lastProduct removeFromSuperview];

    // 2.判断按钮的状态
    // 2.1.判断移除按钮的状态
    sender.enabled = self.shopCartView.subviews.count;
    // 2.2.判断添加按钮的状态
    self.addProductBtn.enabled = YES;
}

#pragma mark - 懒加载代码
- (NSArray *)products
{
    if (_products == nil) {
        // 1.获取plist文件的路径
        NSString *plistPath = [[NSBundle mainBundle] pathForResource:@"products.plist" ofType:nil];

        // 2.读取plist文件
        _products = [NSArray arrayWithContentsOfFile:plistPath];

        // 3.将字典转成模型对象
        NSMutableArray *tempArray = [NSMutableArray array];
        for (NSDictionary *dict in _products) {
            // 3.1.创建模型对象,并且给属性赋值
            // MSHProduct *product = [MSHProduct productWithIcon:dict[@"icon"] title:dict[@"title"]];

           给自己创建的view传递字典属性在后面一般都是将字典转换成模型,直接传递模型
            MSHProduct *product = [MSHProduct productWithDict:dict];

            // 3.2.将模型对象放入数组中
            [tempArray addObject:product];
        }

        _products = tempArray;
    }

    return _products;
}

@end
自定View的注意事项:
import "MSHProductView.h"

@interface MSHProductView ()

@property (weak, nonatomic) IBOutlet UIImageView *iconView;
@property (weak, nonatomic) IBOutlet UILabel *titleLabel;

@end

@implementation MSHProductView

#pragma mark - 初始化方法
/*
- (instancetype)init
{
    if (self = [super init]) {
        NSLog(@"%s", __func__);
    }
    return self;
}

- (instancetype)initWithFrame:(CGRect)frame
{
    if (self = [super initWithFrame:frame]) {
        NSLog(@"%s", __func__);
    }
    return self;
}
*/

// 如果控件时通过xib或者storyboard加载出来的,那么就会执行该方法
// 作用:在initWithCoder方法中添加子控件 xib自定义的空间不会执行initWithFrame方法
- (instancetype)initWithCoder:(NSCoder *)aDecoder
{
    if (self = [super initWithCoder:aDecoder]) {
        NSLog(@"%s", __func__);
        self.backgroundColor = [UIColor yellowColor];
    }
    return self;
}

// 所以xib中的控件都加载好之后会执行该方法
// 作用:初始化操作,比如设置背景,初始化一些数据
- (void)awakeFromNib
{
    [super awakeFromNib]; 重写父类的方法
    设置控件的属性,初始化数据,注意来到这里是XIb中的控件已经加载好
    self.backgroundColor = [UIColor yellowColor];

    NSLog(@"%s", __func__);
}

#pragma mark - 快速通过xib创建对象的类方法
+ (instancetype)productView
{  从Xib中加载控件的方式 注意这里返回的是一个数组()因为我们可能在一个Xib中描述多个View,通常都是描述一个,我们直接用firstObject或者lastObject
    return [[[NSBundle mainBundle] loadNibNamed:@"MSHProductView" owner:nil options:nil] firstObject];
}


#pragma mark - 设置数据的方法 重写模型的set方法,拿到模型的数据,给子控件赋值
- (void)setIcon:(NSString *)iconName
{
    self.iconView.image = [UIImage imageNamed:iconName];
}

- (void)setTitle:(NSString *)title
{
    self.titleLabel.text = title;
}
#pragma mark - xib的加载原理
- (UIView *)loadXib
{
    // 1.加载数组当中通过下标找到的View  首先根据xib中找到描述View的类型是什么
    MSHProductView *productView = [[MSHProductView alloc] initWithCoder:nil];
    productView.tag = 1000; 然后设置View的属性
    productView.backgroundColor = [UIColor yellowColor];

    // 2.加载子控件
    // 2.1.加载iconView子控件
    UIImageView *imageView = [[UIImageView alloc]  initWithCoder:nil];
    imageView.backgroundColor = [UIColor redColor];
    imageView.tag = 1000;
    self.iconView = imageView;
    [productView addSubview:imageView]; 创建跟设置完子控件的属性之后,最后将自控家添加到自定义的View当中

    // 2.2.加载titleLabel子控件
    UILabel *titleLabel = [[UILabel alloc] initWithCoder:nil];
    titleLabel.tag = 2000;
    self.titleLabel = titleLabel;
    [productView addSubview:titleLabel];

    return productView;
}
