侧边导航工具代码封装 —— 自定义
今天又是忙碌的一天,但是想到明天就双休日了心情顿时开朗了,哈哈~
废话不多说,相信很多小伙伴都在项目中会用到侧边悬浮导航吧? 就是在网站首页或者所有页面的边上悬浮这一条快捷入口或者工具吧?
是不是因为每次都要去写这个功能而感到无聊呢? 今天我就来安利一波我的自定义侧边栏工具吧!!
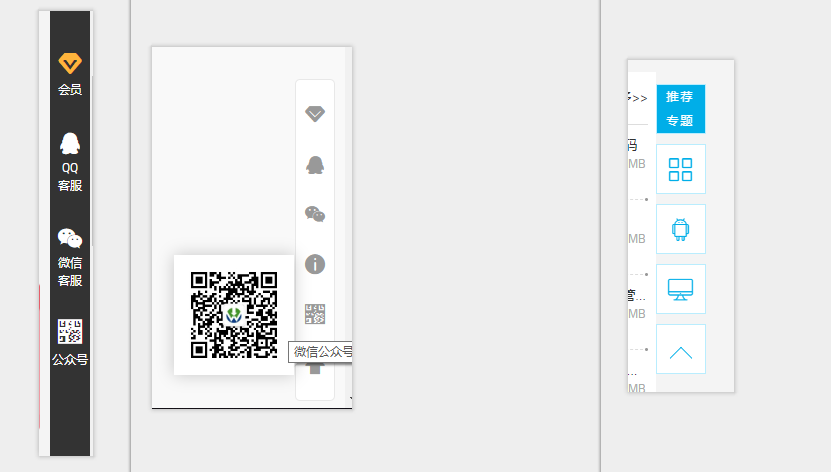
例如楼下这几个就很常见啦~

那我们需要考虑一些什么呢?
首页你会发现这些侧边字体图标都不一样, 然后名称不一样, 鼠标效果不一样等,有的是点击跳转页面, 有的点击弹框窗口,有点悬浮展示二维码等。。。 那自定义封装这种东西就需要很多参数配置咯,是的, 下面我们来封装这个工具
// 首先在需要的页面中可能需要这样调用

    new SideBar({
        item1: {    // 所有类似工具 都以  /^item\d/ 这个正则匹配 也就是item + 数字模式
            selector: '/vip.html',  // 需要点击跳转到这个地址
            iconClass: 'icon-vip', // 使用的字体图标类名
            cellText: 'VIP',  // 这个功能的名称 title属性
        },
        item2: {
            iconClass: 'icon-qq',
            cellText: '客服QQ',
            img: ' ',  // 客服的QQ二维码,图片的调用路径
            iconStyle: {fontSize: '18px'}  // 自定义样式,这个字体图标单独改变

        },
        item3: {
            iconClass: 'icon-wx',
            cellText: '客服微信',
            img: 'http://mac.orsoon.com/assets/images/kfewm.png',
        },
        item4: {
            selector: '/complaint.html',
            iconClass: 'icon-warn',
            cellText: '内容举报',
        },
        item5: {
            iconClass: 'icon-ewm',
            cellText: '微信公众号',
            img: '  ',
            imgStyle :{}  // 独立设置这个图片盒子样式
        },
        goTopIcon: {    // 最后一个是返回顶部按钮, 需要单独命名
            iconClass: 'icon-top',
            cellText: '返回顶部'
        },
        goTopIconShow: 500 , // 这个是返回顶部按钮在距离顶部距离显示隐藏功能
        scrollSpeed: 300, // 这个是返回顶部的速度
        commonIconStyle: {  //这边是定义所有字体图标样式
            fontSize: "20px"
        },
        commonImgStyle: {   // 所有悬浮隐藏图片盒子的样式
            width: "200px"
        }
    }, dom );  // 这里的dom 指的你需要将生成的侧边元素放入的位置, 不填则会默认生成#siderbar 加入到body当中
这个工具也可以在首页侧边展示栏目做 标题提取 与锚点定位, 只需要改写一些方法即可,我们后面再说。
那下面我们就开始定义这个方法了。
原方法是Jq写的 , 后来将构造函数改成了 es6的 class 方法,但是内容没变多少。。。
/**
	* @SideBar 侧边导航构造函数
	* opts {object} 必填 true
		* /^item\d/ : 构成侧边元素 false {obj}
			* selector: 跳转地址 || #id  这边如果是锚点跳转需要填入#加上锚点id,用来定位
			* iconClass: 字体图标
			* cellText: title名称
			* img: 悬浮图片
			* iconStyle: 独立自定义字体图标样式
			* imgStyle: 独立自定义图片样式

		* commonIconStyle: 图标自定义样式 false
		* commonImgStyle: 悬浮展示图片自定义样式 false
		* scrollSpeed: 返回顶部速度 false
		* goTopIconShow: 距离顶部高度显示 false

 	* 接受参数 dom {dom 对象, false} 默认生成 #siderbar 元素加入页面
*/

(function ($, win, doc) {
    'use strict';
    class SideBar {
    	constructor (opts, dom = '<div id="siderbar"></div>') {  // 初始化定义默认侧边包裹元素
    		this._init(opts, dom);
    	}

    	_init(opts, dom) {
    	    this.opts = {}; // 可以添加一些默认参数
            $.extend(this.opts, opts, true);   // 合并参数
            this.sildeDom = dom;
            // this.elementTopArray = [];   // 这边是为锚点定位 声明的数组 存放栏目位置


            if(this.sildeDom === '<div id="siderbar"></div>') {  // 如果没有容器则添加默认
            	this.sildeDom = $(this.sildeDom);
            	$('body').append(this.sildeDom);
            }

            this.createBarItems();  // 构造侧边元素
            this.opts.goTopIcon && this.createGoTopIcon(); // 如果有返回顶部定义则添加

    	}

    	createBarItems () {
            var self = this;
            for (var key in this.opts) {  // 遍历参数对象
                if (/item\d*/.test(key)) {  // 正则匹配侧边元素
                    var item = this.opts[key];
                    var $iconSpan,
                        $textSpan = '',
                        $aLink,
                        $cellWrapper = $('<div class="cell-wrapper">'),  // 声明容器
                        $sidebar_cell = $('<div class="sidebar_cell">'); // 声明侧边每一组的元素

                    $iconSpan = this.createIcons(item, $iconSpan);  // 调用图标元素生成
                    $textSpan = this.createTexts(item, $textSpan); // 调用内容生成 侧边二维码
                    $aLink = this.createALink(item, $aLink); // 链接生成

                    $cellWrapper.append($aLink.append($iconSpan, $textSpan)).appendTo($sidebar_cell);

                     // 自定义鼠标悬浮效果, 也可以根据需求修改添加其他事件
                    $sidebar_cell.mouseover(function(e) {
                    	if($(this).find('img').length) {
                    		$(this).find('.cell-img').show();
                    	}
                    }).mouseout(function() {
                    	if($(this).find('img').length) {
                    		$(this).find('.cell-img').hide();
                    	}
                    });

                    // $sidebar_cell.click(function (e) {  // 这个是锚点定位点击事件
                    //     var _href = $(this).find('a').attr('href');

                    //     switch (_href[0]) {
                    //         case '#':
                    //         case '.':
                    //             self.moveToElement($(_href));
                    //             break;
                    //         default:
                    //             break;
                    //     }
                    //     return false;
                    // });

                    this.sildeDom.append($sidebar_cell)  //加入到页面容器中

                    // if (this.opts.watchScroll) {   // 这边是存入每个元素容器的高度
                    //     var selector = item.selector;  // 如果是锚点定位, 则opt中item* 的selector 输入为栏目标题的id,可以根据这个获取高度
                    //     var elementTop = $(selector).position().top;
                    //     elementTop && this.elementTopArray.push(elementTop);
                    // }
                }
            }
        }

        createIcons (obj, iconSpan) {
            var opts = this.opts;
            obj.iconClass && (iconSpan = $('<span class="cell-item cell-icon">').addClass(obj.iconClass));  //字体图标添加

            var _iconStyle = {};
            opts.commonIconStyle && $.extend(_iconStyle, opts.commonIconStyle);  //合并样式
            obj.iconStyle && $.extend(_iconStyle, obj.iconStyle);  // 单独样式
            iconSpan.css(_iconStyle);  //添加样式

            return iconSpan;
        }

        createTexts (obj, textSpan) {
            var opts = this.opts;

            obj.img && (textSpan = $('<div class="cell-item cell-img">').html('<img src="'+ obj.img +'">')); // 添加图片


            var _imgStyle = {};
            opts.commonImgStyle && $.extend(_imgStyle, opts.commonImgStyle);
            obj.imgStyle && $.extend(_imgStyle, obj.imgStyle);

            if(!!textSpan) {
            	textSpan.css(_imgStyle);  //确认有图片添加样式
            }
            return textSpan;
        }

        createALink (obj, aLink) {
            var _href = obj.selector || obj.href || 'javascript:;';
            aLink = $('<a href="' + _href + '" target="_blank" title="'+ obj.cellText +'">');

            return aLink;
        }

        createGoTopIcon () {  // 返回顶部元素与功能添加
            var opts = this.opts,
                goTopObj = opts.goTopIcon,
                _speed = opts.scrollSpeed || 300;
            var _goTopIconShow = opts.goTopIconShow || 400;

            var $sideBarCell = $('<div class="sidebar_cell">'),
                $cellWrapper = $('<div class="cell-wrapper">'),
                $icon = $('<i class="cell-item back-to-top">'),
                $aLink = $('<a href="javascript:;" title="'+ goTopObj.cellText +'">');

            var _iconStyle = {};
            opts.commonIconStyle && $.extend(_iconStyle, opts.commonIconStyle);
            goTopObj.iconClass && $icon.addClass(goTopObj.iconClass);
            goTopObj.iconStyle && $.extend(_iconStyle, goTopObj.iconStyle);

            $icon.css(_iconStyle);

            $cellWrapper.append($aLink.append($icon)).appendTo($sideBarCell);

            $sideBarCell.on('click', function (e) {
                e.preventDefault();
                $('html, body').animate({ scrollTop: 0 }, _speed);
                return false;
            });

            $(window).on('load scroll', function () {
                var winTop = $(window).scrollTop();
                winTop < _goTopIconShow ? $sideBarCell.fadeOut() : $sideBarCell.fadeIn();
            });

            this.sildeDom.append($sideBarCell);

            return this;
        }

    };

    win.SideBar = SideBar;
})(jQuery, window, document);
这个方法还是很好用的, 只是上面这样加入后,需要自己在样式文件中定义一下样式,我没有在js直接书写默认样式,,,这个因为是自己的项目就有点随意了。。。这边只是提供一下我思路,莫要见怪, 样式还是很简单的,按照你需要的去写就行了
之前提到的锚点定位,需要在构造函数中添加如下方法
        watchScroll () {  // 检测滚动位置根据锚点位置动态切换当前锚点样式
            var currentIndex = 0,
                topArray = this.elementTopArray;
            $(window).on('load scroll', function () {
                var winTop = $(window).scrollTop();
                for (var i = 0; i < topArray.length; i++) {
                    var height_1 = topArray[i],
                        height_2 = topArray[i + 1];
                    if (height_1 > winTop) {
                        break;
                    }
                    if (!height_2 || height_1 <= winTop && height_2 > winTop) {
                        currentIndex = i;
                        break;
                    }
                }
                var $sidebarCell = $('#go-top').find('.sidebar_cell');
                $sidebarCell.eq(currentIndex).addClass('active').siblings().removeClass('active');
            });
        }

        moveToElement (ele) {  // 点击定位到栏目位置
            var elapse = this.opts.scrollSpeed || 200;

            var _top = $(ele).offset().top;

            $('html, body').animate({ scrollTop: _top }, elapse);
        }
就这么多了,因为是拆分方法的问题, 这边这个构造函数主要是作为工具侧边来用, 如果对于锚点跳转有不懂的可以问我,当然自己琢磨出来的就更厉害啦- - 加油
项目已经上线,www.macdown.com可以查看效果哦,网站还有其他很多功能,如果好奇可以留言询问哦
谢谢,如果有一点点帮助,希望你能支持一些点个赞哟,哈哈
前进道路长,学习不可怠


