nginx常用语句
- 格式:nginx -s reload
- 帮助:-? -h
- 使用指定的配置文件:-c
- 指定配置指令:-g
- 指定运行目录:-p
- 发送信号:-s
- 立刻停止服务:stop
- 优雅的停止服务:quit
- 重载配置文件:reload
- 重新开始记录日志文件:reopen
- 测试配置文件是否有语法错误:-t -T
- 打印nginx的版本信息、编译信息等:-v -V
windows系统下:在cmd界面 打开:start nginx 关闭:nginx -s stop
openresty
使用lua脚本文件
location / {
    default_type text/html;
    content_by_lua_file C:/Users/Desktop/openresty-1.15.8.3-win64/conf/luaTest/a.lua;
}
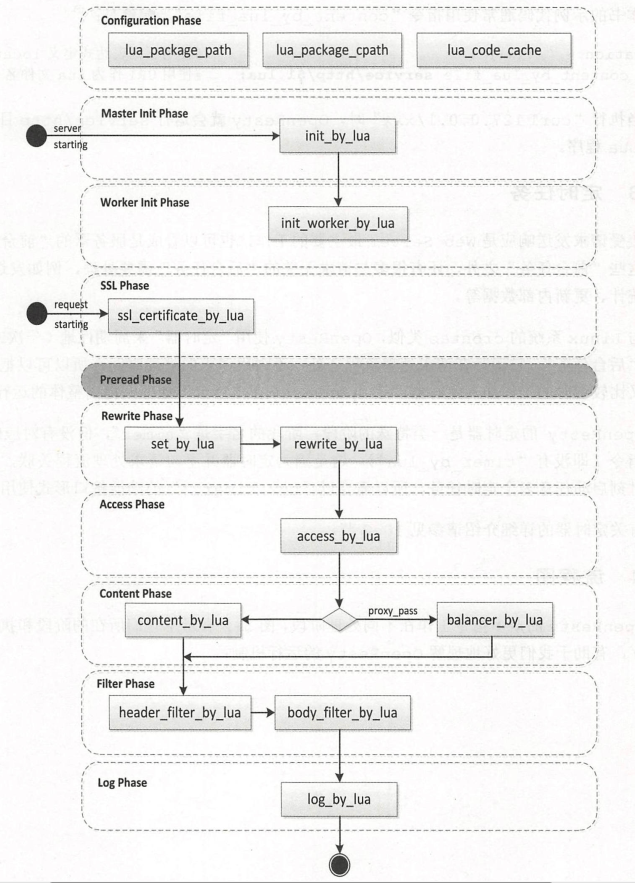
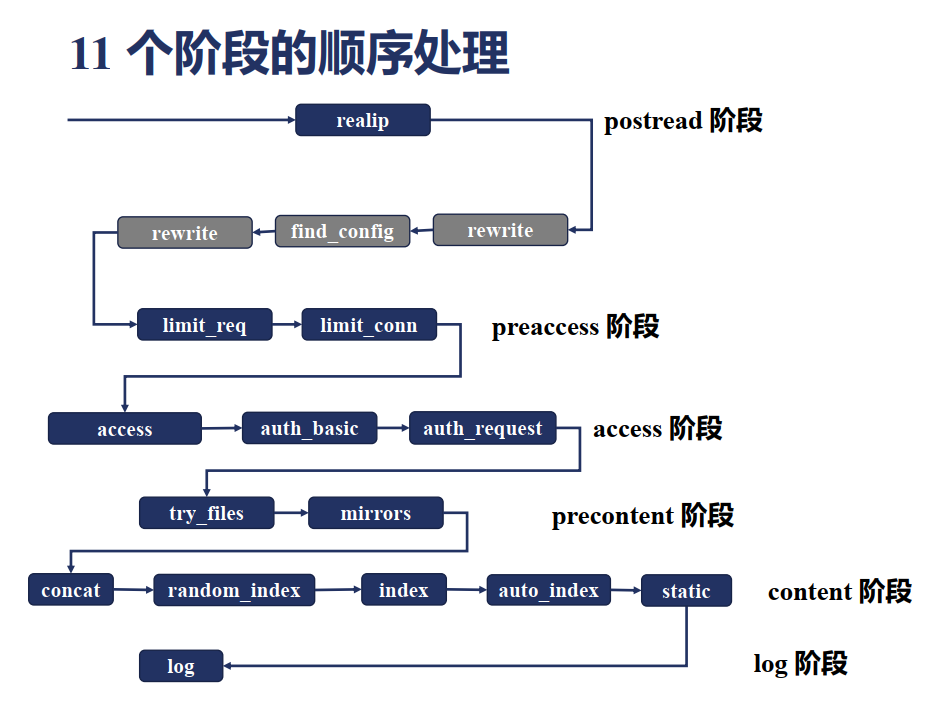
HTTP请求处理流程
openresty版

nginx版

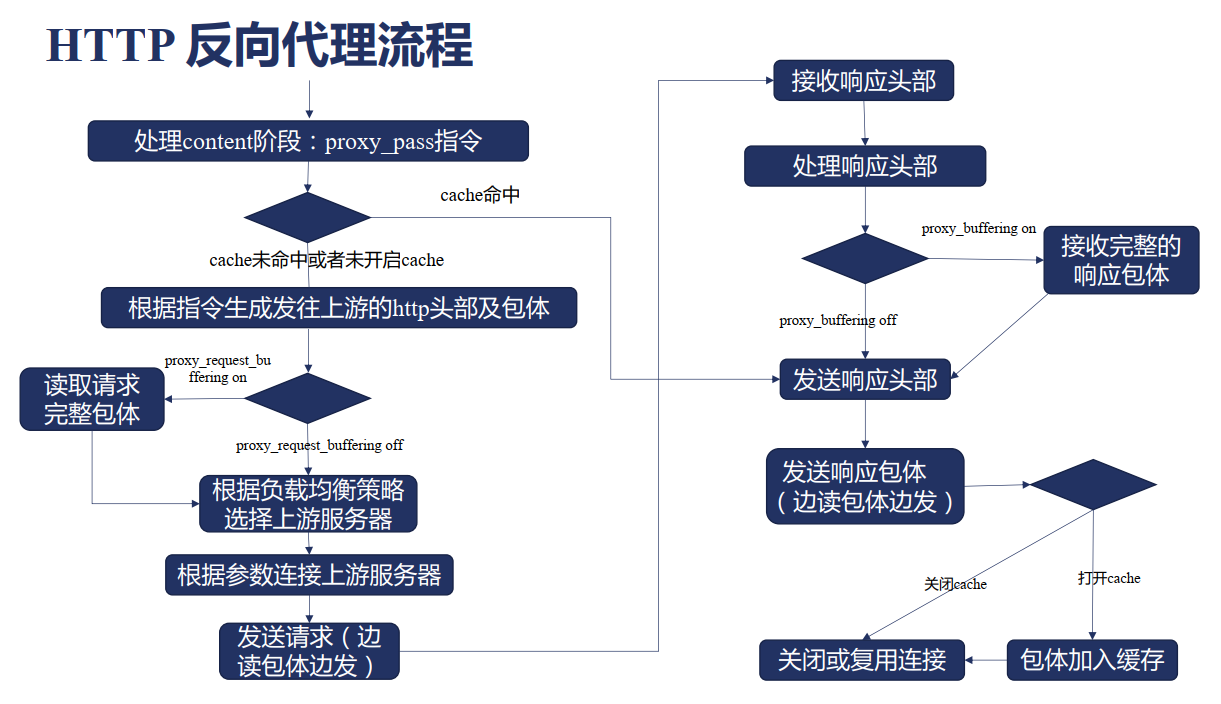
HTTP反向代理流程

全局变量
| 全局变量名 | 功能 |
|---|---|
$host |
请求信息中的 Host,如果请求中没有 Host 行,则等于设置的服务器名,不包含端口 |
$request_method |
客户端请求类型,如 GET、POST |
$args |
请求中的参数 |
$arg_PARAMETER |
GET 请求中变量名 PARAMETER 参数的值,例如:$http_user_agent(Uaer-Agent 值), $http_referer... |
$content_length |
请求头中的 Content-length 字段 |
$http_user_agent |
客户端agent信息 |
$http_cookie |
客户端cookie信息 |
$remote_addr |
客户端的IP地址 |
$remote_port |
客户端的端口 |
$http_user_agent |
客户端agent信息 |
$server_protocol |
请求使用的协议,如 HTTP/1.0、HTTP/1.1 |
$server_addr |
服务器地址 |
$server_name |
服务器名称 |
$server_port |
服务器的端口号 |
$scheme |
HTTP 方法(如http,https) |
location配置标记匹配
=  :URI必须完全匹配
~  :大小写敏感匹配
~* :大小写不敏感匹配
^~ :前缀匹配,匹配URI的前半部分即可
静态服务
server {
  listen       80;
  server_name  static.sherlocked93.club;
  charset utf-8;    # 防止中文文件名乱码

  location /download {
    alias	          /usr/share/nginx/html/static;  # 静态资源目录

    autoindex               on;    # 开启静态资源列目录
    autoindex_exact_size    off;   # on(默认)显示文件的确切大小,单位是byte;off显示文件大概大小,单位KB、MB、GB
    autoindex_localtime     off;   # off(默认)时显示的文件时间为GMT时间;on显示的文件时间为服务器时间
  }
}
nginx解决跨域问题
方式一
在前端服务地址为 fe.sherlocked93.club 的页面请求 be.sherlocked93.club 的后端服务导致的跨域,可以这样配置:
server {
	listen 9001;
	server_name fe.sherlocked93.club;

	location / {
  	proxy_pass be.sherlocked93.club;
  }
}
这样就将对前一个域名 fe.sherlocked93.club 的请求全都代理到了 be.sherlocked93.club,前端的请求都被我们用服务器代理到了后端地址下,绕过了跨域。
方式二
添加表头
server {
  listen       80;
  server_name  be.sherlocked93.club;

  add_header 'Access-Control-Allow-Origin' '*';
  add_header 'Access-Control-Allow-Credentials' 'true';

  location / {
    root  /usr/share/nginx/html/be;
    index index.html;
  }
}
图片防盗链
server {
  listen       80;
  server_name  *.sherlocked93.club;

  # 图片防盗链
  location ~* \.(gif|jpg|jpeg|png|bmp|swf)$ {
    valid_referers none blocked 192.168.0.2;  # 只允许本机 IP 外链引用
    if ($invalid_referer){
      return 403;
    }
  }
}
请求过滤
# 非指定请求全返回 403
if ( $request_method !~ ^(GET|POST|HEAD)$ ) {
  return 403;
}

location / {
  # IP访问限制(只允许IP是 192.168.0.2 机器访问)
  allow 192.168.0.2;
  deny all;

  root   html;
  index  index.html index.htm;
}
添加新模块
1.下载模块
git clone https://github.com/agentzh/echo-nginx-module
2.放入指定位置
mv echo-nginx-module-master /usr/local/src/nginx-1.8.1/echo-nginx-module
3.查看已编译参数
/usr/local/nginx/sbin/nginx -V   结果为:
--user=www --group=www --prefix=/usr/local/nginx --with-http_stub_status_module --with-http_ssl_module --with-http_gzip_static_module --with-ipv6
4.重新编译
./configure --user=www --group=www --prefix=/usr/local/nginx --with-http_stub_status_module --with-http_ssl_module --with-http_gzip_static_module --add-module=/usr/local/src/nginx-1.8.1/echo-nginx-module --with-ipv6
make
PS: 这里只需要make,一定不要执行make install,不然会覆盖
5.备份原文件
cp /usr/local/nginx/sbin/nginx /usr/local/nginx/sbin/nginx.bak
6.替换nginx二进制文件
cp /usr/local/src/nginx-1.8.1/objs/nginx /usr/local/nginx/sbin/nginx
7.检查以及平滑启动nginx
ln -s /usr/local/nginx/sbin/nginx /usr/local/bin/nginx(做软链,添加到环境变量)
nginx -t (检测配置文件)
nginx -s reload (平滑重启)
posted on 2020-01-10 00:05 MrSmartLin 阅读(656) 评论(0) 编辑 收藏 举报

