Python ttkbootstrap学习
tkinter知识
记录一些tkinter库的知识。
pack布局
个人觉得布局其实是很负责的,因此这里对布局进行一个补充说明。
pack布局是根据添加组件的顺序依次排列所有组件。
pack() 方法的参数有:side, fill, padx/pady, ipadx/ipady, anchor, expand
side: 决定组件停靠的方向,选项:left, right, top, bottom
-
'top': 向上停靠 默认
-
'bottom':向下停靠
-
'left':向左停靠
-
'right':向右停靠
ttk.Button(root, text="Button 1", bootstyle=SUCCESS).pack(side=RIGHT, padx=5, pady=10)
ttk.Button(root, text="Button 2", bootstyle=(INFO, OUTLINE)).pack(side=RIGHT, padx=5, pady=10)

fill :表示填充分配空间:
- x:水平方向填充
- y:竖直方向填充
- both:水平和竖直方向填充
- none:不填充(默认值)
expand :表示是否填充父组件的额外空间
- True:扩展整个空白区,使能 fill 属性
- fill=X:当GUI窗体大小发生变化时,widget在X方向跟随GUI窗体变化
- fill=Y:当GUI窗体大小发生变化时,widget在Y方向跟随GUI窗体变化
- fill=BOTH:当GUI窗体大小发生变化时,widget在X、Y两方向跟随GUI窗体变化
- False:关闭 fill属性
ttk.Button(root, text="Button 1", bootstyle=SUCCESS).pack(side=LEFT, fill=Y, padx=5, pady=10, expand=True)
ttk.Button(root, text="Button 2", bootstyle=(INFO, OUTLINE)).pack(side=LEFT, fill=X, padx=5, pady=10, expand=True)

padx/pady: 组件外,组件跟邻近组件或窗体边界的距离(外边距),默认值:0
-
水平方向上的外边距
-
垂直方向上的外边距
ttk.Button(root, text="Button 1", bootstyle=SUCCESS).pack(side=LEFT, fill=Y, padx=20, pady=20, expand=True)
ttk.Button(root, text="Button 2", bootstyle=(INFO, OUTLINE)).pack(side=LEFT, fill=BOTH, padx=20, pady=20, expand=True)

ipadx/ipady: 组件内,组件文本跟组件边界之间的距离(内边距),默认值:0
-
水平方向上的内边距
-
垂直方向上的内边距
ttk.Button(root, text="Button 1", bootstyle=SUCCESS).pack(side=TOP, fill=Y, padx=20, pady=20, ipadx=10, ipady=10, expand=True)
ttk.Button(root, text="Button 2", bootstyle=(INFO, OUTLINE)).pack(side=TOP, fill=BOTH, padx=20, ipadx=0, ipady=0, pady=20, expand=True)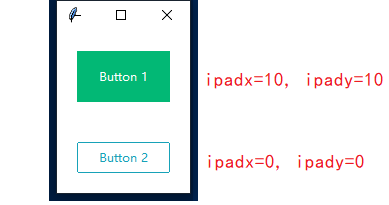
pack布局示例
以ttkbootstrap的官方示例简单的数据输入 - ttkbootstrap为例进行说明,示例源码:
import ttkbootstrap as ttk
from ttkbootstrap.constants import *

class DataEntryForm(ttk.Frame):

    def __init__(self, master):
        super().__init__(master, padding=(20, 10))
        self.pack(fill=BOTH, expand=YES)

        # form variables
        self.name = ttk.StringVar(value="")
        self.address = ttk.StringVar(value="")
        self.phone = ttk.StringVar(value="")

        # form header
        hdr_txt = "Please enter your contact information"
        hdr = ttk.Label(master=self, text=hdr_txt, width=50)
        hdr.pack(fill=X, pady=10)

        # form entries
        self.create_form_entry("name", self.name)
        self.create_form_entry("address", self.address)
        self.create_form_entry("phone", self.phone)
        self.create_buttonbox()

    def create_form_entry(self, label, variable):
        """Create a single form entry"""
        container = ttk.Frame(self)
        container.pack(fill=X, expand=YES, pady=5)

        lbl = ttk.Label(master=container, text=label.title(), width=10)
        lbl.pack(side=LEFT, padx=5)

        ent = ttk.Entry(master=container, textvariable=variable)
        ent.pack(side=LEFT, padx=5, fill=X, expand=YES)

    def create_buttonbox(self):
        """Create the application buttonbox"""
        container = ttk.Frame(self)
        container.pack(fill=X, expand=YES, pady=(15, 10))

        sub_btn = ttk.Button(
            master=container,
            text="Submit",
            command=self.on_submit,
            bootstyle=SUCCESS,
            width=6,
        )
        sub_btn.pack(side=RIGHT, padx=5)
        sub_btn.focus_set()

        cnl_btn = ttk.Button(
            master=container,
            text="Cancel",
            command=self.on_cancel,
            bootstyle=DANGER,
            width=6,
        )
        cnl_btn.pack(side=RIGHT, padx=5)

    def on_submit(self):
        """Print the contents to console and return the values."""
        print("Name:", self.name.get())
        print("Address:", self.address.get())
        print("Phone:", self.phone.get())
        return self.name.get(), self.address.get(), self.phone.get()

    def on_cancel(self):
        """Cancel and close the application."""
        self.quit()


if __name__ == "__main__":

    app = ttk.Window("Data Entry", "superhero", resizable=(False, False))
    DataEntryForm(app)
    app.mainloop()
这里不讨论实现的内容,仅讨论是如何使用pack布局实现的。
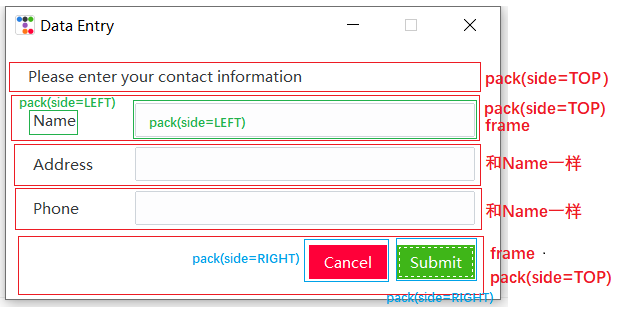
首先,最外层都是Frame,都是使用pack布局方式,side都是默认值TOP。
然后各个Frame内部根据需要可以调整布局方式,当前都是用的pack布局,但是side不一样,Name、Address、Phone都是LEFT,两个按钮为RIGHT。
按照这种方式,理论上使用pack都能实现大部分想要的布局。
ttkbootstrap
官网:ttkbootstrap - ttkbootstrap
Themes
支持的主题
light主题:轻量级主题 - ttkbootstrap --- Light themes - ttkbootstrap
dark主题:深色主题 - ttkbootstrap --- Dark themes - ttkbootstrap
不同主题具体的颜色值,可以查看安装包的源代码路径themes\standard.py
查看所有的主题名字:
from ttkbootstrap.themes.standard import *
print (STANDARD_THEMES.keys())
# dict_keys(['cosmo', 'flatly', 'litera', 'minty', 'lumen', 'sandstone', 'yeti', 'pulse', 'united', 'morph', 'journal', 'darkly', 'superhero', 'solar', 'cyborg', 'vapor', 'simplex', 'cerculean'])
配置主题的方式,创建window时通过themename指定:
root = ttk.Window(themename="darkly")
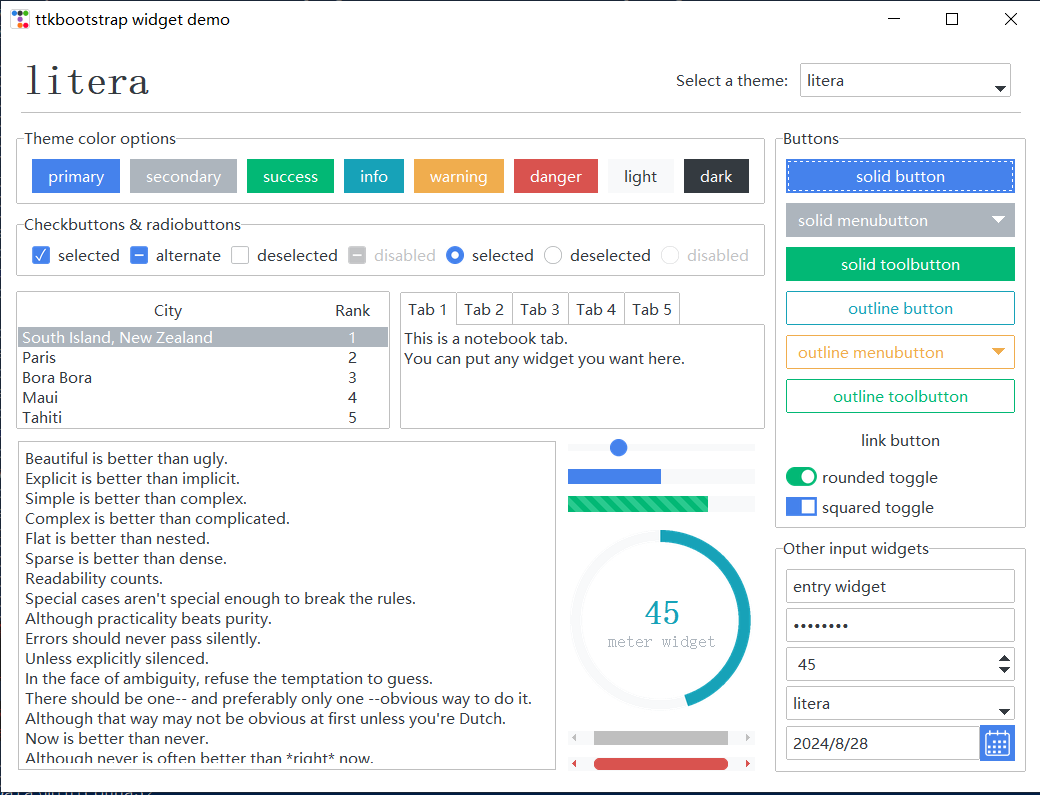
也可以直接运行python -m ttkbootstrap查看支持的主题:
但是如果遇到运行时报错,比如:
PS C:\ProgramData\miniconda3> .\python.exe -m ttkbootstrap
Traceback (most recent call last):
  File "C:\ProgramData\miniconda3\lib\runpy.py", line 197, in _run_module_as_main
    return _run_code(code, main_globals, None,
  File "C:\ProgramData\miniconda3\lib\runpy.py", line 87, in _run_code
    exec(code, run_globals)
  File "C:\ProgramData\miniconda3\lib\site-packages\ttkbootstrap\__main__.py", line 298, in <module>
    bagel = setup_demo(app)
  File "C:\ProgramData\miniconda3\lib\site-packages\ttkbootstrap\__main__.py", line 173, in setup_demo
    m = ttk.Meter(
  File "C:\ProgramData\miniconda3\lib\site-packages\ttkbootstrap\widgets.py", line 718, in __init__
    self._setup_widget()
  File "C:\ProgramData\miniconda3\lib\site-packages\ttkbootstrap\widgets.py", line 759, in _setup_widget
    self._draw_meter()
  File "C:\ProgramData\miniconda3\lib\site-packages\ttkbootstrap\widgets.py", line 856, in _draw_meter
    img.resize((self._metersize, self._metersize), Image.CUBIC)
AttributeError: module 'PIL.Image' has no attribute 'CUBIC'
则可以通过将库中的源码更改以下,更改文件为C:\ProgramData\miniconda3\lib\site-packages\ttkbootstrap\widgets.py的856行,具体要看你的安装路径。
将:
img.resize((self._metersize, self._metersize), Image.CUBIC)
更改为:
img.resize((self._metersize, self._metersize), Image.LANCZOS)
动态更改主题
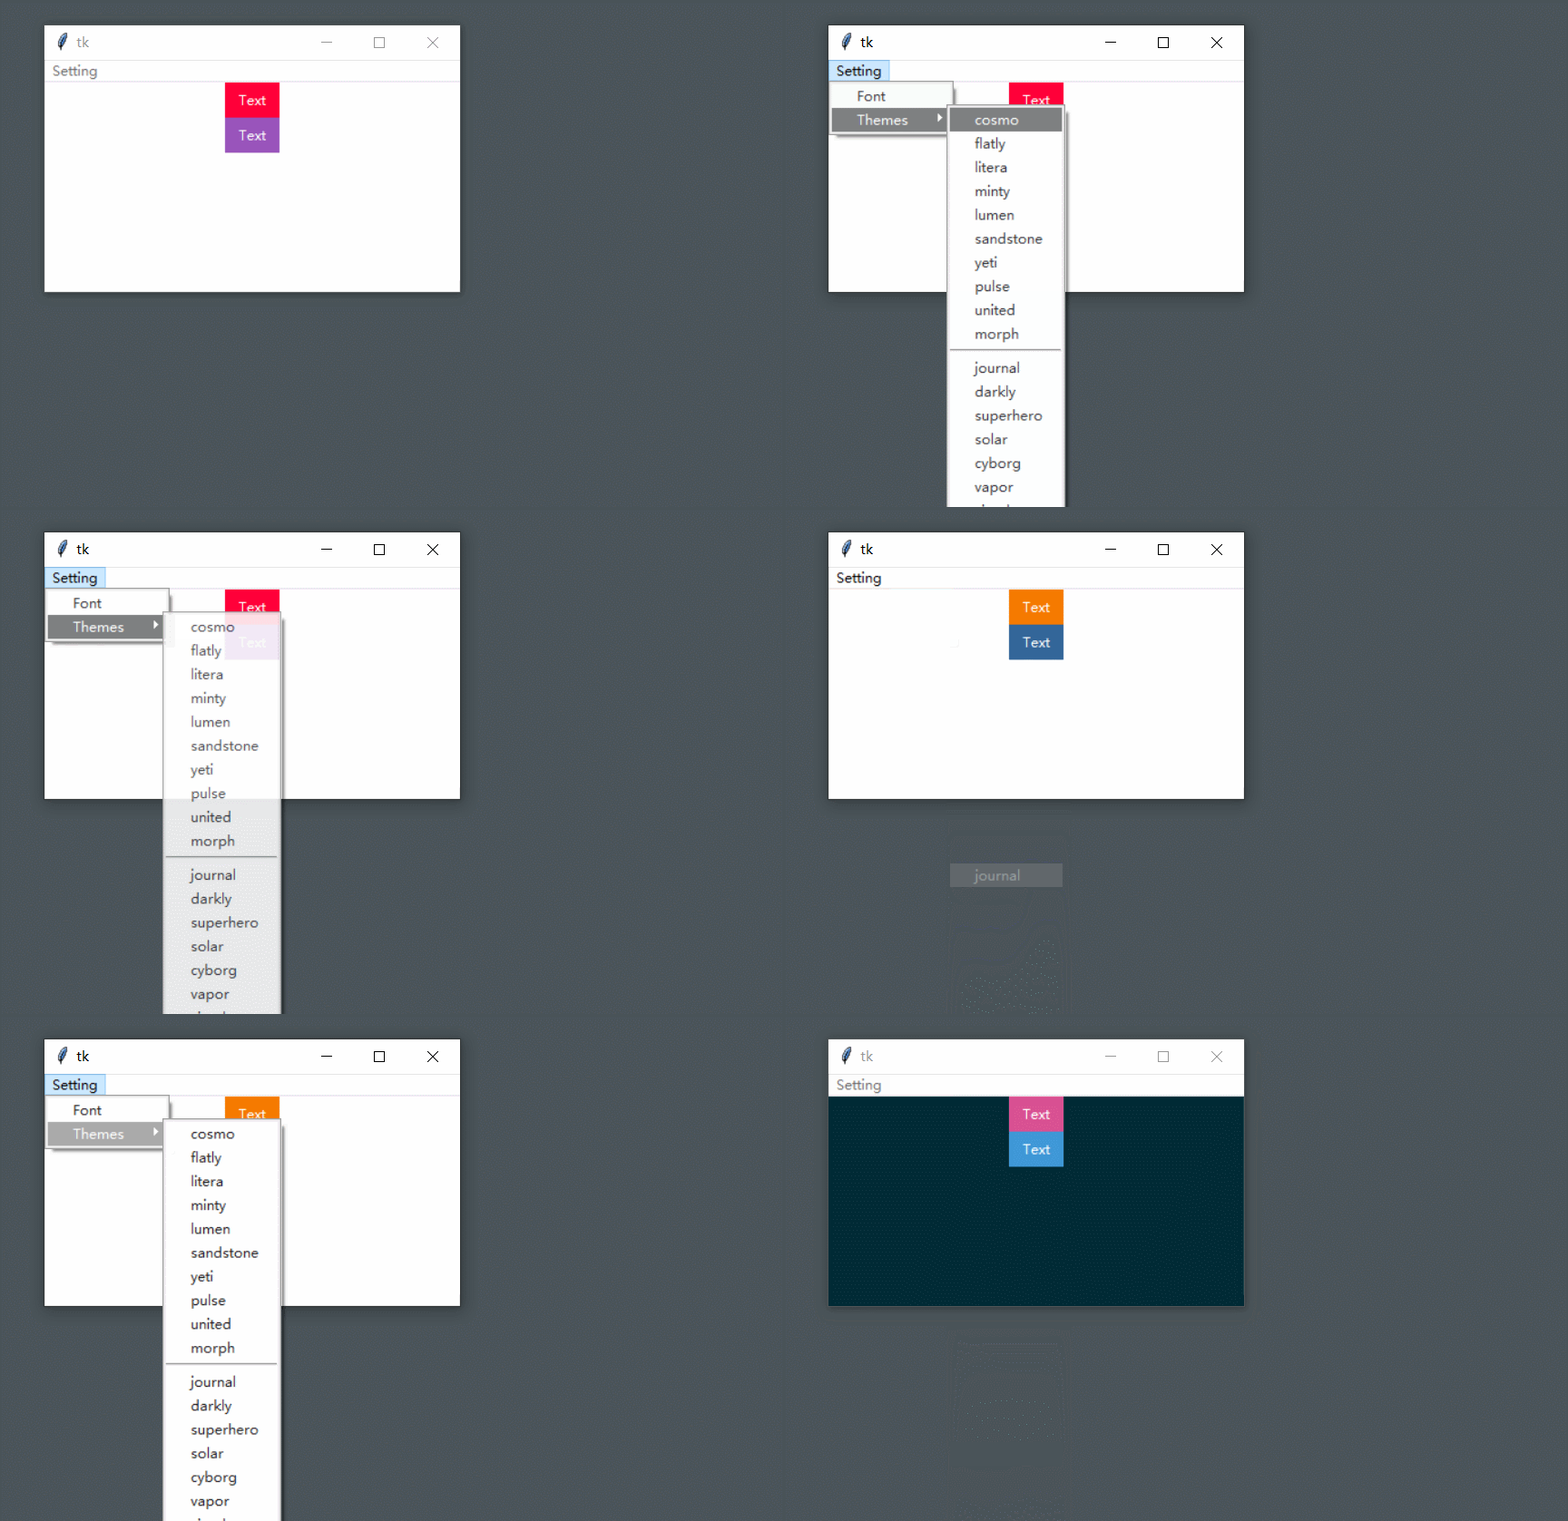
下面是一个示例,可以动态的在Menu菜单中更改窗口的主题:
import ttkbootstrap as ttk
from ttkbootstrap.constants import *

def setup_ui(style):
    root = style.master
    root.geometry('500x300')
    ttk.Button(root, text='Text', bootstyle='danger.TButton').pack(side=TOP, padx=0, pady=0)
    ttk.Button(root, text='Text', bootstyle='info.TButton').pack(side=TOP, padx=0, pady=0)

    # 创建顶级菜单
    top_menubar = ttk.Menu(root)
    submenu = ttk.Menu(top_menubar)
    top_menubar.add_cascade(label='Setting', menu=submenu)
    submenu.add_command(label='Font')
    # 创建Themes下的子菜单
    themes_submenu = ttk.Menu(submenu)
    submenu.add_cascade(label='Themes', menu=themes_submenu, underline=0)
    def make_adder(name):
        def adder():
            style.theme_use(name)
        return adder
    for each in ['cosmo', 'flatly', 'litera', 'minty', 'lumen', 'sandstone',
                'yeti', 'pulse', 'united', 'morph', 'journal', 'darkly',
                'superhero', 'solar', 'cyborg', 'vapor', 'simplex', 'cerculean']:
        if each == 'journal': # 在light主题和drak主题之间插入一个分割线
            themes_submenu.add_separator()
        themes_submenu.add_command(label=each, command=make_adder(each))
    root.config(menu=top_menubar)

    return root

if __name__ == "__main__":
    default_theme = 'cosmo'
    style = ttk.Style(theme=default_theme)
    root = setup_ui(style)
    root.mainloop()
组件样式
ttkbootstrap 组件有数十种预定义样式,bootstyle关键字可以修改组件type 和color 。
Style Colors 样式颜色
实际颜色值是为每个主题定义的,也是定义在themes\standard.py。
比如默认主题litera,颜色定义为:
"litera": {
    "type": "light",
    "colors": {
        "primary": "#4582ec",
        "secondary": "#adb5bd",
        "success": "#02b875",
        "info": "#17a2b8",
        "warning": "#f0ad4e",
        "danger": "#d9534f",
        "light": "#F8F9FA",
        "dark": "#343A40",
        "bg": "#ffffff",
        "fg": "#343a40",
        "selectbg": "#adb5bd",
        "selectfg": "#ffffff",
        "border": "#bfbfbf",
        "inputfg": "#343a40",
        "inputbg": "#fff",
        "active": "#e5e5e5",
    },
},
示例:
import ttkbootstrap as ttk
from ttkbootstrap.constants import *

root = ttk.Window()

ttk.Button(root, text='primary', bootstyle=PRIMARY).pack(side=LEFT, padx=5, pady=5)
ttk.Button(root, text='secondary', bootstyle=SECONDARY).pack(side=LEFT, padx=5, pady=5)
ttk.Button(root, text='success', bootstyle=SUCCESS).pack(side=LEFT, padx=5, pady=5)
ttk.Button(root, text='info', bootstyle=INFO).pack(side=LEFT, padx=5, pady=5)
ttk.Button(root, text='warning', bootstyle=WARNING).pack(side=LEFT, padx=5, pady=5)
ttk.Button(root, text='danger', bootstyle=DANGER).pack(side=LEFT, padx=5, pady=5)
ttk.Button(root, text='light', bootstyle=LIGHT).pack(side=LEFT, padx=5, pady=5)
ttk.Button(root, text='dark', bootstyle=DARK).pack(side=LEFT, padx=5, pady=5)

root.mainloop()

print (root.style.colors)
# (('primary', '#4582ec'), ('secondary', '#adb5bd'), ('success', '#02b875'), ('info', '#17a2b8'), ('warning', '#f0ad4e'), ('danger', '#d9534f'), ('light', '#F8F9FA'), ('dark', '#343A40'), ('bg', '#ffffff'), ('fg', '#343a40'), ('selectbg', '#adb5bd'), ('selectfg', '#ffffff'), ('border', '#bfbfbf'), ('inputfg', '#343a40'), ('inputbg', '#fff'), ('active', '#e5e5e5'))
Style Types 样式类型
bootstyle也可以制显示的窗口组件的类型。
示例,创建两个button,但是类型不同:
import ttkbootstrap as ttk
from ttkbootstrap.constants import *

root = ttk.Window()

ttk.Button(root, text="Solid Button", bootstyle=SUCCESS).pack(side=LEFT, padx=5, pady=10)
ttk.Button(root, text="Outline Button", bootstyle=(SUCCESS, OUTLINE)).pack(side=LEFT, padx=5, pady=10)

root.mainloop()

bootstyle 关键字用法
关键字的后台有一个正则表达式,用于解析输入并将其转换为适当的 ttk 样式。
可以传入字符串格式的keywords,也可以传入可迭代对象的keywords,例如使用 list 或 tuples。
以下所有变体都是合法的,并且将产生相同的样式:
- "info-outline"
- "info outline"
- "outline-info"
- ("info", "outline")
- (INFO, OUTLINE)
一般直接使用宏的方式,宏定义在ttkbootstrap\constants.py,通过from ttkbootstrap.constants import *方式引入。
Style guide 风格指南
所有 ttkbootstrap 样式都使用已在 ttk 组件中添加。
Colors 颜色
颜色在所有组件上都可用,并且可以通过关键字进行更改。
以下是每种颜色的关键字:
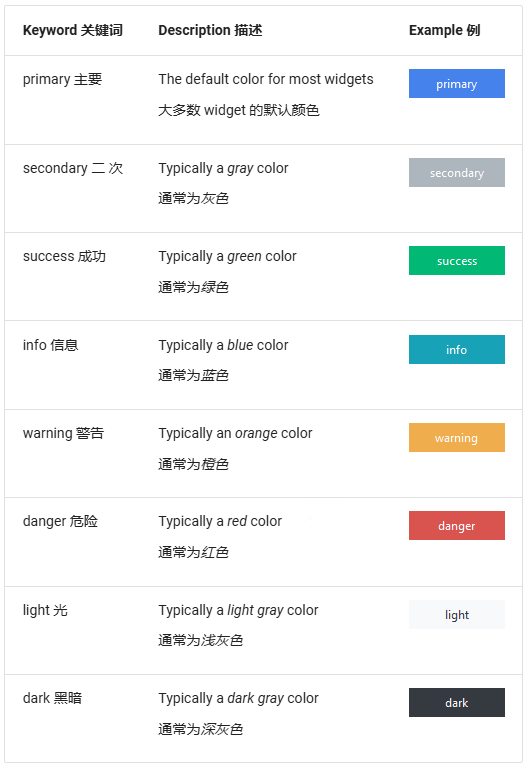
Button 按钮
按钮 - ttkbootstrap --- Button - ttkbootstrap
Button具有多种样式类型,默认情况下颜色为primary 。另外还支持 disabled state的特殊样式。
Solid button (默认) 实心按钮
默认样式具有纯色背景,悬停时会变亮,按下时会变暗。当 Widget 具有焦点时,按钮内会显示一个虚线环。

Outline button 轮廓按钮
这种风格的特点是轮廓细腻。按下或悬停时,按钮将变为类似于默认按钮样式的纯色。当 Widget 具有焦点时,按钮内会显示一个虚线环。

Link button 链接按钮
此样式具有一个具有标签外观的按钮。悬停时或按下时,文本颜色将更改为 info,以模拟 HTML 超链接上预期的效果。按下按钮时,会有轻微的移位缓解,给人一种运动的感觉。当 Widget 具有焦点时,按钮内会显示一个虚线环。

Other button styles 其他按钮样式
Disabled button Disabled 禁用按钮
此样式不能通过bootstyle关键字应用,它是通过state参数配置的。
# create the button in a disabled state
Button(state="disabled")
示例
import ttkbootstrap as ttk
from ttkbootstrap.constants import *

root = ttk.Window()

ttk.Button(root, text="Solid Button", bootstyle=INFO).pack(side=LEFT, padx=5, pady=10)
ttk.Button(root, text="Outline Button", bootstyle=(SUCCESS, OUTLINE)).pack(side=LEFT, padx=5, pady=10)
ttk.Button(root, text="Link Button", bootstyle=(SUCCESS, LINK)).pack(side=LEFT, padx=5, pady=10)
ttk.Button(root, text="Link Button", bootstyle="success-link", state="disabled").pack(side=LEFT, padx=5, pady=10)

root.mainloop()

DateEntry 日期条目
日期条目 - ttkbootstrap --- DateEntry - ttkbootstrap
组件实现源码:widgets.py
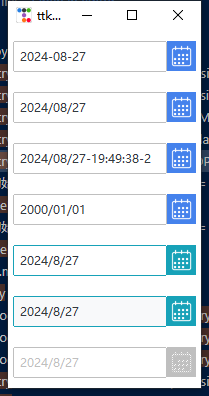
此 Widget 由两个 Widget:Entry和 Button。Entry 组件的行为与默认的 Entry 组件相同,日历Button的行为与默认的实心按钮相同。
按下日历按钮时,将调用 DatePickerPopup。应用于弹出窗口的默认颜色为 primary。
此小组件还支持 disabled state、readonly state 和 invalid state 的特殊样式。

支持的参数
- dateformat=r"%x":格式化字符串,支持的格式见Python strftime reference cheatsheet,比如一些常见的格式:"%Y-%m-%d"、"%Y-%m-%d"、'%Y/%m/%d-%H:%M:%S'
- startdate=None:Specifies the first day of the week. 0=Monday, 1=Tuesday, etc...
- startdate:显示日期,默认是当前的日期,支持输入格式为datetime
- bootstyle="":配置组件的风格,支持primary, secondary, success, info, warning, danger, light, dark
- state:只支持使用
configure(self, cnf=None, **kwargs):函数配置,cnf参数不需要填写,**kwargs支持两个参数:state='readonly':只读日期条目state='disabled':禁用日期输入
获取值
获取日期也是通过configure(self, cnf=None, **kwargs):函数得到,cnf参数需要填写,支持下面的参数值:
- "dateformat":获取dateformat参数值
- "firstweekday":获取firstweekday参数
- "startdate":获取startdate参数
- "bootstyle":获取bootstyle参数
- "state":获取Entry和Button的"state"值,返回格式为
{"Entry": entrystate, "Button": buttonstate} - 获取日期:日期其实就是Entry的值,获取方式为
cur_date = d.entry.get()
示例
import ttkbootstrap as ttk
from ttkbootstrap.constants import *
from datetime import datetime, timedelta

root = ttk.Window()

ttk.DateEntry(dateformat='%Y-%m-%d').pack(side=TOP, padx=5, pady=10)
ttk.DateEntry(dateformat='%Y/%m/%d').pack(side=TOP, padx=5, pady=10)
ttk.DateEntry(dateformat='%Y/%m/%d-%H:%M:%S-%w').pack(side=TOP, padx=5, pady=10)
ttk.DateEntry(dateformat='%Y/%m/%d', startdate=datetime.strptime("2000-1-1", "%Y-%m-%d").date()).pack(side=TOP, padx=5, pady=10)
ttk.DateEntry(bootstyle="INFO").pack(side=TOP, padx=5, pady=10)

# 不支持初始化的时候传值, 不知道为什么? d = ttk.DateEntry(state='readonly')
d = ttk.DateEntry(bootstyle="INFO")
d.configure(state='readonly')
print (d.configure(cnf='state'))
d.pack(side=TOP, padx=5, pady=10)

# 不支持初始化的时候传值, 不知道为什么? d = ttk.DateEntry(state='disabled')
d = ttk.DateEntry()
d.configure(state='disabled')
d.pack(side=TOP, padx=5, pady=10)
print (d.entry.get())  # 2024/8/27

root.mainloop()
Labelframe 标签框
这个组件tkinter是没有的。
此 Widget 样式具有样式化的边框和标签。默认情况下,border 和 label 使用主题定义的边框和前景色默认值。使用所选颜色时,标签文本和边框都使用此颜色。

参数:
-
STANDARD OPTIONS:class, cursor, style, takefocus
-
WIDGET-SPECIFIC OPTIONS:labelanchor, text, underline, padding, labelwidget, width, height
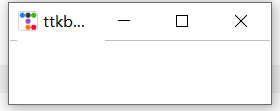
Labelframe 本质还是一个container,如果里面没有任何其它组件,则不会显示的,比如:
option_lf = ttk.Labelframe(root, text="Lable Frame", padding=15)
option_lf.pack(fill=X, expand=YES, anchor=N)
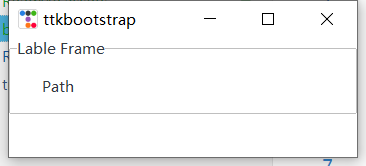
当在container中创建了一个组件时,就会显示Labelframe 的text:
option_lf = ttk.Labelframe(root, text="Lable Frame", padding=15)
option_lf.pack(fill=X, expand=YES, anchor=N)
path_lbl = ttk.Label(option_lf, text="Path", width=8)
path_lbl.pack(side=LEFT, padx=(15, 0))
Gallery
这里是将官方的gallery进行简化得到的一些示例。
官方示例:图库 - ttkbootstrap --- Gallery - ttkbootstrap
Collapsing Frame折叠框架
折叠框架 - ttkbootstrap --- Collapsing Frame - ttkbootstrap
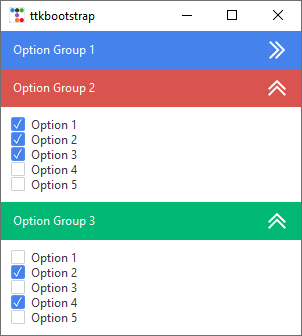
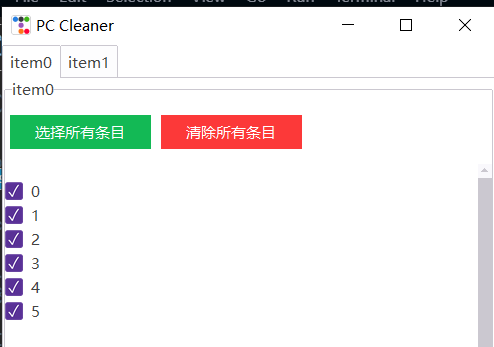
notebook
PC 清洁工 - ttkbootstrap --- PC Cleaner - ttkbootstrap


【推荐】国内首个AI IDE,深度理解中文开发场景,立即下载体验Trae
【推荐】编程新体验,更懂你的AI,立即体验豆包MarsCode编程助手
【推荐】抖音旗下AI助手豆包,你的智能百科全书,全免费不限次数
【推荐】轻量又高性能的 SSH 工具 IShell:AI 加持,快人一步
· 无需6万激活码!GitHub神秘组织3小时极速复刻Manus,手把手教你使用OpenManus搭建本
· C#/.NET/.NET Core优秀项目和框架2025年2月简报
· Manus爆火,是硬核还是营销?
· 终于写完轮子一部分:tcp代理 了,记录一下
· 【杭电多校比赛记录】2025“钉耙编程”中国大学生算法设计春季联赛(1)