Spring Cloud 系列之 ZooKeeper 注册中心
什么是注册中心
服务注册中心是服务实现服务化管理的核心组件,类似于目录服务的作用,主要用来存储服务信息,譬如提供者 url 串、路由信息等。服务注册中心是微服务架构中最基础的设施之一。
注册中心可以说是微服务架构中的“通讯录”,它记录了服务和服务地址的映射关系。在分布式架构中,服务会注册到这里,当服务需要调用其它服务时,就到这里找到服务的地址,进行调用。
简单理解就是:在没有注册中心时候,服务间调用需要知道被当服务调方的具体地址(写死的 ip:port)。更换部署地址,就不得不修改调用当中指定的地址。而有了注册中心之后,每个服务在调用别人的时候只需要知道服务名称(软编码)就好,地址都会通过注册中心根据服务名称获取到具体的服务地址进行调用。

举个现实生活中的例子,比如说,我们手机中的通讯录的两个使用场景:
当我想给张三打电话时,那我需要在通讯录中按照名字找到张三,然后就可以找到他的手机号拨打电话。—— 服务发现
李四办了手机号并把手机号告诉了我,我把李四的号码存进通讯录,后续,我就可以从通讯录找到他。—— 服务注册
通讯录 —— ?什么角色(服务注册中心)
总结:服务注册中心的作用就是服务的注册和服务的发现。
常见的注册中心
- Netflix Eureka
- Alibaba Nacos
- HashiCorp Consul
- Apache ZooKeeper
- CoreOS Etcd
- CNCF CoreDNS
| 特性 | Eureka | Nacos | Consul | Zookeeper |
|---|---|---|---|---|
| CAP | AP | CP + AP | CP | CP |
| 健康检查 | Client Beat | TCP/HTTP/MYSQL/Client Beat | TCP/HTTP/gRPC/Cmd | Keep Alive |
| 雪崩保护 | 有 | 有 | 无 | 无 |
| 自动注销实例 | 支持 | 支持 | 不支持 | 支持 |
| 访问协议 | HTTP | HTTP/DNS | HTTP/DNS | TCP |
| 监听支持 | 支持 | 支持 | 支持 | 支持 |
| 多数据中心 | 支持 | 支持 | 支持 | 不支持 |
| 跨注册中心同步 | 不支持 | 支持 | 支持 | 不支持 |
| SpringCloud集成 | 支持 | 支持 | 支持 | 支持 |
CAP 原则与 BASE 理论
CAP 原则

CAP 原则又称 CAP 定理,指的是在一个分布式系统中, Consistency(一致性)、 Availability(可用性)、Partition tolerance(分区容错性),三者不可得兼。
CAP 由 Eric Brewer 在 2000 年 PODC 会议上提出。该猜想在提出两年后被证明成立,成为我们熟知的 CAP 定理。CAP 三者不可兼得。
| 特性 | 定理 |
|---|---|
| Consistency | 也叫做数据原子性,系统在执行某项操作后仍然处于一致的状态。在分布式系统中,更新操作执行成功后所有的用户都应该读到最新的值,这样的系统被认为是具有强一致性的。等同于所有节点访问同一份最新的数据副本。 |
| Availability | 每一个操作总是能够在一定的时间内返回结果,这里需要注意的是"一定时间内"和"返回结果"。一定时间内指的是,在可以容忍的范围内返回结果,结果可以是成功或者是失败。 |
| Partition tolerance | 在网络分区的情况下,被分隔的节点仍能正常对外提供服务(分布式集群,数据被分布存储在不同的服务器上,无论什么情况,服务器都能正常被访问)。 |
取舍策略
CAP 三个特性只能满足其中两个,那么取舍的策略就共有三种:
- CA without P:如果不要求P(不允许分区),则C(强一致性)和A(可用性)是可以保证的。但放弃 P 的同时也就意味着放弃了系统的扩展性,也就是分布式节点受限,没办法部署子节点,这是违背分布式系统设计的初衷的。
- CP without A:如果不要求A(可用),相当于每个请求都需要在服务器之间保持强一致,而P(分区)会导致同步时间无限延长(也就是等待数据同步完才能正常访问服务),一旦发生网络故障或者消息丢失等情况,就要牺牲用户的体验,等待所有数据全部一致了之后再让用户访问系统。设计成 CP 的系统其实不少,最典型的就是分布式数据库,如 Redis、HBase 等。对于这些分布式数据库来说,数据的一致性是最基本的要求,因为如果连这个标准都达不到,那么直接采用关系型数据库就好,没必要再浪费资源来部署分布式数据库。
- AP without C:要高可用并允许分区,则需放弃一致性。一旦分区发生,节点之间可能会失去联系,为了高可用,每个节点只能用本地数据提供服务,而这样会导致全局数据的不一致性。典型的应用就如某米的抢购手机场景,可能前几秒你浏览商品的时候页面提示是有库存的,当你选择完商品准备下单的时候,系统提示你下单失败,商品已售完。这其实就是先在 A(可用性)方面保证系统可以正常的服务,然后在数据的一致性方面做了些牺牲,虽然多少会影响一些用户体验,但也不至于造成用户购物流程的严重阻塞。
总结
现如今,对于多数大型互联网应用的场景,主机众多、部署分散,而且现在的集群规模越来越大,节点只会越来越多,所以节点故障、网络故障是常态,因此分区容错性也就成为了一个分布式系统必然要面对的问题。那么就只能在 C 和 A 之间进行取舍。但对于传统的项目就可能有所不同,拿银行的转账系统来说,涉及到金钱的对于数据一致性不能做出一丝的让步,C 必须保证,出现网络故障的话,宁可停止服务,可以在 A 和 P 之间做取舍。
总而言之,没有最好的策略,好的系统应该是根据业务场景来进行架构设计的,只有适合的才是最好的。
BASE 理论
CAP 理论已经提出好多年了,难道真的没有办法解决这个问题吗?也许可以做些改变。比如 C 不必使用那么强的一致性,可以先将数据存起来,稍后再更新,实现所谓的 “最终一致性”。
这个思路又是一个庞大的问题,同时也引出了第二个理论 BASE 理论。
BASE:全称 Basically Available(基本可用),Soft state(软状态),和 Eventually consistent(最终一致性)三个短语的缩写,来自 ebay 的架构师提出。
BASE 理论是对 CAP 中一致性和可用性权衡的结果,其来源于对大型互联网分布式实践的总结,是基于 CAP 定理逐步演化而来的。其核心思想是:
既然无法做到强一致性(Strong consistency),但每个应用都可以根据自身的业务特点,采用适当的方式来使系统达到最终一致性(Eventual consistency)。
Basically Available(基本可用)
基本可用是指分布式系统在出现故障的时候,允许损失部分可用性(例如响应时间、功能上的可用性)。需要注意的是,基本可用绝不等价于系统不可用。
- 响应时间上的损失:正常情况下搜索引擎需要在 0.5 秒之内返回给用户相应的查询结果,但由于出现故障(比如系统部分机房发生断电或断网故障),查询结果的响应时间增加到了 1~2 秒。
- 功能上的损失:购物网站在购物高峰(如双十一)时,为了保护系统的稳定性,部分消费者可能会被引导到一个降级页面。
Soft state(软状态)
什么是软状态呢?相对于原子性而言,要求多个节点的数据副本都是一致的,这是一种 “硬状态”。
软状态是指允许系统存在中间状态,而该中间状态不会影响系统整体可用性。分布式存储中一般一份数据会有多个副本,允许不同副本数据同步的延时就是软状态的体现。
Eventually consistent(最终一致性)
系统不可能一直是软状态,必须有个时间期限。在期限过后,应当保证所有副本保持数据一致性。从而达到数据的最终一致性。这个时间期限取决于网络延时,系统负载,数据复制方案设计等等因素。
实际上,不只是分布式系统使用最终一致性,关系型数据库在某个功能上,也是使用最终一致性的,比如备份,数据库的复制都是需要时间的,这个复制过程中,业务读取到的值就是旧值。当然,最终还是达成了数据一致性。这也算是一个最终一致性的经典案例。
总结
总的来说,BASE 理论面向的是大型高可用可扩展的分布式系统,和传统事务的 ACID 是相反的,它完全不同于 ACID 的强一致性模型,而是通过牺牲强一致性来获得可用性,并允许数据在一段时间是不一致的。
为什么需要注册中心
了解了什么是注册中心,那么我们继续谈谈,为什么需要注册中心。在分布式系统中,我们不仅仅是需要在注册中心找到服务和服务地址的映射关系这么简单,我们还需要考虑更多更复杂的问题:
- 服务注册后,如何被及时发现
- 服务宕机后,如何及时下线
- 服务如何有效的水平扩展
- 服务发现时,如何进行路由
- 服务异常时,如何进行降级
- 注册中心如何实现自身的高可用
这些问题的解决都依赖于注册中心。简单看,注册中心的功能有点类似于 DNS 服务器或者负载均衡器,而实际上,注册中心作为微服务的基础组件,可能要更加复杂,也需要更多的灵活性和时效性。所以我们还需要学习更多 Spring Cloud 微服务组件协同完成应用开发。
注册中心解决了以下问题:
- 服务管理
- 服务之间的自动发现
- 服务的依赖关系管理
Zookeeper 介绍

Apache ZooKeeper 是一个开放源码的分布式应用程序协调组件,是 Hadoop 和 Hbase 的重要组件。它是一个为分布式应用提供一致性服务的软件,提供的功能包括:配置维护、域名服务、分布式同步、组服务等。
在微服务项目开发中 ZooKeeper 主要的角色是当做服务注册中心存在,我们将编写好的服务注册至 ZooKeeper 即可。
ZooKeeper 安装
环境准备
ZooKeeper 在 Java 中运行,版本 1.8 或更高(JDK 8 LTS,JDK 11 LTS,JDK 12 - Java 9 和 10 不支持)
下载
ZooKeeper 下载地址:
安装
将文件上传至 Linux 服务器。
单机版
创建目录/解压
创建 zookeeper 目录。
mkdir -p /usr/local/zookeeper
将文件解压至该目录。
tar -zxvf apache-zookeeper-3.6.1-bin.tar.gz -C /usr/local/zookeeper/
创建数据目录、日志目录。
mkdir -p /usr/local/zookeeper/apache-zookeeper-3.6.1-bin/data
mkdir -p /usr/local/zookeeper/apache-zookeeper-3.6.1-bin/log
修改配置文件
# 进入配置文件目录
cd /usr/local/zookeeper/apache-zookeeper-3.6.1-bin/conf/
# ZooKeeper 启动默认加载名为 zoo.cfg 的配置文件,复制一份命名为 zoo.cfg
cp zoo_sample.cfg zoo.cfg
# 修改配置文件
vi zoo.cfg
主要修改数据目录dataDir、日志目录dataLogDir两处即可,修改结果如下:
# The number of milliseconds of each tick
tickTime=2000
# The number of ticks that the initial
# synchronization phase can take
initLimit=10
# The number of ticks that can pass between
# sending a request and getting an acknowledgement
syncLimit=5
# the directory where the snapshot is stored.
# do not use /tmp for storage, /tmp here is just
# example sakes.
dataDir=/usr/local/zookeeper/apache-zookeeper-3.6.1-bin/data
dataLogDir=/usr/local/zookeeper/apache-zookeeper-3.6.1-bin/log
# the port at which the clients will connect
clientPort=2181
# the maximum number of client connections.
# increase this if you need to handle more clients
#maxClientCnxns=60
#
# Be sure to read the maintenance section of the
# administrator guide before turning on autopurge.
#
# http://zookeeper.apache.org/doc/current/zookeeperAdmin.html#sc_maintenance
#
# The number of snapshots to retain in dataDir
#autopurge.snapRetainCount=3
# Purge task interval in hours
# Set to "0" to disable auto purge feature
#autopurge.purgeInterval=1

## Metrics Providers
#
# https://prometheus.io Metrics Exporter
#metricsProvider.className=org.apache.zookeeper.metrics.prometheus.PrometheusMetricsProvider
#metricsProvider.httpPort=7000
#metricsProvider.exportJvmInfo=true
启动/关闭
启动。
cd /usr/local/zookeeper/apache-zookeeper-3.6.1-bin/
bin/zkServer.sh start
---------------------------------------------------------------------------------
ZooKeeper JMX enabled by default
Using config: /usr/local/zookeeper/apache-zookeeper-3.6.1-bin/bin/../conf/zoo.cfg
Starting zookeeper ... STARTED
关闭。
cd /usr/local/zookeeper/apache-zookeeper-3.6.1-bin/
bin/zkServer.sh stop
---------------------------------------------------------------------------------
ZooKeeper JMX enabled by default
Using config: /usr/local/zookeeper/apache-zookeeper-3.6.1-bin/bin/../conf/zoo.cfg
Stopping zookeeper ... STOPPED
集群版
再准备两台机器,和刚才单机的机器加一起构成一个集群环境(如果电脑跑不动就改为一台机器跑三个进程的方式)。
创建目录/解压
创建 zookeeper 目录。
mkdir -p /usr/local/zookeeper
将文件解压至该目录。
tar -zxvf apache-zookeeper-3.6.1-bin.tar.gz -C /usr/local/zookeeper/
创建数据目录、日志目录。
mkdir -p /usr/local/zookeeper/apache-zookeeper-3.6.1-bin/data
mkdir -p /usr/local/zookeeper/apache-zookeeper-3.6.1-bin/log
myid 文件
在 data 目录下创建 myid 文件,文件中就只写个 1 即可,其他两个机器分别写 2 和 3。
cd /usr/local/zookeeper/apache-zookeeper-3.6.1-bin/data/
vi myid
修改配置文件
# 进入配置文件目录
cd /usr/local/zookeeper/apache-zookeeper-3.6.1-bin/conf/
# zookeeper 启动默认加载名为 zoo.cfg 的配置文件,所以复制一份命名为 zoo.cfg
cp zoo_sample.cfg zoo.cfg
# 修改配置文件
vi zoo.cfg
主要修改:
- 数据目录
dataDir - 日志目录
dataLogDir - 端口
clientPort(如果是一台机器的伪集群,需要修改 2181 端口,比如:2181、2182、2183) - 集群配置(如果是一台机器的伪集群,需要修改 2888 和 3888 的端口,比如:2888、2889、2890 和 3888、3889、3890)
# The number of milliseconds of each tick
tickTime=2000
# The number of ticks that the initial
# synchronization phase can take
initLimit=10
# The number of ticks that can pass between
# sending a request and getting an acknowledgement
syncLimit=5
# the directory where the snapshot is stored.
# do not use /tmp for storage, /tmp here is just
# example sakes.
dataDir=/usr/local/zookeeper/apache-zookeeper-3.6.1-bin/data
dataLogDir=/usr/local/zookeeper/apache-zookeeper-3.6.1-bin/log
# the port at which the clients will connect
clientPort=2181
# the maximum number of client connections.
# increase this if you need to handle more clients
#maxClientCnxns=60
#
# Be sure to read the maintenance section of the
# administrator guide before turning on autopurge.
#
# http://zookeeper.apache.org/doc/current/zookeeperAdmin.html#sc_maintenance
#
# The number of snapshots to retain in dataDir
#autopurge.snapRetainCount=3
# Purge task interval in hours
# Set to "0" to disable auto purge feature
#autopurge.purgeInterval=1

## Metrics Providers
#
# https://prometheus.io Metrics Exporter
#metricsProvider.className=org.apache.zookeeper.metrics.prometheus.PrometheusMetricsProvider
#metricsProvider.httpPort=7000
#metricsProvider.exportJvmInfo=true
# 集群配置
# server.1 中的 1 是 myid 文件中的内容,2888 用于集群内部通信,3888 用于选择 leader
server.1=192.168.10.101:2888:3888
server.2=192.168.10.102:2888:3888
server.3=192.168.10.103:2888:3888
启动/关闭
启动。
cd /usr/local/zookeeper/apache-zookeeper-3.6.1-bin/
bin/zkServer.sh start
#################################################################################
ZooKeeper JMX enabled by default
Using config: /usr/local/zookeeper/apache-zookeeper-3.6.1-bin/bin/../conf/zoo.cfg
Starting zookeeper ... STARTED
关闭。
cd /usr/local/zookeeper/apache-zookeeper-3.6.1-bin/
bin/zkServer.sh stop
#################################################################################
ZooKeeper JMX enabled by default
Using config: /usr/local/zookeeper/apache-zookeeper-3.6.1-bin/bin/../conf/zoo.cfg
Stopping zookeeper ... STOPPED
集群状态查看
cd /usr/local/zookeeper/apache-zookeeper-3.6.1-bin/
bin/zkServer.sh status
################################ 192.168.10.101 ################################
ZooKeeper JMX enabled by default
Using config: /usr/local/zookeeper/apache-zookeeper-3.6.1-bin/bin/../conf/zoo.cfg
Client port found: 2181. Client address: localhost.
Mode: follower
################################ 192.168.10.102 ################################
ZooKeeper JMX enabled by default
Using config: /usr/local/zookeeper/apache-zookeeper-3.6.1-bin/bin/../conf/zoo.cfg
Client port found: 2181. Client address: localhost.
Mode: leader
################################ 192.168.10.103 ################################
ZooKeeper JMX enabled by default
Using config: /usr/local/zookeeper/apache-zookeeper-3.6.1-bin/bin/../conf/zoo.cfg
Client port found: 2181. Client address: localhost.
Mode: follower
看到以上信息说明 ZooKeeper 集群环境已搭建成功,接下来就可以通过 RPC 框架对接 ZooKeeper,将 ZooKeeper 作为我们的注册中心来使用。
ZooKeeper 入门案例
zookeeper-demo 聚合工程。SpringBoot 2.3.0.RELEASE、Spring Cloud Hoxton.SR5。
创建项目
我们创建聚合项目来讲解 ZooKeeper,首先创建一个 pom 父工程。
添加依赖
pom.xml
<?xml version="1.0" encoding="UTF-8"?>
<project xmlns="http://maven.apache.org/POM/4.0.0"
         xmlns:xsi="http://www.w3.org/2001/XMLSchema-instance"
         xsi:schemaLocation="http://maven.apache.org/POM/4.0.0 http://maven.apache.org/xsd/maven-4.0.0.xsd">
    <modelVersion>4.0.0</modelVersion>

    <!-- 项目坐标地址 -->
    <groupId>org.example</groupId>
    <!-- 项目模块名称 -->
    <artifactId>zookeeper-demo</artifactId>
    <!-- 项目版本名称 快照版本SNAPSHOT、正式版本RELEASE -->
    <version>1.0-SNAPSHOT</version>

    <!-- 继承 spring-boot-starter-parent 依赖 -->
    <!-- 使用继承方式,实现复用,符合继承的都可以被使用 -->
    <parent>
        <groupId>org.springframework.boot</groupId>
        <artifactId>spring-boot-starter-parent</artifactId>
        <version>2.3.0.RELEASE</version>
    </parent>

    <!--
        集中定义依赖组件版本号,但不引入,
        在子工程中用到声明的依赖时,可以不加依赖的版本号,
        这样可以统一管理工程中用到的依赖版本
     -->
    <properties>
        <!-- Spring Cloud Hoxton.SR5 依赖 -->
        <spring-cloud.version>Hoxton.SR5</spring-cloud.version>
    </properties>

    <!-- 项目依赖管理 父项目只是声明依赖,子项目需要写明需要的依赖(可以省略版本信息) -->
    <dependencyManagement>
        <dependencies>
            <!-- spring cloud 依赖 -->
            <dependency>
                <groupId>org.springframework.cloud</groupId>
                <artifactId>spring-cloud-dependencies</artifactId>
                <version>${spring-cloud.version}</version>
                <type>pom</type>
                <scope>import</scope>
            </dependency>
        </dependencies>
    </dependencyManagement>

</project>
商品服务 product-service
创建项目
在刚才的父工程下创建一个 product-service 项目。
添加依赖
主要添加 spring-cloud-starter-zookeeper-discovery 依赖。
<dependency>
    <groupId>org.springframework.cloud</groupId>
    <artifactId>spring-cloud-starter-zookeeper-discovery</artifactId>
</dependency>
完整依赖如下:
<?xml version="1.0" encoding="UTF-8"?>
<project xmlns="http://maven.apache.org/POM/4.0.0"
         xmlns:xsi="http://www.w3.org/2001/XMLSchema-instance"
         xsi:schemaLocation="http://maven.apache.org/POM/4.0.0 http://maven.apache.org/xsd/maven-4.0.0.xsd">

    <!-- 继承父依赖 -->
    <parent>
        <artifactId>zookeeper-demo</artifactId>
        <groupId>org.example</groupId>
        <version>1.0-SNAPSHOT</version>
    </parent>
    <modelVersion>4.0.0</modelVersion>

    <artifactId>product-service</artifactId>

    <!-- 项目依赖 -->
    <dependencies>
        <!-- spring cloud zookeeper discovery 依赖 -->
        <dependency>
            <groupId>org.springframework.cloud</groupId>
            <artifactId>spring-cloud-starter-zookeeper-discovery</artifactId>
        </dependency>
        <!-- spring boot web 依赖 -->
        <dependency>
            <groupId>org.springframework.boot</groupId>
            <artifactId>spring-boot-starter-web</artifactId>
        </dependency>
        <!-- lombok 依赖 -->
        <dependency>
            <groupId>org.projectlombok</groupId>
            <artifactId>lombok</artifactId>
            <scope>provided</scope>
        </dependency>

        <!-- spring boot test 依赖 -->
        <dependency>
            <groupId>org.springframework.boot</groupId>
            <artifactId>spring-boot-starter-test</artifactId>
            <scope>test</scope>
            <exclusions>
                <exclusion>
                    <groupId>org.junit.vintage</groupId>
                    <artifactId>junit-vintage-engine</artifactId>
                </exclusion>
            </exclusions>
        </dependency>
    </dependencies>

</project>
配置文件
application.yml
server:
  port: 7070 # 端口

spring:
  application:
    name: product-service # 应用名称
  # 配置 ZooKeeper 注册中心
  cloud:
    zookeeper:
      discovery:
        enabled: true # 如果不想使用 ZooKeeper 进行服务注册和发现,设置为 false 即可
      connect-string: 192.168.10.101:2181,192.168.10.102:2181,192.168.10.103:2181
实体类
Product.java
package org.example.pojo;

import lombok.AllArgsConstructor;
import lombok.Data;
import lombok.NoArgsConstructor;

import java.io.Serializable;

@Data
@NoArgsConstructor
@AllArgsConstructor
public class Product implements Serializable {

    private Integer id;
    private String productName;
    private Integer productNum;
    private Double productPrice;

}
编写服务
ProductService.java
package org.example.service;

import org.example.pojo.Product;

import java.util.List;

/**
 * 商品服务
 */
public interface ProductService {

    /**
     * 查询商品列表
     *
     * @return
     */
    List<Product> selectProductList();

}
ProductServiceImpl.java
package org.example.service.impl;

import lombok.extern.slf4j.Slf4j;
import org.example.pojo.Product;
import org.example.service.ProductService;
import org.springframework.stereotype.Service;

import java.util.Arrays;
import java.util.List;

/**
 * 商品服务
 */
@Slf4j
@Service
public class ProductServiceImpl implements ProductService {

    /**
     * 查询商品列表
     *
     * @return
     */
    @Override
    public List<Product> selectProductList() {
        log.info("商品服务查询商品信息...");
        return Arrays.asList(
                new Product(1, "华为手机", 1, 5800D),
                new Product(2, "联想笔记本", 1, 6888D),
                new Product(3, "小米平板", 5, 2020D)
        );
    }

}
控制层
ProductController.java
package org.example.controller;

import org.example.pojo.Product;
import org.example.service.ProductService;
import org.springframework.beans.factory.annotation.Autowired;
import org.springframework.web.bind.annotation.GetMapping;
import org.springframework.web.bind.annotation.RequestMapping;
import org.springframework.web.bind.annotation.RestController;

import java.util.List;

@RestController
@RequestMapping("/product")
public class ProductController {

    @Autowired
    private ProductService productService;

    /**
     * 查询商品列表
     *
     * @return
     */
    @GetMapping("/list")
    public List<Product> selectProductList() {
        return productService.selectProductList();
    }

}
该项目我们可以通过单元测试进行测试,也可以直接通过 url 使用 postman 或者浏览器来进行测试。
启动类
通过 Spring Cloud 原生注解 @EnableDiscoveryClient 开启服务注册发现功能。
package org.example;

import org.springframework.boot.SpringApplication;
import org.springframework.boot.autoconfigure.SpringBootApplication;

// 开启 @EnableDiscoveryClient 注解,当前版本默认会开启该注解
//@EnableDiscoveryClient
@SpringBootApplication
public class ProductServiceApplication {

    public static void main(String[] args) {
        SpringApplication.run(ProductServiceApplication.class, args);
    }

}
订单服务 order-service
创建项目
在刚才的父工程下创建一个 order-service 项目。
添加依赖
pom.xml
<?xml version="1.0" encoding="UTF-8"?>
<project xmlns="http://maven.apache.org/POM/4.0.0"
         xmlns:xsi="http://www.w3.org/2001/XMLSchema-instance"
         xsi:schemaLocation="http://maven.apache.org/POM/4.0.0 http://maven.apache.org/xsd/maven-4.0.0.xsd">

    <!-- 继承父依赖 -->
    <parent>
        <artifactId>zookeeper-demo</artifactId>
        <groupId>org.example</groupId>
        <version>1.0-SNAPSHOT</version>
    </parent>
    <modelVersion>4.0.0</modelVersion>

    <artifactId>order-service</artifactId>

    <!-- 项目依赖 -->
    <dependencies>
        <!-- spring cloud zookeeper discovery 依赖 -->
        <dependency>
            <groupId>org.springframework.cloud</groupId>
            <artifactId>spring-cloud-starter-zookeeper-discovery</artifactId>
        </dependency>
        <!-- spring boot web 依赖 -->
        <dependency>
            <groupId>org.springframework.boot</groupId>
            <artifactId>spring-boot-starter-web</artifactId>
        </dependency>
        <!-- lombok 依赖 -->
        <dependency>
            <groupId>org.projectlombok</groupId>
            <artifactId>lombok</artifactId>
            <scope>provided</scope>
        </dependency>

        <!-- spring boot test 依赖 -->
        <dependency>
            <groupId>org.springframework.boot</groupId>
            <artifactId>spring-boot-starter-test</artifactId>
            <scope>test</scope>
            <exclusions>
                <exclusion>
                    <groupId>org.junit.vintage</groupId>
                    <artifactId>junit-vintage-engine</artifactId>
                </exclusion>
            </exclusions>
        </dependency>
    </dependencies>

</project>
配置文件
application.yml
server:
  port: 9090 # 端口

spring:
  application:
    name: order-service # 应用名称
  # 配置 ZooKeeper 注册中心
  cloud:
    zookeeper:
      discovery:
        enabled: true # 如果不想使用 ZooKeeper 进行服务注册和发现,设置为 false 即可
      connect-string: 192.168.10.101:2181,192.168.10.102:2181,192.168.10.103:2181
实体类
Product.java
package org.example.pojo;

import lombok.AllArgsConstructor;
import lombok.Data;
import lombok.NoArgsConstructor;

import java.io.Serializable;

@Data
@NoArgsConstructor
@AllArgsConstructor
public class Product implements Serializable {

    private Integer id;
    private String productName;
    private Integer productNum;
    private Double productPrice;

}
Order.java
package org.example.pojo;

import lombok.AllArgsConstructor;
import lombok.Data;
import lombok.NoArgsConstructor;

import java.io.Serializable;
import java.util.List;

@Data
@NoArgsConstructor
@AllArgsConstructor
public class Order implements Serializable {

    private Integer id;
    private String orderNo;
    private String orderAddress;
    private Double totalPrice;
    private List<Product> productList;

}
消费服务
OrderService.java
package org.example.service;

import org.example.pojo.Order;

public interface OrderService {

    /**
     * 根据主键查询订单
     *
     * @param id
     * @return
     */
    Order selectOrderById(Integer id);

}
对于服务的消费我们这里讲三种实现方式:
- DiscoveryClient:通过元数据获取服务信息
- LoadBalancerClient:Ribbon 的负载均衡器
- @LoadBalanced:通过注解开启 Ribbon 的负载均衡器
DiscoveryClient
Spring Boot 不提供任何自动配置的RestTemplate bean,所以需要在启动类中注入 RestTemplate。
package org.example;

import org.springframework.boot.SpringApplication;
import org.springframework.boot.autoconfigure.SpringBootApplication;
import org.springframework.context.annotation.Bean;
import org.springframework.web.client.RestTemplate;

// 开启 @EnableDiscoveryClient 注解,当前版本默认会开启该注解
//@EnableDiscoveryClient
@SpringBootApplication
public class OrderServiceApplication {

    @Bean
    public RestTemplate restTemplate() {
        return new RestTemplate();
    }

    public static void main(String[] args) {
        SpringApplication.run(OrderServiceApplication.class, args);
    }

}
OrderServiceImpl.java
package org.example.service.impl;

import lombok.extern.slf4j.Slf4j;
import org.example.pojo.Order;
import org.example.pojo.Product;
import org.example.service.OrderService;
import org.springframework.beans.factory.annotation.Autowired;
import org.springframework.cloud.client.ServiceInstance;
import org.springframework.cloud.client.discovery.DiscoveryClient;
import org.springframework.core.ParameterizedTypeReference;
import org.springframework.http.HttpMethod;
import org.springframework.http.ResponseEntity;
import org.springframework.stereotype.Service;
import org.springframework.util.CollectionUtils;
import org.springframework.web.client.RestTemplate;

import java.util.List;

@Slf4j
@Service
public class OrderServiceImpl implements OrderService {

    @Autowired
    private RestTemplate restTemplate;

    @Autowired
    private DiscoveryClient discoveryClient;

    /**
     * 根据主键查询订单
     *
     * @param id
     * @return
     */
    @Override
    public Order selectOrderById(Integer id) {
        log.info("订单服务查询订单信息...");
        return new Order(id, "order-001", "中国", 22788D,
                selectProductListByDiscoveryClient());
    }

    private List<Product> selectProductListByDiscoveryClient() {
        StringBuffer sb = null;

        // 获取服务列表
        List<String> serviceIds = discoveryClient.getServices();
        if (CollectionUtils.isEmpty(serviceIds))
            return null;

        // 根据服务名称获取服务
        List<ServiceInstance> serviceInstances = discoveryClient.getInstances("service-provider");
        if (CollectionUtils.isEmpty(serviceInstances))
            return null;

        ServiceInstance si = serviceInstances.get(0);
        sb = new StringBuffer();
        sb.append("http://" + si.getHost() + ":" + si.getPort() + "/product/list");
        log.info("订单服务调用商品服务...");
        log.info("从注册中心获取到的商品服务地址为:{}", sb.toString());

        // ResponseEntity: 封装了返回数据
        ResponseEntity<List<Product>> response = restTemplate.exchange(
                sb.toString(),
                HttpMethod.GET,
                null,
                new ParameterizedTypeReference<List<Product>>() {});
        log.info("商品信息查询结果为:{}", response.getBody());
        return response.getBody();
    }

}
LoadBalancerClient
OrderServiceImpl.java
package org.example.service.impl;

import lombok.extern.slf4j.Slf4j;
import org.example.pojo.Order;
import org.example.pojo.Product;
import org.example.service.OrderService;
import org.springframework.beans.factory.annotation.Autowired;
import org.springframework.cloud.client.ServiceInstance;
import org.springframework.cloud.client.loadbalancer.LoadBalancerClient;
import org.springframework.core.ParameterizedTypeReference;
import org.springframework.http.HttpMethod;
import org.springframework.http.ResponseEntity;
import org.springframework.stereotype.Service;
import org.springframework.web.client.RestTemplate;

import java.util.List;

@Slf4j
@Service
public class OrderServiceImpl implements OrderService {

    @Autowired
    private RestTemplate restTemplate;

    @Autowired
    private LoadBalancerClient loadBalancerClient; // Ribbon 负载均衡器

    /**
     * 根据主键查询订单
     *
     * @param id
     * @return
     */
    @Override
    public Order selectOrderById(Integer id) {
        log.info("订单服务查询订单信息...");
        return new Order(id, "order-001", "中国", 22788D,
                selectProductListByLoadBalancerClient());
    }

    private List<Product> selectProductListByLoadBalancerClient() {
        StringBuffer sb = null;

        // 根据服务名称获取服务
        ServiceInstance si = loadBalancerClient.choose("service-provider");
        if (null == si)
            return null;

        sb = new StringBuffer();
        sb.append("http://" + si.getHost() + ":" + si.getPort() + "/product/list");
        log.info("订单服务调用商品服务...");
        log.info("从注册中心获取到的商品服务地址为:{}", sb.toString());

        // ResponseEntity: 封装了返回数据
        ResponseEntity<List<Product>> response = restTemplate.exchange(
                sb.toString(),
                HttpMethod.GET,
                null,
                new ParameterizedTypeReference<List<Product>>() {});
        log.info("商品信息查询结果为:{}", response.getBody());
        return response.getBody();
    }

}
@LoadBalanced
启动类注入 RestTemplate 时添加 @LoadBalanced 负载均衡注解,表示这个 RestTemplate 在请求时拥有客户端负载均衡的能力。
package com.example;

import org.springframework.boot.SpringApplication;
import org.springframework.boot.autoconfigure.SpringBootApplication;
import org.springframework.cloud.client.discovery.EnableDiscoveryClient;
import org.springframework.cloud.client.loadbalancer.LoadBalanced;
import org.springframework.context.annotation.Bean;
import org.springframework.web.client.RestTemplate;

@EnableDiscoveryClient
@SpringBootApplication
public class OrderServiceApplication {

    @Bean
    @LoadBalanced // 负载均衡注解
    public RestTemplate restTemplate() {
        return new RestTemplate();
    }

    public static void main(String[] args) {
        SpringApplication.run(OrderServiceApplication.class, args);
    }

}
OrderServiceImpl.java
package org.example.service.impl;

import lombok.extern.slf4j.Slf4j;
import org.example.pojo.Order;
import org.example.pojo.Product;
import org.example.service.OrderService;
import org.springframework.beans.factory.annotation.Autowired;
import org.springframework.core.ParameterizedTypeReference;
import org.springframework.http.HttpMethod;
import org.springframework.http.ResponseEntity;
import org.springframework.stereotype.Service;
import org.springframework.web.client.RestTemplate;

import java.util.List;

@Slf4j
@Service
public class OrderServiceImpl implements OrderService {

    @Autowired
    private RestTemplate restTemplate;

    /**
     * 根据主键查询订单
     *
     * @param id
     * @return
     */
    @Override
    public Order selectOrderById(Integer id) {
        log.info("订单服务查询订单信息...");
        return new Order(id, "order-001", "中国", 22788D,
                selectProductListByLoadBalancerAnnotation());
    }

    private List<Product> selectProductListByLoadBalancerAnnotation() {
        String url = "http://product-service/product/list";
        log.info("订单服务调用商品服务...");
        log.info("从注册中心获取到的商品服务地址为:{}", url);
        // ResponseEntity: 封装了返回数据
        ResponseEntity<List<Product>> response = restTemplate.exchange(
                url,
                HttpMethod.GET,
                null,
                new ParameterizedTypeReference<List<Product>>() {});
        log.info("商品信息查询结果为:{}", response.getBody());
        return response.getBody();
    }

}
控制层
OrderController.java
package org.example.controller;

import org.example.pojo.Order;
import org.example.service.OrderService;
import org.springframework.beans.factory.annotation.Autowired;
import org.springframework.web.bind.annotation.GetMapping;
import org.springframework.web.bind.annotation.PathVariable;
import org.springframework.web.bind.annotation.RequestMapping;
import org.springframework.web.bind.annotation.RestController;

@RestController
@RequestMapping("/order")
public class OrderController {

    @Autowired
    private OrderService orderService;

    /**
     * 根据主键查询订单
     *
     * @param id
     * @return
     */
    @GetMapping("/{id}")
    public Order selectOrderById(@PathVariable("id") Integer id) {
        return orderService.selectOrderById(id);
    }

}
访问
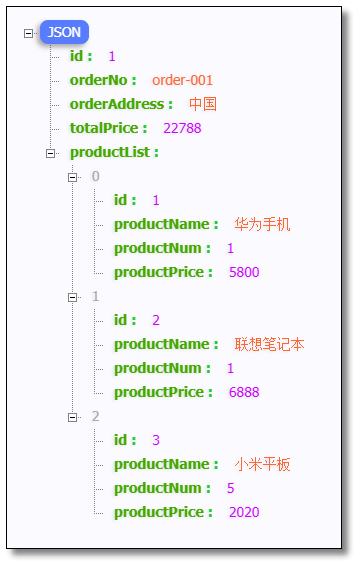
访问:http://localhost:9090/order/1 结果如下:

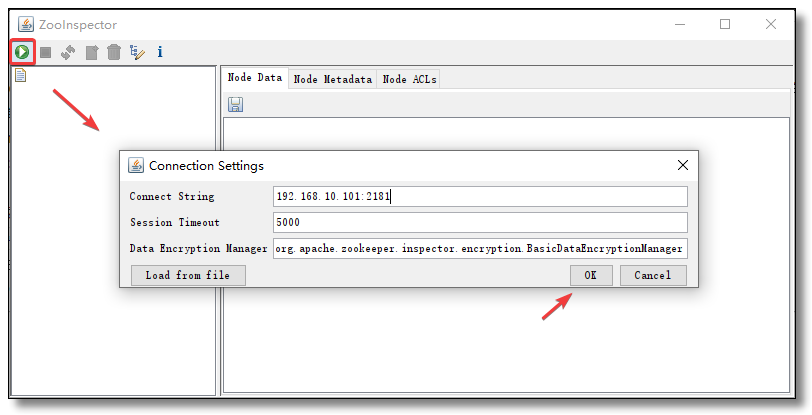
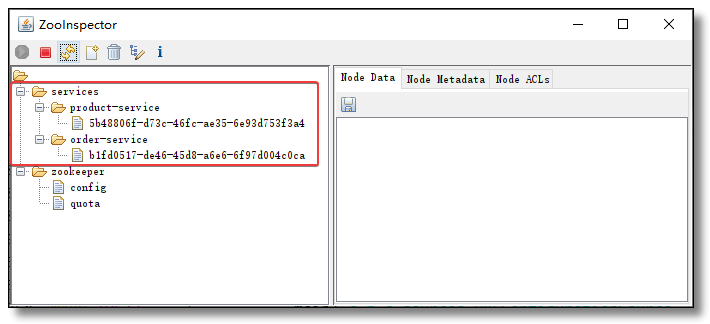
使用 ZooKeeper 图形化的客户端工具 ZooInspector 连接 ZooKeeper 查看服务信息如下:


至此 ZooKeeper 注册中心所有的知识点就讲解结束了。

本文采用 知识共享「署名-非商业性使用-禁止演绎 4.0 国际」许可协议。
大家可以通过 分类 查看更多关于 Spring Cloud 的文章。
🤗 您的点赞和转发是对我最大的支持。
📢 扫码关注 哈喽沃德先生「文档 + 视频」每篇文章都配有专门视频讲解,学习更轻松噢 ~

https://mrhelloworld.com


 浙公网安备 33010602011771号