Typora自动编号设置
找到C:\Users\用户名\AppData\Roaming\Typora\themes\路径下的base.user.css,用文本编辑器打开(若不存在,则自己创建一个),将一下内容复制进去,然后重启Typora即可。
以下是我的Typora自动编号配置:
/* 正文标题区: #write */
/* [TOC]目录树区: .md-toc-content */
/* 侧边栏的目录大纲区: .sidebar-content */

/** initialize css counter */
#write, .sidebar-content,.md-toc-content{
    counter-reset: h2
}

#write h1, .outline-h1, .md-toc-item.md-toc-h1 {
    counter-reset: h2
}

#write h2, .outline-h2, .md-toc-item.md-toc-h2 {
    counter-reset: h3
}

#write h3, .outline-h3, .md-toc-item.md-toc-h3 {
    counter-reset: h4
}

#write h4, .outline-h4, .md-toc-item.md-toc-h4 {
    counter-reset: h5
}

#write h5, .outline-h5, .md-toc-item.md-toc-h5 {
    counter-reset: h6
}

/** put counter result into headings */
/* 一级标题不展示 */
#write h1:before,
.outline-h1>.outline-item>.outline-label:before,
.md-toc-item.md-toc-h1>.md-toc-inner:before {
    /* counter-increment: h1;
    content: counter(h1) ". " */
}

/* 二级标题 */
#write h2:before,
.outline-h2>.outline-item>.outline-label:before,
.md-toc-item.md-toc-h2>.md-toc-inner:before {
    counter-increment: h2;
    content: counter(h2) ".   ";
    /* content: counter(h2) ". " */
}

/* 三级标题 */
#write h3:before,
h3.md-focus.md-heading:before, /** override the default style for focused headings */
.outline-h3>.outline-item>.outline-label:before,
.md-toc-item.md-toc-h3>.md-toc-inner:before {
    text-decoration: none;
    counter-increment: h3;
    /* content: counter(h1) "." counter(h2) "." counter(h3) ". " */
    /* content: counter(h2) "." counter(h3) ". " */
    content: counter(h2) "." counter(h3) "   "
}

/* 四级标题 */
#write h4:before,
h4.md-focus.md-heading:before,
.outline-h4>.outline-item>.outline-label:before,
.md-toc-item.md-toc-h4>.md-toc-inner:before {
    text-decoration: none;
    counter-increment: h4;
    /* content: counter(h1) "." counter(h2) "." counter(h3) "." counter(h4) ". " */
    /* content: counter(h2) "." counter(h3) "." counter(h4) ". " */
    content: counter(h2) "." counter(h3) "." counter(h4) "   "
}

/* 五级标题 */
#write h5:before,
h5.md-focus.md-heading:before,
.outline-h5>.outline-item>.outline-label:before,
.md-toc-item.md-toc-h5>.md-toc-inner:before {
    text-decoration: none;
    counter-increment: h5;
    /* content: counter(h1) "." counter(h2) "." counter(h3) "." counter(h4) "." counter(h5) ". " */
    /* content: counter(h2) "." counter(h3) "." counter(h4) "." counter(h5) ". " */
    content: counter(h2) "." counter(h3) "." counter(h4) "." counter(h5) "   "
}

/* 六级标题 */
#write h6:before,
h6.md-focus.md-heading:before,
.outline-h6>.outline-item>.outline-label:before,
.md-toc-item.md-toc-h6>.md-toc-inner:before {
    text-decoration: none;
    counter-increment: h6;
    /* content: counter(h1) "." counter(h2) "." counter(h3) "." counter(h4) "." counter(h5) "." counter(h6) ". " */
    /* content: counter(h2) "." counter(h3) "." counter(h4) "." counter(h5) "." counter(h6) ". " */
    content: counter(h2) "." counter(h3) "." counter(h4) "." counter(h5) "." counter(h6) "   "
}

/** override the default style for focused headings */
#write>h3.md-focus:before,
#write>h4.md-focus:before,
#write>h5.md-focus:before,
#write>h6.md-focus:before,
h3.md-focus:before,
h4.md-focus:before,
h5.md-focus:before,
h6.md-focus:before {
    color: inherit;
    border: inherit;
    border-radius: inherit;
    position: inherit;
    left:initial;
    float: none;
    top:initial;
    font-size: inherit;
    padding-left: inherit;
    padding-right: inherit;
    vertical-align: inherit;
    font-weight: inherit;
    line-height: inherit;
}

/* 设置行距 */


/* 设置一级标题行距 */
#write h1 {
    margin-bottom:50px;
    margin-top:50px;
}

#write h2 {
    margin-bottom:30px;
    margin-top:50px;
}

#write h3 {
    margin-bottom:30px;
    margin-top:30px;
}

#write h4 {
    margin-bottom:30px;
    margin-top:30px;
}

#write h5 {
    margin-bottom:30px;
    margin-top:30px;
}
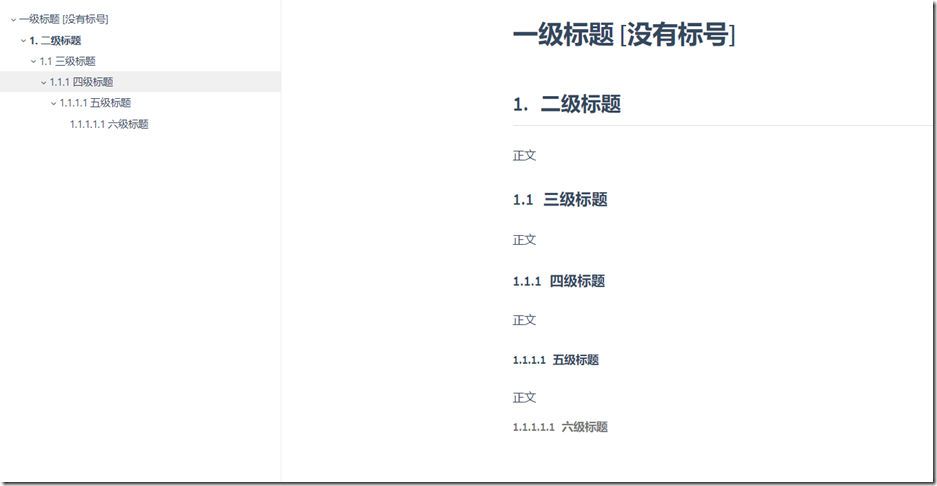
效果如下,
使用起来非常方便,再也不用自己手动来维护这个标号了。
关注公众号大数据君!关注最新的大数据技术动态!


 浙公网安备 33010602011771号