Egret,Cocos creator 截图显示(试用于web,小程序)
一、Egret截图实现
白鹭的截图实现很简单,在官网教学实例里面就有较详细的例子,下面我只贴出关键的代码;
//RenderTexture 是动态纹理类,他实现了将显示对象及其子对象绘制成为一个纹理的功能
/**  drawToTexture
 * 将指定显示对象绘制为一个纹理
 * @param displayObject {egret.DisplayObject} 需要绘制的显示对象
 * @param clipBounds {egret.Rectangle} 绘制矩形区域
 * @param scale {number} 缩放比例
 * @version Egret 2.4
 * @platform Web,Native
 * @language zh_CN
 */

var rt:egret.RenderTexture = new egret.RenderTexture;
rt.drawToTexture( param1, param2, param3);
RenderTexture是继承自egret.Texture;上面代码绘制成一个纹理后,可以直接给 egret.bitmap的 texture的属性附上值;
let _bmpSnap: egret.Bitmap = new egret.Bitmap;
_bmpSnap.texture = rt;
这时候就可以把 _bmpSnap 添加到显示的界面上就行了
二、Cocos 截图实现
先看一下界面如何摆放

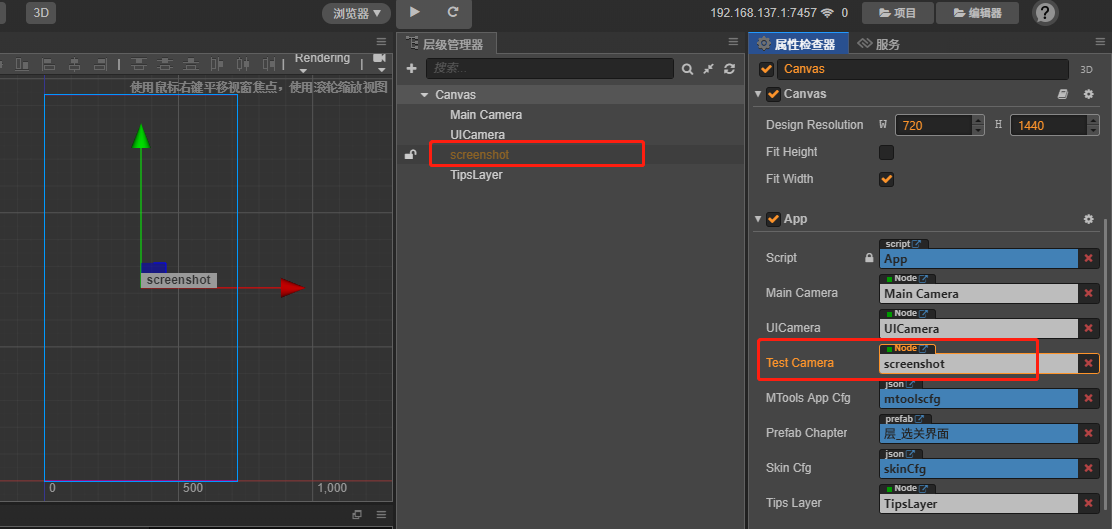
首先在界面上放置一个摄像机;如图screenshot;我这里因为游戏需要,为了不影响mianCamera的其他功能,就重新创建了一个,
接下来,把screenshot挂载到脚本声明的变量上面;
图上还缺少一个放截图的sprite组件的节点

同理我们挂载到变量 testSprite上面;
接下来就是实现的代码了;
const { ccclass, property } = cc._decorator;

export default class ScreenShot extends cc.Component {

    private static instance: ScreenShot;

    @property(cc.Camera)
    public testCamera: cc.Camera = null;

    @property(cc.Sprite)
    public testSprite: cc.Sprite = null;

    public static getInstance(): ScreenShot {
        if (ScreenShot.instance == null) {
            ScreenShot.instance = new ScreenShot();
        }
        return ScreenShot.instance;
    }

    public _canvas: any = null;
    public texture: cc.RenderTexture;
    private _width: number = 0;
    private _height: number = 0;

    start() {
    }

    onOpen() {
        this.screenshotsInti();//首先进行初始化
        this.scheduleOnce(() => {
            //spriteFrame可以用于替换精灵中的spriteFrame属性来显示截图
            this.screenshots((spriteFrame) => {
                this.testSprite.spriteFrame = spriteFrame
            });
        }, 0)
    }

    screenshotsInti() {//截图初始化
        let texture = new cc.RenderTexture();
        let gl = cc.game["_renderContext"];
        texture.initWithSize(cc.visibleRect.width, cc.visibleRect.height, gl.STENCIL_INDEX8);
        this.testCamera.getComponent(cc.Camera).targetTexture = texture;
        this.texture = texture;
    }

    screenshots(callback) { //截图函数
        let picData = this.initImage();
        let spriteFrame = this.showSprite(picData);
        if (callback) callback(spriteFrame);
    }

    initImage() {
        let data = this.texture.readPixels();
        this._width = this.texture.width;
        this._height = this.texture.height;
        let picData = this.filpYImage(data, this._width, this._height);
        return picData;
    }

    showSprite(picData) {
        let texture = new cc.Texture2D();
        console.log('canvas', this._width, this._height);
        //cc.Texture2D.RGBA8888是一个cc.Texture2D中的枚举,可以自行查阅官网API
        texture.initWithData(picData, cc.Texture2D["RGBA8888"], this._width, this._height);
        let spriteFrame = new cc.SpriteFrame();
        spriteFrame.setTexture(texture);
        return spriteFrame;
    }

    filpYImage(data, width, height) {
        // create the data array
        let picData = new Uint8Array(width * height * 4);
        let rowBytes = width * 4;
        for (let row = 0; row < height; row++) {
            let srow = height - 1 - row;
            let start = srow * width * 4;
            let reStart = row * width * 4;
            // save the piexls data
            for (let i = 0; i < rowBytes; i++) {
                picData[reStart + i] = data[start + i];
            }
        }
        return picData;
    }
}
调用 onOpen实现截图;首先调用screenshotsInti()初始化创建一个 RenderTexture,应该是和白鹭的原理一样,都是创建一个动态的纹理集;
this.testCamera.getComponent(cc.Camera).targetTexture = texture;
这一步其实拿到摄像机显示的画面,处理成纹理集;
(但是这一步有点看不懂,前后是不是颠倒了????写法是这样的,大家研究一下)
scheduleOnce这里放个计时器,按需求写,可以不写。
最后直接给 this.testSprite.spriteFrame 赋值就可以了。
山重水复疑无路,柳暗花明又一村!
专注填坑,少走弯路!


