TinyCore Linux 安装和配置
重要说明:
我是在虚拟机中安装的,在创建虚拟机的时候,虚拟硬盘选择的SCSI的时候,在TinyCore系统中无法识别出硬盘。
如果选择的是SATA、IDE、NVMe则可以正常识别出硬盘,所以不要选择SCSI,否则在TinyCore系统中无法识别出硬盘。
官方也提供了安装说明,不过是英文的,感兴趣的自己去看。
官方安装说明:http://tinycorelinux.net/install.html
=======================================================================================
Tiny Core Linux 安装配置
简介
Tiny Core Linux是一个mini Linux操作系统,基于 BusyBox和FLTK提供基本功能。 其发行版本在11M-16M 官网上也提供Plus版本也只有106M。它很精致。
安装
操作系统安装
镜像下载
下载页面 http://tinycorelinux.net/downloads.html
我下载了两个版本镜像:
- x86版本:
TinyCore-11.1.iso - x86_64位版本:
TinyCorePure64-11.1.iso
环境准备
我们使用的vmware 首先新建一个linux虚拟机, 我选的版本是其他Linux5.x或更高版本内核64位, 并添加了两块SATA的硬盘(默认的SCSI硬盘识别似乎有些问题)
开始安装
安装过程主要下面三个步骤 :
- 光盘启动操作系统;
- 配置网络
- 下载安装脚本安装;
1 . 选择镜像: 光盘镜像选择 x86版本:TinyCore-11.1.iso (不影响安装)
2 . 启动系统: 启动后会出现四个选项, 选择第三项
Boot TinyCore
Boot TinyCore (on slow devices, waitusb=5)
Boot Core (command line only)
Boot Core (command line only on slow devices, waitusb=5)
可以看到系统后进入命令行窗口,但是这种模式下进行操作重启将全部丢失。要保留我们相关配置,需要挂载硬盘。
3 . 配置网络: 配置网卡地址路由及域名服务器。
sudo ifconfig eth0 192.168.xxx.202 netmask 255.255.255.0
sudo route add default gw 192.168.xxx.1 dev eth0
sudo echo nameserver 192.168.xxx.1 >> /etc/resolv.conf
4 . 下载安装脚本: 会联机下载相关安装包
tce-load -wi tc-install.tcz
5 . 安装:
- 启动安装脚本
sudo tc-install.sh
- 选择
c从光盘启动
Core Installation.
Install from [R]unning OS, from booted [C]drom, from
 [I]so file, or from [N]et. (r/c/i/n): c
- 选择
f安装到本地硬盘
Select install type for /mnt/sr0/boot/core.gz

Frugal
* Use for frugal hard drive installations.
Note: You will be prompted for disk/partion and
formatting options.

HDD
* Use for pendrives. Your BIOS must support USB-HDD booting.
* A single FAT partition will be made.
Note: Requires dosfstools extension.
Warning: This is a whole drive installation!

Zip
* Use for pendrives. Drive will be formatted into two FAT partitions.
* One small one for USB_ZIP boot compatibility, and used to hold Tiny Core.
* The remaining partition will be used for backup & extensions.
Note: Requires dosfstools and perl extensions.
Warning: This is a whole drive installation!

Select Install type [F]rugal, [H]DD, [Z]ip. (f/h/z): f
- 选择
1使用整个硬盘安装
Select Target for Installation of core

 1. Whole Disk
 2. Partition

Enter selection ( 1 - 2 ) or (q)uit: 1
- 选择
1安装到第一块硬盘上
Select disk for core

 1. sda
 2. sdb

Enter selection ( 1 - 2 ) or (q)uit: 1
- 安装
bootloader选择y
Would you like to install a bootloader?
Most people should answer yes unless they are trying to embed Core
into a different Linux distribution with an existing bootloader.

Enter selection ( y, n ) or (q)uit: y
Install Extensions from this TCE/CDE Directory:
- 选择分区格式
ext4
Select Formatting Option for sda

 1. ext2
 2. ext3
 3. ext4
 4. vfat

Enter selection ( 1 - 4 ) or (q)uit: 3
- 设置一些启动选项, 这里先不输入, 直接回车
Enter space separated boot options:
Example: vga=normal syslog showapps waitusb=5
- 选择
y,开始安装
Last chance to exit before destroying all data on sda
Continue (y/..)?
- 安装完毕后有以下信息回显, 安装完毕.
Writing zero's to beginning of /dev/sda
Partitioning /dev/sda
Formatting /dev/sda1
mke2fs 1.45.4 (23-Sep-2019)
1+0 records in
1+0 records out
440 bytes (440B) copied, 0.000846 seconds, 507.9KB/s
UUID="XXXXXXX"
Applying syslinux.
/mnt/drive/tce/boot/extlinux is device /dev/sda1
Setting up core image on /mnt/sda1
Installation has completed
Press Enter key to continue.
按照这个步骤把第二块硬盘也安装一下. 第二块硬盘使用镜像
TinyCorePure64-11.1.iso 安装, 使用umount卸载原有x86镜像,mount重新挂载新的镜像。
sudo umount /dev/sr0
...
sudo mount /dev/sr0
6 . 重启动,进入配置阶段
配置
启动后默认进入X86版本系统, 下面开始配置grub2,openssh等,其中需要注意的是 Tiny linux相关设置如果不执行filetool.sh, 只是临时生效,重启系统就会丢失。
相关软件包安装需要先配置网络然后联网通过tce工具下载即可, 如果要长期使用需要做持久化处理。
网络配置
配置网络并支持永久生效
- 生成文件/opt/eth0.sh 文件内容:
sudo ifconfig eth0 192.168.xxx.202 netmask 255.255.255.0
sudo route add default gw 192.168.xxx.1 dev eth0
sudo echo nameserver 192.168.xxx.1 >> /etc/resolv.conf
- 增加可执行权限
chmod 755 /opt/eth0.sh
sudo /opt/eth0.sh
- 设置开机启动及永久生效
sudo echo "/opt/eth0.sh" >> /opt/.filetool.lst
sudo chmod 775 /opt/bootlocal.sh
sudo echo "/opt/eth0.sh &" >> /opt/bootlocal.sh
filetool.sh -b
开机启动配置
- 联网后使用
tce安装grub2
tce-load -wi grub2-multi.tcz
sudo grub-install --target=i386-pc --boot-directory=/mnt/sda1/boot /dev/sda
- 生成
grub.cfg文件
menuentry "x86" {
    set root=(hd0, 1)
    linux /tce/boot/vmlinuz tce=sda1
    initrd /tce/bot/core.gz
}

menuentry "x86_64" {
    set root=(hd1, 1)
    linux /tce/boot/vmlinuz64 tce=sdb1
    initrd /tce/bot/corepure64.gz
}
这部分修改由于本事就在硬盘上不需要做持久化处理, 重新启动就可以看到grub2启动界面
*x86
 x86_64
openssh配置
- 如果需要远程登录可以安装
openssh
tce-load -wi openssh.tcz
- 相关配置文件生成
cd /usr/local/etc/ssh
sudo cp sshd_config.orig sshd_config
- 设置密码
#使用以下命令修改密码,但需要满足密码策略要求
passwd

#强制更改默认用户 “tc” 的密码,以便您可以在 ssh user@hostname的方式登录时提示框下输入此密码。使用以下命令以更改密码:
echo tc:password!23 | sudo chpasswd

#注意:如果要更改 root 密码,可以使用以下命令以更改 root 更改密码:
echo root:password!23 | sudo chpasswd
- 启动 SSH 服务
sudo /usr/local/etc/init.d/openssh start- 持久化处理
sudo echo '/usr/local/etc/ssh' >> /opt/.filetool.lst
sudo echo '/etc/shadow' >> /opt/.filetool.lst
filetool.sh -b
sudo echo '/usr/local/etc/init.d/openssh start &' >> /opt/bootlocal.sh
- 配置免密
生成SSH key, 使用ssh-keygen或PuTTY Key Generator可以生成公私钥对, 公钥上传服务器/home/tc/.ssh目录命名为authorized_keys - 相关问题
安装过程中报错 : server refused our key- 公钥格式: 如果使用
putty key generator界面上会提示要拷贝的公钥文件内容,需要改为 openssh 使用的公钥格式, 或者使用下面命令转换
ssh-keygen -i -f 公钥文件名- 权限调整:去掉组权限
chmod 700 ~/.ssh chmod 600 ~/.ssh/authorized_keys - 公钥格式: 如果使用
- 永久保存处理
sudo echo '/home/tc/.ssh/' >> /opt/.filetool.lst
filetool.sh -b
这样就可以通过ssh远程免密登录了
新增硬盘
- 安装
gdisk
tce-load -wi gdisk.tcz
- 使用
gdisk创建两个500M分区, 重启生效
brw-rw----    1 root     staff       8,  33 Sep  2 04:51 /dev/sdc1
brw-rw----    1 root     staff       8,  34 Sep  2 04:51 /dev/sdc2
- 格式化
mkfs.ext2 /dev/sdc1
mkfs.ext3 /dev/sdc2
- 修改
/etc/fstab
/etc/fstab
/dev/sdc1       /mnt/sdc1       ext2     noauto,users,exec    0 0 # Added by TC
/dev/sdc2       /mnt/sdc2       ext3     noauto,users,exec    0 0 # Added by TC
- 修改
bootlocal.sh启动后自动挂载
echo "sudo mount /dev/sdc1 &" >> /opt/bootlocal.sh
echo "sudo mount /dev/sdc2 &" >> /opt/bootlocal.sh
filetool.sh -b
sudo reboot
...

$ mount
rootfs on / type rootfs (rw,size=633520k,nr_inodes=223783)
...
/dev/sdc1 on /mnt/sdc1 type ext2 (rw,relatime)
/dev/sdc2 on /mnt/sdc2 type ext3 (rw,relatime)
参考
Assign Persistent Static IP Address to Tiny Core Linux
Install Tiny Core Linux on Local Disk (Frugal)
Configure SSH Server on Tiny Core Linux using openSSH
Trying to do ssh authentication with key files: server refused our key
出处:https://garlicspace.com/2020/09/02/tiny-core-linux-%E5%AE%89%E8%A3%85%E9%85%8D%E7%BD%AE/
=============================================================================================================
Tiny Core Linux 显示中文的方法
Tiny Core Linux的下载地址:
http://www.tinycorelinux.net/downloads.html
当前的版本为:4.7.5
每个人的需求都不一样,我选择 Tiny Core Linux 的原因很简单——因为体积小。建立这个系统的目的就是看看网页,所以只要让网页浏览器能正常显示出中文即可。
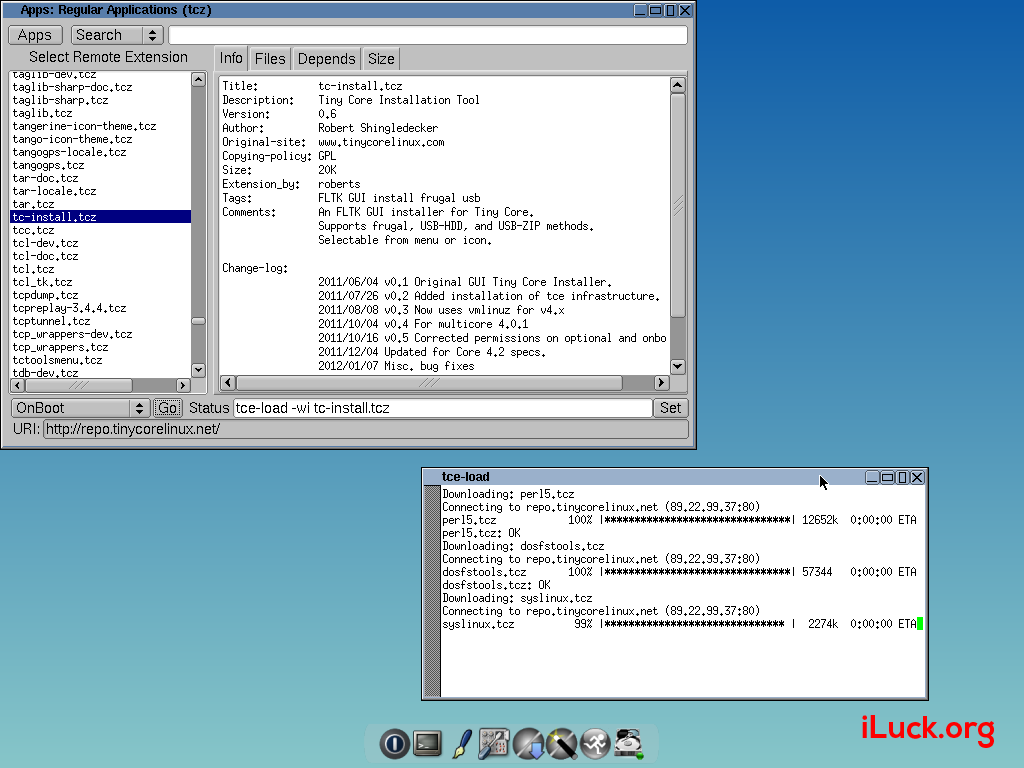
一、利用ISO文件启动计算机,启动后安装“tc-install.tcz”,这个程序是部署系统的GUI工具。
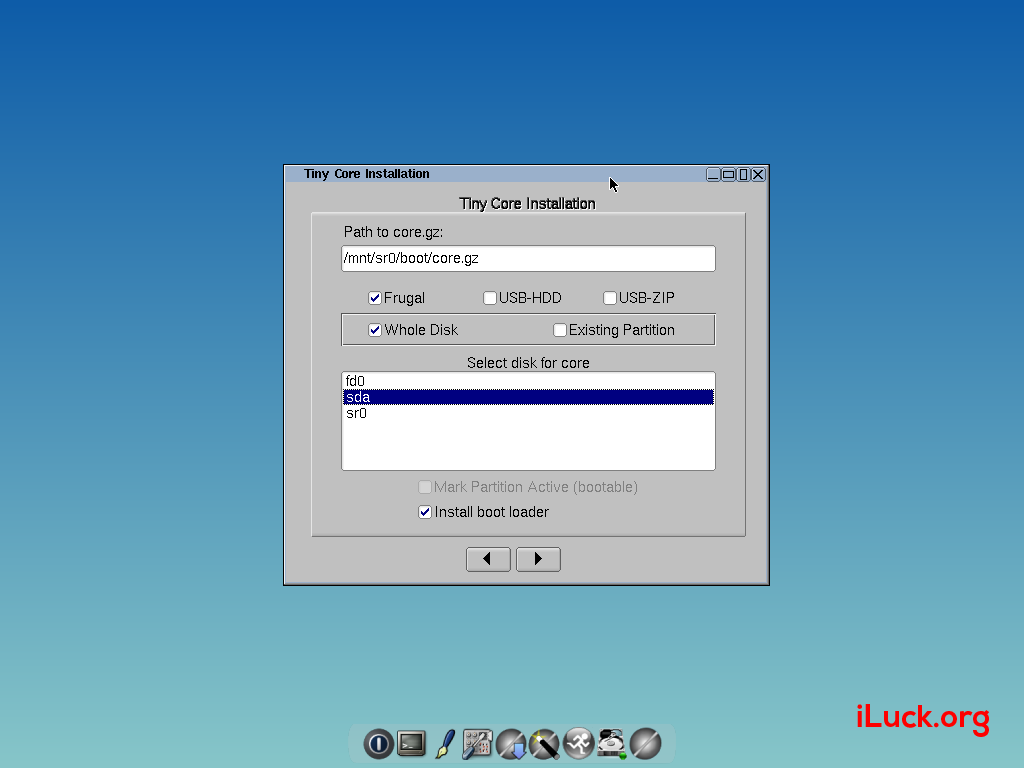
二、运行“Tiny Core Installation”,选择硬盘。

请注意:如果您前面勾选了“Install boot loader”,可以在安装后随时在 bootloader 的配置文件中编辑它们。
那么 bootloader 的配置文件通常是在: /mnt/nvme0n1p1/tce/boot/extlinux/extlinux.conf,如果没有这个文件,可以使用以下find代码搜索一下
sudo find / -type f|grep extlinux.conf
如果存在,则会显示具体路径信息。
三、选择文件系统。
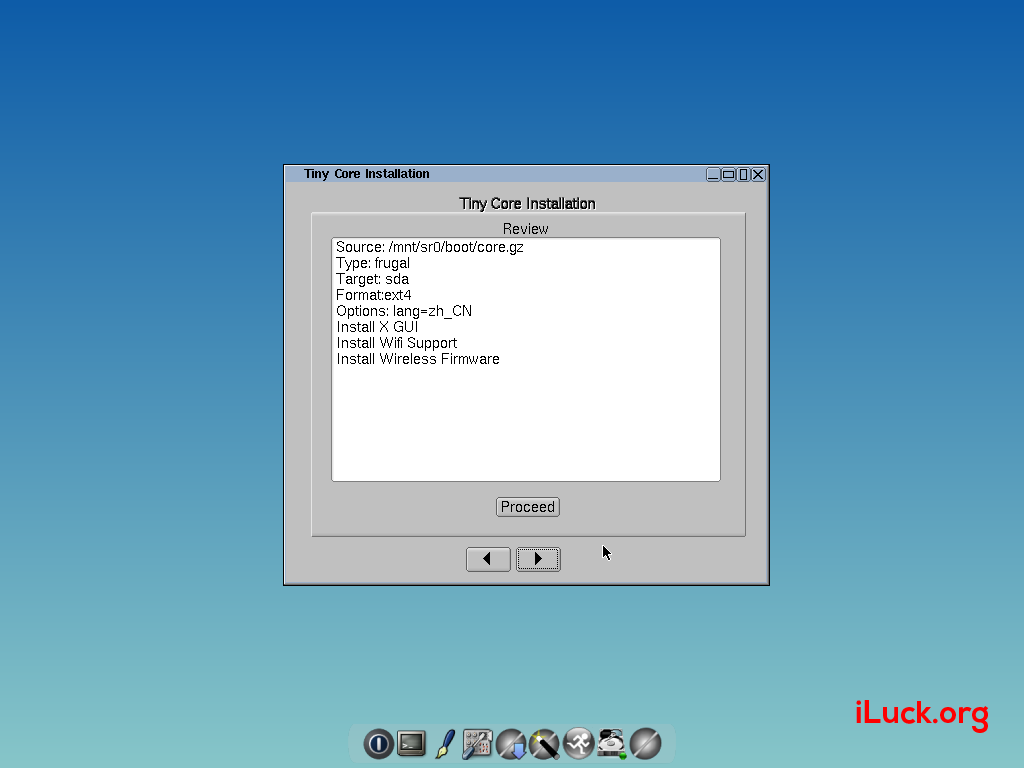
四、设置启动参数,因为要用中文环境,所以设置为:lang=zh_CN。
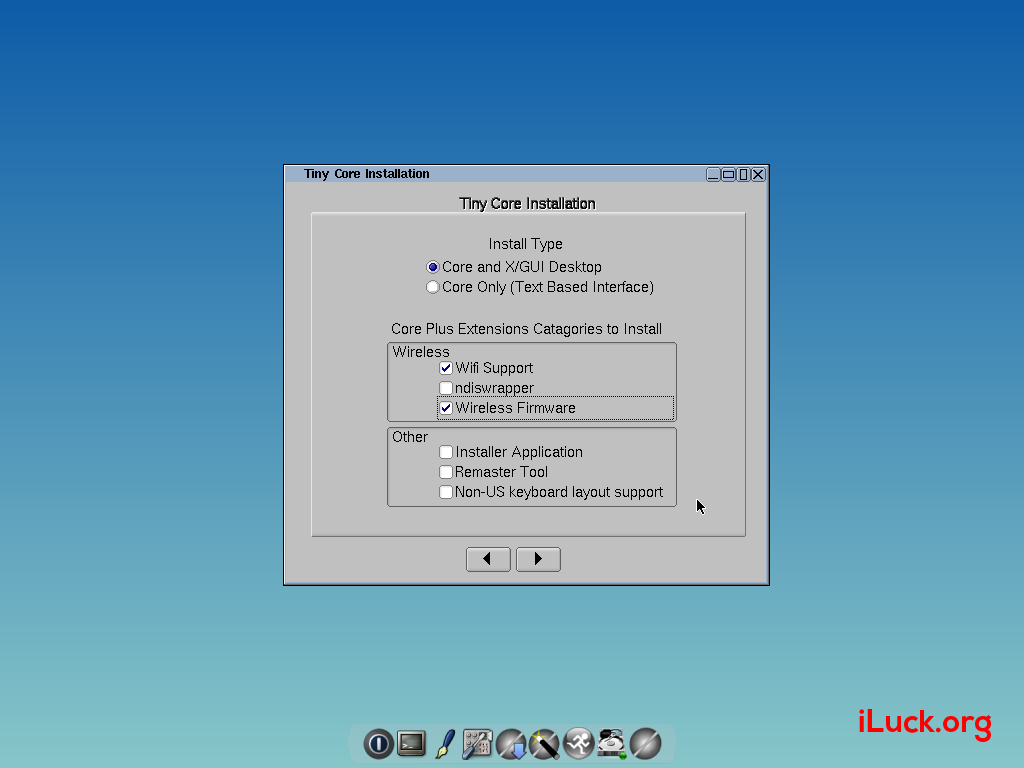
五、使用桌面系统和无线网络环境。
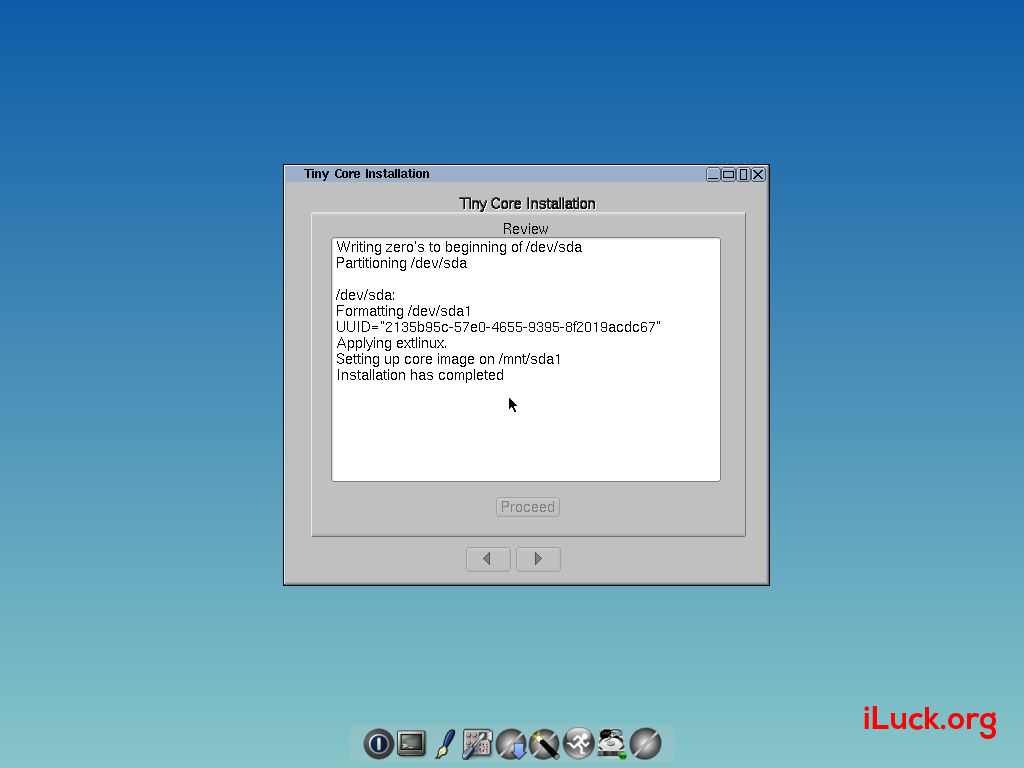
六、点击[Proceed]开始安装。
七、系统安装完成,现在可以从硬盘启动系统了。
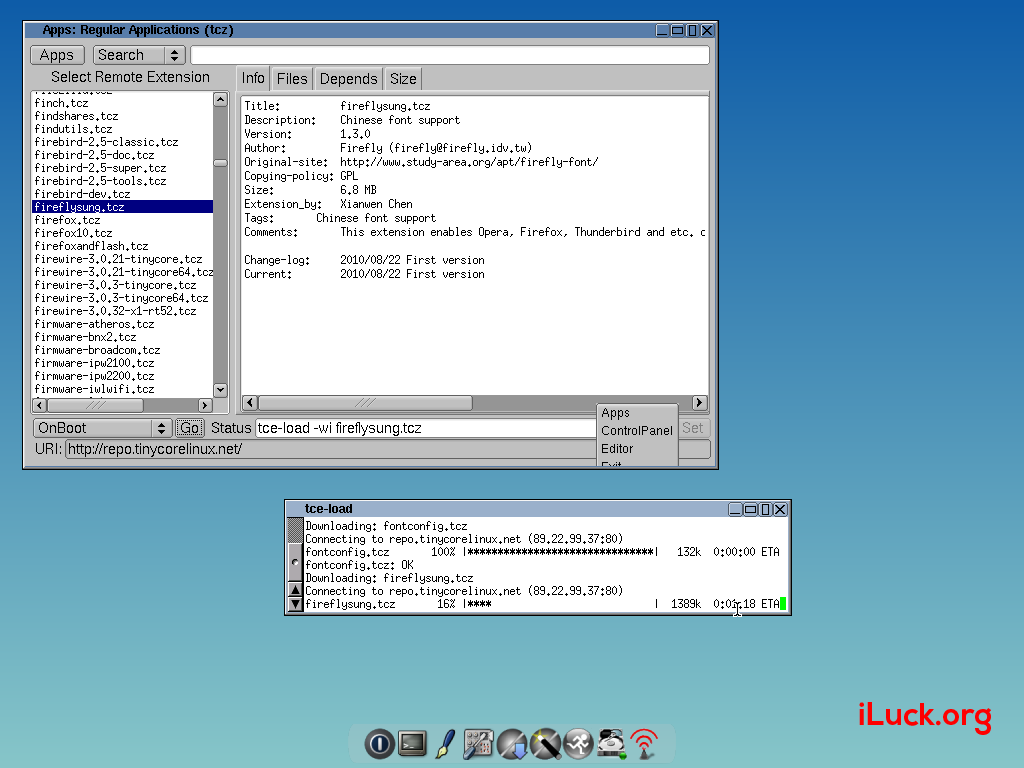
八、安装中文字体:“fireflysung.tcz”。
九、安装“getlocale.tcz”设置中文语言环境,可以选择使用[Download+Load]的方式,因为以后不需要再用这个程序切换系统语言环境,没有必要进行保留。其他的程序都要使用[OnBoot]方式。
十、运行“sudo getlocale.sh”选择zh_CN。
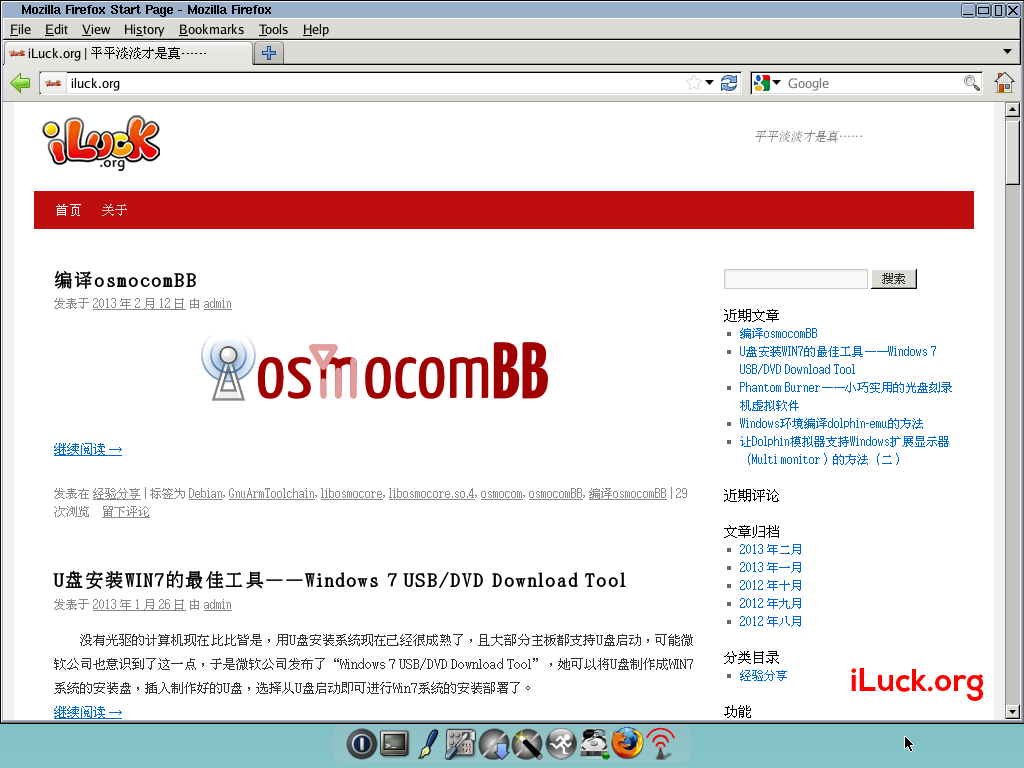
十一、安装“Firefox”用来浏览网页,并选择安装“getFlash11.tcz”以支持Flash的显示。
十二、重新启动系统后浏览器已正常显示中文。
参考:https://my.oschina.net/yygh/blog/484459
=======================================================================================
Tiny Core Linux 安装和配置
https://blog.csdn.net/stevenldj/article/details/112852507
目标
通过最小的命令行版 Tiny Core Linux 系统光盘安装 Tiny Core Linux 桌面环境,设置中文界面,安装输入法,设置分辨率。
所有软件包都从仓库下载,可以安装在虚拟机中,也可以安装在 U 盘中,实现从实机启动。
下载站点
官方网站:http://www.tinycorelinux.net/
FTP 站点:http://www.tinycorelinux.net/12.x/x86_64/release/
官方镜像:http://mirrors.163.com/tinycorelinux/
FTP 镜像:http://mirrors.163.com/tinycorelinux/12.x/x86_64/release/
准备
下载 CorePure64.ISO 文件(16MB):
http://mirrors.163.com/tinycorelinux/12.x/x86_64/release/CorePure64-12.0.iso
安装
1、创建虚拟机,名称为 TinyCoreLinux,磁盘容量 1GB-8GB,内存容量 512MB-2GB。
2、从 CorePure64-12.0.iso 启动虚拟机,启动时会暂停在 boot: 提示符位置,等待用户输入启动参数,此时直接回车即可(如果不按任何键,过一会儿会自动继续启动)。
3、使用 ping 命令检查一下网络是否正常(安装过程需要联网):
ping www.baidu.com # 检测过程会一直持续,按 Ctrl+C 可停止
4、设置软件源:
sudo echo http://mirrors.163.com/tinycorelinux/ > /opt/tcemirror
5、执行下面的命令安装一个软件包:grub2中直接提供了multiboot和multiboot2命令,可分别用于引导符合multiboot v1规范和multiboot v2规范的内核
tce-load -wi grub2-multi # 参数:w 是下载,i 是安装
6、创建分区(如果要将系统安装在 U 盘上,可以将空的 U 盘接入虚拟机,然后用 U 盘的设备名替换 /dev/sda 和 /dev/sda1 来完成之后的所有步骤即可):
sudo fdisk /dev/sda # 進入 fdisk 交互界面
m # 按 m 查看帮助,列出可用的命令
n # 按 n 创建新分区,進入创建分区过程 >>
p # 选择分区类型:按 p 选择主分区
1 # 选择主分区位置:按数字 1 选择第一个位置
Enter # 起始扇区:回车,使用默认值
Enter # 结束扇区:回车,使用默认值,完成分区创建 <<
p # 按 p 查看刚创建的分区表是否正确
w # 按 w 将结果写入磁盘,同时会退出 fdisk
sudo fdisk -l # 查看当前分区状态,应该有一个 /dev/sda1 分区
mkfs.ext4 /dev/sda1 # 格式化新分区(不能用 fat 或 ntfs 格式,否则无法正常下载软件包)
7、将 /dev/sda1 的卷标修改为 TinyCore(启动时会查找这个分区):
sudo tune2fs -L TinyCore /dev/sda1
8、将 /dev/sda1 挂载到 /mnt/sda1:
sudo mkdir -p /mnt/sda1
sudo mount /dev/sda1 /mnt/sda1
9、安装 grub2 引到程序:
sudo grub-install --root-directory=/mnt/sda1 --no-floppy /dev/sda
10、将 Tiny Core Linux 的系统文件复制到虚拟机磁盘中:
sudo mkdir -p /mnt/sda1/tc64/tce
sudo mkdir -p /mnt/sr0
sudo mount /dev/sr0 /mnt/sr0 # 挂载光驱
cd /mnt/sr0/boot
ls
sudo cp corepure64.gz vmlinuz64 /mnt/sda1/tc64 # 拷贝 initrd 和vmlinuz
11、创建 grub2 启动菜单:
cd /mnt/sda1/boot/grub
sudo vi grub.cfg # 必须以 root 权限运行
進入 vi 环境后,按 i 進入编辑模式,输入如下内容(注释可以不用输入):
timeout=0
menuentry "Tiny Core Linux x64" {
# loglevel:日志等级,设置为 3 避免过多的调试信息充满屏幕
# vga :分辨率,791=1024*768(必须设置,否则启动过程可能会死机)
# showapps:启动过程中显示加载的软件包列表
# pause :启动完毕时暂停,以便查看输出信息(回车继续,这里未使用)
# tce :指定软件包存放在标签为 TinyCore 的磁盘的 /tc64/tce 目录中
linux /tc64/vmlinuz64 loglevel=3 vga=791 showapps tce=LABEL=TinyCore/tc64/tce
initrd /tc64/corepure64.gz
}
然后按 Esc 退出编辑模式,按冒号 : 進入命令模式,输入 wq 回车,退出 vi 编辑器。
12、卸载 CorePure64-12.0.iso 虚拟光盘,以便从硬盘启动,然后重启虚拟机:
sudo reboot
13、启动后,再次设置软件源:
sudo echo http://mirrors.163.com/tinycorelinux/ > /opt/tcemirror
14、安装 GUI 界面所必需的软件包:
# Xorg-7.7 图形界面的核心
# Xorg-7.7-3d 3D 支持(三维软件需要此包)
# alsa 声卡驱动
# openbox 窗口管理器(也可以选择其它窗口管理器,比如 icewm)
# wbar 屏幕底部的任务栏
# aterm 虚拟终端(也可以选择其它虚拟终端,比如 lxterminal)
tce-load -wi Xorg-7.7 Xorg-7.7-3d alsa openbox aterm wbar
声卡驱动安装好后,可以使用 alsamixer 命令调整音量,進入 alsamixer 界面后,通过左右键选择设备,通过 M 键开启或关闭设备,通过上下键调节设备音量,按 Esc 键退出设置界面。
设置完毕后,需要保存设置,否则重启后又要重新调节。可以通过 sudo alsactl store 命令保存音量设置,不过对于 Tiny Core Linux 来说,该保存操作不会生效,因为 alsactl 会将配置文件保存在 /usr/local/etc 目录中,而这个目录在重启后会被还原,所以需要用另一种方法来调节开机音量,编辑 /opt/bootlocal.sh 文件,添加如下内容即可(记得重启前保存用户配置,否则修改的内容也会丟失):
amixer -q set Master on 100%
amixer -q set Speaker on 100%
amixer -q set Headphone on 100%
15、安装可选的软件包:
# ntfs-3g 用来访问 NTFS 分区
# xfe 文件管理器
# file-roller 压缩解压程序
# geany 文本编辑器
# vlc 视频播放器
# firefox-ESR 火狐浏览器最新版
tce-load -wi ntfs-3g xfe file-roller geany vlc firefox-ESR
可能在第一次挂载 ntfs 分区的时侯会出现无法写入的情况,这是因为 Tiny Core Linux 在启动过程中,在填写 /etc/fstab 文件的时侯还没有安装 ntfs-3g 程序,所以使用了内核提供的 ntfs 模块,而内核的 ntfs 模块只能以只读的方式挂载 ntfs 分区,所以导致挂载后的 ntfs 分区无法写入。此时可以将分区卸载后重新挂载,应该就没问题了,因为卸载时会触发 udev 去更新 /etc/fstab 文件,更新时就能发现 ntfs-3g 程序,从而生成正确的 /etc/fstab 文件。也可以在 /opt/bootlocal.sh 中添加如下内容,让系统在启动时,在所有软件包都加载完毕后,再次更新 /etc/fstab 文件:
rebuildfstab
16、如果系统安装在 U 盘上,准备在实机启动,则需要安装相应驱动:
tce-load -wi wifi # 无线网卡驱动
tce-load -wi pulseaudio # 声卡驱动
tce-load -wi xf86-video-nv # Nvidia 显卡驱动
tce-load -wi xf86-video-ati # Ati 显卡驱动
tce-load -wi xf86-video-intel # Intel 显卡驱动
17、重启系统,進入 GUI 界面,方便進一步操作(重启前,需要保存用户配置):
backup # 保存用户数据(出现提示后按 y,然后回车)
sudo reboot # 重启系统
18、進入桌面后,打开 Apps 程序,安装需要的软件,第一次启动时,会询问是否检测最快的软件源,点击 Yes,检测完毕后,点击 Ok,進入 Apps 界面。
点击 Apps 按钮,选择 Cloud -> Browse 菜单项,会列出所有的软件列表,可以在右边的搜索框中输入软件名称,然后回车進行搜索,找到后,选中要安装的软件,然后点击下面的 Go 按钮進行下载并安装。
之后的重启就不要再用 sudo reboot 命令了,因为需要保存用户配置信息,应该使用任务栏中的关机按钮,选择 backup 选项后再重启。
汉化
1、安装 getlocale 软件包:
tce-load -wi getlocale
2、打开终端,执行下面的命令,会進入选择语言的界面:
sudo getlocale.sh
勾选列表最后以 zh_ 开头的所有选项(按空格键勾选),然后回车确认,再次按回车键开始执行。执行完毕后,按回车键退出程序。
3、编辑 /mnt/sda1/boot/grub/grub.cfg 文件:
sudo editor /mnt/sda1/boot/grub/grub.cfg
修改启动选项(添加 lang 和 tz 两项):
timeout=0
menuentry "Tiny Core Linux x64" {
# loglevel:日志等级,设置为 3 避免过多的调试信息充满屏幕
# vga :分辨率,791=1024*768(必须设置,否则启动过程可能会死机)
# showapps:启动过程中显示加载的软件包列表
# pause :启动完毕时暂停,以便查看输出信息(回车继续,这里未使用)
# lang :设置系统语言,zh_CN.UTF8 是简体中文
# tz :设置系统时区,CCT 是中国时区的名称(-8 后与国际时间同步)
# tce :指定软件包存放在标签为 TinyLinux 的磁盘的 /tc64/tce 目录中
linux /tc64/vmlinuz64 loglevel=3 vga=791 showapps lang=zh_CN.UTF8 tz=CCT-8 tce=LABEL=TinyCore/tc64/tce
initrd /tc64/corepure64.gz
}
4、安装中文字体:
tce-load -wi notocjk-regular-fonts-ttc
5、安装中文输入法:
tce-load -wi fcitx-sunpinyin
然后打开 /home/tc/.ashrc,在文件最后添加如下内容:
export XIM=fcitx
export GTK_IM_MODULE=fcitx
export QT_IM_MODULE=fcitx
export XIM_PROGRAM=fcitx
export XMODIFIERS="@im=fcitx"
重启后,点击任务栏中的 fcitx 图标,然后才可以使用 Ctrl+Space 切换输入法。某些软件无法使用输入法,某些软件可以(比如 firefox)。需要注意的是,启用输入法后,aterm 终端将无法接收任何输入,无论输入法是什么状态,建议安装其它终端代替,比如 lxterminal:
tce-load -wi lxterminal
6、如果要汉化系统界面,可以安装下面的软件包(系统界面汉化后,Apps 的搜索功能会有影响,搜索结果不是很准确,这是因为 Apps 自身的 Bug 导致的,它使用汉化后的文本来判断搜索模式,也就是搜索框前面的下拉列表,有三个选项,汉化后这三个选项都失效了,导致搜索结果不准确):
tce-load -wi base-locale fltk-full
base-locale 是系统界面的语言包,Tiny Core Linux 的系统软件是使用 fltk 库编写的,而系统中集成的 fltk 库是精简版本,不支持 UTF8 字符,所以需要安装完整版的 fltk 库才能正确显示中文界面。
7、如果要汉化其它软件,可以安装相应软件的汉化包,也就是软件名后面添加了 -locale 后缀的软件包,比如:
tce-load -wi vlc-locale # vlc 播放器汉化
tce-load -wi lxterminal-locale # lxterminal 终端汉化
设置
系统启动时要加载的软件列表在 /mnt/sda1/tc64/tce/onboot.lst 文件中(要先挂载 /dev/sda1 分区),编辑此文件即可决定启动时加载哪些软件。
对于语言包(以 -locale 结尾的包),不需要加入到 onboot.lst 文件中,因为系统在加载软件的时侯,如果发现有同名的语言包,就会自动加载。
如果在 onboot.lst 文件旁边有一个 copy2fs.flg 文件,则系统在加载软件包
时会把软件包中的文件复制到系统中,而不是链接到系统中,这样当系统访问软件相关的文件时,直接就可以访问到,而不需要通过链接定位文件(如果没有 copy2fs.flg 文件,则系统在加载软件包时,会将软件包挂载到 /tmp/tcloop 目录中,然后在系统目录中创建相应的链接到挂载点中的各个文件,所以访问时有一个通过链接定位文件的时间消耗)。
如果嫌 aterm 终端的字体太小,可以修改 /home/tc/.Xdefaults 文件中的 aterm 设置:
Aterm*scrollBar: true
Aterm*transparent: false
Aterm*title: Terminal
Aterm*foreground: white
Aterm*background: black
Aterm*font: -misc-fixed-medium-r-normal-*-20--*-*-c-*-iso8859-1
Aterm*cursorColor: green
Aterm*fading: 70
Aterm*shading: 50
Aterm*color12: DodgerBlue1
Aterm*saveLines: 1000
修改分辨率
可以使用 xrandr 程序来修改分辨率,下面这个脚本可以作为参考:
#!/bin/ash
# 功能:关闭笔记本屏幕,使用外接屏幕,同时设置外接屏幕的分辨率
# 检查显示器的名称(不同的 xrandr 程序输出的名称不一样)
if xrandr|grep ^VGA1\ connected > /dev/null; then
VGA1=VGA1
LVDS1=LVDS1
elif xrandr|grep ^VGA-1\ connected > /dev/null; then
VGA1=VGA-1
LVDS1=LVDS-1
else
exit
fi
# 查询分辨率模式代码,如果需要某个分辨率的模式,请手动执行获取
# cvt 1600 900
# 以下是 1600x900 分辨率的输出结果,可用于之后的命令中
# 1368x768 59.88 Hz (CVT) hsync: 47.79 kHz; pclk: 85.25 MHz
# Modeline "1600x900_60.00" 118.25 1600 1696 1856 2112 900 903 908 934 -hsync +vsync
# 设置外接显示器为主显示器
xrandr --output $VGA1 --primary
# 关闭笔记本自身的显示器
xrandr --output $LVDS1 --off
# 为外接显示器增加分辨率
xrandr --newmode "1920x1080_60.00" 173.00 1920 2048 2248 2576 1080 1083 1088 1120 -hsync +vsync
xrandr --addmode $VGA1 1920x1080_60.00
# 为外接显示器增加分辨率
xrandr --newmode "1600x900_60.00" 118.25 1600 1696 1856 2112 900 903 908 934 -hsync +vsync
xrandr --addmode $VGA1 1600x900_60.00
# 为外接显示器增加分辨率
xrandr --newmode "1368x768_60.00" 85.25 1368 1440 1576 1784 768 771 781 798 -hsync +vsync
xrandr --addmode $VGA1 1368x768_60.00
# 设置外接显示器的分辨率(从下面选择一个合适的分辨率使用)
# xrandr --output $VGA1 --mode 1368x768_60.00
xrandr --output $VGA1 --mode 1600x900_60.00
# xrandr --output $VGA1 --mode 1920x1080_60.00
# 设置外接显示器的亮度,可以根据需要设置(0.0-1.0)
xrandr --output $VGA1 --brightness 1.0
————————————————
版权声明:本文为CSDN博主「stevenldj」的原创文章,遵循CC 4.0 BY-SA版权协议,转载请附上原文出处链接及本声明。
原文链接:https://blog.csdn.net/stevenldj/article/details/112852507
2024-11-26 15:15:51【出处】:https://www.cnblogs.com/liuzhaoyzz/p/15765319.html
=======================================================================================
安装使用TinyCore Linux的一些收获
为了学习Linux Shell编程,决定安装一个纯粹的Linux,由于电脑硬件配置较低,选择了最轻量化Llinux操作系统版本TinyCore Linux。
一、TinyCore Linux有三个版本
打开TinyCore Linux的下载页面 http://www.tinycorelinux.net/downloads.html,上面提供了三个版本:
|
The Core Project, as suggested by our name, is not a turnkey desktop distribution. Instead we deliver just the core Linux from which it is quite easy to add what you want. We offer 3 different x86 "cores" to get you started: Core, TinyCore, and our installation image, CorePlus. |
|
|
(17 MB) |
Core is the base system which provides only a command line interface and is therefore recommended for experienced users only. Command line tools are provided so that extensions can be added to create a system with a graphical desktop environment. Ideal for servers, appliances, and custom desktops. |
|
(23 MB) |
TinyCore is the recommended option for new users who have a wired network connection. It includes the base Core system plus X/GUI extensions for a dynamic FLTK/FLWM graphical desktop environment. |
|
(248 MB) |
CorePlus is an installation image and not the distribution. It is recommended for new users who only have access to a wireless network or who use a non-US keyboard layout. It includes the base Core System and installation tools to provide for the setup with the following options: Choice of 7 Window Managers, Wireless support via many firmware files and ndiswrapper, non-US keyboard support, and a remastering tool. |
分别是:
1.Core (17 MB):仅提供命令行界面的基本系统,因此仅建议有经验的用户使用。提供了命令行工具,以便可以添加扩展以创建具有图形桌面环境的系统。非常适合服务器、设备和自定义桌面。
2.TinyCore(23 MB):是具有有线网络连接的新用户的推荐选项。它包括基本的核心系统以及用于动态FLTK / FLWM图形桌面环境的X / GUI扩展。
3.CorePlus(248 MB):是安装映像,而不是发行版。建议只能访问无线网络或使用非美式键盘布局的新用户使用。它包括基本的核心系统和安装工具,为设置提供以下选项:7个窗口管理器的选择,通过许多固件文件和ndiswrapper的无线支持,非美国键盘支持和重新制作工具。
我先后尝试了第1个和第2个。
二、在U盘上安装启动TinyCore linux——Core (17 MB)
(一)下载 TinyCore linux Core
下载地址:
(二)下载和安装 LinuxLive USB Creator
1.到 https://www.linuxliveusb.com/en/download 下载 LinuxLive USB Creator。

2.运行下载的LinuxLive USB Creator安装程序, 首先选择程序界面语言:

3.然后跟随安装向导进行安装:

4.选择安装位置:

5.点击“安装”按钮进行安装:

6.点击“完成”按钮,完成程序安装并启动LinuxLive USB Creator

(三)使用LinuxLive USB Creator将tinycore linux放进u盘
1.启动LinuxLive USB Creator

2.选择安装盘:U盘

这里我选择的是容量为2GB、盘符为G的U盘
3.选择安装源:

点击ISO/IMG/ZIP,选择刚才下载tinycore linux安装镜像文件Core-14.0.iso。LinuxLive USB Creator会提示“此版本Linux不在兼容列表里”,不用理会。
4.选项:

一般保留默认,也可以钩消“隐藏U盘上创建的文件”。
5.点击闪电图标开始安装
(四)从U盘启动TinyCore Linux
重新启动电脑,从U盘启动


这样就可以学习linux 命令和shell编程了。
但这样学习存在两个问题:
1. 输入的命令无法复制 保存,或者发到博客上
2.无法截取屏幕 发到博客上。手机拍照有反光。
于是尝试在虚拟机上安装Linux。
三、在电脑上安装使用VMware Wokstation+TinyCore (23 MB)
(一)安装VMware Wokstation
这个网上有很多教程,这里不再赘述。
(二)下载 TinyCore linux——TinyCore (23 MB)
下载地址:
http://www.tinycorelinux.net/14.x/x86/release/TinyCore-current.iso
(三)在VMware Wokstation中安装 TinyCore linux——TinyCore (23 MB)
这个网上有很多教程,这里不再赘述。
需要说明的是,Tiny Core Linux系统不识别SCSI类型的磁盘,所以虚拟机中的虚拟磁盘的类型要选择IDE类型的。
(四)从虚拟机中启动TinyCore Linux

1.使用TinyCore桌面
选择第1项:Boot TinyCore。

这个桌面跟Windows有较大的差异。
而且打开的终端字体较小,输入的命令、反馈的命令执行结果 截图看得不太清楚。
2.使用Core(command line only)
于是重启系统,选择第3项:Boot Core(command line only),这样字体较大,截图看得清楚。
四、命令行模式下的关机
在桌面中,可以使用菜单来关机或重启系统。

在命令行模式下,如何关机呢?
如果是DOS操作系统,在命令提示符下,直接关闭电脑电源就可以了。
但是对于Linux,提供有关机命令,比如shutdown、halt等。
user@host : ~ $ shutdowm
-sh: shutdown: not f ound
user@host : ~ $ halt
halt : Operat ion not permitted
user@host : ~ $

尝试命令 sudo halt,提示输入root密码。
输入命令:sudo passwd tc,按照提示符输入帐户tc的密码。
输入命令:sudo passwd root,按照提示符输入帐户root的密码。
再尝试命令 sudo halt,终于正常关机了。
又尝试命令 sudo poweroff,也可以正常关机。

五、从命令行启动桌面
选择第3项:Boot Core(command line only),启动命令行后,如何进入桌面呢?
尝试了命令:startx、init 5

目前只好 sudo reboot 重启系统,再从启动菜单中选择第1项:Boot TinyCore
出处:https://blog.51cto.com/endurer/7934015
=======================================================================================
如果,您希望更容易地发现我的新博客,不妨点击一下绿色通道的【关注我】。(●'◡'●)
因为,我的写作热情也离不开您的肯定与支持,感谢您的阅读,我是【Jack_孟】!
本文来自博客园,作者:jack_Meng,转载请注明原文链接:https://www.cnblogs.com/mq0036/p/13749661.html
【免责声明】本文来自源于网络,如涉及版权或侵权问题,请及时联系我们,我们将第一时间删除或更改!
posted on 2020-09-29 14:57 jack_Meng 阅读(11455) 评论(0) 编辑 收藏 举报
