

SpringBoot入门
SpringBoot是Spring项目中的一个子工程。主要作用就是帮助我能快速构建庞大的spring项目并尽可能的减少一切的xml配置

案例:通过Springboot整合SpringMVC 和mybatis
1.创建工程,添加父工程坐标和启动器和所需的依赖 jdk版本管理等 完整pom.xml
 1 <?xml version="1.0" encoding="UTF-8"?>
 2 <project xmlns="http://maven.apache.org/POM/4.0.0"
 3          xmlns:xsi="http://www.w3.org/2001/XMLSchema-instance"
 4          xsi:schemaLocation="http://maven.apache.org/POM/4.0.0 http://maven.apache.org/xsd/maven-4.0.0.xsd">
 5     <modelVersion>4.0.0</modelVersion>
 6
 7     <groupId>com.leyou.demo</groupId>
 8     <artifactId>springboot-demo</artifactId>
 9     <version>1.0-SNAPSHOT</version>
10
11     <properties>
12         <java.version>1.8</java.version>
13     </properties>
14
15     <parent>
16         <groupId>org.springframework.boot</groupId>
17         <artifactId>spring-boot-starter-parent</artifactId>
18         <version>2.0.4.RELEASE</version>
19     </parent>
20
21     <dependencies>
22         <!--web启动器-->
23         <dependency>
24             <groupId>org.springframework.boot</groupId>
25             <artifactId>spring-boot-starter-web</artifactId>
26         </dependency>
27         <!--druid不需要, 用springboot自带的HiKariCP更优秀-->
28         <!--<dependency>-->
29             <!--<groupId>com.alibaba</groupId>-->
30             <!--<artifactId>druid</artifactId>-->
31             <!--<version>1.1.6</version>-->
32         <!--</dependency>-->
33         <!--mybatis 启动器 是mybatis自己写的 -->
34         <dependency>
35             <groupId>org.mybatis.spring.boot</groupId>
36             <artifactId>mybatis-spring-boot-starter</artifactId>
37             <version>1.3.2</version>
38         </dependency>
39         <!--连接数据库的驱动-->
40         <dependency>
41             <groupId>mysql</groupId>
42             <artifactId>mysql-connector-java</artifactId>
43         </dependency>
44         <!--jdbc事务管理相关-->
45         <dependency>
46             <groupId>org.springframework.boot</groupId>
47             <artifactId>spring-boot-starter-jdbc</artifactId>
48         </dependency>
49     </dependencies>
50 </project>
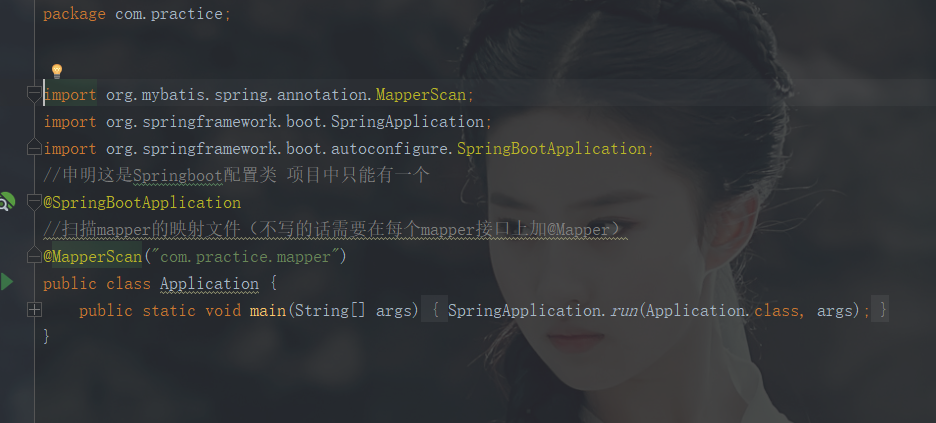
2:编写启动类 类名可以任意(后面的所有java代码都要和启动类在同一个包或这包的子类包中)
3. 编写controller
 1 package com.practice.controller;
 2
 3
 4 import com.practice.pojo.User;
 5 import com.practice.service.UserService;
 6 import org.springframework.beans.factory.annotation.Autowired;
 7 import org.springframework.web.bind.annotation.GetMapping;
 8 import org.springframework.web.bind.annotation.PathVariable;
 9 import org.springframework.web.bind.annotation.RestController;
10
11
12 @RestController //表示该类下的所以方法的返回值全部用json数据类型接收
13 public class HelloController {
14
15     @Autowired
16     private UserService userService;
17
18
19     @GetMapping("hello1/{id}")
20     public User hello(@PathVariable("id") Long id) {
21         User user = userService.queryUserById(id);
22         return user;
23     }
24 }
4. 创建service 和userMapper (user对象要创建)
 1 import com.practice.pojo.User;
 2
 3 public interface UserService {
 4     User queryUserById(Long id);
 5 }
 6
 7 import com.practice.mapper.UserMapper;
 8 import com.practice.pojo.User;
 9 import com.practice.service.UserService;
10 import org.springframework.beans.factory.annotation.Autowired;
11 import org.springframework.stereotype.Service;
12
13 @Service("userService")
14 public class UserServiceImpl implements UserService {
15     @Autowired
16     private UserMapper userMapper;
17     @Override
18     public User queryUserById(Long id) {
19         return userMapper.queryUserById(id);
20     }
21 }
22
23
24 import com.practice.pojo.User;
25 import org.apache.ibatis.annotations.Param;
26
27 public interface UserMapper {
28     /**
29      * 通过id查询用户
30      * @param id
31      * @return
32      */
33     User queryUserById(@Param("id") Long id);
34 }
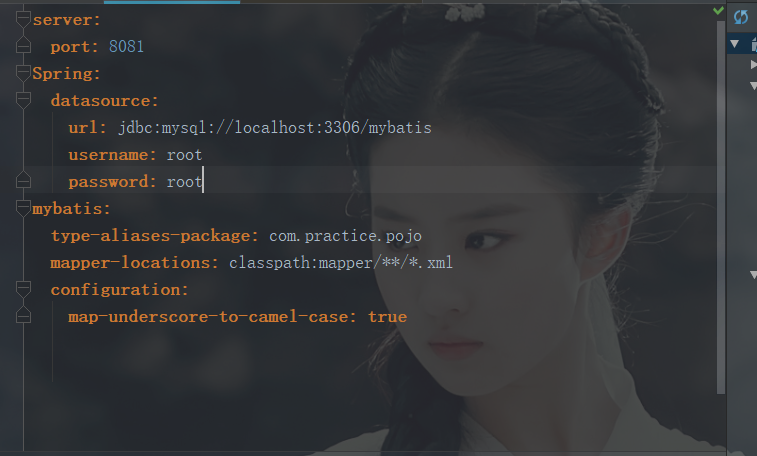
5. 创建application.yml这是SoringBoot的默认读取的属性文件名(也可以是application.properties)
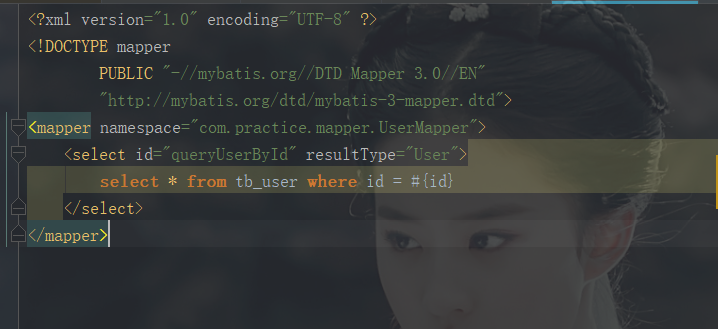
6. 创建UserMapper.xml
然后测试:运行application mian函数
结果

**访问静态资源:
-
classpath:/META-INF/resources/
-
classpath:/resources/
-
classpath:/static/
-
classpath:/public
只要静态资源放在这些目录中任何一个,SpringMVC都会帮我们处理。
例如:
访问结果
还有就是上面的注解作用可以自己再翻源码了解了解!
小白终将成为大白(●—●)

 浙公网安备 33010602011771号