关于高清显示屏下canvas绘制模糊问题探索处理
一般场景
我们看下,我们在高清显示屏下,实现这样一个内容,里面填充颜色及文字。第一种是用普通div元素的方式绘制,第二种就是用canvas的方式来绘制,示例效果如下:
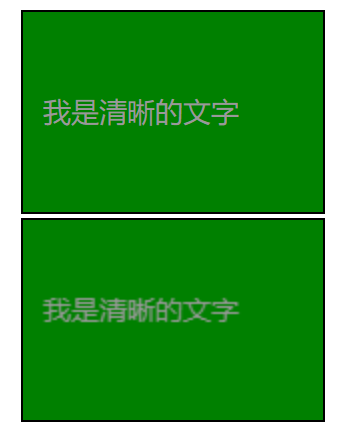
从图上我们可以看出,普通div的绘制方式是清晰的,但是用canvas的绘制方式是模糊的。
参考示例代码如下:
css代码:
html,body {
	padding: 0;
	margin: 0;
}
#normal-parent,#canvas-parent {
	width: 150px;
	height: 100px;
	border: 1px solid #000;
	margin: 0 auto 2px;
}
.normal-word {
	width: 150px;
	height: 100px;
	line-height: 0;
	padding-top: 50px;
	padding-left: 10px;
	background-color: green;
	font-size: 14px;
	color: #999;
	font-family: 'Georgia';
	box-sizing: border-box;
}
HTML及JS代码:
<div id="normal-parent" style="margin-top: 10px;">
	<div class="normal-word">我是清晰的文字</div>
</div>

<div id="canvas-parent">
	<canvas id="canvas-init" width="150" height="100"></canvas>
</div>

<script type="text/javascript">
var canvas = document.getElementById('canvas-init');
var ctx = canvas.getContext('2d');

ctx.fillStyle = 'green';
ctx.fillRect(0,0,150,100);
ctx.font = "14px Georgia";
ctx.fillStyle = "#999";
ctx.fillText("我是清晰的文字", 10, 50);
</script>
为什么canvas画出来的内容会模糊呢?
我们先来看几个常见的概念:
- 设备像素=物理像素(物理分辨率,比如13寸的macbook pro的分辨率为
2560*1600指的是物理分辨率) - 设备独立像素=逻辑像素(逻辑分辨率,实际上13寸的macbook pro的屏幕只能显示
1440*900的大小,所以1440*900就是它的逻辑分辨率) - dpr:设备像素比
devicePixelRatio= 物理像素/设备独立像素 - ppi:即每英寸像素取值,更确切的说法应该是像素密度,也就是衡量单位物理面积内拥有像素值的情况。ppi越高,每英寸像素点越多,图像越清晰。
- 默认情况下 1css像素=1设备独立像素
注:设备像素比(dpr) 是指在移动开发中1个css像素占用多少设备像素,比如dpr=2就代表1个css像素用2x2个设备像素来绘制。
几个常见的概念说明后,我们在接着标题解释下为什么canvas在高清屏下画出来的内容是模糊的呢?
首先,在一台普通屏幕上的像素(设备独立像素,也即是逻辑像素),可以当成正常的像素(css像素),比如画10px的元素,那么它就是10px的元素。但是如果在高清屏下就会发生变化,有一个属性就做设备像素比devicePixelRatio。在高清屏下,比如我们的设备像素比devicePixelRatio为2,那么在css设置100px(逻辑像素),实际渲染的是200px的物理像素。
而不管是否是高清屏,canvas中的单位1(逻辑像素),就是1物理像素。所以在高清屏下,canvas绘制的内容就变得模糊了。
怎样处理变清晰?
canvas标签有一个特性,canvas元素的大小(宽高)会影响canvas的画布的内容。
根据上面的一个特性,我们来举个例子,跟上面的示例类似,我们默认设置一个canvas画布,默认画布大小150*100,然后我们改变canvas元素的宽度变成原来的一半,示例代码如下,为了做对比,我们加上了原来的示例代码:
CSS代码:
html,body {
	padding: 0;
	margin: 0;
}
#normal-parent,#canvas-parent,#canvas-parent2 {
	width: 150px;
	height: 100px;
	border: 1px solid #000;
	margin: 0 auto 2px;
}
.normal-word {
	width: 150px;
	height: 100px;
	line-height: 0;
	padding-top: 50px;
	padding-left: 10px;
	background-color: green;
	font-size: 14px;
	color: #999;
	font-family: 'Georgia';
	box-sizing: border-box;
}
HTML跟JS代码:
<div id="normal-parent" style="margin-top: 10px;">
	<div class="normal-word">我是清晰的文字</div>
</div>

<div id="canvas-parent">
	<canvas id="canvas-init" width="150" height="100"></canvas>
</div>
<div id="canvas-parent2">
	<canvas id="canvas-scale" width="150" height="100"></canvas>
</div>

<script type="text/javascript">
var canvas = document.getElementById('canvas-init');
var ctx = canvas.getContext('2d');

ctx.fillStyle = 'green';
ctx.fillRect(0,0,150,100);
ctx.font = "14px Georgia";
ctx.fillStyle = "#999";
ctx.fillText("我是清晰的文字", 10, 50);

var canvas2 = document.getElementById('canvas-scale');
var ctx2= canvas2.getContext('2d');

canvas2.style.width = canvas2.width / 2 + 'px';

ctx2.fillStyle = 'green';
ctx2.fillRect(0,0,150,100);
ctx2.font = "14px Georgia";
ctx2.fillStyle = "#999";
ctx2.fillText("我是清晰的文字", 10, 50);
</script>
示例效果:
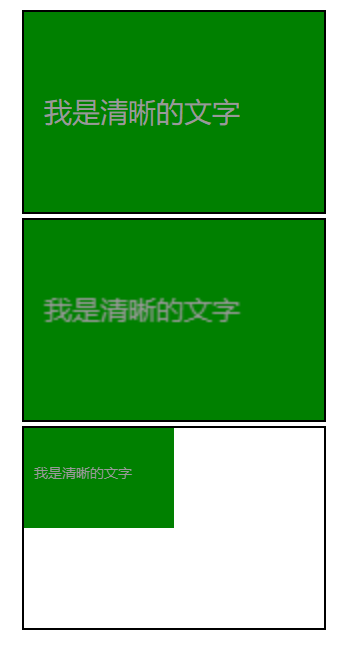
可以看到最后面一个canvas画布的效果,画布x方向和y方向的内容被缩放到原来的1/2。
所以我们利用这个特性,在高清屏下(假设devicePixelRatio的值为2,逻辑像素为100),将canvas画布大小乘以2转换成实际像素(物理像素)大小,然后通过css设置canvas元素大小为逻辑像素100px。缩放后,画布就清晰了。但是这个时候画布内容是缩小的,这个时候可以利用canvas的scale()方法去放大2倍。
注释:canvas 的 scale() 的方法在 放大/缩小 canvas 时,不会改变内容素质,可以理解为清晰度不会变。
那么上例的代码改造下,代码如下:
var canvas = document.getElementById('canvas-init');
var ctx = canvas.getContext('2d');
var ratio = window.devicePixelRatio || 1;
canvas.style.width = canvas.width + 'px';
canvas.style.height = canvas.height + 'px';
canvas.width = canvas.width * ratio;
canvas.height = canvas.height * ratio;
ctx.scale(ratio,ratio);

ctx.fillStyle = 'green';
ctx.fillRect(0,0,150,100);
ctx.font = "14px Georgia";
ctx.fillStyle = "#999";
ctx.fillText("我是清晰的文字", 10, 50);

var canvas2 = document.getElementById('canvas-scale');
var ctx2= canvas2.getContext('2d');

canvas2.style.width = canvas2.width + 'px';
canvas2.style.height = canvas2.height + 'px';
canvas2.width = canvas2.width * ratio;
canvas2.height = canvas2.height * ratio;
ctx2.scale(ratio,ratio);

ctx2.fillStyle = 'green';
ctx2.fillRect(0,0,150,100);
ctx2.font = "14px Georgia";
ctx2.fillStyle = "#999";
ctx2.fillText("我是清晰的文字", 10, 50);
效果图:
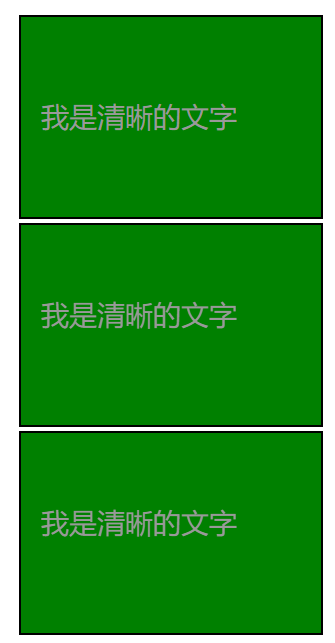
现在看到的清晰度就完全一样了。
参考地址: