首先将对TableLayout类进行简单的介绍,然后通过一个案例来说明表格布局的用法。
1.TableLayout类简介
TableLayout类以行和列的形式管理控件,每行为一个TableRow对象,也可以为一个View对象,当为View对象时,该View对象将跨越该行的所有列。在TableRow中可以添加子控件,每添加一个子控件为一列。
TableLayout布局中并不会为每一行、每一列或每个单元格绘制边框,每一行可以有0或多个单元格,每个单元格为一个View对象。TableLayout中可以有空的单元格,单元格也可以像HTML中那样跨越多个列。
在表格布局中,一个列的宽度由该列中最宽的那个单元格指定,而表格的宽度是由父容器指定的。在TableLayout中,可以为列设置三种属性。
Shrinkable,如果一个列被标识为Shrinkable,则该列的宽度可以进行收缩,以使表格能够适应其父容器的大小。
Stretchable,如果一个列被标识为Stretchable,则该列的宽度可以进行拉伸,以使填满表格中空闲的空间。
Collapsed,如果一个列被标识为Collapsed,则该列将会被隐藏。
注意:一个列可以同时具有Shrinkable和Stretchable属性,在这种情况下,该列的宽度将任意拉伸或收缩以适应父容器。
TableLayout继承自LinearLayout类,除了继承来自父类的属性和方法,TableLayout类中还包含表格布局所特有的属性和方法。这些属性和方法说明如下表所示。
| 属性名称 | 对应方法 | 描述 |
| android:collapseColumns | setColumnCollapsed(int,boolean) | 设置指定列号的列为Collapsed,列号从0开始计算 |
| android:shrinkColumns | setShrinkAllColumns(boolean) | 设置指定列号的列为Shrinkable,列号从0开始计算 |
| android:stretchColumns | setStretchAllColumns(boolean) | 设置指定列号的列为Stretchable,列号从0开始计算 |
说明:setShrinkAllColumns和setStretchAllColumns实现的功能是将表格中的所有列设置为Shrinkable或Stretchable。
2.表格布局案例
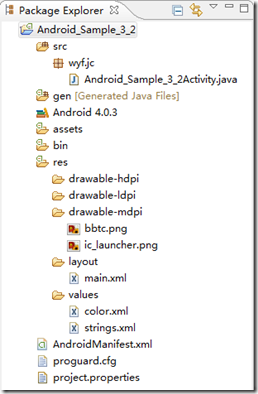
通过一个案例来说明TableLayout布局管理器的用法,该案例的开发步骤如下。
1)创建一个项目Android_Sample_3_2。
2)打开项目res/values目录下的strings.xml,在其中输入如下代码。
1: <?xml version="1.0" encoding="utf-8"?>2: <resources>3:4: <string name="app_name">TableExample</string>5: <!-- 该值用于独占一行的列 -->6: <string name="tv1">我自己是一行........我自己是一行</string>7: <!-- 该值用于内容较少的列 -->8: <string name="tvShort">我的内容少</string>9: <!-- 该值用于被拉伸的列 -->10: <string name="tvStrech">我是被拉伸的一列</string>11: <!-- 该值用于被收缩的列 -->12: <string name="tvShrink">我是被收缩的一列被收缩的一列</string>13: <!-- 该值用于内容比较长的列 -->14: <string name="tvLong">我的内容比较长比较长比较长</string>15:16: </resources>
第6行声明的字符串对象将会作为独占表格中一行的TextView的字符串内容。
第8行声明的字符串对象将会作为表格某行中内容较少的TextView的字符串内容。
第10行声明的字符串对象将会作为表格某行内容较少被拉伸的TextView的字符串内容。
第12行声明的字符串对象将会作为表格某行中内容较多被收缩的TextView的字符串内容。
第14行声明的字符串对象将会作为表格某行中内容较多的TextView的字符串内容。
2)在项目res/values目录下,新建color.xml,其中代码如下。
1: <?xml version="1.0" encoding="UTF-8"?>2: <resources>3: <color name="red">#fd8d8d</color>4: <color name="green">#9cfda3</color>5: <color name="blue">#8d9dfd</color>6: <color name="white">#FFFFFF</color>7: <color name="black">#000000</color>8: </resources>
3)将图片文件bbtc.png放到res/drawable-mdpi/目录下,该图片将作为背景图片。
4)开发程序的布局文件。在本案例中,在布局文件main.xml中定义了三个表格,每个表格中只包含一行。
下面分别介绍每个表格的内部布局方式。首先打开项目res/layout目录下的main.xml文件,将其中已有的代码替换为如下代码。
首先,ID为TableLayout01的表格布局的实现代码,如下所示。
1: <TableLayout2: xmlns:android="http://schemas.android.com/apk/res/android"3: android:id="@+id/TableLayout01"4: android:layout_width="fill_parent"5: android:layout_height="wrap_content"6: android:background="@color/white" >7: <TextView8: android:id="@+id/TextView01"9: android:layout_width="wrap_content"10: android:layout_height="wrap_content"11: android:layout_margin="4dp"12: android:background="@color/red"13: android:text="@string/tv1"14: android:textColor="@color/black" >15: </TextView>16: </TableLayout>
第1~16行声明了一个表格布局,该表格布局的ID为TableLayout01,其背景色为白色。
第13行为TextView空间设置了显示的内容。
第12行设置TextView的背景色为红色。
第14行设置TextView的字体颜色为黑色。
上述表格布局中,表格中只有一行,而在该行声明了一个TextView对象占满所有的列。
下面介绍ID为TableLayout02的表格布局的实现代码,如下所示。
1: <TableLayout2: xmlns:android="http://schemas.android.com/apk/res/android"3: android:id="@+id/TableLayout02"4: android:layout_width="fill_parent"5: android:layout_height="wrap_content"6: android:background="@color/white"7: android:stretchColumns="0" >8: <TableRow9: android:id="@+id/TableRow01"10: android:layout_width="wrap_content"11: android:layout_height="wrap_content"12: android:background="@color/white" >13: <TextView14: android:id="@+id/TextView02"15: android:layout_width="wrap_content"16: android:layout_height="wrap_content"17: android:layout_margin="4dp"18: android:background="@color/green"19: android:text="@string/tvStrech"20: android:textColor="@color/black" >21: </TextView>22: <TextView23: android:id="@+id/TextView03"24: android:layout_width="wrap_content"25: android:layout_height="wrap_content"26: android:layout_margin="4dp"27: android:background="@color/blue"28: android:text="@string/tvShort"29: android:textColor="@color/black" >30: </TextView>31: </TableRow>32: </TableLayout>
第1~31行声明了一个表格布局,该表格布局的ID为TableLayout02,其背景色为白色,并且对编号为0的列设置了Stretchable属性。
第8~12行声明了一个TableRow,并设置其在父容器中的布局方式。
第13~21行声明了TextView,并为其指定了ID和在父容器中的布局方式。该TextView所占的列被设置了Stretchable属性。
第22~30行声明了一个TextView控件,并为其指定了ID。该TextView中所显示的内容较少,所以代码第13~21行声明的TextView控件会填充该TextView剩下的空间。
上述表格布局中总共有一个用TableRow声明的行,在该行中包括两列,其中一列被设置了Stretchable属性。
下面来看ID为TableLayout03的表格布局的实现代码,如下所示。
1: <TableLayout2: xmlns:anroid="http://schemas.android.com/apk/res/android"3: android:id="@+id/TableLayout03"4: android:layout_width="fill_parent"5: android:layout_height="wrap_content"6: android:background="@color/white"7: android:collapseColumns="1"8: android:shrinkColumns="0" >9: <TableRow10: android:id="@+id/TableRow02"11: android:layout_width="wrap_content"12: android:layout_height="wrap_content"13: android:background="@color/white" >14: <TextView15: android:id="@+id/TextView04"16: android:layout_width="wrap_content"17: android:layout_height="wrap_content"18: android:layout_margin="4dp"19: android:background="@color/green"20: android:text="@string/tvShrink"21: android:textColor="@color/black" >22: </TextView>23: <TextView24: android:id="@+id/TextView05"25: android:layout_width="wrap_content"26: android:layout_height="wrap_content"27: android:layout_margin="4dp"28: android:background="@color/blue"29: android:text="@string/tvShort"30: android:textColor="@color/black" >31: </TextView>32: <TextView33: android:id="@+id/TextView06"34: android:layout_width="wrap_content"35: android:layout_height="wrap_content"36: android:layout_margin="4dp"37: android:background="@color/red"38: android:text="@string/tvLong"39: android:textColor="@color/black" >40: </TextView>41: </TableRow>42: </TableLayout>
第1~42行声明了一个表格布局,该表格布局的ID为TableLayout03,其背景色为白色,并且对编号为1的列设置了Collapsed属性,对编号为0的列设置了Shrinkable属性。
第9~13行声明了一个TableRow,并设置了其在父容器中的布局。
第14~22行声明了一个TextView控件,该TextView控件所占的列被设置了Shrinkable属性,可收缩的列将会纵向扩展。
第23~31行声明了一个TextView控件,该TextView控件所占的列被设置了Collapsed属性,所以此View将不会被显示。
第32~40行声明了一个TextView控件,该TextView控件所显示的内容比较长,所以会迫使代码第23~31行声明的TextView控件所占的列进行收缩。
完整代码显示如下
1: <?xml version="1.0" encoding="utf-8"?>2: <LinearLayout xmlns:android="http://schemas.android.com/apk/res/android"3: android:id="@+id/LinearLayout01"4: android:layout_width="fill_parent"5: android:layout_height="fill_parent"6: android:background="@drawable/bbtc"7: android:gravity="bottom"8: android:orientation="vertical" >9: <TableLayout10: xmlns:android="http://schemas.android.com/apk/res/android"11: android:id="@+id/TableLayout01"12: android:layout_width="fill_parent"13: android:layout_height="wrap_content"14: android:background="@color/white" >15: <TextView16: android:id="@+id/TextView01"17: android:layout_width="wrap_content"18: android:layout_height="wrap_content"19: android:layout_margin="4dp"20: android:background="@color/red"21: android:text="@string/tv1"22: android:textColor="@color/black" >23: </TextView>24: </TableLayout>25: <TableLayout26: xmlns:android="http://schemas.android.com/apk/res/android"27: android:id="@+id/TableLayout02"28: android:layout_width="fill_parent"29: android:layout_height="wrap_content"30: android:background="@color/white"31: android:stretchColumns="0" >32: <TableRow33: android:id="@+id/TableRow01"34: android:layout_width="wrap_content"35: android:layout_height="wrap_content"36: android:background="@color/white" >37: <TextView38: android:id="@+id/TextView02"39: android:layout_width="wrap_content"40: android:layout_height="wrap_content"41: android:layout_margin="4dp"42: android:background="@color/green"43: android:text="@string/tvStrech"44: android:textColor="@color/black" >45: </TextView>46: <TextView47: android:id="@+id/TextView03"48: android:layout_width="wrap_content"49: android:layout_height="wrap_content"50: android:layout_margin="4dp"51: android:background="@color/blue"52: android:text="@string/tvShort"53: android:textColor="@color/black" >54: </TextView>55: </TableRow>56: </TableLayout>57: <TableLayout58: xmlns:anroid="http://schemas.android.com/apk/res/android"59: android:id="@+id/TableLayout03"60: android:layout_width="fill_parent"61: android:layout_height="wrap_content"62: android:background="@color/white"63: android:collapseColumns="1"64: android:shrinkColumns="0" >65: <TableRow66: android:id="@+id/TableRow02"67: android:layout_width="wrap_content"68: android:layout_height="wrap_content"69: android:background="@color/white" >70: <TextView71: android:id="@+id/TextView04"72: android:layout_width="wrap_content"73: android:layout_height="wrap_content"74: android:layout_margin="4dp"75: android:background="@color/green"76: android:text="@string/tvShrink"77: android:textColor="@color/black" >78: </TextView>79: <TextView80: android:id="@+id/TextView05"81: android:layout_width="wrap_content"82: android:layout_height="wrap_content"83: android:layout_margin="4dp"84: android:background="@color/blue"85: android:text="@string/tvShort"86: android:textColor="@color/black" >87: </TextView>88: <TextView89: android:id="@+id/TextView06"90: android:layout_width="wrap_content"91: android:layout_height="wrap_content"92: android:layout_margin="4dp"93: android:background="@color/red"94: android:text="@string/tvLong"95: android:textColor="@color/black" >96: </TextView>97: </TableRow>98: </TableLayout>99: </LinearLayout>
5)完成了布局文件main.xml的开发之后,最后开发Activity部分的代码。打开项目的Activity类Android_Sample_3_2Activity.java,默认情况不需要做修改,代码如下。
1: package wyf.jc;2:3: import android.app.Activity;4: import android.os.Bundle;5:6: public class Android_Sample_3_2Activity extends Activity {7: @Override8: public void onCreate(Bundle savedInstanceState) {9: super.onCreate(savedInstanceState);10: setContentView(R.layout.main);11: }12: }
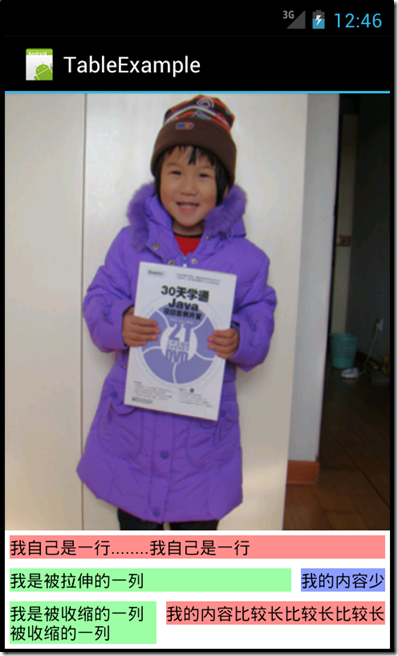
完成上述步骤的开发之后,下面运行本应用程序,结果如下图所示。
第2个表格的第1列和第3个表格的第1列分别设置了拉伸和收缩的属性,因此在该行的其他列所显示的内容比较多或比较少时,这些设置了拉伸和收缩属性的列会自动伸长或缩短,以保证表格的宽度不变。
作者:银月莲
出处:http://www.cnblogs.com/moonsilvering
本文版权归作者和博客园共有,欢迎转载,但未经作者同意必须保留此段声明,且在文章页面明显位置给出原文连接,包括文章,代码,图片等本站内所有资源,否则保留追究法律责任的权利。


