Service是一个具有较长的生命周期但是并没有用户界面的程序。
Service一般由Activity启动但是并不依赖于Activity,即当Activity的生命周期结束时,Service仍然会继续运行,知道自己的生命周期结束为止。Service的启动方式有两种。
1.startService方式启动
当Activity调用startService方法启动Service时,会依次调用onCreate和onStart方法来启动Service,而当调用stopService方法结束Service时,又会调用onDestroy方法结束Service。Service同样可以在自身调用stopSelf或stopService方法来结束Service。
2.bindService方式启动
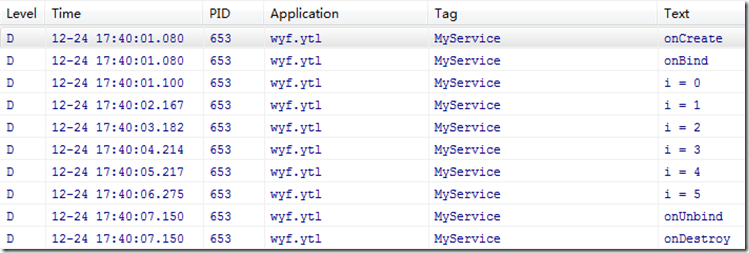
另一种启动方式是通过bindService方法启动Service,此时会依次调用onCreate和onBind方法启动Service。而当通过unbindService方法结束Service时,则会依次调用onUnbind和onDestroy方法。
接下来通过一个较大的案例来介绍Service的使用方法,其开发步骤如下。
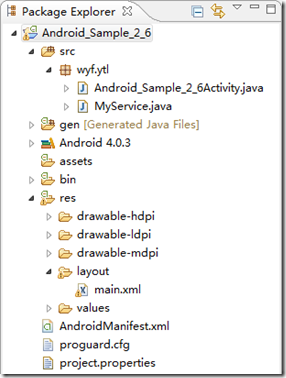
1)创建一个名为Android_Sample_2_6的Android项目。
2)在src/wyf/ytl下创建MyService.java文件,并开发其代码,代码如下所示。
1: package wyf.ytl;2:3: import android.app.Service;4: import android.content.Intent;5: import android.os.IBinder;6: import android.util.Log;7:8: public class MyService extends Service {9:10: MyThread myThread;11:12: public void onCreate() {13: Log.d("MyService", "onCreate");14: super.onCreate();15: }16:17: public void onStart(Intent intent, int startId) {18:19: Log.d("MyService", "onStart");20: if (myThread == null) {21: myThread = new MyThread();22: myThread.start(); // 启动线程23: }24: super.onStart(intent, startId);25: }26:27: public IBinder onBind(Intent arg0) {28:29: Log.d("MyService", "onBind");30: if (myThread == null) {31: myThread = new MyThread();32: myThread.start();// 启动线程33: }34: return null;35: }36:37: public boolean onUnbind(Intent intent) {38: Log.d("MyService", "onUnbind");39: if (myThread != null) {40: myThread.flag = false;41: myThread = null;// 释放线程42: }43: return super.onUnbind(intent);44: }45:46: public void onDestroy() {47: Log.d("MyService", "onDestroy");48: if (myThread != null) {49: myThread.flag = false;50: myThread = null;51: }52: super.onDestroy();53: }54:55: public class MyThread extends Thread {56: boolean flag = true;57: int i = 0;58:59: public void run() {60: while (flag) {61: Log.d("MyService", "i = " + (i++));62: try {63: Thread.sleep(1000);// 睡眠1秒钟64: } catch (Exception e) {65: e.printStackTrace();66: }67: }68: }69: }70: }
第12~15行为重写的onCreate方法,在该方法中使用Log类输出日志。
第17~25行为重写的onStart方法,方法中先输出日志,然后判断myThread是否为空,当为空时初始化并启动线程。
第27~35行为重写的onBind方法,是Service的另一种启动方法。
第37~44行为重写的onUnbind方法,该方法会在使用unbindService方法停止Service时被调用。
第46~53行为onDestroy方法会在该Service被释放时被调用,在该方法中释放线程。
第55~69行为测试的线程,在该线程中会每隔一秒钟输出一次日志,并且每次将i值自加。
3)在AndroidManifest.xml中</activity>后面添加一句“<service android:name=”.MyService”/>”。
1: <?xml version="1.0" encoding="utf-8"?>2: <manifest xmlns:android="http://schemas.android.com/apk/res/android"3: package="wyf.ytl"4: android:versionCode="1"5: android:versionName="1.0" >6:7: <uses-sdk android:minSdkVersion="15" />8:9: <application10: android:icon="@drawable/ic_launcher"11: android:label="@string/app_name" >12: <activity13: android:name=".Android_Sample_2_6Activity"14: android:label="@string/app_name" >15: <intent-filter>16: <action android:name="android.intent.action.MAIN" />17:18: <category android:name="android.intent.category.LAUNCHER" />19: </intent-filter>20: </activity>21: <service android:name=".MyService"></service>22:23: </application>24:25: </manifest>
4)开发res/layout下的main.xml文件,其代码如下所示。主要是向线性布局中添加四个按钮,并分别为其添加ID。
1: <?xml version="1.0" encoding="utf-8"?>2: <LinearLayout xmlns:android="http://schemas.android.com/apk/res/android"3: android:layout_width="fill_parent"4: android:layout_height="fill_parent"5: android:orientation="vertical" >6:7: <Button android:id="@+id/startService"8: android:layout_width="fill_parent" android:layout_height="wrap_content"9: android:text="startService"></Button>10:11: <Button android:id="@+id/stopService"12: android:layout_width="fill_parent" android:layout_height="wrap_content"13: android:text="stopService"></Button>14:15: <Button android:id="@+id/bindService"16: android:layout_width="fill_parent" android:layout_height="wrap_content"17: android:text="bindService"></Button>18:19: <Button android:id="@+id/unbindService"20: android:layout_width="fill_parent" android:layout_height="wrap_content"21: android:text="unbindService"></Button>22:23: </LinearLayout>
5)需要开发Activity,打开Android_Sample_2_6Activity.java,用下列代码替换原有代码。
1: package wyf.ytl;2:3: import android.app.Activity;4: import android.content.ComponentName;5: import android.content.Intent;6: import android.content.ServiceConnection;7: import android.os.Bundle;8: import android.os.IBinder;9: import android.view.View;10: import android.view.View.OnClickListener;11: import android.widget.Button;12:13: public class Android_Sample_2_6Activity extends Activity {14:15: OnClickListener myOnClickListener;// 监听方法16: ServiceConnection connection;// 得到ServiceConnection引用17: Button startService;18: Button stopService;19: Button bindService;20: Button unbindService;21:22: @Override23: public void onCreate(Bundle savedInstanceState) {24: super.onCreate(savedInstanceState);25: setContentView(R.layout.main);26: connection = new ServiceConnection() {27: @Override28: public void onServiceConnected(ComponentName name, IBinder service) {29: }30:31: @Override32: public void onServiceDisconnected(ComponentName name) {33: }34: };35:36: startService = (Button) findViewById(R.id.startService);37: stopService = (Button) findViewById(R.id.stopService);38: bindService = (Button) findViewById(R.id.bindService);39: unbindService = (Button) findViewById(R.id.unbindService);40:41: myOnClickListener = new OnClickListener() {// 创建监听类42: @Override43: public void onClick(View v) {44: Intent intent = new Intent(Android_Sample_2_6Activity.this,45: MyService.class);46: if (v == startService) {47: startService(intent);// 启动Service48: bindService.setEnabled(false);49: unbindService.setEnabled(false);50: } else if (v == stopService) {51: stopService(intent);// 停止Service52: bindService.setEnabled(true);53: unbindService.setEnabled(true);54: } else if (v == bindService) {55: bindService(intent, connection, BIND_AUTO_CREATE);56: startService.setEnabled(false);57: stopService.setEnabled(false);58: } else if (v == unbindService) {59: unbindService(connection);// 停止Service60: startService.setEnabled(true);61: stopService.setEnabled(true);62: }63: }64: };65:66: startService.setOnClickListener(myOnClickListener);67: stopService.setOnClickListener(myOnClickListener);68: bindService.setOnClickListener(myOnClickListener);69: unbindService.setOnClickListener(myOnClickListener);70: }71: }
第17~20行声明四个按钮的应用。
第26~34行创建一个ServiceConnection对象用于绑定Service.
第36~39行得到四个按钮的应用。
第41~64行为按钮的监听方法根据按下按钮的不同执行不同的操作。
第66~69行为各个按钮添加监听。
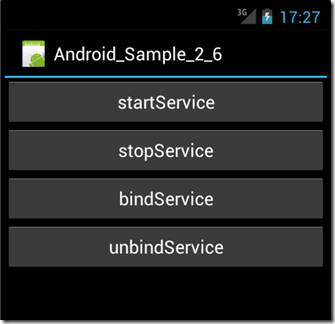
6)运行该项目,在模拟器中可看到如下图所示效果。
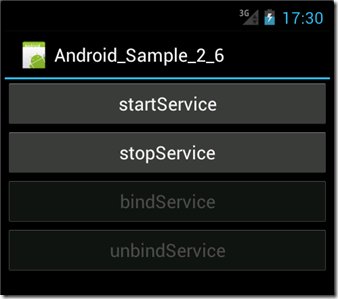
当单击StartService按钮时,会启动Service,在后台打印i的值,如下图所示,单击stopService按钮,则Service停止。
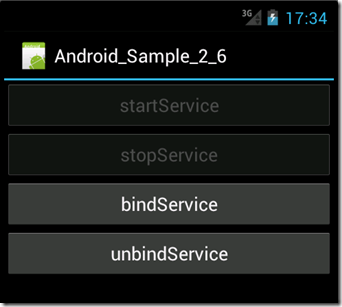
当单击bindService按钮时,也会启动Service,在后台打印i的值,如下图所示,单击unbindService按钮,则Service停止。
作者:银月莲
出处:http://www.cnblogs.com/moonsilvering
本文版权归作者和博客园共有,欢迎转载,但未经作者同意必须保留此段声明,且在文章页面明显位置给出原文连接,包括文章,代码,图片等本站内所有资源,否则保留追究法律责任的权利。


