Spring Cloud (三):配置中心 Spring Cloud Config 和 Consul
Spring Boot 的配置文件一般是放在 application.properties 或 application.yml,修改配置需要重启程序,而且每个程序管理自己的配置文件,实际应用不大方便
配置中心的好处
- 统一管理所有程序的配置
- 多环境,比如开发环境,生产环境,可以为不同环境维护不同的配置
- 权限管理,一个用户只能读写部分配置
- 配置格式校验,防止用户配错
- 配置的版本控制和回滚
- 灰度发布,指定配置只在部分机器起作用(即可以先在部分机器验证,再推广到所有机器)
- 配置的实时推送,即可以不重启程序就让改变的配置起作用
这些功能在不同的配置中心的支持度会不一样
Spring Cloud 最早的配置中心使用 Config,后来又开发了 Consul(即可以做配置中心又可以做服务发现),也有一些公司自己开源的,比如携程的 Apollo,比如阿里的 Nacos
Spring Cloud Config
Config 默认使用 git 来存储配置,除此外也可以用 svn,数据库,本地文件系统
(1) 创建 Config Server
<dependency>
    <groupId>org.springframework.boot</groupId>
    <artifactId>spring-boot-starter-web</artifactId>
</dependency>

<dependency>
    <groupId>org.springframework.cloud</groupId>
    <artifactId>spring-cloud-config-server</artifactId>
</dependency>
## bootstrap.yml
spring:
  application:
    name: config-single-server
  cloud:
     config:
        server:
          git:
            uri: https://github.com/spring-cloud-samples/config-repo
            username: xxxxxx
            password: xxxxxx
            default-label: master       # 分支
            search-paths: config-path   # 配置文件所在的根目录
## application.yml
server:
  port: 3301
@SpringBootApplication
@EnableConfigServer
public class Application {
    public static void main(String[] args) {
        SpringApplication.run(Application.class, args);
    }
}
启动后可以访问的接口格式如下
/{application}/{profile}[/{label}]
/{application}-{profile}.yml
/{label}/{application}-{profile}.yml
/{application}-{profile}.properties
/{label}/{application}-{profile}.properties
application 是 app 的名字,profile 是环境,label 是分支(可选,默认是 master),比如
http://localhost:3301/my-app/dev/master
http://localhost:3301/my-app/prod
http://localhost:3301/my-app-dev.yml
http://localhost:3301/my-app-prod.yml
http://localhost:3301/master/my-app-prod.yml
Config Server 会到 https://github.com/spring-cloud-samples/config-repo 这个 repo 下的 config-path 找到相应的配置文件比如 my-app-prod.yml
(2) 创建应用
<dependency>
    <groupId>org.springframework.boot</groupId>
    <artifactId>spring-boot-starter-web</artifactId>
</dependency>

<dependency>
    <groupId>org.springframework.cloud</groupId>
    <artifactId>spring-cloud-starter-config</artifactId>
</dependency>

<dependency>
    <groupId>org.springframework.boot</groupId>
    <artifactId>spring-boot-starter-actuator</artifactId>
</dependency>
# bootstrap.yml
spring:
  profiles:
    active: dev

---
spring:
  profiles: prod
  application:
    name: my-app
  cloud:
     config:
       uri: http://localhost:3301
       label: master
       profile: prod

---
spring:
  profiles: dev
  application:
    name: my-app
  cloud:
     config:
       uri: http://localhost:3301
       label: master
       profile: dev
# application.yml
server:
  port: 3302
management:
  endpoint:
    shutdown:
      enabled: false
  endpoints:     # 打开 refresh 接口,允许自动刷新配置
    web:
      exposure:
        include: "*"

data:
  env: xxxx
  user:
    username: xxxx
    password: xxxx
@Component
@Data
@ConfigurationProperties(prefix = "data")
public class Data {
    public static class UserInfo {
        private String username;
        private String password;

        public String getUsername() {
            return username;
        }
        public void setUsername(String username) {
            this.username = username;
        }
        public String getPassword() {
            return password;
        }
        public void setPassword(String password) {
            this.password = password;
        }
        @Override
        public String toString() {
            return "UserInfo{" +
                    "username='" + username + '\'' +
                    ", password='" + password + '\'' +
                    '}';
        }
    }

    private String env;
    private UserInfo user;
}
@RestController
@RefreshScope
public class Controller {
    @Autowired
    private Data data;

    @GetMapping(value = "show")
    public Object show(){
        return data;
    }
}
访问 http://localhost:3302/show 可以看到返回的是 git 上存储的配置
(3) 自动刷新
可以看到 @RefreshScope 添加到了 Controller 上,这样 Controller 使用的 Data 配置可以无需重启就更新
在 git 上修改配置后,通过发送 POST 请求到 http://localhost:3302/actuator/refresh 就可以触发自动更新
注意如果是通过 @Value 获取的配置,无法得到自动更新
Config 原生不支持配置的实时推送,如果每次改动都要发 POST 请求给应用就太麻烦了,尤其配置的应用多的话,为此如果是使用 git 做配置存储的话,可以使用 git 的 WebHook 功能,将每个应用的 actuator/refresh 地址添加到 git 的 WebHook,这样当存储在 git 上的配置有改动时,git 就会发送 POST 请求让每个应用刷新配置
需要给每个应用注册 WebHook 还是比较麻烦,可以利用 Spring Cloud Bus 实现订阅通知功能,Spring Cloud Bus 的底层需要一个消息队列,有 RabbitMQ 和 Kafka 可以选择
假设已经有了一个 RabbitMQ 队列,只需要在应用端加入以下配置
<dependency>
    <groupId>org.springframework.cloud</groupId>
    <artifactId>spring-cloud-starter-bus-amqp</artifactId>
</dependency>
spring:
  rabbitmq:
    host: localhost
    port: 5672
    username: guest
    password: guest
假设有多个应用,这时只要将其中一个的 actuator/bus-refresh 接口添加到 git 的 WebHook,这样配置改动会发送 POST 请求到这个应用,这个应用会自动到 Config Server 拉取最新的配置,同时这个应用会通知 Bus,而 Bus 在收到通知后,会发请求给其他所有应用的 actuator/bus-refresh 接口,其他应用又会自动到 Config Server 拉取数据
但这样会有一个应用承担着通知 Bus 的责任,这样不是很合适,可以将 Config Server 也添加 Bus,只将 Config Server 添加 WebHook,这样变成由 Config Server 收到 WebHook 的请求,并通知 Bus
(4) 结合 Eureka
假设 Eureka 已经启动,并且 Config 已经注册到 Eureka 名字为 config-server
这样应用需要引入 Eureka Client,配置 Eureka 信息,同时不再配置 Config 的 URI,而是配置 Config 的 Discovery 信息
<dependency>
    <groupId>org.springframework.cloud</groupId>
    <artifactId>spring-cloud-starter-netflix-eureka-client</artifactId>
</dependency>
eureka:
  client:
    serviceUrl:
      register-with-eureka: true
      fetch-registry: true
      defaultZone: http://localhost:8761/eureka/

spring:
  profiles:
    active: dev
---
spring:
  profiles: prod
  application:
    name: config-client
  cloud:
    config:
      label: master
      profile: prod
      discovery:
        enabled: true
        service-id: config-server
---
spring:
  profiles: dev
  application:
    name: config-client
  cloud:
    config:
      label: master
      profile: dev
      discovery:
        enabled: true
        service-id: config-server
@SpringBootApplication
@EnableEurekaClient
public class Application {
    public static void main(String[] args) {
        SpringApplication.run(Application.class, args);
    }
}
访问启动的 show 接口,同样可以得到 git 的配置
Consul
Consul 是一个一站式的组件,集成了不少功能,包括服务发现和配置中心
consul 的安装参考 Spring Cloud (二):服务发现 Eureka 和 Consul
现在实现一个可以自动获取配置的应用
<dependency>
    <groupId>org.springframework.cloud</groupId>
    <artifactId>spring-cloud-starter-consul-config</artifactId>
</dependency>
# bootstrap.yml
spring:
  application:
    name: consul-client-service-1
  cloud:
    consul:
      host: localhost    # consul 的 ip 和端口
      port: 8500
      config:
        enabled: true
        format: yaml     # 有四种格式:yaml/files/properties/key-value, 默认 key-value
        prefix: config   # 存在 consul 上的目录,默认就是 config
        default-context: consul-client-service-1    # 存在 consul 上的应用名字,默认是 spring.application.name
        data-key: data   # 存在 consul 上的配置的 key,对应的 value 就相等于 application.yaml 的所有内容
        watch:
          enabled: true  # 启用配置自动刷新,默认 true
          delay: 10000   # 刷新频率,单位毫秒,默认 1000
          wait-time: 30  # 查询等待的时间,单位秒,默认 55
# application.yml
spring:
profiles:
active: dev # 这个值同样会在 consul 上用到
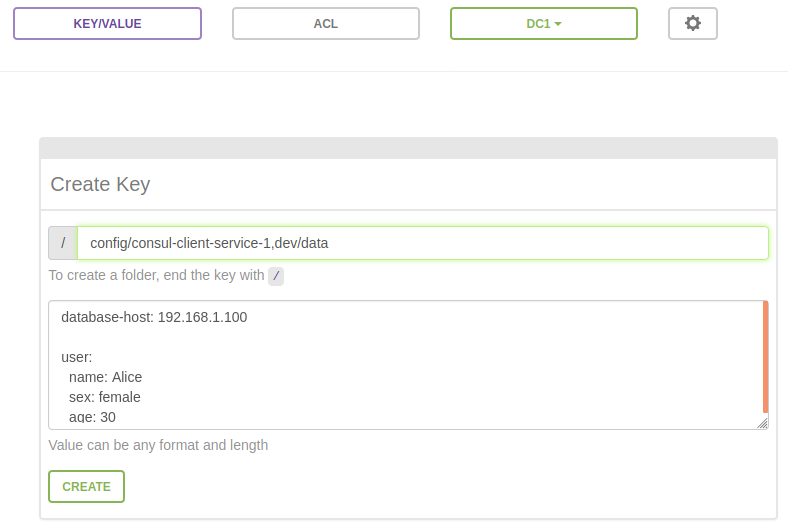
# consul 的路径应该是 /config/consul-client-service-1,dev/data
server:
port: 9000
在 Consul 上选择 KEY/VALUE 然后创建 key,名字为 /config/consul-client-service-1,dev/data,注意最后的 data 后面没有符号 / 不然会被当成目录,并且写上对应的配置内容
database-host: 192.168.1.100

user:
  name: Alice
  sex: female
  age: 30
如下图
然后在程序中使用配置
@EnableScheduling    // 用于定时拉取配置
@SpringBootApplication
public class DemoApplication {
    public static void main(String[] args) {
        SpringApplication.run(DemoApplication.class, args);
    }
}
@RefreshScope     // 用于自动刷新
@RestController
@RequestMapping("/api/v1")
public class DemoController {
    @Value("${database-host}")
    private String dbHost;

    @Autowired
    private User user;

    @GetMapping(value = "db")
    public String getDB(){
        return dbHost;
    }

    @GetMapping(value = "user")
    public Object getUser(){
        return user;
    }
}
@Component
@EnableConfigurationProperties
@ConfigurationProperties(prefix = "user")
public class User {
    private String name;
    private String sex;
    private int age

    public String getName() {
        return name;
    }
    public void setName(String name) {
        this.name= name;
    }

    public String getSex() {
        return sex;
    }
    public void setSex(String sex) {
        this.sex= sex;
    }

    public int getAge() {
        return age;
    }
    public void setAge(int age) {
        this.age= age;
    }
}
启动程序,访问程序,可以看到返回的是 Consul 上的配置信息
修改 Consul 的配置再访问程序,可以看到配置会自动更新

 浙公网安备 33010602011771号