【2022.05.08】使用docker安装jupyter notebook
因为需要在单位用pycharm实在是太卡了,所以换成网页的编辑器
安装操作系统
本文使用的镜像:Ubuntu - Official Image | Docker Hub
docker pull ubuntu:20.04
很小,下载一小会就结束了然后运行这个docker
这里开放的8888端口指的是一会网页的端口
docker run -itd -p 8888:8888 --name jupyterhub --restart always ubuntu:20.04 bash
安装jupyter
进入容器,用可视化网页进入也可以
docker exec -it jupyterhub bash
先升级一下,如果太慢的话,可以换源后升级,会快一点
apt update
apt upgrade
安装一些基本依赖,等待一段时间
apt install python3 python3-pip wget
进入nodejs的官网,copy一下Linux Binaries (x64)的下载地址(视操作系统而定
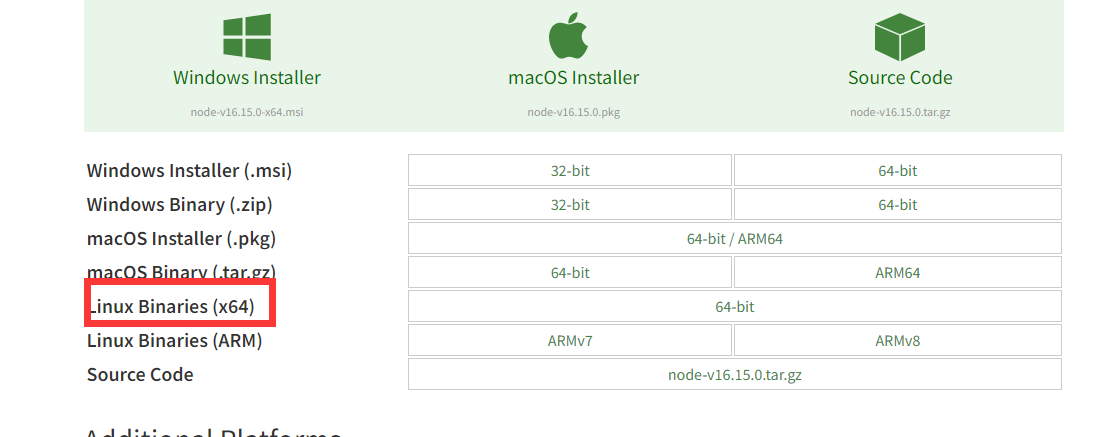
输入wget 刚才的链接
wget https://nodejs.org/dist/v16.15.0/node-v16.15.0-linux-x64.tar.xz
可以ls一下,看看下载的文件名
然后解压
tar -xvf node-v16.15.0-linux-x64.tar.xz
使用ln命令建立软链接同步
ln -s /node-v16.15.0-linux-x64/bin/node /usr/local/bin/
ln -s /node-v16.15.0-linux-x64/bin/npm /usr/local/bin/
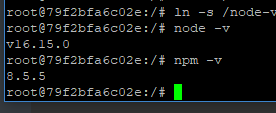
使用node和npm命令确认是否安装成功
node -v
npm -v
有版本号说明安装成功了
改一下pip3的源,这个不改会真的卡
pip3 config set global.index-url https://pypi.tuna.tsinghua.edu.cn/simple
安装一些依赖
apt install libffi-dev
npm install -g configurable-http-proxy
pip3 install notebook
pip3 install jupyterhub
pip3 install --upgrade cython
配置
cd /etc/
mkdir jupyterhub
cd jupyterhub
jupyterhub --generate-config
增加用户,和输入密码,后面回车就行
adduser 用户名
增加授权
chmod -R 700 /home/用户名/
安装文本编辑器nano或者vim,我习惯nano
apt install nano
nano /etc/jupyterhub/jupyterhub_config.py
使用Ctrl+w进行查找,找到proxy_cmd
取消注释,在其中加入单引号,然后加入路径
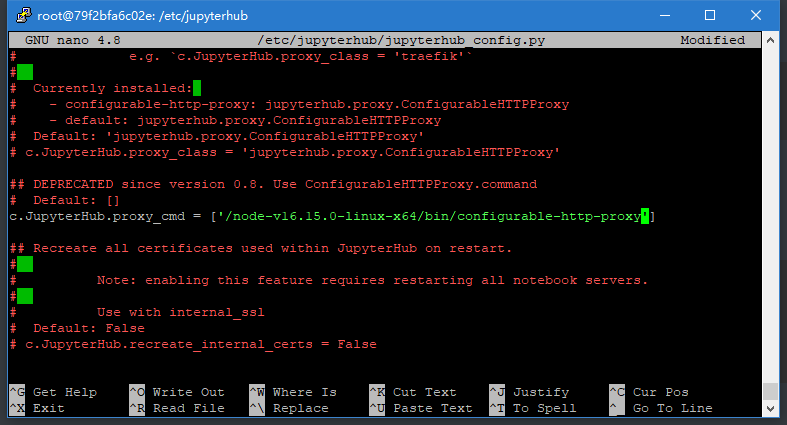
/node-v16.15.0-linux-x64/bin/configurable-http-proxy
根据你实际情况来
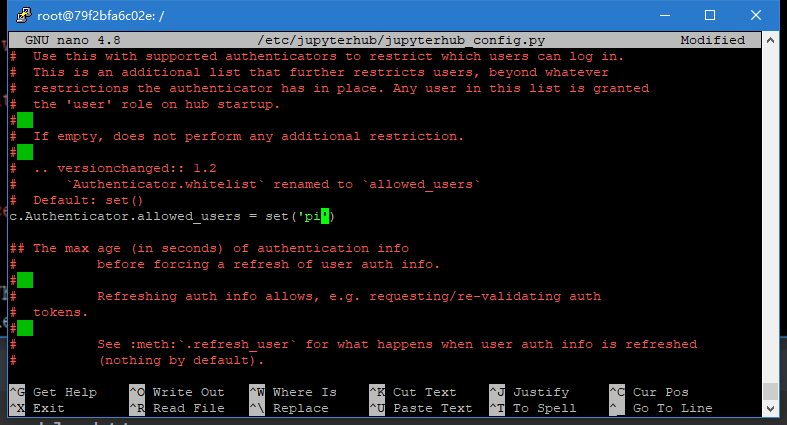
找到c.Authenticator.allowed,和上面操作相似,在单引号内加入自己用户名,如果之后登陆失败可以按照后一种图片来修改
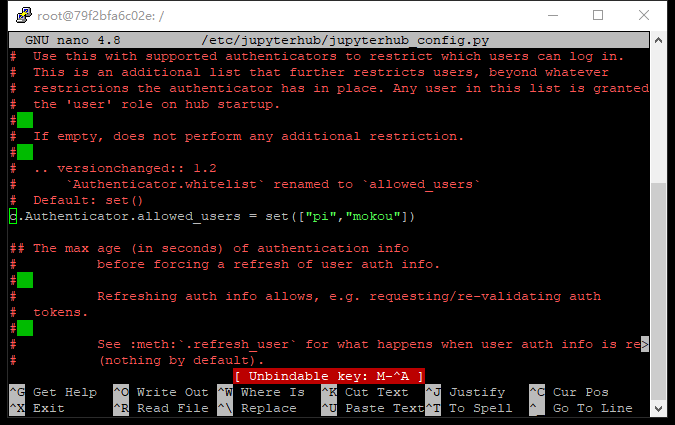
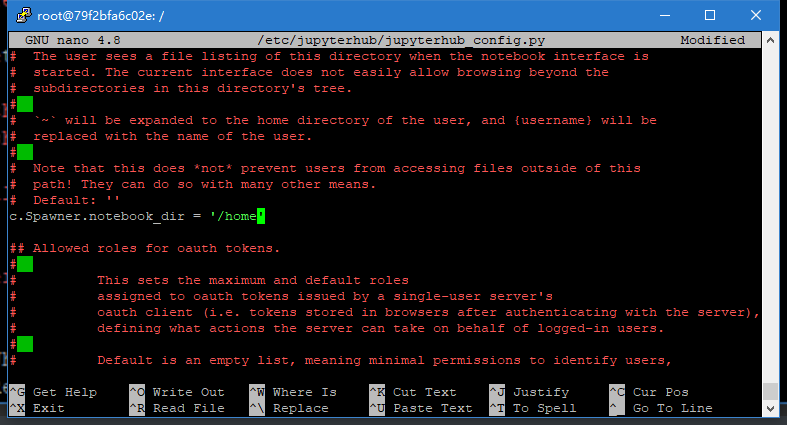
找到c.Spawner.notebook
在这其中加入'/home'
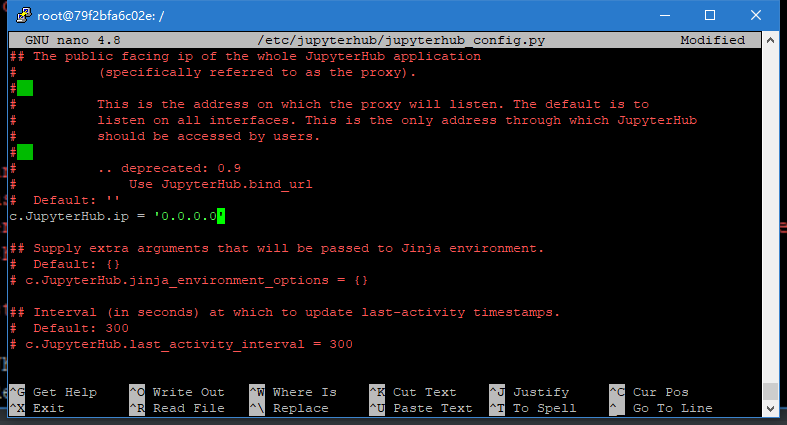
找到c.JupyterHub.ip
改为0.0.0.0
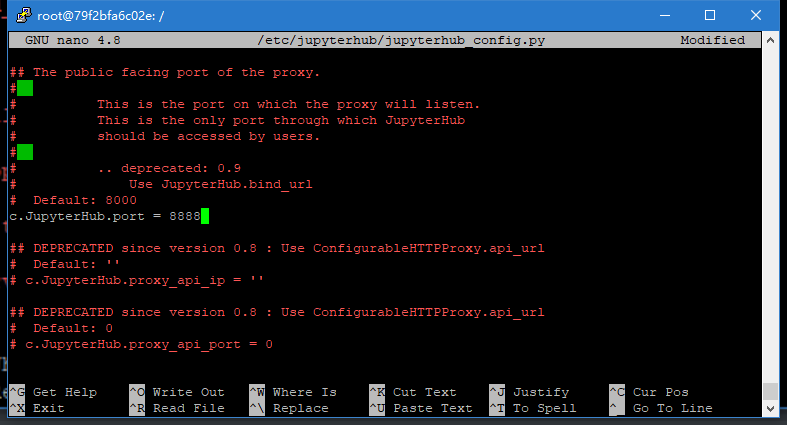
找到c.JupyterHub.port
改为8888
Ctrl+x 回车退出
然后在文件中加入
nano /etc/init.d/jupyterhub
输入
#! /bin/sh
### BEGIN INIT INFO
# Provides:          jupyterhub
# Required-Start:    $remote_fs $syslog
# Required-Stop:     $remote_fs $syslog
# Default-Start:     2 3 4 5
# Default-Stop:      0 1 6
# Short-Description: Start jupyterhub
# Description:       This file should be used to construct scripts to be
#                    placed in /etc/init.d.
### END INIT INFO

# Author: Alisue <lambdalisue@hashnote.net>
#
# Please remove the "Author" lines above and replace them
# with your own name if you copy and modify this script.

# Do NOT "set -e"

# PATH should only include /usr/* if it runs after the mountnfs.sh script
PATH=/sbin:/usr/sbin:/bin:/usr/bin:/usr/local/bin
DESC="Multi-user server for Jupyter notebooks"
NAME=jupyterhub
DAEMON=/usr/local/bin/jupyterhub
DAEMON_ARGS="--config=/etc/jupyterhub/jupyterhub_config.py"
PIDFILE=/var/run/$NAME.pid
SCRIPTNAME=/etc/init.d/$NAME

# Exit if the package is not installed
[ -x "$DAEMON" ] || exit 0

# Read configuration variable file if it is present
[ -r /etc/default/$NAME ] && . /etc/default/$NAME

# Load the VERBOSE setting and other rcS variables
. /lib/init/vars.sh

# Define LSB log_* functions.
# Depend on lsb-base (>= 3.2-14) to ensure that this file is present
# and status_of_proc is working.
. /lib/lsb/init-functions

#
# Function that starts the daemon/service
#
do_start()
{
	# Return
	#   0 if daemon has been started
	#   1 if daemon was already running
	#   2 if daemon could not be started
	start-stop-daemon --start --quiet --pidfile $PIDFILE --exec $DAEMON --test > /dev/null \
		|| return 1
	start-stop-daemon --start --background --make-pidfile --quiet --pidfile $PIDFILE --exec $DAEMON -- \
		$DAEMON_ARGS \
		|| return 2
	# Add code here, if necessary, that waits for the process to be ready
	# to handle requests from services started subsequently which depend
	# on this one.  As a last resort, sleep for some time.
}

#
# Function that stops the daemon/service
#
do_stop()
{
	# Return
	#   0 if daemon has been stopped
	#   1 if daemon was already stopped
	#   2 if daemon could not be stopped
	#   other if a failure occurred
	start-stop-daemon --stop --quiet --retry=TERM/30/KILL/5 --pidfile $PIDFILE --name $NAME
	RETVAL="$?"
	[ "$RETVAL" = 2 ] && return 2
	# Wait for children to finish too if this is a daemon that forks
	# and if the daemon is only ever run from this initscript.
	# If the above conditions are not satisfied then add some other code
	# that waits for the process to drop all resources that could be
	# needed by services started subsequently.  A last resort is to
	# sleep for some time.
	start-stop-daemon --stop --quiet --oknodo --retry=0/30/KILL/5 --exec $DAEMON
	[ "$?" = 2 ] && return 2
	# Many daemons don't delete their pidfiles when they exit.
	rm -f $PIDFILE
	return "$RETVAL"
}

#
# Function that sends a SIGHUP to the daemon/service
#
do_reload() {
	#
	# If the daemon can reload its configuration without
	# restarting (for example, when it is sent a SIGHUP),
	# then implement that here.
	#
	start-stop-daemon --stop --signal 1 --quiet --pidfile $PIDFILE --name $NAME
	return 0
}

case "$1" in
  start)
	[ "$VERBOSE" != no ] && log_daemon_msg "Starting $DESC" "$NAME"
	do_start
	case "$?" in
		0|1) [ "$VERBOSE" != no ] && log_end_msg 0 ;;
		2) [ "$VERBOSE" != no ] && log_end_msg 1 ;;
	esac
	;;
  stop)
	[ "$VERBOSE" != no ] && log_daemon_msg "Stopping $DESC" "$NAME"
	do_stop
	case "$?" in
		0|1) [ "$VERBOSE" != no ] && log_end_msg 0 ;;
		2) [ "$VERBOSE" != no ] && log_end_msg 1 ;;
	esac
	;;
  status)
	status_of_proc "$DAEMON" "$NAME" && exit 0 || exit $?
	;;
  #reload|force-reload)
	#
	# If do_reload() is not implemented then leave this commented out
	# and leave 'force-reload' as an alias for 'restart'.
	#
	#log_daemon_msg "Reloading $DESC" "$NAME"
	#do_reload
	#log_end_msg $?
	#;;
  restart|force-reload)
	#
	# If the "reload" option is implemented then remove the
	# 'force-reload' alias
	#
	log_daemon_msg "Restarting $DESC" "$NAME"
	do_stop
	case "$?" in
	  0|1)
		do_start
		case "$?" in
			0) log_end_msg 0 ;;
			1) log_end_msg 1 ;; # Old process is still running
			*) log_end_msg 1 ;; # Failed to start
		esac
		;;
	  *)
		# Failed to stop
		log_end_msg 1
		;;
	esac
	;;
  *)
	#echo "Usage: $SCRIPTNAME {start|stop|restart|reload|force-reload}" >&2
	echo "Usage: $SCRIPTNAME {start|stop|status|restart|force-reload}" >&2
	exit 3
	;;
esac

:
为其增加权限
chmod +x /etc/init.d/jupyterhub
开启服务
service jupyterhub start
进入网页
开启网页,这里的port是第一步开放的接口
jupyterhub --ip 0.0.0.0 --port 8888 -f /etc/jupyterhub/jupyterhub_config.py
可以看到已经运行了
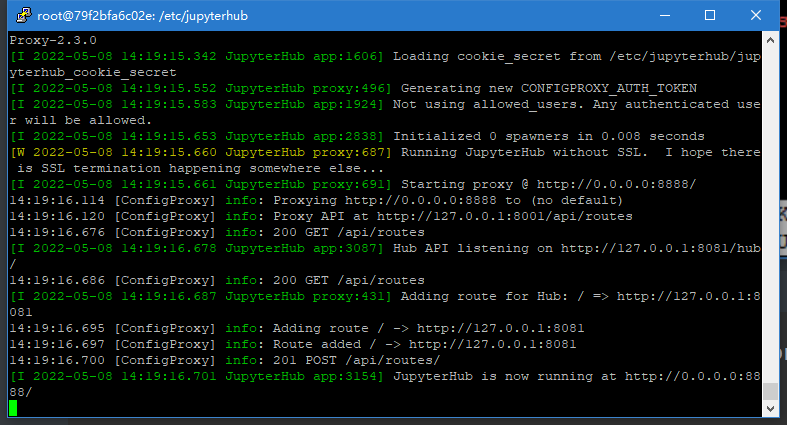
可以进入网页了,输入刚才的账号密码
jupyterlab
因为hub的ui不是很喜欢,对多文件不是很友好,所以改成lab
pip3 install jupyterlab
jupyter labextension install @jupyterlab/hub-extension
jupyter serverextension enable --py jupyterlab --sys-prefix
继续编辑配置文档
nano /etc/jupyterhub/jupyterhub_config.py
找到c.Spawner.default,改为/lab
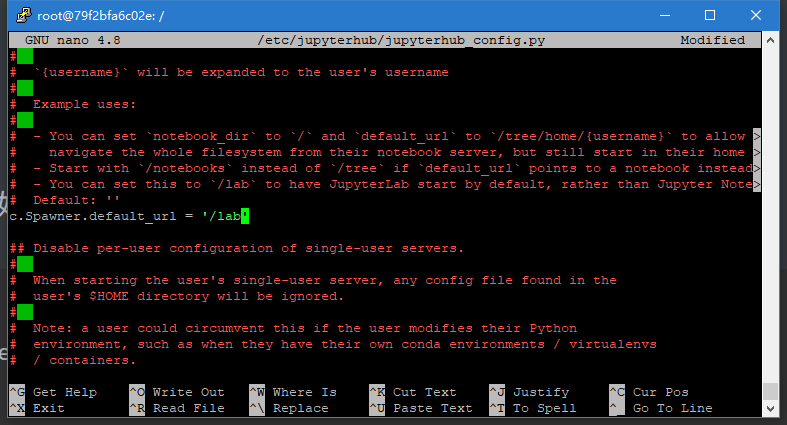
找到c.Spawner.cmd,改为jupyter-labhub
重启网络
service jupyterhub restart
再次进入就是jupyterlab了

修改密码
进入交互式python
ipython
输入以下命令,一行一行输
from notebook.auth import passwd
p =passwd()
print(p)
将得到的密码复制,exit退出
cd ~/.jupyter
ls,顺便将那份文件备份下

nano这个文件,替换那个字符串


【推荐】国内首个AI IDE,深度理解中文开发场景,立即下载体验Trae
【推荐】编程新体验,更懂你的AI,立即体验豆包MarsCode编程助手
【推荐】抖音旗下AI助手豆包,你的智能百科全书,全免费不限次数
【推荐】轻量又高性能的 SSH 工具 IShell:AI 加持,快人一步
· 无需6万激活码!GitHub神秘组织3小时极速复刻Manus,手把手教你使用OpenManus搭建本
· Manus爆火,是硬核还是营销?
· 终于写完轮子一部分:tcp代理 了,记录一下
· 别再用vector<bool>了!Google高级工程师:这可能是STL最大的设计失误
· 单元测试从入门到精通