面向对象进阶2
__setitem__,__getitem,__delitem__
把对象属性的操作模拟成字典的操作方式,不多说,老规矩,上代码来举例说明其中的奥妙之处:
class Foo:
    def __init__(self,name):
        self.name = name
    def __setitem__(self, key, value):     #当对象用字典的形式设置值时触发执行
        self.__dict__[key] = value         #以字典的形式设置对象的值
    def __getitem__(self, item):           #当对象用字典的形式获取值时触发执行
        return self.__dict__[item]         #返回想要获取的对应的值
    def __delitem__(self, key):            #当对象用字典的形式删除某个值时触发执行
        self.__dict__.pop(key)             #删除对应的键和值
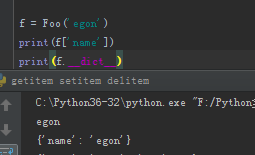
下面我们用不同的操作来验证我们的结果:
f = Foo('egon')
print(f['name'])
print(f.__dict__)
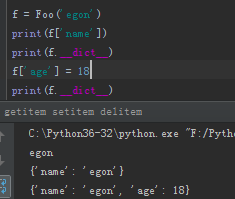
我们再添加一个数据属性age
f = Foo('egon')
print(f['name'])
print(f.__dict__)
f['age'] = 18
print(f.__dict__)
我们最后实验一下删除操作:
del f['age']
print(f.__dict__)

-----------------------------------------------------------------------------------------------------------------------
__slots__方法
 1 #未使用__slots__的类
 2 class People:
 3     x = 1
 4     def __init__(self,name):
 5         self.name = name
 6 #使用__slots__的类
 7 class Foo:
 8     __slots__=['x','y','z']
 9     def __init__(self,name):
10         self.name = name
11
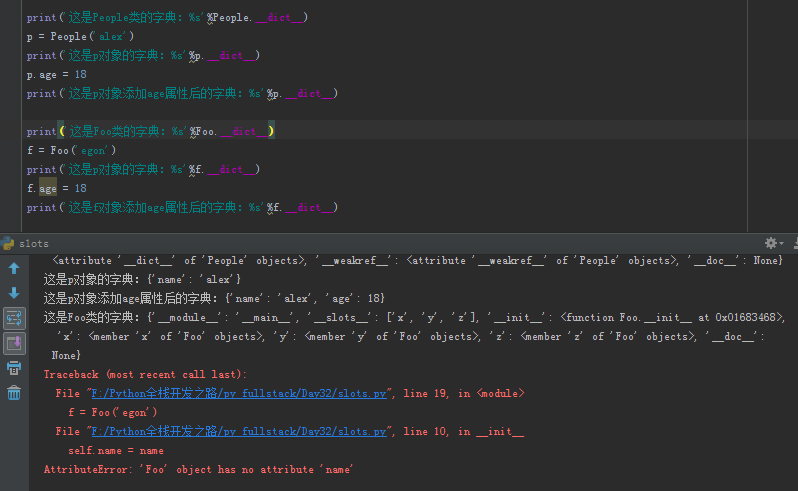
12 print('这是People类的字典:%s'%People.__dict__)
13 p = People('alex')
14 print('这是p对象的字典:%s'%p.__dict__)
15 p.age = 18
16 print('这是p对象添加age属性后的字典:%s'%p.__dict__)
17
18 print('这是Foo类的字典:%s'%Foo.__dict__)
19 f = Foo('egon')
20 print('这是p对象的字典:%s'%f.__dict__)
21 f.age = 18
22 print('这是f对象添加age属性后的字典:%s'%f.__dict__)
下面是结果截图,我们可以看到,我们可以看出对比,有__slots__定义属性的类实例化的时候报错了:
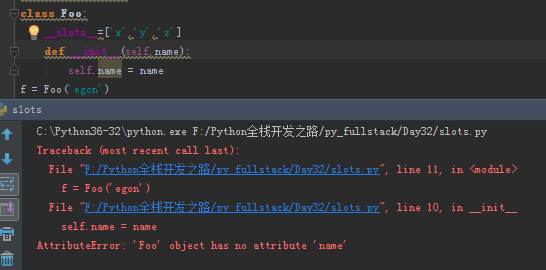
下面我们做下更改看看到底是怎么个用法:
class Foo:
    __slots__=['x','y','z']
    def __init__(self,name):
        self.name = name
f = Foo('egon')
这种初始化方式也会报错:
我再次更改:
class Foo:
    __slots__=['x','y','z']

print(Foo.__dict__)
f = Foo()
print(f.__dict__)

从上面的结果我们可以看出,类实例化之前是有__dict__方法来查看它字典里面的内容的,然而,在实例化之后,f中并没有了__dict__这个方法。
下面我们继续验证:
print(Foo.__dict__)
f = Foo()
f.x = 1
f.y = 2
f.z = 3
print(f.x,f.y,f.z)
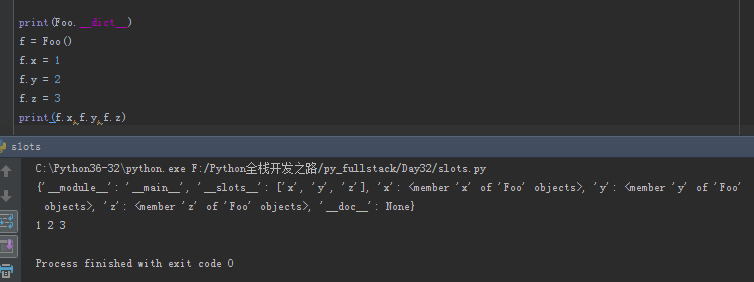
从上面结果我们可以看出实例化之后,我们可以正常使用x,y,z变量,下面我们增加属性可不可以呢?
f.u = 4

我们增加新的属性是不可行的,但这时候我们是能够通过类来直接添加属性的:
Foo.u = 4
print(f.u)
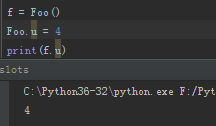
但是这种方式不建议使用,这样会打破对实例化出来的对象的限制和一致性。
----------------------------------------------------------------------------------------------------------------------
__next__和__iter__实现迭代器协议
我们之前说过含有__iter__和__next__方法的对象就是一个迭代器,所以我们举例自己来定制一个迭代器:
 1 from collections import Iterable,Iterator
 2 class Foo:
 3     def __init__(self,start):
 4         self.start = start
 5     def __iter__(self):
 6         return self
 7     def __next__(self):
 8         if self.start>10:
 9             raise StopIteration
10         n = self.start
11         self.start+=1
12         return n
13
14 f = Foo(0)
15 print(isinstance(f,Iterator)) #判断是不是一个生成器
16 print(isinstance(f,Iterable)) #判断是不是一个可迭代对象
17 for i in f:
18     print('------->',i)
结果截图:
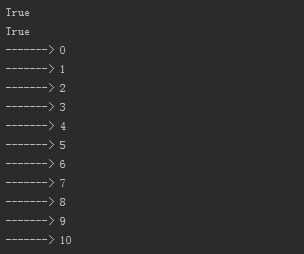
以上结果可以判断用__iter__和__next__方法就可以生成一个迭代器
下面我们自己来模拟一个简单功能的range函数:
 1 from collections import Iterator,Iterable
 2 class Range:
 3     def __init__(self,start,*args):
 4         self.start = start
 5         self.stop = args
 6     def __iter__(self):
 7         return self
 8     def __next__(self):
 9         if self.start>=self.stop:
10             raise StopIteration
11         n = self.start
12         self.start+=1
13         return n
-------------------------------------------------------------------------------------------------------------------------
__doc__
这个方法就是查看给类或函数增加的描述信息
class Foo:
    '我是描述信息'
    pass

print(Foo.__doc__)

class Foo:
    '我是描述信息'
    pass

class Bar(Foo):
    pass
print(Bar.__doc__) #该属性无法继承给子类
------------------------------------------------------------------------------------------------------------------------
__module__和__class__
__module__ 表示当前操作的对象在那个模块
__class__ 表示当前操作的对象的类是什么
class Foo:
    def __init__(self,name):
        self.name = name

f = Foo('egon')
print(f.__module__)
print(f.__class__)
输出结果如下:
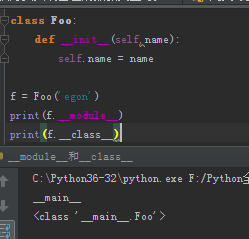
-----------------------------------------------------------------------------------------------------------------
__del__
析构函数:
析构方法,当对象在内存中被释放时,自动触发执行。
注:此方法一般无须定义,因为Python是一门高级语言,程序员在使用时无需关心内存的分配和释放,因为此工作都是交给Python解释器来执行,所以,析构函数的调用是由解释器在进行垃圾回收时自动触发执行的。
 1 import time
 2 class Open:
 3     def __init__(self,filepath,mode = 'r',encoding = 'utf-8'):
 4         self.f = open(filepath,mode=mode,encoding=encoding)
 5         self.filepath = filepath
 6         self.mode = mode
 7         self.encoding = encoding
 8     def write(self,value):
 9         t = time.strftime('%Y-%m-%d %X')
10         self.f.write('%s  %s'%(t,value))
11     def __getattr__(self, item):
12         return getattr(self.f,item)
13     def __del__(self):
14         print('__del__执行了!!')
15         self.f.close()
下面我们用各种方法来实验到底什么时候执行__del__方法:
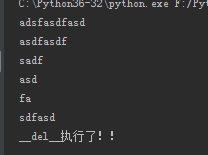
正常情况下程序都执行完成后,执行了__del__方法。
f = Open('1.txt',mode='r',encoding='utf-8')
print(f.read())
输出结果:
再看一种在程序为执行完的情况下:
f = Open('1.txt',mode='r',encoding='utf-8')
print(f.read())
f.seek(0)
print(f.readline())
del f
print('------------>')
输出结果:
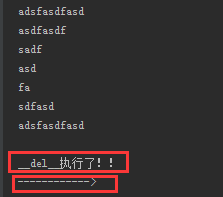
从这里我们可以看出,在程序未完全执行完成就执行了__del__方法,原因是我们将文件句柄f在内存中清除掉了,所以这个名字f对文件的句柄开辟的那一块内存空间没有了引用所以__del__会被触发执行,我们来进一步实验看看是不是这个原理。
f = Open('1.txt',mode='r',encoding='utf-8')
print(f.read())
f.seek(0)
print(f.readline())
f_bak = f
del f
print('------------>')
输出结果为:

由于我们在删除f之前把它的指向复制给了另一个变量f_bak,所以这时候指向文件句柄开辟的内存空间变量是两个,这时候我们删掉f,还有另一个f_bak指向那块内存空间,所以,在程序执行完成之前并没有释放掉f_bak对那块内存空间的索引,所以__del__在程序的最后才执行。
---------------------------------------------------------------------------------------------------------------------
__enter__和__exit__
我们知道在操作文件对象的时候可以这样写:
with open(文件名) as f:
  '代码块'
上述叫做上下文管理协议,即with语句,为了让一个对象兼容with语句,必须在这个对象的类中声明__enter__和__exit__方法
 1 import time
 2 class Open:
 3     def __init__(self,filepath,mode = 'r',encoding = 'utf-8'):
 4         self.f = open(filepath,mode=mode,encoding=encoding)
 5         self.filepath = filepath
 6         self.mode = mode
 7         self.encoding = encoding
 8     def write(self,value):
 9         t = time.strftime('%Y-%m-%d %X')
10         self.f.write('%s  %s'%(t,value))
11     def __getattr__(self, item):
12         return getattr(self.f,item)
13     def __enter__(self):
14         return self
15     def __exit__(self, exc_type, exc_val, exc_tb):
16         self.f.close()
17         return True
18 with Open('1.txt',mode='r',encoding='utf-8') as f:
19     print(f.read())
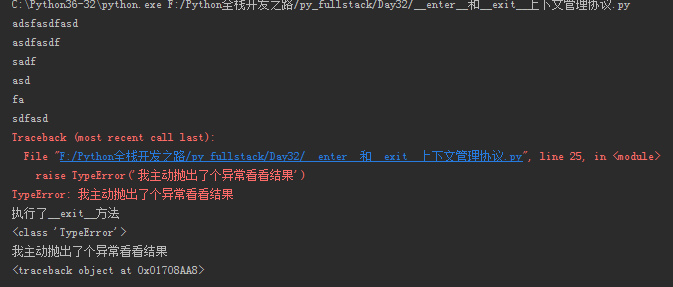
__exit__()中的三个参数分别代表异常类型,异常值和追溯信息,with语句中代码块出现异常,则with后的代码都无法执行
 1 import time
 2 class Open:
 3     def __init__(self,filepath,mode = 'r',encoding = 'utf-8'):
 4         self.f = open(filepath,mode=mode,encoding=encoding)
 5         self.filepath = filepath
 6         self.mode = mode
 7         self.encoding = encoding
 8     def write(self,value):
 9         t = time.strftime('%Y-%m-%d %X')
10         self.f.write('%s  %s'%(t,value))
11     def __getattr__(self, item):
12         return getattr(self.f,item)
13     def __enter__(self):
14         return self
15     def __exit__(self, exc_type, exc_val, exc_tb):
16         print('执行了__exit__方法')
17         print(exc_type)
18         print(exc_val)
19         print(exc_tb)
20 with Open('1.txt',mode='r',encoding='utf-8') as f:
21     print(f.read())
22     raise TypeError('我主动抛出了个异常看看结果')
23     f.seek(0)
24     print(f.read())
结果截图:
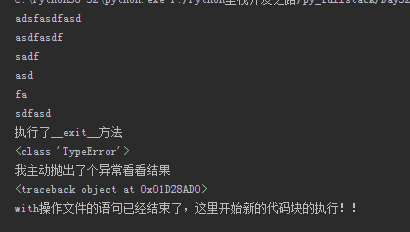
如果__exit__返回值为True,那么异常会被清空,就好像啥都没发生一样,with内异常后的语句无法正常执行,但是with语句以外后面的语句是正常执行的
 1 import time
 2 class Open:
 3     def __init__(self,filepath,mode = 'r',encoding = 'utf-8'):
 4         self.f = open(filepath,mode=mode,encoding=encoding)
 5         self.filepath = filepath
 6         self.mode = mode
 7         self.encoding = encoding
 8     def write(self,value):
 9         t = time.strftime('%Y-%m-%d %X')
10         self.f.write('%s  %s'%(t,value))
11     def __getattr__(self, item):
12         return getattr(self.f,item)
13     def __enter__(self):
14         return self
15     def __exit__(self, exc_type, exc_val, exc_tb):
16         print('执行了__exit__方法')
17         print(exc_type)
18         print(exc_val)
19         print(exc_tb)
20         return True
21 with Open('1.txt',mode='r',encoding='utf-8') as f:
22     print(f.read())
23     raise TypeError('我主动抛出了个异常看看结果')
24     f.seek(0)
25     print(f.read())
26 print('with操作文件的语句已经结束了,这里开始新的代码块的执行!!')
结果截图:
如果我们想正常操作一个文件,并在操作完后应该进行文件进行自动关闭的操作,我们要把代码写成第一段代码里面__exit__中的内容,将文件进行关闭操作。
--------------------------------------------------------------------------------------------------------------------
__call__
对象后面加括号,触发执行。
注:构造方法的执行是由创建对象触发的,即:对象 = 类名() ;而对于 __call__ 方法的执行是由对象后加括号触发的,即:对象() 或者 类()()
class Foo:
    def __init__(self):
        pass
     def __call__(self, *args, **kwargs):
        print('__call__')

obj = Foo() # 执行 __init__
obj()       # 执行 __call__
----------------------------------------------------------------------------------------------------------------
元类:metaclass
平时我们创建一个类要遵守的三个要点是:
class Foo:
    pass

f1=Foo() #f1是通过Foo类实例化的对象
python中一切皆是对象,类本身也是一个对象,当使用关键字class的时候,python解释器在加载class的时候就会创建一个对象(这里的对象指的是类而非类的实例)
上例可以看出f1是由Foo这个类产生的对象,而Foo本身也是对象,那它又是由哪个类产生的呢?
#type函数可以查看类型,也可以用来查看对象的类,二者是一样的
print(type(f1)) # 输出:<class '__main__.Foo'>     表示,obj 对象由Foo类创建
print(type(Foo)) # 输出:<type 'type'>
什么是元类?
元类是类的类,是类的模板
元类是用来控制如何创建类的,正如类是创建对象的模板一样
元类的实例为类,正如类的实例为对象(f1对象是Foo类的一个实例,Foo类是 type 类的一个实例)
type是python的一个内建元类,用来直接控制生成类,python中任何class定义的类其实都是type类实例化的对象
定义类有两种方式:
# 第一种方式:
class People:
    def func(self):
        print('from func')


# 第二种方式:
def run(self):
    print('run')
class_name = 'Foo'
class_dict = {
    'x' : 1,
    'run':run,
}
bases = (object,)
Foo = type(class_name,bases,class_dict)
一个类没有声明自己的元类,默认他的元类就是type,除了使用元类type,用户也可以通过继承type来自定义元类(顺便我们也可以瞅一瞅元类如何控制类的创建,工作流程是什么)
class Foo:
    def __init__(self,name):
        self.name = name

f = Foo('egon')
print(type(Foo)) #输出结果:<class 'type'>
我们自定制一个元类:
 1 class My_class(type):
 2     def __init__(self,class_name,class_bases,class_dict):
 3         print('class_name:%s'%class_name)
 4         print('class_bases:',class_bases)
 5         print('class_dict:%s'%class_dict)
 6         print('self:%s'%self)
 7
 8 class Foo(metaclass=My_class):
 9     x = 1
10     def __init__(self,name):
11         self.name = name
12     def run(self):
13         print('run')
上面8-10行的代码相当于做了这件事情:
Foo = type('Foo',(object,),{'x':1,'run':run})
在我们执行这段代码的时候,会触发My_class中的__init__()这个方法的执行,所以执行的结果为:

我们现在将上面的代码加上一个功能,这个需求是这样的,规定每个类中的函数属性都必须加上注释,如果没加上注释说明的话就报错,代码是这样的:
 1 class My_class(type):
 2     def __init__(self,class_name,class_bases,class_dict):
 3         for key in class_dict:
 4             if not callable(class_dict[key]):continue
 5             if not class_dict[key].__doc__:
 6                 raise TypeError('你必须加上注释!!')
 7
 8 class Foo(metaclass=My_class):
 9     x = 1
10     def __init__(self,name):
11         self.name = name
12     def run(self):
13         print('run')
加上以上的代码后,运行程序会报错:

如果我们给每个函数方法都加上注释的话就不会出现报错的情况:
 1 class My_class(type):
 2     def __init__(self,class_name,class_bases,class_dict):
 3         for key in class_dict:
 4             if not callable(class_dict[key]):continue
 5             if not class_dict[key].__doc__:
 6                 raise TypeError('你必须加上注释!!')
 7
 8 class Foo(metaclass=My_class):
 9     x = 1
10     def __init__(self,name):
11         'func init'
12         self.name = name
13     def run(self):
14         'func run'
15         print('run')
元类的总结:
 1 #元类总结
 2 class Mymeta(type):
 3     def __init__(self,name,bases,dic):
 4         print('===>Mymeta.__init__')
 5
 6
 7     def __new__(cls, *args, **kwargs):
 8         print('===>Mymeta.__new__')
 9         return type.__new__(cls,*args,**kwargs)
10
11     def __call__(self, *args, **kwargs):
12         print('aaa')
13         obj=self.__new__(self)
14         self.__init__(self,*args,**kwargs)
15         return obj
16
17 class Foo(object,metaclass=Mymeta):
18     def __init__(self,name):
19         self.name=name
20     def __new__(cls, *args, **kwargs):
21         return object.__new__(cls)
22
23 '''
24 需要记住一点:名字加括号的本质(即,任何name()的形式),都是先找到name的爹,然后执行:爹.__call__
25
26 而爹.__call__一般做两件事:
27 1.调用name.__new__方法并返回一个对象
28 2.进而调用name.__init__方法对儿子name进行初始化
29 '''
30
31 '''
32 class 定义Foo,并指定元类为Mymeta,这就相当于要用Mymeta创建一个新的对象Foo,于是相当于执行
33 Foo=Mymeta('foo',(...),{...})
34 因此我们可以看到,只定义class就会有如下执行效果
35 ===>Mymeta.__new__
36 ===>Mymeta.__init__
37 实际上class Foo(metaclass=Mymeta)是触发了Foo=Mymeta('Foo',(...),{...})操作,
38 遇到了名字加括号的形式,即Mymeta(...),于是就去找Mymeta的爹type,然后执行type.__call__(...)方法
39 于是触发Mymeta.__new__方法得到一个具体的对象,然后触发Mymeta.__init__方法对对象进行初始化
40 '''
41
42 '''
43 obj=Foo('egon')
44 的原理同上
45 '''
46
47 '''
48 总结:元类的难点在于执行顺序很绕,其实我们只需要记住两点就可以了
49 1.谁后面跟括号,就从谁的爹中找__call__方法执行
50 type->Mymeta->Foo->obj
51 Mymeta()触发type.__call__
52 Foo()触发Mymeta.__call__
53 obj()触发Foo.__call__
54 2.__call__内按先后顺序依次调用儿子的__new__和__init__方法
55 '''
简单的过程分析:
 1 class Mymeta(type):
 2      def __init__(self,class_name,class_bases,class_dic):
 3             pass
 4      def __call__(self, *args, **kwargs):
 5         obj=self.__new__(self)            #实例化一个空对象
 6         self.__init__(obj,*args,**kwargs) #相当于调用Foo中的init方法,obj.name='egon'
 7         return obj                       #返回一个空对象
 8 class Foo(metaclass=Mymeta):
 9     x=1
10     def __init__(self,name):
11         self.name=name #obj.name='egon'
12     def run(self):
13         'run function'
14         print('running')
15 # print(Foo.__dict__)
16
17 f=Foo('egon')  #这相当于调用Mymeta中的__call__方法,并传值
18
19 print(f)
20
21 print(f.name)
“元类就是深度的魔法,99%的用户应该根本不必为此操心。如果你想搞清楚究竟是否需要用到元类,那么你就不需要它。那些实际用到元类的人都非常清楚地知道他们需要做什么,而且根本不需要解释为什么要用元类。” —— Python界的领袖 Tim Peters


