k8s-部署-01-环境准备
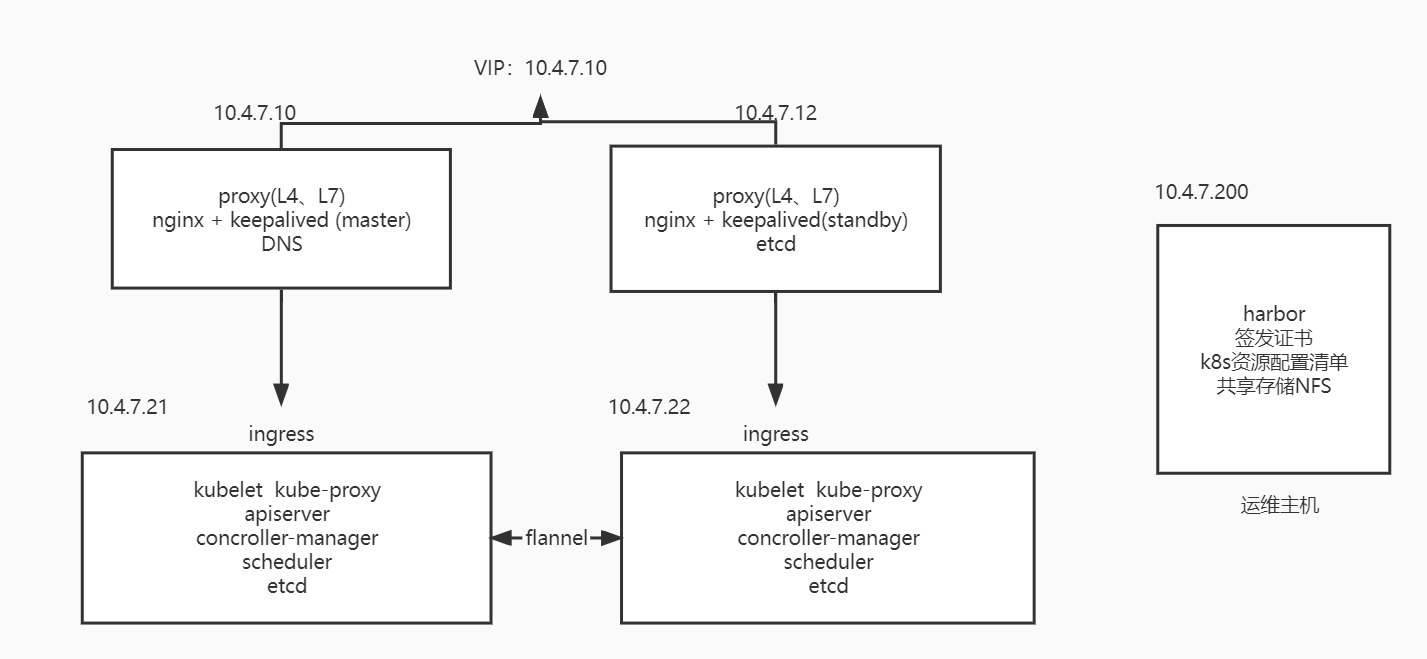
1、服务主机规划:
| IP地址 |
主机名 |
主机角色 |
| 10..4.7.11 |
hdss7-11.host.com |
|
| 10.4.7.12 |
hdss7-12.host.com |
|
| 10.4.7.21 |
hdss7-21.host.com |
|
| 10.4.7.22 |
hdss7-22.host.com |
|
| 10.4.7.200 |
hdss7-200.host.com |
|
| 10.4.7.10 |
|
nginx VIP |
2、架构图
 3、服务器基础环境初始化
3.1、主机名修改
hostnamectl set-hostname hdss7-11.host.com
3.2、主机IP修改
# 刚开始初始化主机时,DNS1应该设置为:114.114.114.114 或者8.8.8.8。等自建DNS配置好之后再设置为:10.7.4.11

[root@hdss7-11 network-scripts]# cat /etc/sysconfig/network-scripts/ifcfg-ens33
TYPE=Ethernet
PROXY_METHOD=none
BROWSER_ONLY=no
BOOTPROTO=static
DEFROUTE=yes
IPV4_FAILURE_FATAL=no
IPV6INIT=yes
IPV6_AUTOCONF=yes
IPV6_DEFROUTE=yes
IPV6_FAILURE_FATAL=no
IPV6_ADDR_GEN_MODE=stable-privacy
NAME=ens33
UUID=d2971a9a-8e22-455c-8197-3c4ce4ed70f9
DEVICE=ens33
ONBOOT=yes
IPADDR=10.4.7.11
NETMASK=255.255.255.0
GATEWAY=10.4.7.254
DNS1=10.4.7.11
3.3、配置yum源
# 建议配置阿里云的yum源
wget -O /etc/yum.repos.d/CentOS-Base.repo https://mirrors.aliyun.com/repo/Centos-7.repo

wget -O /etc/yum.repos.d/epel.repo http://mirrors.aliyun.com/repo/epel-7.repo
3.4、安装所需的安装包
yum install -y wget net-tools telnet tree nmap sysstat lrzsz dos2uninx bind-utils
3.5、关闭防火墙
systemctl stop firewalld

systemctl disable firewalld

systemctl status firewalld
3.6、关闭selinux
[root@hdss7-11 network-scripts]# cat /etc/selinux/config

# This file controls the state of SELinux on the system.
# SELINUX= can take one of these three values:
#     enforcing - SELinux security policy is enforced.
#     permissive - SELinux prints warnings instead of enforcing.
#     disabled - No SELinux policy is loaded.
SELINUX=disabled
# SELINUXTYPE= can take one of three values:
#     targeted - Targeted processes are protected,
#     minimum - Modification of targeted policy. Only selected processes are protected.
#     mls - Multi Level Security protection.
SELINUXTYPE=targeted


[root@hdss7-11 network-scripts]# getenforce
Disabled
[root@hdss7-11 network-scripts]#
3.7、对时
yum -y install ntpdate ntp chrond

ntpdate asia.pool.ntp.org

ntpdate ntp3.aliyun.com

systemctl enable ntpd

systemctl status ntpd
3.8、内核参数的优化
[root@hdss7-11 network-scripts]$ cat /etc/sysctl.conf
# sysctl settings are defined through files in
# /usr/lib/sysctl.d/, /run/sysctl.d/, and /etc/sysctl.d/.
#
# Vendors settings live in /usr/lib/sysctl.d/.
# To override a whole file, create a new file with the same in
# /etc/sysctl.d/ and put new settings there. To override
# only specific settings, add a file with a lexically later
# name in /etc/sysctl.d/ and put new settings there.
#
# For more information, see sysctl.conf(5) and sysctl.d(5).
net.ipv4.tcp_tw_reuse = 1
net.ipv4.tcp_max_tw_buckets = 5000
net.ipv4.ip_local_port_range = 32768 65535
net.ipv4.conf.all.arp_ignore=2
net.ipv4.conf.default.arp_ignore=2
net.ipv4.conf.default.send_redirects=0
net.ipv4.conf.all.send_redirects=0
net.ipv4.conf.default.accept_redirects=0
net.ipv4.conf.all.accept_redirects=0
net.ipv4.conf.all.accept_source_route=0
net.ipv4.conf.default.accept_source_route=0
net.ipv4.tcp_syncookies=1
net.ipv4.tcp_tw_recycle=1
net.core.rmem_max=26214400
net.core.rmem_default=26214400
net.core.wmem_max=655360
net.core.wmem_default=655360
3.9、关闭NetworkManager
systemctl stop NetworkManager

systemctl disable NetworkManager

systemctl status NetworkManager

 浙公网安备 33010602011771号