iceberg数据写入流程
在上一篇文章中我们主要讲解了iceberg各个元数据文件中的数据组织形式,那么这些元数据是怎么生成的呢?如何通过spark写入iceberg?本文将带大家简单了解一下使用spark 2.4.7 batch写入iceberg的整体流程。
spark写入示例
本文主要演示如何使用iceberg hadoopTable写入数据,hadoopCatalog和hiveCatalog在使用上大同小异。
import org.apache.iceberg.hadoop.HadoopTables
import org.apache.hadoop.conf.Configuration
import org.apache.iceberg.catalog.TableIdentifier
import org.apache.iceberg.Schema
import org.apache.iceberg.types._
import org.apache.spark.sql.types._
import org.apache.iceberg.PartitionSpec
import org.apache.iceberg.spark.SparkSchemaUtil
import org.apache.spark.sql._
import spark.implicits._

val order_item_schema = StructType(List(
      StructField("id", LongType, true),
      StructField("order_id", LongType, true),
      StructField("product_id", LongType, true),
      StructField("product_price", DecimalType(7,2), true),
      StructField("product_quantity", IntegerType, true),
      StructField("product_name", StringType, true)
    ))

val order_item_action = Seq(
      Row(1L, 1L, 1L, Decimal.apply(50.00, 7, 2), 2, "table lamp"),
      Row(2L, 1L, 2L, Decimal.apply(100.5, 7, 2), 1, "skirt"),
      Row(3L, 2L, 1L, Decimal.apply(50.00, 7, 2), 1, "table lamp"),
      Row(4L, 3L, 3L, Decimal.apply(0.99, 7, 2), 1, "match")
    )

val iceberg_schema = new Schema(
      Types.NestedField.optional(1, "id", Types.LongType.get()),
      Types.NestedField.optional(2, "order_id", Types.LongType.get()),
      Types.NestedField.optional(3, "product_id", Types.LongType.get()),
      Types.NestedField.optional(4, "product_price", Types.DecimalType.of(7, 2)),
      Types.NestedField.optional(5, "product_quantity", Types.IntegerType.get()),
      Types.NestedField.optional(6, "product_name", Types.StringType.get())
    )

val iceberg_partition = PartitionSpec.builderFor(iceberg_schema).identity("id").build()

val hadoopTable = new HadoopTables(sc.hadoopConfiguration);
val location = "hdfs://10.242.199.202:9000/hive/empty_order_item";

hadoopTable.create(iceberg_schema, iceberg_partition, location)

val df = spark.createDataFrame(sc.makeRDD(order_item_action), order_item_schema)

df.write.format("iceberg").mode("overwrite").save("hdfs://10.242.199.202:9000/hive/empty_order_item")
spark写入iceberg主要分为两步:
- Executor写入数据
- Driver commit生成元数据
Executor写入逻辑

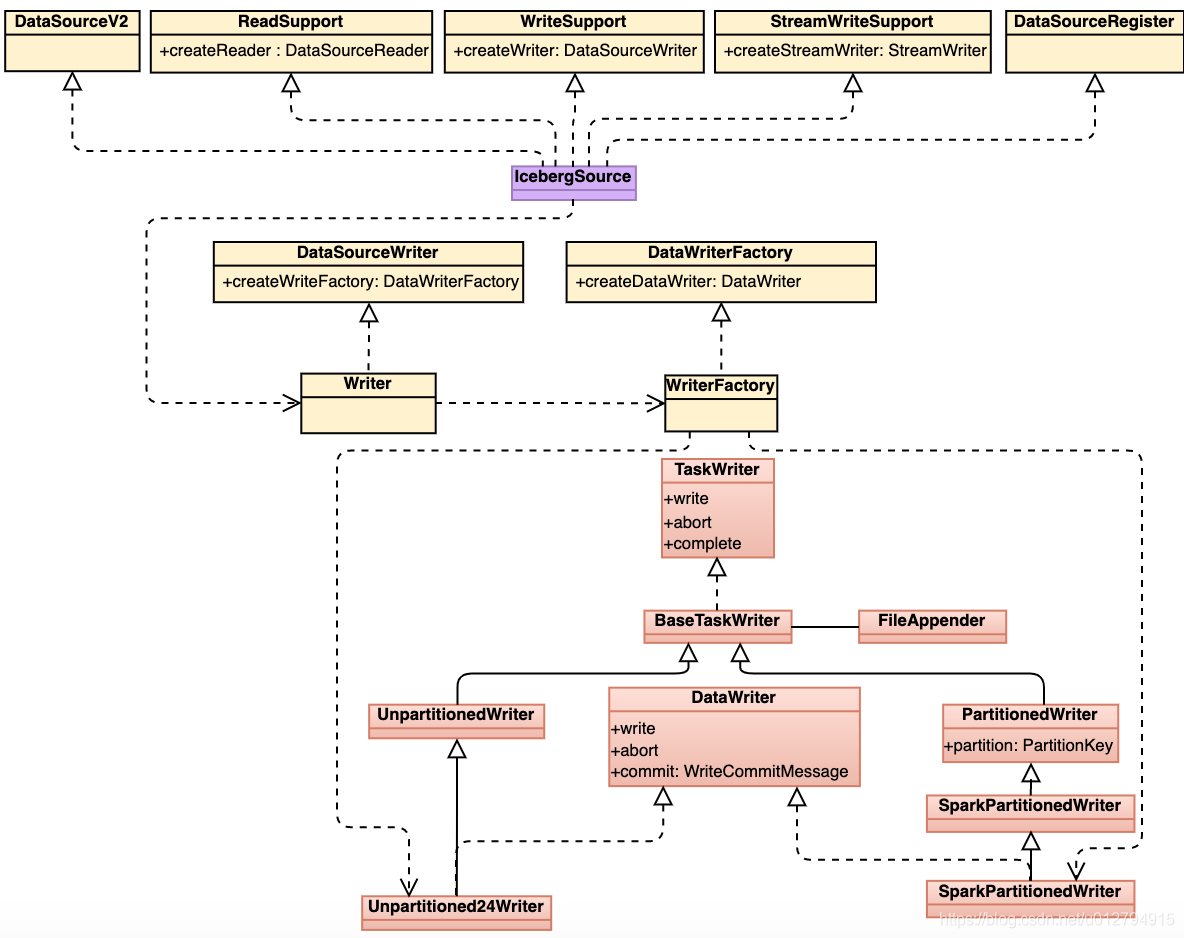
由上图可以看到IcebergSource实现了spark ReadSupport、WriteSupport、StreamWriteSupport等接口,WriteFactory根据写入表的类型:(1) 分区表 (2) 非分区表,生成不同的writer,最后通过write方法写入数据。
我们以写入分区表为例简单介绍一下executor端iceberg写入数据的流程:
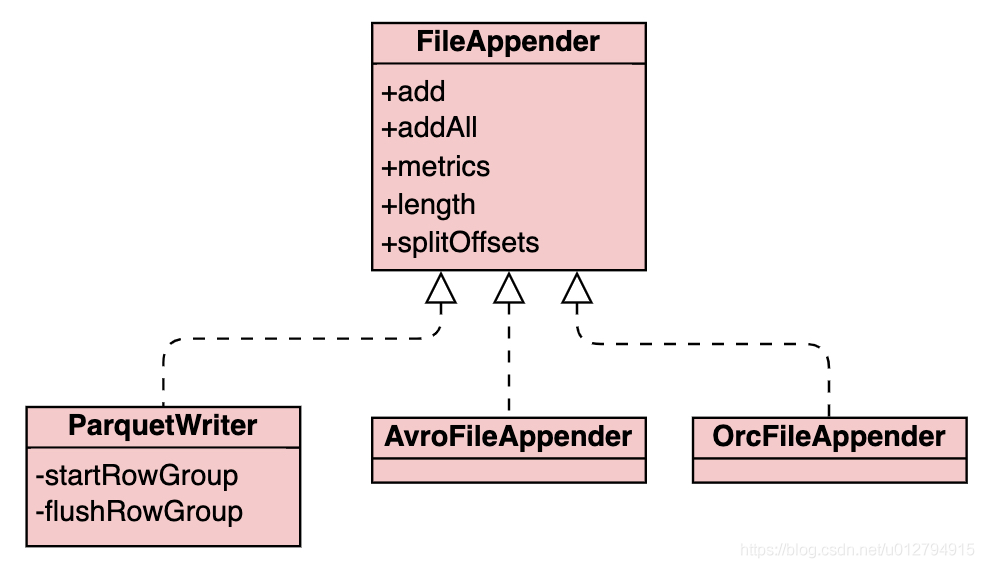
- 根据file format生成对应的FileAppender,FileAppender完成实际的写文件操作。目前支持3种文件格式的写入:Parquet、Avro以及Orc

- iceberg分区数据不直接写入数据文件中,而是通过目录树结构来进行存储,分区目录结构与hive类型,都是以key1=value1/key2=value2的形式进行组织。在写入数据之前,partitionWriter首先根据partition transform函数得到对应的partition value,然后创建对应的分区目录
- fileAppender通过调用不同的file format组件将数据写入到文件中。iceberg写入时可以通过设置write.target-file-size-bytes table property调整写入文件target大小,默认为LONG_MA
- 当所有数据写入完成后,iceberg会收集写入的统计信息,例如record_count, lower_bound, upper_bound, value_count等用于driver端生成对应的manifest文件,最后executor端将这些信息传回driver端。
Driver commit逻辑
iceberg snapshot中的统计信息实际是累计更新的结果,相较于上次commit,本次commit发生了哪些变化,例新增了多少条记录,删除了多少条记录,新增了多少文件,删除了多少文件等等。既然是累计更新,首先需要知道上次snapshot的信息,然后计算最后的结果。iceberg读取当前最新snapshot数据过程如下:
- 读取version.hint中记录的最新metadata版本号versionNumber
- 读取version[versionNumber].metadata.json文件,根据metadata中记录的snpshots信息以及current snapshot id得到最新snapshot的location
- 最后根据获得的location读取对应的snapshot文件得到最新的snapshot数据
在本篇文章中,我们使用了overwrite的写入方式,overwrite实际上可以等价划分成两个步骤:
- delete
- insert
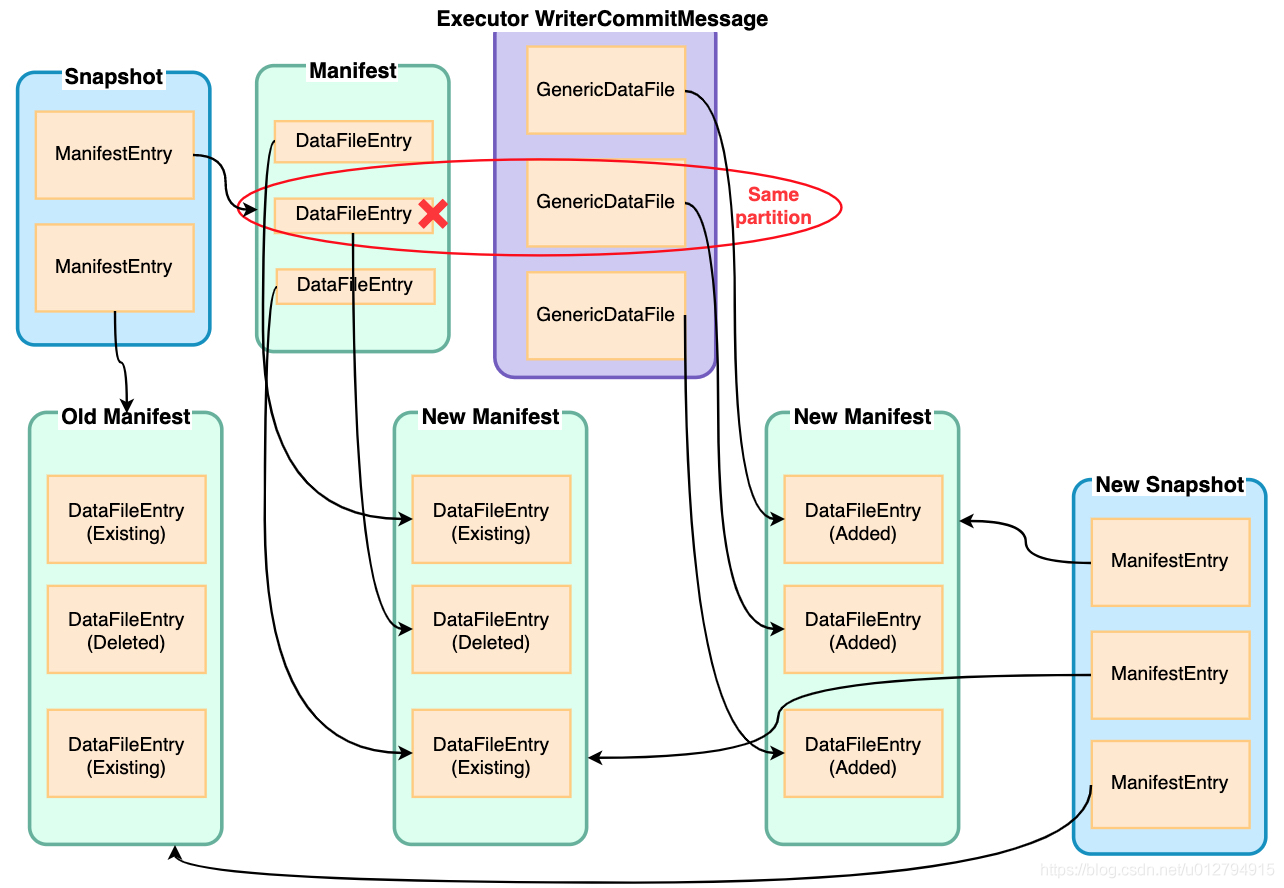
那么我们如何知道需要删除哪些数据呢?这里就要用到刚刚读取的current snapshot数据以及executor传回的信息,根据这些信息,我们可以计算得到哪些分区文件是需要通过覆盖删除的,实际上是将manifest中的对应DataFileEntry标记成删除写入到新的manifest文件中,没有被删除的DataFileEntry则标记成Existing写入到manifest文件中
在完成了delete操作之后,insert操作就相对比较简单,只要将GenericDataFile全部写入到新的manifest中即可
iceberg默认开启merge manifest功能,当manifest文件数量超过commit.manifest.min-count-to-merge时(默认100),将多个small manifest文件合并成large manifest(large manifest文件大小由commit.manifest.target-size-bytes指定,默认为8M)
最后iceberg根据这些Added/Deleted/Existing DataFileEntry得到本次commit的差值统计信息,与前一次snapshot统计信息累加最终得到本次snapshot的统计信息(added_data_files_count, added_rows_count等)。生成snapshot的整个过程如下图所示:
在生成新的snapshot后,只剩最后一步那就是生成新版本的version.metadata.json文件,同时将版本号写入到version.hint中,至此完成了所有iceberg数据的写入。
总结
本文简单介绍了iceberg数据写入的整个流程,可以看到整个过程中比较重要的地方在于如何生成元数据,元数据的这种管理方式支持iceberg能够进行快速高效的查询,并且保证了多个snapshot可以共用同一份数据文件避免了数据的冗余性。
原文链接:https://blog.csdn.net/u012794915/article/details/111831471


