LNMP 搭建与部署 -03
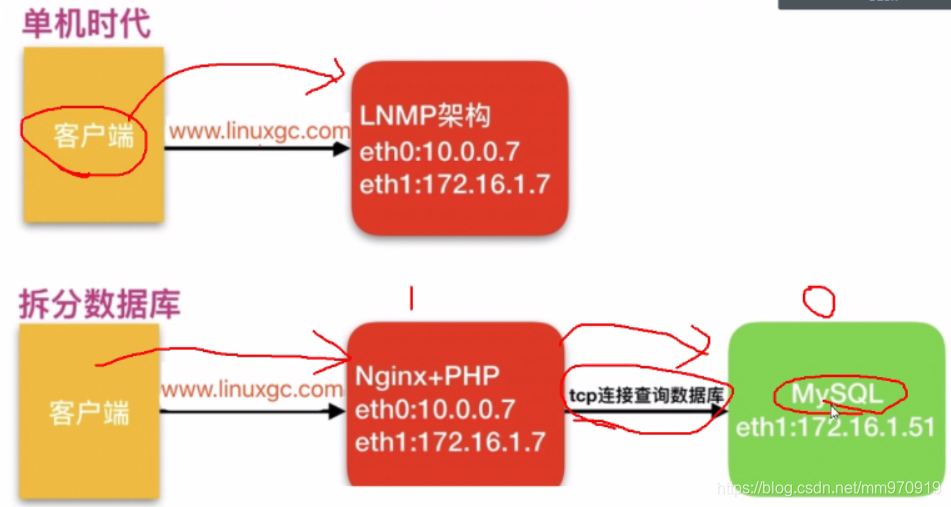
一、拆分数据库
1.为什么要拆分
单台服务器运行LNMP会出现一系列问题,如内存占满,网络down机等,会把LNMP一步一步的kill掉,所以要将web和数据库进行独立部署。

2.数据库拆分后解决了什么问题
1.缓解web网站的压力
2.增强数据库读写性能
3.提高用户访问速度
3.环境准备
环境准备

 主机	        IP	                安装软件            部署的服务

web01	  10.0.0.7,172.16.1.7	    -                  nginx+php

db01	   172.16.1.51        mariadb-server         mariadb-server


## 在新的服务器上搭建数据库(盖新房子)

#注:在新机上安装软件[root@db01 ~]# yum install -y mariadb-server
1.配置数据库密码(装修)
[root@db01 ~]# systemctl start mariadb
[root@db01 ~]# mysqladmin -uroot password
New password: 123
Confirm new password: 123

2.测试连接远程数据库(测试房子能不能住人)--- ## web01机器测试

[root@web01 ~]# mysql -uroot -p -h 172.16.1.51
Enter password:
ERROR 1130 (HY000): Host '172.16.1.7' is not allowed to connect to this MariaDB server

### 命令拆分:
mysql 			#数据库命令
-u				#指定用户
root 			#root用户
-p 				#使用数据库root用户的密码
123				#数据库root用户的密码
-h				#指定数据库的主机
172.16.1.51		#主机IP

3.5db数据库端授权用户远程连接(想办法住,db端操作)--- ## db01机器操作

[root@db01 ~]#  mysql -uroot -p123

MariaDB [(none)]> create database wordpress;
Query OK, 1 row affected (0.00 sec)

MariaDB [(none)]> grant all on wordpress.* to wp@'172.16.1.%' identified by '123';
Query OK, 0 rows affected (0.00 sec)

grant 				#数据库授权命令
all 				#所有权限
on					#在...上面
wordpress.* 		 #wordpress下面的所有表   库.表
to					#给...
wp@'172.16.1.%' 	 #数据库用户
identified			#设置密码
by 					#密码是...
123		            #密码内容

4.再次测试连接(房子可以住了)
[root@web01 ~]# mysql -uwp -p -h 172.16.1.51
Enter password: 123

##查看内容  show databases;
MariaDB [(none)]> show databases;
+--------------------+
| Database           |
+--------------------+
| information_schema |
| test               |
| wordpress          |
+--------------------+
3 rows in set (0.00 sec)

5.旧数据库导出数据(打包行李搬出房子)
[root@web01 ~]# mysqldump -uroot -p -B wordpress > /opt/wp.sql
Enter password: 123
[root@web01 ~]# mysqldump -uroot -p -B zhihu > /opt/zh.sql
Enter password: 123

6.将数据推送到新服务器(汽车运送行李)
[root@web01 ~]# scp /opt/wp.sql 172.16.1.51:/opt/
[root@web01 ~]# scp /opt/zh.sql 172.16.1.51:/opt/
7.将数据导入新数据库(将行李放入新房子) ### 多种方式
1.库外导入
[root@db01 ~]# mysql -uroot -p < /opt/wp.sql
Enter password:
[root@db01 ~]# mysql -uroot -p < /opt/zh.sql
Enter password:

2.库内读取
MariaDB [wordpress]> source /opt/wp.sql;
MariaDB [zhihu]> source /opt/zh.sql;

3.任意门方式导数据
[root@web01 ~]# mysql -uwp -p -h 172.16.1.51 < /opt/wp.sql
Enter password: 123
[root@web01 ~]# mysql -uwp -p -h 172.16.1.51 < /opt/zh.sql
Enter password: 123
8.查看数据
MariaDB [(none)]> use wordpress;
Reading table information for completion of table and column names
You can turn off this feature to get a quicker startup with -A

Database changed
MariaDB [wordpress]> show tables; ## 查看
+-----------------------+
| Tables_in_wordpress   |
+-----------------------+
| wp_commentmeta        |
| wp_comments           |
| wp_links              |
| wp_options
| wp_terms              |
| wp_usermeta           |
| wp_users              |
+-----------------------+
12 rows in set (0.00 sec)

8.修改项目中数据库地址(告知朋友自己的新家地址)

[root@web01 ~]# vim /mm/wordpress/wp-config.php
/** WordPress数据库的名称 */
define('DB_NAME', 'wordpress');

/** MySQL数据库用户名 */
define('DB_USER', 'wp');

/** MySQL数据库密码 */
define('DB_PASSWORD', '123');

/** MySQL主机 */
define('DB_HOST', '172.16.1.51');

[root@web03 ~]# vim /code/zhihu/system/config/database.php

9.停掉旧数据库(拆迁旧家)
[root@web01 ~]# systemctl stop mariadb

10.访问页面测试
http://linux12.wp.com/
二、web服务器扩展
环境准备

 主机	        IP	                安装软件            部署的服务

web01	  10.0.0.7,172.16.1.7	    -                  nginx+php

web02	  10.0.0.8,172.16.1.8	   nginx                 nginx+php

db01	   172.16.1.51        mariadb-server         mariadb-server

#注:安装软件nginx与 mariadb-server
2.web02搭建nginx
1.配置官方源
[root@web01 ~]# scp /etc/yum.repos.d/nginx.repo 172.16.1.8:/etc/yum.repos.d/

2.安装nginx
[root@web02 ~]# yum install -y nginx

3.创建用户
[root@web02 ~]# groupadd www -g 666
[root@web02 ~]# useradd www -u 666 -g 666

4.上传php包
[root@web02 ~]# rz

5.解压安装php
[root@web02 ~]# tar xf php.tar.gz
[root@web02 ~]# yum localinstall -y *.rpm

6.同步web01的配置文件到web02
#同步nginx配置文件
[root@web01 ~]# scp /etc/nginx/nginx.conf 172.16.1.8:/etc/nginx/
[root@web01 ~]# scp /etc/nginx/conf.d/linux12.wp.com.conf 172.16.1.8:/etc/nginx/conf.d/

#同步php的配置
[root@web01 ~]# scp /etc/php-fpm.d/www.conf 172.16.1.8:/etc/php-fpm.d/
[root@web01 ~]# scp /etc/php.ini 172.16.1.8:/etc/

7.启动nginx和php服务
[root@web02 ~]# systemctl start nginx
[root@web02 ~]# systemctl enable nginx
[root@web02 ~]# systemctl start php-fpm
[root@web02 ~]# systemctl enable php-fpm

8.推送web01站点目录到web02

[root@web01 ~]# scp -r /mm 172.16.1.8:/

9.授权站点目录
[root@web02 ~]# chown -R www.www /mm/

10.修改本地hosts访问测试
#10.0.0.7 linux12.wp.com
 10.0.0.8 linux12.wp.com
三、搭建文件共享
环境准备

 主机	        IP	                安装软件             部署的服务

web01	  10.0.0.7	                -                nginx+php

web02	  10.0.0.88	              nginx              nginx+php

db01	   172.16.1.51         mariadb-server         mariadb-server

nfs	        172.16.1.31                                  	nfs

#注:安装软件nginx与 mariadb-server
2.搭建NFS服务器
1.安装nfs
[root@nfs ~]# yum install -y nfs-utils
2.创建挂载目录
[root@nfs ~]# mkdir /data/wp -p
1
3.配置NFS
[root@nfs ~]# vim /etc/exports
/data/wp 172.16.1.0/24(rw,sync,all_squash,anonuid=666,anongid=666)
4.创建用户
5.授权
[root@nfs ~]# chown -R www.www /data/
6.启动NFS
[root@nfs ~]# systemctl start nfs

7.检查配置
[root@nfs ~]# cat /var/lib/nfs/etab
/data/wp	172.16.1.0/24(rw,sync,wdelay,hide,nocrossmnt,secure,root_squash,all_squash,no_subtree_check,secure_locks,acl,no_pnfs,anonuid=666,anongid=666,sec=sys,rw,secure,root_squash,all_squash)

### 3.配置客户端
1.安装nfs和rpcbind
[root@web01 ~]# yum install -y nfs-utils rpcbind

2.启动rpcbind

3.查看挂载点
[root@web01 ~]# showmount -e 172.16.1.31
Export list for 172.16.1.31:
/data/wp 172.16.1.0/24

4.确定挂载目录
[root@web01 ~]# ll /mm/wordpress/wp-content/uploads/

5.先推送挂载目录下的文件
[root@web01 ~]# rsync -avz /mm/wordpress/wp-content/uploads/ 172.16.1.31:/data/wp/
[root@web02 ~]# rsync -avz /mm/wordpress/wp-content/uploads/ 172.16.1.31:/data/wp/

#验证文件
[root@nfs ~]# ll /data/wp/2021/04/

6.挂载
[root@web01 ~]# mount -t nfs 172.16.1.31:/data/wp /mm/wordpress/wp-content/uploads
[root@web02 ~]# mount -t nfs 172.16.1.31:/data/wp /mm/wordpress/wp-content/uploads

7.三台机器实现共享     --- ###退出去在进来就好了
web01 web02 nfs

[root@web01 2021]#  mount -t nfs 172.16.1.31:/data/wp /mm/wordpress/wp-content/uploads
[root@web01 2021]# df
172.16.1.31:/data/wp     17811456 2286080  15525376  13% /mm/wordpress/wp-content/uploads

[root@web02 04]# mount -t nfs 172.16.1.31:/data/wp /mm/wordpress/wp-content/uploads
[root@web02 04]# df -h
172.16.1.31:/data/wp      17G  2.2G   15G  13% /mm/wordpress/wp-content/upload

