
一 下载安装
先去官网下载安装包。然后上传到linux主机(ALT+P切换到sftp,然后使用put 本地文件路径):

然后解压:
tar -zxvf zookeeper-3.4.10.tar.gz
二 基本使用
进入到解压后目录:
cd zookeeper-3.4.10
然后进入到conf目录,并且复制一分核心配置文件zoo_sample.cfg:
[root@localhost conf]# cp zoo_sample.cfg zoo.cfg
基本命令:
//启动:zkServer.sh start
 //停止:zkServer.sh stop
//查看状态:zkServer.sh status
切换到bin下启动zookeeper:
[root@localhost bin]# sh zkServer.sh start
ZooKeeper JMX enabled by default
Using config: /root/zookeeper-3.4.10/bin/../conf/zoo.cfg
Starting zookeeper ... STARTED
连接到启动的zookeeper:
[root@localhost bin]# sh zkCli.sh
Connecting to localhost:2181
2020-12-06 19:55:52,311 [myid:] - INFO  [main:Environment@100] - Client environment:zookeeper.version=3.4.10-39d3a4f269333c922ed3db283be479f9deacaa0f, built on 03/23/2017 10:13 GMT
2020-12-06 19:55:52,313 [myid:] - INFO  [main:Environment@100] - Client environment:host.name=localhost
2020-12-06 19:55:52,313 [myid:] - INFO  [main:Environment@100] - Client environment:java.version=1.8.0_242
2020-12-06 19:55:52,315 [myid:] - INFO  [main:Environment@100] - Client environment:java.vendor=Oracle Corporation
2020-12-06 19:55:52,315 [myid:] - INFO  [main:Environment@100] - Client environment:java.home=/usr/lib/jvm/java-1.8.0-openjdk-1.8.0.242.b08-0.el7_7.x86_64/jre
2020-12-06 19:55:52,315 [myid:] - INFO  [main:Environment@100] - Client environment:java.class.path=/root/zookeeper-3.4.10/bin/../build/classes:/root/zookeeper-3.4.10/bin/../build/lib/*.jar:/root/zookeeper-3.4.10/bin/../lib/slf4j-log4j12-1.6.1.jar:/root/zookeeper-3.4.10/bin/../lib/slf4j-api-1.6.1.jar:/root/zookeeper-3.4.10/bin/../lib/netty-3.10.5.Final.jar:/root/zookeeper-3.4.10/bin/../lib/log4j-1.2.16.jar:/root/zookeeper-3.4.10/bin/../lib/jline-0.9.94.jar:/root/zookeeper-3.4.10/bin/../zookeeper-3.4.10.jar:/root/zookeeper-3.4.10/bin/../src/java/lib/*.jar:/root/zookeeper-3.4.10/bin/../conf:
2020-12-06 19:55:52,316 [myid:] - INFO  [main:Environment@100] - Client environment:java.library.path=/usr/java/packages/lib/amd64:/usr/lib64:/lib64:/lib:/usr/lib
2020-12-06 19:55:52,316 [myid:] - INFO  [main:Environment@100] - Client environment:java.io.tmpdir=/tmp
2020-12-06 19:55:52,316 [myid:] - INFO  [main:Environment@100] - Client environment:java.compiler=<NA>
2020-12-06 19:55:52,316 [myid:] - INFO  [main:Environment@100] - Client environment:os.name=Linux
2020-12-06 19:55:52,316 [myid:] - INFO  [main:Environment@100] - Client environment:os.arch=amd64
2020-12-06 19:55:52,316 [myid:] - INFO  [main:Environment@100] - Client environment:os.version=3.10.0-862.el7.x86_64
2020-12-06 19:55:52,316 [myid:] - INFO  [main:Environment@100] - Client environment:user.name=root
2020-12-06 19:55:52,316 [myid:] - INFO  [main:Environment@100] - Client environment:user.home=/root
2020-12-06 19:55:52,316 [myid:] - INFO  [main:Environment@100] - Client environment:user.dir=/root/zookeeper-3.4.10/bin
2020-12-06 19:55:52,317 [myid:] - INFO  [main:ZooKeeper@438] - Initiating client connection, connectString=localhost:2181 sessionTimeout=30000 watcher=org.apache.zookeeper.ZooKeeperMain$MyWatcher@2b71fc7e
2020-12-06 19:55:52,353 [myid:] - INFO  [main-SendThread(localhost:2181):ClientCnxn$SendThread@1032] - Opening socket connection to server localhost/0:0:0:0:0:0:0:1:2181. Will not attempt to authenticate using SASL (unknown error)
Welcome to ZooKeeper!
JLine support is enabled
2020-12-06 19:55:52,491 [myid:] - INFO  [main-SendThread(localhost:2181):ClientCnxn$SendThread@876] - Socket connection established to localhost/0:0:0:0:0:0:0:1:2181, initiating session
2020-12-06 19:55:52,793 [myid:] - INFO  [main-SendThread(localhost:2181):ClientCnxn$SendThread@1299] - Session establishment complete on server localhost/0:0:0:0:0:0:0:1:2181, sessionid = 0x17637e639210001, negotiated timeout = 30000

WATCHER::

WatchedEvent state:SyncConnected type:None path:null
[zk: localhost:2181(CONNECTED) 0]
可以看zkcli.sh与zkServer.sh脚本其本质上也是再调用zookeeper工厂的方法启动项目。
查看常用命令:
[zk: localhost:2181(CONNECTED) 0] help
ZooKeeper -server host:port cmd args
        stat path [watch]
        set path data [version]
        ls path [watch]
        delquota [-n|-b] path
        ls2 path [watch]
        setAcl path acl
        setquota -n|-b val path
        history
        redo cmdno
        printwatches on|off
        delete path [version]
        sync path
        listquota path
        rmr path
        get path [watch]
        create [-s] [-e] path data acl
        addauth scheme auth
        quit
        getAcl path
        close
        connect host:port
创建一些节点:
[zk: localhost:2181(CONNECTED) 3] create /note "note"
Created /note
[zk: localhost:2181(CONNECTED) 4] create /note/note001 "note001"
Created /note/note001
[zk: localhost:2181(CONNECTED) 5]
下载zooviwer查看zookeeper的数据结构:
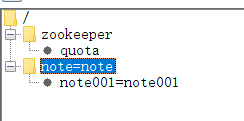
发现刚刚创建的节点就过来了。zk是一种树形的层级结构。
zookeeper提供了 create、delete、set、get 四个基本的增删改查命令。
zookeeper分为临时、永久两种。zookeeper的节点都是有序的。
可以去监听一个节点,节点的监听事件只一次有效。基于临时有序节点+监听实现分布式锁。
三 集群搭建
我们模拟在单机下启动三个zk节点并且搭建集群。
首先创建三个文件夹,分别代表三个zk服务对外提供服务端口为2181、2182、2183。
[root@localhost ~]#  cp -r zookeeper-3.4.10 zookeeper2181
[root@localhost ~]#  cp -r zookeeper-3.4.10 zookeeper2182
[root@localhost ~]#  cp -r zookeeper-3.4.10 zookeeper2183
然后修改zookeeper2181相关的配置:
# The number of milliseconds of each tick
tickTime=2000
# The number of ticks that the initial
# synchronization phase can take
initLimit=10
# The number of ticks that can pass between
# sending a request and getting an acknowledgement
syncLimit=5
# the directory where the snapshot is stored.
# do not use /tmp for storage, /tmp here is just
# example sakes.
dataDir=/root/zookeeper2181/data
# the port at which the clients will connect
clientPort=2181
#增加集群配置
server.1=192.168.1.9:2287:3387
server.2=192.168.1.9:2288:3387
server.3=192.168.1.9:2289:3387
# the maximum number of client connections.
# increase this if you need to handle more clients
#maxClientCnxns=60
#
# Be sure to read the maintenance section of the
# administrator guide before turning on autopurge.
#
# http://zookeeper.apache.org/doc/current/zookeeperAdmin.html#sc_maintenance
#
# The number of snapshots to retain in dataDir
#autopurge.snapRetainCount=3
# Purge task interval in hours
# Set to "0" to disable auto purge feature
#autopurge.purgeInterval=1
主要修改三个地方,dataDir指定为myid的路径,端口修改为对应端口2181,然后增加集群配置。
#集群配置信息 #server.A=B:C:D
#A:是一个数字,表示这个是服务器的编号
#B:是这个服务器的ip地址
#C:Zookeeper服务器之间的通信端口
#D:Leader选举的端口
在datadir下增加myid文件。
[root@localhost data]# echo "1" > myid
2182与2183参考一样的配置。
配置完成之后分别启动三台主机:
[root@localhost bin]# ./zkServer.sh start
然后查看节点状态:
[root@localhost bin]# ./zkServer.sh status
ZooKeeper JMX enabled by default
Using config: /root/zookeeper2182/bin/../conf/zoo.cfg
Mode: follower

[root@localhost bin]# ./zkServer.sh status
ZooKeeper JMX enabled by default
Using config: /root/zookeeper2181/bin/../conf/zoo.cfg
Mode: follower

[root@localhost bin]# ./zkServer.sh status
ZooKeeper JMX enabled by default
Using config: /root/zookeeper2183/bin/../conf/zoo.cfg
Mode: leader
三个节点2181、2182位follower 2183位leader。
Tips:
在启动集群的时候有喷到2181节点就是一直显示为Mode: standalone,再查看了配置文件确实没问题之后,使用jps查看 QuorumPeerMain进程,存在的话杀掉进程重启即可。
