“回嘉探宝”技术实现
①start界面加载进度条实现:

首先在层级栏新建一个Image,在image下新建一个Text文本。
image作为进度条的样式,text为进度条上显示的文本。
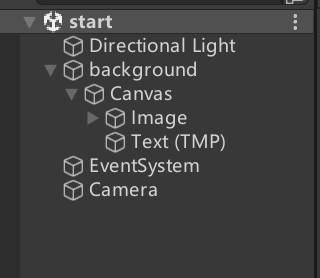
在camera组件下绑定脚本Load Scene,脚本选择的对象是之前新建的Image和Text,如下图

脚本代码:
using UnityEngine;
using System.Collections;
using UnityEngine.UI;
using UnityEngine.SceneManagement;
using TMPro;

public class LoadScene : MonoBehaviour
{
    public TextMeshProUGUI loadingText;
    public Image progressBar;
    private int curProgressValue = 0;

    void FixedUpdate()
    {
        int progressValue = 100;

        if (curProgressValue < progressValue)
        {
            curProgressValue++;
        }

        loadingText.text = $"游戏加载中...{curProgressValue}%";//实时更新进度百分比的文本显示

        progressBar.fillAmount = curProgressValue / 100f;//实时更新滑动进度图片的fillAmount值

        if (curProgressValue == 100)
        {
            loadingText.text = "OK";//文本显示完成OK
            SceneManager.LoadScene("Menu");
        }
    }
}
②UI的优化

考虑到unity自带UI过于简陋,所以选择更换UI的贴图,操作如下
首先选中需要更换贴图的button
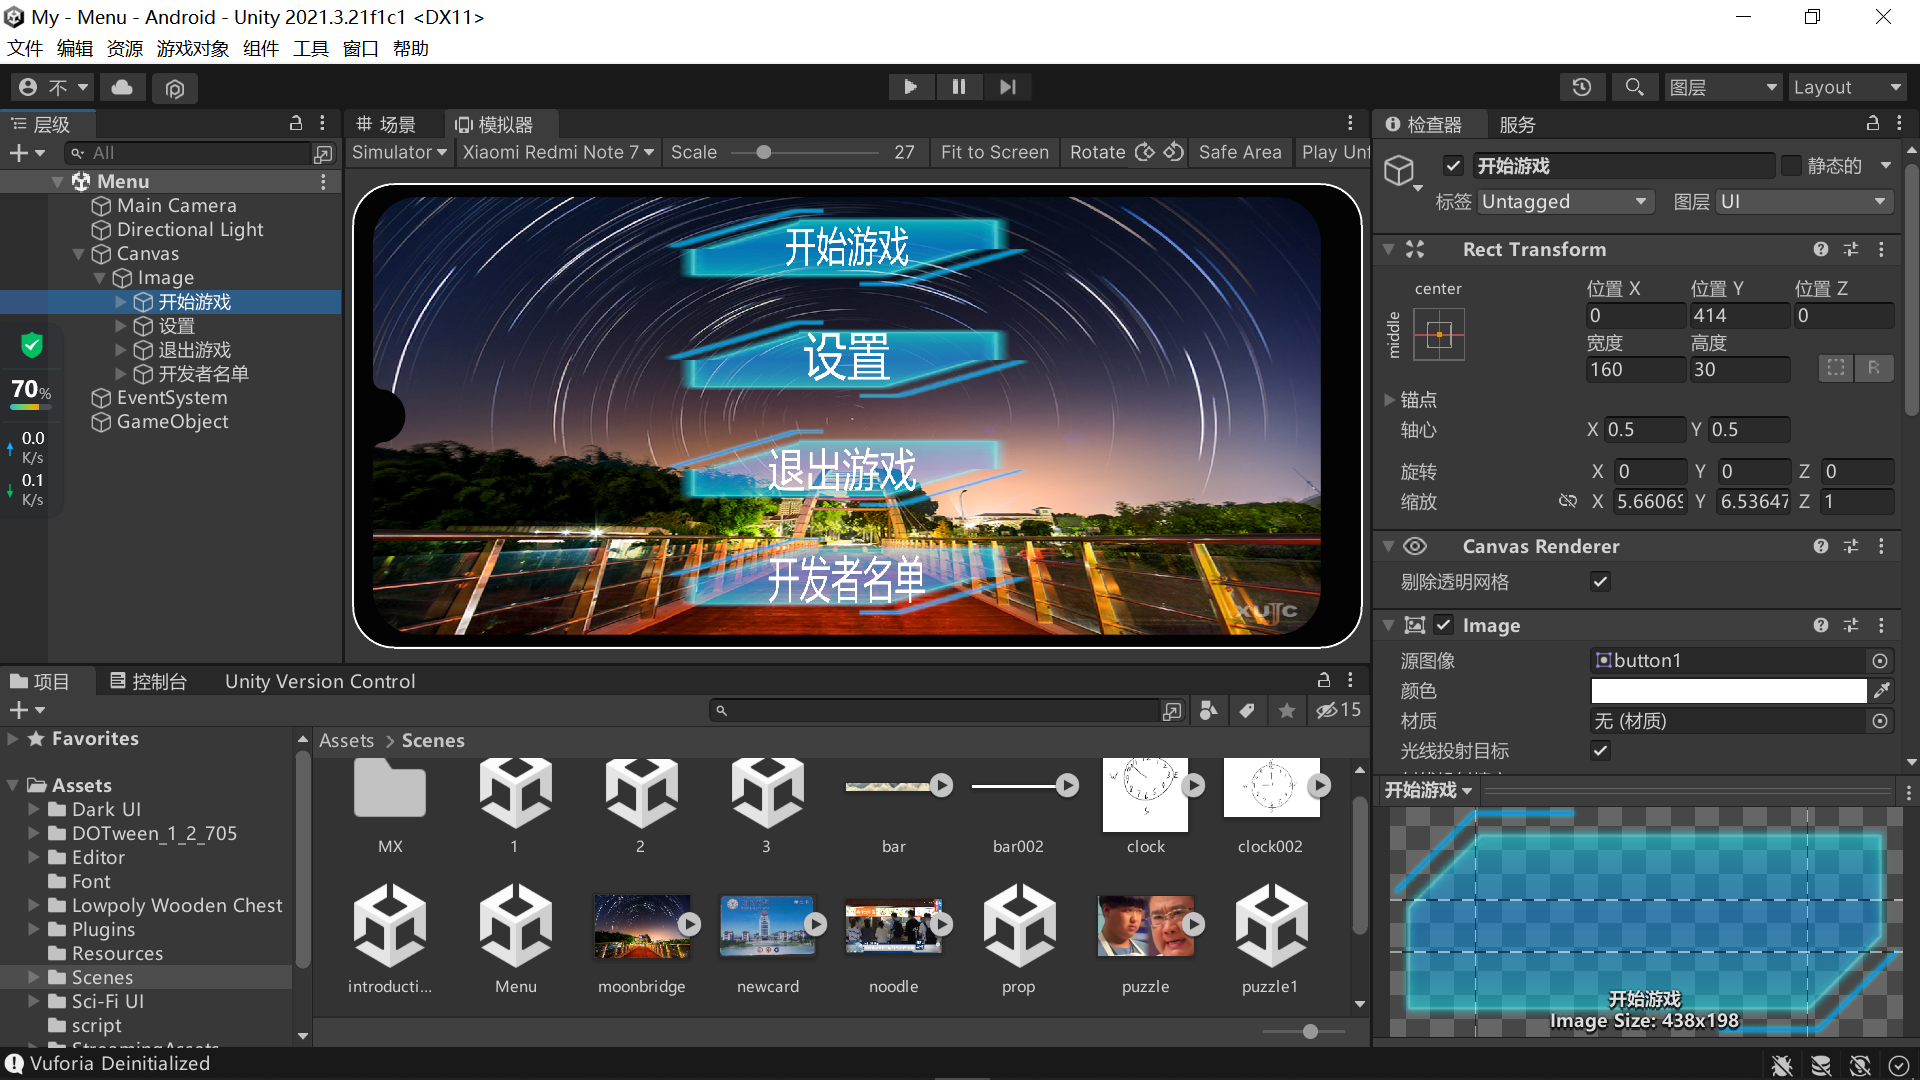
接下来点击Image的源图像,在你的资源中选择你需要更换的贴图,完成你的UI优化。

③按钮实现界面跳转
首先新建一个脚本ChangeScene,代码如下
using System.Collections;
using System.Collections.Generic;
using UnityEngine;
using UnityEngine.SceneManagement;

public class ChangeScene : MonoBehaviour
{
    // Start is called before the first frame update
    void Start()
    {

    }

    // Update is called once per frame
    void Update()
    {

    }
    public void Jump()
    {
        SceneManager.LoadScene("introduction");
    }
}
在层级界面新建一个空物体(GameObject)
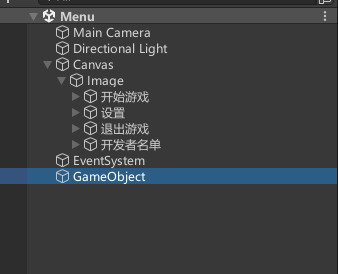
将新建的脚本绑定到空对象上
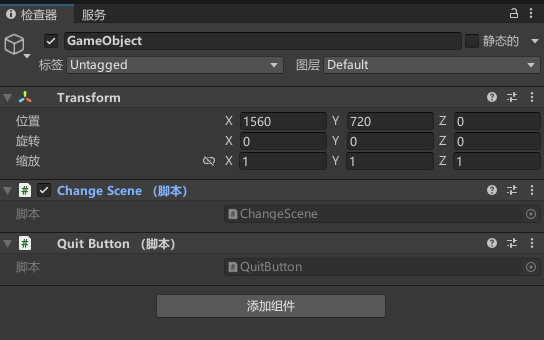
之后选中开始游戏按钮,在检查器界面为它新加一个鼠标点击事件,将空对象拖入,并选择ChangeScene.Jump函数

还要注意跳转的页面所在场景是否在生成设置中Build中的场景内,如果没有,需要先将需要跳转的场景拖入进去,效果如下
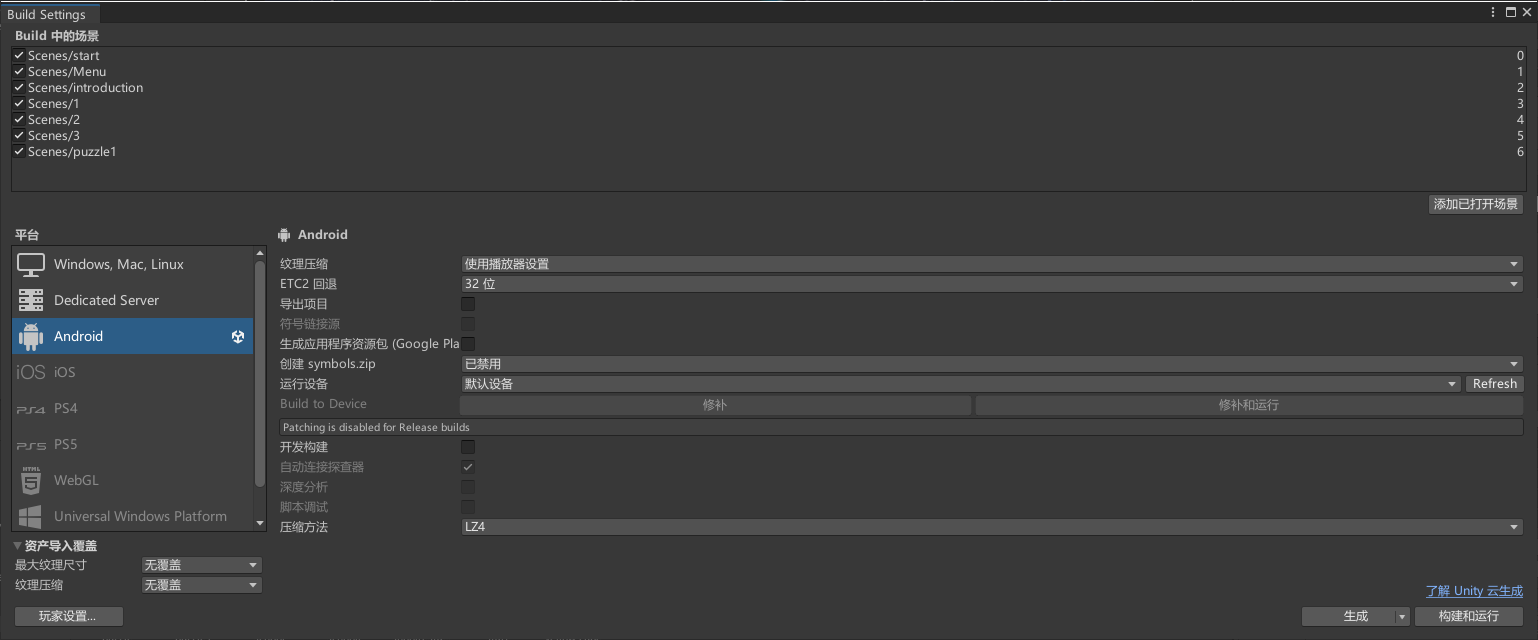
最终保存,可以成功运行
④退出游戏的功能实现
首先新建一个button按钮,然后新建一个c#脚本,命名为QuitButton
脚本代码:
using UnityEngine;
using UnityEngine.UI;
using TMPro;
using System.Collections;
using System.Collections.Generic;

public class QuitButton : MonoBehaviour
{
    /// <summary>
    /// 退出游戏
    /// </summary>
    public void Close()
    {
        Application.Quit();//退出应用
    }
}
和实现页面跳转功能一样,先新建一个空对象,将脚本挂载到空对象上,在退出按钮的检查器界面新添加一个鼠标点击事件

⑤打字机效果实现
需要挂载脚本如下:
using System.Collections;
using System.Collections.Generic;
using UnityEngine;
using UnityEngine.UI;

public class 打字机脚本 : MonoBehaviour
{
    public float 打字机间隔时间 = 0.1f;
    float 计时器时间;
    public Text 文字组件;
    string 文字内容 = "需要实现打字机效果的文本";
    int 文字内容的数量;
    bool 是否开始打字 = true;

    // Start is called before the first frame update
    void Start()
    {
        文字组件.fontSize = 100;
    }

    // Update is called once per frame
    void Update()
    {
        开始打字功能();
    }

    public void 开始打字功能()
    {
        if(是否开始打字 == true)
        {
            计时器时间 += Time.deltaTime;
            if(计时器时间>=打字机间隔时间)
            {
                计时器时间 = 0;
                文字内容的数量++;
                文字组件.text = 文字内容.Substring(0, 文字内容的数量);
                if(文字内容的数量>=文字内容.Length)
                {
                    是否开始打字 = false;
                }
            }
        }
    }
}
⑥安卓截屏(保存到相册)
将脚本挂载到需要有截屏功能的场景摄像头下:
using UnityEngine;
using UnityEngine.UI;
using System.Collections;
using System;
using System.IO;
using System.Security.AccessControl;
using System.Collections.Generic;
using UnityEngine.Android;

public static class AndroidPermissionMgr
{
    /// <summary>
    /// 外部访问方法
    /// </summary>
    /// <param name="type">权限名</param>
    /// <param name="time">如拒绝延迟多久再次申请</param>
    public static void Get(string type, float time)
    {
        if (!Permission.HasUserAuthorizedPermission(type))
        {
            Permission.RequestUserPermission(type);

        }
    }

    //延时调用
    static IEnumerator Check(string type, float time)
    {
        yield return new WaitForSeconds(time);
        Get(type, time);
    }
}


/// <summary>
/// 截图保存安卓手机相册
/// </summary>
public class CaptureScreenshotMgr : MonoBehaviour
{
    private string path;
    /// <summary>
    /// 保存按钮点击事件
    /// </summary>
    public void OnScreenShootClick()
    {
        StartCoroutine(ScreenShoot());
    }
    //获取图片的保存路径
    public string ScreenshotPath()
    {
        string filePath = "";
        if (Application.platform == RuntimePlatform.Android)
        {
            filePath = "/storage/emulated/0/Pictures/pictest/";
        }
        if (!Directory.Exists(filePath))
        {
            try
            {
                Directory.CreateDirectory(filePath);
            }
            catch (PathTooLongException)
            {
                Debug.Log("路径或者文件名超过系统定义的最大长度。");
                //txt.text += "路径或者文件名超过系统定义的最大长度。";
            }
            catch (DirectoryNotFoundException)
            {
                //txt.text += "保存目录没有找到。";
                Debug.Log("保存目录没有找到。");
            }
            catch (UnauthorizedAccessException)
            {
                //txt.text += "创建目录失败,因为没有足够的权限。";
                Debug.Log("创建目录失败,因为没有足够的权限。");
            }

        }
        return filePath;
    }
    //截图保存之后刷新相册
    IEnumerator ScreenShoot()
    {
        //保存照片前隐藏保存按钮和返回按钮


        //图片大小
        Texture2D tex = new Texture2D(Screen.width, Screen.height, TextureFormat.RGB24, true);
        yield return new WaitForEndOfFrame();
        tex.ReadPixels(new Rect(0, 0, Screen.width, Screen.height), 0, 0, true);
        tex.Apply();
        yield return tex;
        byte[] byt = tex.EncodeToPNG();

        //显示返回按钮


        //图片名称,一般以日期命名
        DateTime currentTime = DateTime.Now;
        string fileName = "Custom" + currentTime.Year + currentTime.Month + currentTime.Day + "_" + currentTime.Hour + currentTime.Minute + currentTime.Second + ".png";
        path = ScreenshotPath() + fileName;
        File.WriteAllBytes(path, byt);
        string[] paths = { path };
        //安卓平台才调用安卓的活动刷新相册
        if (Application.platform == RuntimePlatform.Android)
        {
            ScanFile(paths);
        }
    }

    //刷新图片,显示到相册中
    void ScanFile(string[] path)
    {
        using (AndroidJavaClass PlayerActivity = new AndroidJavaClass("com.unity3d.player.UnityPlayer"))
        {
            AndroidJavaObject playerActivity = PlayerActivity.GetStatic<AndroidJavaObject>("currentActivity");
            using (AndroidJavaObject Conn = new AndroidJavaObject("android.media.MediaScannerConnection", playerActivity, null))
            {
                Conn.CallStatic("scanFile", playerActivity, path, null, null);
            }
        }
    }
}
⑦数字谜题
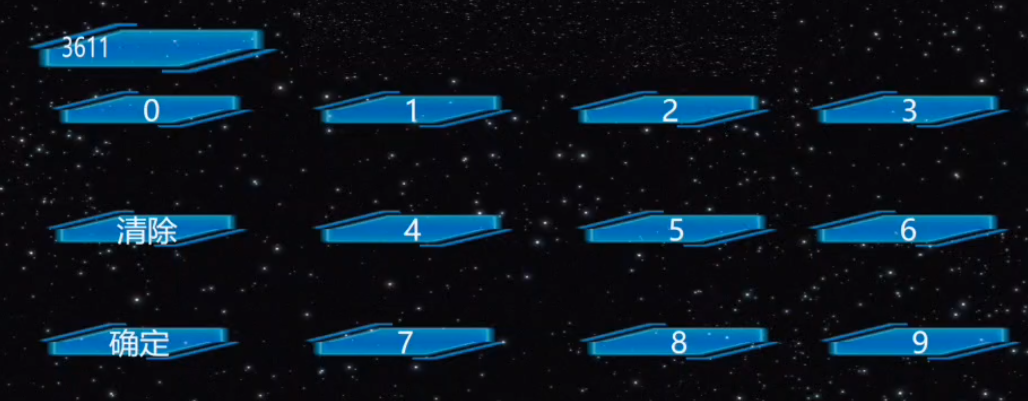
脚本实现(挂载到画布下):
using System.Collections;
using System.Collections.Generic;
using UnityEngine;
using UnityEngine.UI;
using TMPro;
using UnityEngine.SceneManagement;


public class codebox : MonoBehaviour
{

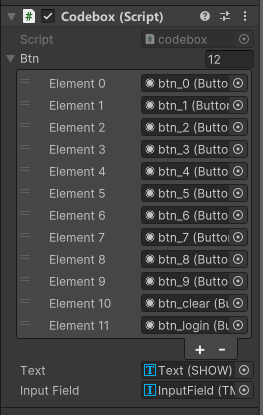
    public Button[] btn;
    private string  _password;
    public TextMeshProUGUI _Text;
    public TMP_InputField m_InputField;

    private void Start()
    {
        btn[0].onClick.AddListener(btn_00);
        btn[1].onClick.AddListener(btn_01);
        btn[2].onClick.AddListener(btn_02);
        btn[3].onClick.AddListener(btn_03);
        btn[4].onClick.AddListener(btn_04);
        btn[5].onClick.AddListener(btn_05);
        btn[6].onClick.AddListener(btn_06);
        btn[7].onClick.AddListener(btn_07);
        btn[8].onClick.AddListener(btn_08);
        btn[9].onClick.AddListener(btn_09);
        btn[10].onClick.AddListener(btn_clear);
        btn[11].onClick.AddListener(btn_login);
    }

    private void Update()
    {
        m_InputField.text = _password;
    }

    private void btn_00()
    {
        _password += "0";
    }
    private void btn_01()
    {
        _password += "1";
    }
    private void btn_02()
    {
        _password += "2";
    }
    private void btn_03()
    {
        _password += "3";
    }
    private void btn_04()
    {
        _password += "4";
    }
    private void btn_05()
    {
        _password += "5";
    }
    private void btn_06()
    {
        _password += "6";
    }
    private void btn_07()
    {
        _password += "7";
    }
    private void btn_08()
    {
        _password += "8";
    }
    private void btn_09()
    {
        _password += "9";
    }
    private void btn_clear()
    {
        _password = "";
    }
    private void btn_login()
    {
        if (_password == "36110")
        {
            _Text.text = "密码正确";
            SceneManager.LoadScene("获得宝箱");
        }
        else
        {
            _Text.text = "密码错误";
            _password = "";

        }
    }

}
⑧制作道具栏
新建场景,新建面板,作为侧边栏(可任意命名)
侧边栏里再新建一个面板,明明为道具栏背景,搜索添加mask组件,(添加遮罩层用的)
添加完Mask组件后可以调整道具栏背景面板的大小,并拖动调整位置
在道具栏背景往下添加新面板,是道具格栏,搜索并添加Grid Layout Group组件,这个组件是道具栏的核心,作用是让下一级的UI部件自动按照顺序排序
继续往下添加UI面板,作为单体道具格的父对象和背景
设置道具格(预制体)背景图片,需要网络上找图,这里选取黄色图
道具格父对象里添加按钮(新旧版都可以,这里用旧版的)
如果没有预制体还需要的部件,这里就可以进行复制粘贴,完成道具栏样式
复制所需要的份数,效果如下


