


vue使用流程
1.准备知识
javase,servlet,jdbc,maven,mybatis,springmvc,ssm(了解),springboot
mysql数据库建的sql语法
html,css,js,vue2相关语法
2.系统功能

3.安装软件
ideal(写代码软件),
nodejs(前端开发环境),官网下载以后直接下一步下一步,即可安装
jdk(后端开发环境),
mysql5.7(数据库),
Navicat(数据库可视化)
notepad++(文本编辑器)
postman(接口调试工具)
4.创建vue工程
参考文档:https://cli.vuejs.org/zh/guide/installation.html
进入已经创建好的项目目录
安装
  npm install -g @vue/cli
    1>安装过程如果没有进度或者安装不动,可以把镜像源更新一下
    2>更新镜像源
      npm config get registry
      或者进行加速
      npm config set registry https://registry.npm.taobao.org
      npm config set registry https://registry.npmmirror.com
        3>继续安装

npm install -g @vue/cli
1 2 3 4 5 6 7 8 9 10 11 12 13 14 15 16 17 18 19 20 21 22 23 24 25 26 27 28 29 30 31 | D:\code-source\library-manager>npm config set registry https://registry.npmmirror.comD:\code-source\library-manager> npm install -g @vue/clinpm warn deprecated inflight@1.0.6: This module is not supported, and leaks memory. Do not use it. Check out lru-cache if you want a good and tested way to coalesce async requests by a key value, which is much more comprehensive and powerful.npm warn deprecated @babel/plugin-proposal-class-properties@7.18.6: This proposal has been merged to the ECMAScript standard and thus this plugin is no longer maintained. Please use @babel/plugin-transform-class-properties instead.npm warn deprecated @babel/plugin-proposal-nullish-coalescing-operator@7.18.6: This proposal has been merged to the ECMAScript standard and thus this plugin is no longer maintained. Please use @babel/plugin-transform-nullish-coalescing-operator instead.npm warn deprecated source-map-url@0.4.1: See https://github.com/lydell/source-map-url#deprecatednpm warn deprecated rimraf@2.6.3: Rimraf versions prior to v4 are no longer supportednpm warn deprecated @babel/plugin-proposal-optional-chaining@7.21.0: This proposal has been merged to the ECMAScript standard and thus this plugin is no longer maintained. Please use @babel/plugin-transform-optional-chaining instead.npm warn deprecated urix@0.1.0: Please see https://github.com/lydell/urix#deprecatednpm warn deprecated rimraf@3.0.2: Rimraf versions prior to v4 are no longer supportednpm warn deprecated glob@7.2.3: Glob versions prior to v9 are no longer supportednpm warn deprecated apollo-datasource@3.3.2: The `apollo-datasource` package is part of Apollo Server v2 and v3, which are now deprecated (end-of-life October 22nd 2023 and October 22nd 2024, respectively). See https://www.apollographql.com/docs/apollo-server/previous-versions/ for more details.npm warn deprecated apollo-server-errors@3.3.1: The `apollo-server-errors` package is part of Apollo Server v2 and v3, which are now deprecated (end-of-life October 22nd 2023 and October 22nd 2024, respectively). This package's functionality is now found in the `@apollo/server` package. See https://www.apollographql.com/docs/apollo-server/previous-versions/ for more details.npm warn deprecated source-map-resolve@0.5.3: See https://github.com/lydell/source-map-resolve#deprecatednpm warn deprecated apollo-server-plugin-base@3.7.2: The `apollo-server-plugin-base` package is part of Apollo Server v2 and v3, which are now deprecated (end-of-life October 22nd 2023 and October 22nd 2024, respectively). This package's functionality is now found in the `@apollo/server` package. See https://www.apollographql.com/docs/apollo-server/previous-versions/ for more details.npm warn deprecated apollo-server-types@3.8.0: The `apollo-server-types` package is part of Apollo Server v2 and v3, which are now deprecated (end-of-life October 22nd 2023 and October 22nd 2024, respectively). This package's functionality is now found in the `@apollo/server` package. See https://www.apollographql.com/docs/apollo-server/previous-versions/ for more details.npm warn deprecated resolve-url@0.2.1: https://github.com/lydell/resolve-url#deprecatednpm warn deprecated shortid@2.2.16: Package no longer supported. Contact Support at https://www.npmjs.com/support for more info.npm warn deprecated apollo-reporting-protobuf@3.4.0: The `apollo-reporting-protobuf` package is part of Apollo Server v2 and v3, which are now deprecated (end-of-life October 22nd 2023 and October 22nd 2024, respectively). This package's functionality is now found in the `@apollo/usage-reporting-protobuf` package. See https://www.apollographql.com/docs/apollo-server/previous-versions/ for more details.npm warn deprecated apollo-server-env@4.2.1: The `apollo-server-env` package is part of Apollo Server v2 and v3, which are now deprecated (end-of-life October 22nd 2023 and October 22nd 2024, respectively). This package's functionality is now found in the `@apollo/utils.fetcher` package. See https://www.apollographql.com/docs/apollo-server/previous-versions/ for more details.npm warn deprecated subscriptions-transport-ws@0.11.0: The `subscriptions-transport-ws` package is no longer maintained. We recommend you use `graphql-ws` instead. For help migrating Apollo software to `graphql-ws`, see https://www.apollographql.com/docs/apollo-server/data/subscriptions/#switching-from-subscriptions-transport-ws For general help using `graphql-ws`, see https://github.com/enisdenjo/graphql-ws/blob/master/README.mdnpm warn deprecated vue@2.7.16: Vue 2 has reached EOL and is no longer actively maintained. See https://v2.vuejs.org/eol/ for more details.changed 851 packages in 27s74 packages are looking for funding run `npm fund` for detailsD:\code-source\library-manager>vue --version@vue/cli 5.0.8 |
5.创建vue工程
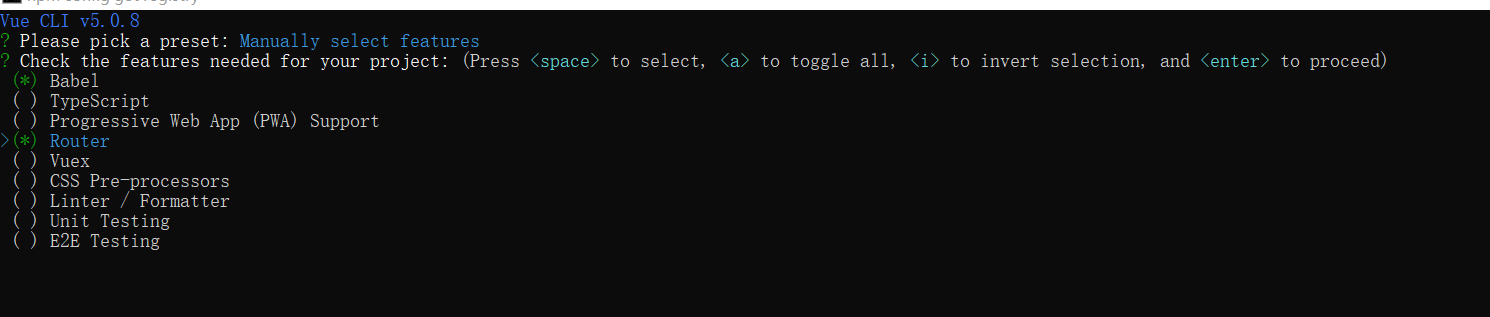
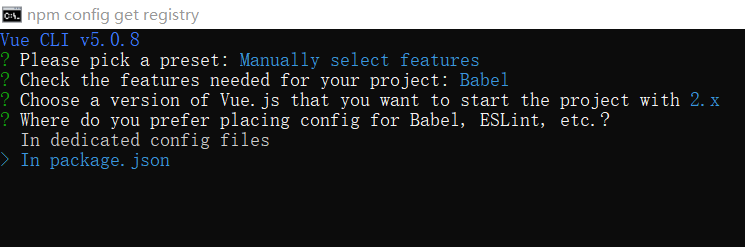
1>vue create 文件夹名字,选择Manually select features
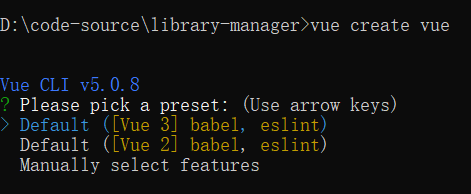
2>选择babel和Router
3>回车,选择2.x版本

4>选择y

5>选择package json
6>保存组件

7>安装完成

8>根据上图提示
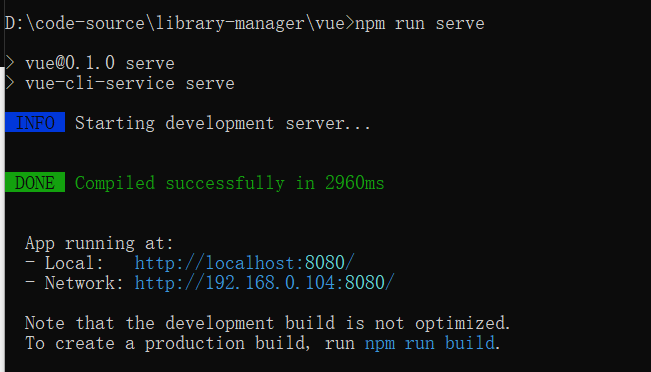
运行:cd vue
npm run serve
6.用idea打开library-manager下面的vue目录
7.安装element组件
npm i element-ui -S
8.在main.js中导入(集成element)
import ElementUI from 'element-ui';
import 'element-ui/lib/theme-chalk/index.css';
Vue.use(ElementUI);
9.删除app.vue里面的样式
1>删除下面
  <nav>
    <router-link to="/">Home</router-link> |
    <router-link to="/about">About</router-link>
  </nav>
   2>删除下面
  <style>
  ......
  </style>
  只保留下面的router-view
<template>
  <div id="app">

    <router-view/>
  </div>
</template>
10.删除homeview.vue的其它部分,只保留西下面的内容,增加一个按钮

<template>
  <div >
<el-button type="primary">按钮</el-button>
  </div>
</template>

<script>

export default {
  name: 'HomeView',

}
</script>
11.配置ideal启动run
点击run configuration

点击+号,选择npm,并且在Scripts :serve
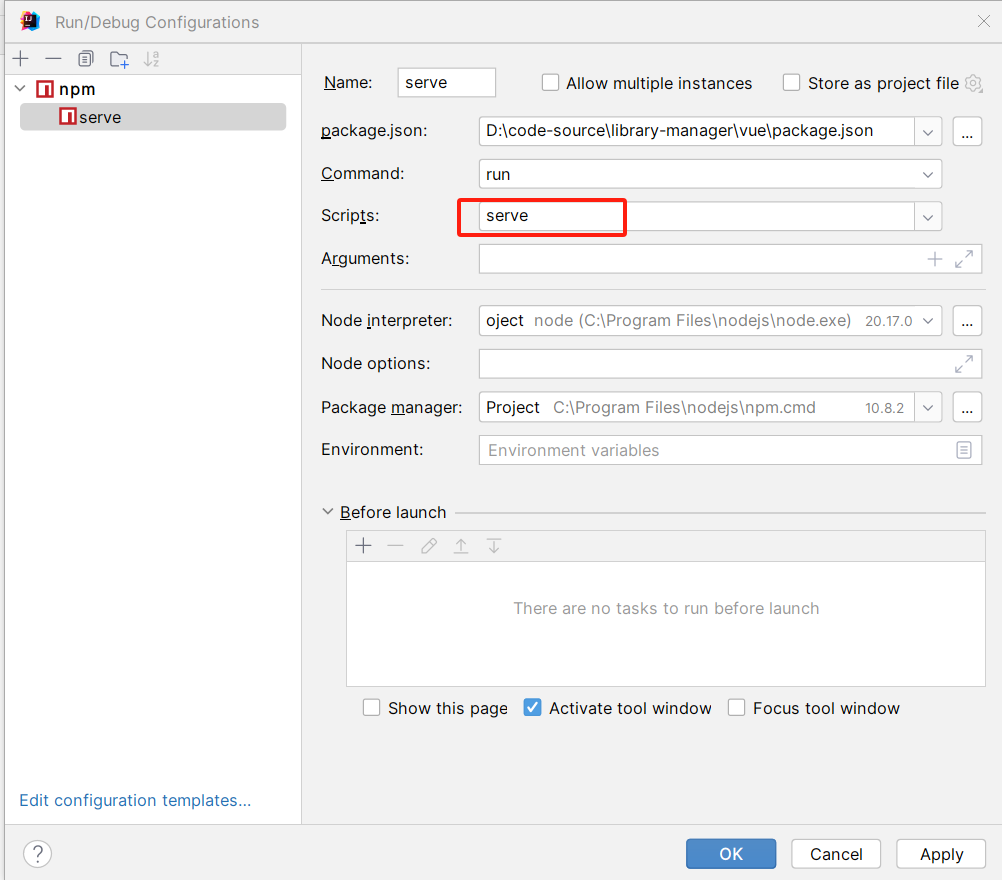
就可以通过ideal启动vue了
12.去掉默认的样式,可以在assets/global.css
body{
    margin: 0;
    padding: 0;
}
*{
    box-sizing: border-box;
}
13.在app.vue里面定义一个页面的框架:头部,左部,主体

homeview是我们的主界面,是我们的main的区域
14.在App.vue里面完成我们的头部,左部,和主体
body{
    margin: 0;
    padding: 0;
    background-color: #eee;将网页主界面全部设置为灰色
}
*{
    box-sizing: border-box;
}
<template>
  <div id="app">
    <!--头部区域-->
 <div style="height: 60px;line-height: 60px;background-color: white">将头部设置为白色


 </div>
    <router-view/>
  </div>
</template>
15.在主页的头部增加logo图标
可以在网站https://www.iconfont.cn/网站进行查找自己需要的图标
把下载好的图标修改为logo.png,放到assets目录下即可
16.在app.vue的里面加入这个图标
<template>
  <div id="app">
    <!--头部区域-->
 <div style="height: 60px;line-height: 60px;background-color: white">
   <img src="@/assets/logo.png" alt="" style="width:40px;position :relative;top:10px;left:20px">
   <span style="margin-left: 25px;font-size: 24px">图书管理系统</span>
 </div>

    <router-view/>
  </div>
</template>
<script>
</script>
17. 在app.vue里面加入左侧的侧边栏
https://element.eleme.cn/#/zh-CN/component/menu在这个网站找到导航栏的代码将其复制过来,加入到app.vue里面侧边导航栏的div里面
<template>
  <div id="app">
    <!--头部区域-->
    <div style="height: 60px;line-height: 60px;background-color: white;margin-bottom: 2px">
      <img src="@/assets/logo.png" alt="" style="width:40px;position :relative;top:10px;left:20px">
      <span style="margin-left: 25px;font-size: 24px">图书管理系统</span>
    </div>

    <!--侧边栏和主体,定义一个div作为他们俩的容器-->
    <div style="display: flex">
      <!--侧边栏导航-->
      <div style="width: 200px;min-height:calc(100vh - 62px - 5px);overflow: hidden;margin-right: 2px;background-color: white">
        <el-menu :default-active="$route.path" router class="el-menu-demo" >
          <el-menu-item index="/" >首页</el-menu-item>
          <el-submenu >
            <template slot="title">关于页面</template>
            <el-menu-item index="/about">关于详情</el-menu-item>
          </el-submenu>
        </el-menu>
      </div>
     <!--主体数据-->
      <div style="flex:1;background-color: white">

        <router-view/>
      </div>
    </div>

  </div>
</template>
<script>
</script>
18.给菜单加上图标
在这个网站搜索图标https://element.eleme.cn
19.增加后端模块
在ideal里面选择new module,

1>选择组件

2>选择组件

3>选择组件
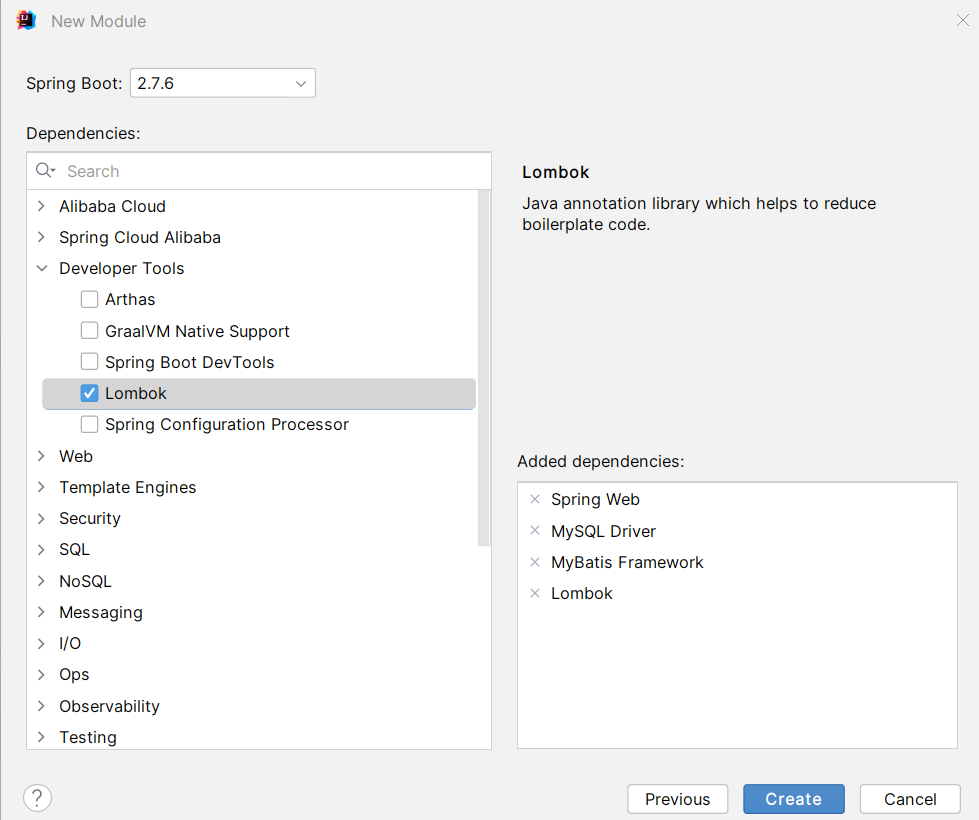
4>红框是我们选择的总共的组件


【推荐】国内首个AI IDE,深度理解中文开发场景,立即下载体验Trae
【推荐】编程新体验,更懂你的AI,立即体验豆包MarsCode编程助手
【推荐】抖音旗下AI助手豆包,你的智能百科全书,全免费不限次数
【推荐】轻量又高性能的 SSH 工具 IShell:AI 加持,快人一步
· 25岁的心里话
· 闲置电脑爆改个人服务器(超详细) #公网映射 #Vmware虚拟网络编辑器
· 零经验选手,Compose 一天开发一款小游戏!
· 通过 API 将Deepseek响应流式内容输出到前端
· AI Agent开发,如何调用三方的API Function,是通过提示词来发起调用的吗