Consul 集群带ACL控制搭建
1.机器规划
我这里起了四台虚拟机,三台用作Server agent,一台用作Client agent。(说明:当然Client可以配置多个,这里由于开太多虚拟机比较耗费资源,就只设置了一个。)| 机器ip(机器名) | http端口(其他端口使用默认值) | Agent类型 | 节点名称 |
|---|---|---|---|
| 10.211.55.28 node1 | 8500 | server | consul-server1 |
| 10.211.55.25 node2 | 8500 | server | consul-server2 |
| 10.211.55.26 node3 | 8500 | server | consul-server3 |
| 10.211.55.27 node4 | 7110 | client 带ui | consul-client1 |
2.先配置好三个Server,并启动一遍。
consul-server1.json{
"datacenter":"dc1",
"primary_datacenter":"dc1",
"bootstrap_expect":1,
"start_join":[
"10.211.55.25",
"10.211.55.26"
],
"retry_join":[
"10.211.55.25",
"10.211.55.26"
],
"advertise_addr": "10.211.55.28",
"bind_addr": "10.211.55.28",
"server":true,
"connect":{
"enabled":true
},
"node_name":"consul-server1",
"data_dir":"/opt/consul/data/",
"enable_script_checks":false,
"enable_local_script_checks":true,
"log_file":"/opt/consul/log/",
"log_level":"info",
"log_rotate_bytes":100000000,
"log_rotate_duration":"24h",
"encrypt":"krCysDJnrQ8dtA7AbJav8g==",
"acl":{
"enabled":true,
"default_policy":"deny",
"enable_token_persistence":true,
"tokens":{
"master":"cd76a0f7-5535-40cc-8696-073462acc6c7"
}
}
}
consul-server2.json
{
    "datacenter":"dc1",
    "primary_datacenter":"dc1",
    "advertise_addr":  "10.211.55.25",
    "bind_addr": "10.211.55.25",
    "server":true,
    "connect":{
        "enabled":true
    },
    "node_name":"consul-server2",
    "data_dir":"/opt/consul/data/",
    "enable_script_checks":false,
    "enable_local_script_checks":true,
    "log_file":"/opt/consul/log/",
    "log_level":"info",
    "log_rotate_bytes":100000000,
    "log_rotate_duration":"24h",
    "encrypt":"krCysDJnrQ8dtA7AbJav8g==",
    "acl":{
        "enabled":true,
        "default_policy":"deny",
        "enable_token_persistence":true,
        "tokens":{
            "master":"cd76a0f7-5535-40cc-8696-073462acc6c7"
        }
    }
}
consul-server3.json
{
    "datacenter":"dc1",
    "primary_datacenter":"dc1",
    "advertise_addr":"10.211.55.26",
    "bind_addr":"10.211.55.26",
    "server":true,
    "connect":{
        "enabled":true
    },
    "node_name":"consul-server3",
    "data_dir":"/opt/consul/data/",
    "enable_script_checks":false,
    "enable_local_script_checks":true,
    "log_file":"/opt/consul/log/",
    "log_level":"info",
    "log_rotate_bytes":100000000,
    "log_rotate_duration":"24h",
    "encrypt":"krCysDJnrQ8dtA7AbJav8g==",
    "acl":{
        "enabled":true,
        "default_policy":"deny",
        "enable_token_persistence":true,
        "tokens":{
            "master":"cd76a0f7-5535-40cc-8696-073462acc6c7"
           }
    }
}
可以看到,consul-server2和consul-server3的配置类似,只是换了下ip和端口;另外consul-server1主要是多了开始连接和重试连接等配置。
接着,启动集群:
在机器10.2111.55.25 (node2)上执行,./consul agent -config-file start-conf/consul-server2.json
在机器10.2111.55.26 (node3)上执行,./consul agent -config-file start-conf/consul-server3.json
在机器10.2111.55.28 (node1)上执行,./consul agent -config-file start-conf/consul-server1.json
3.生成并配置agent-token,解决server agent ACL block问题
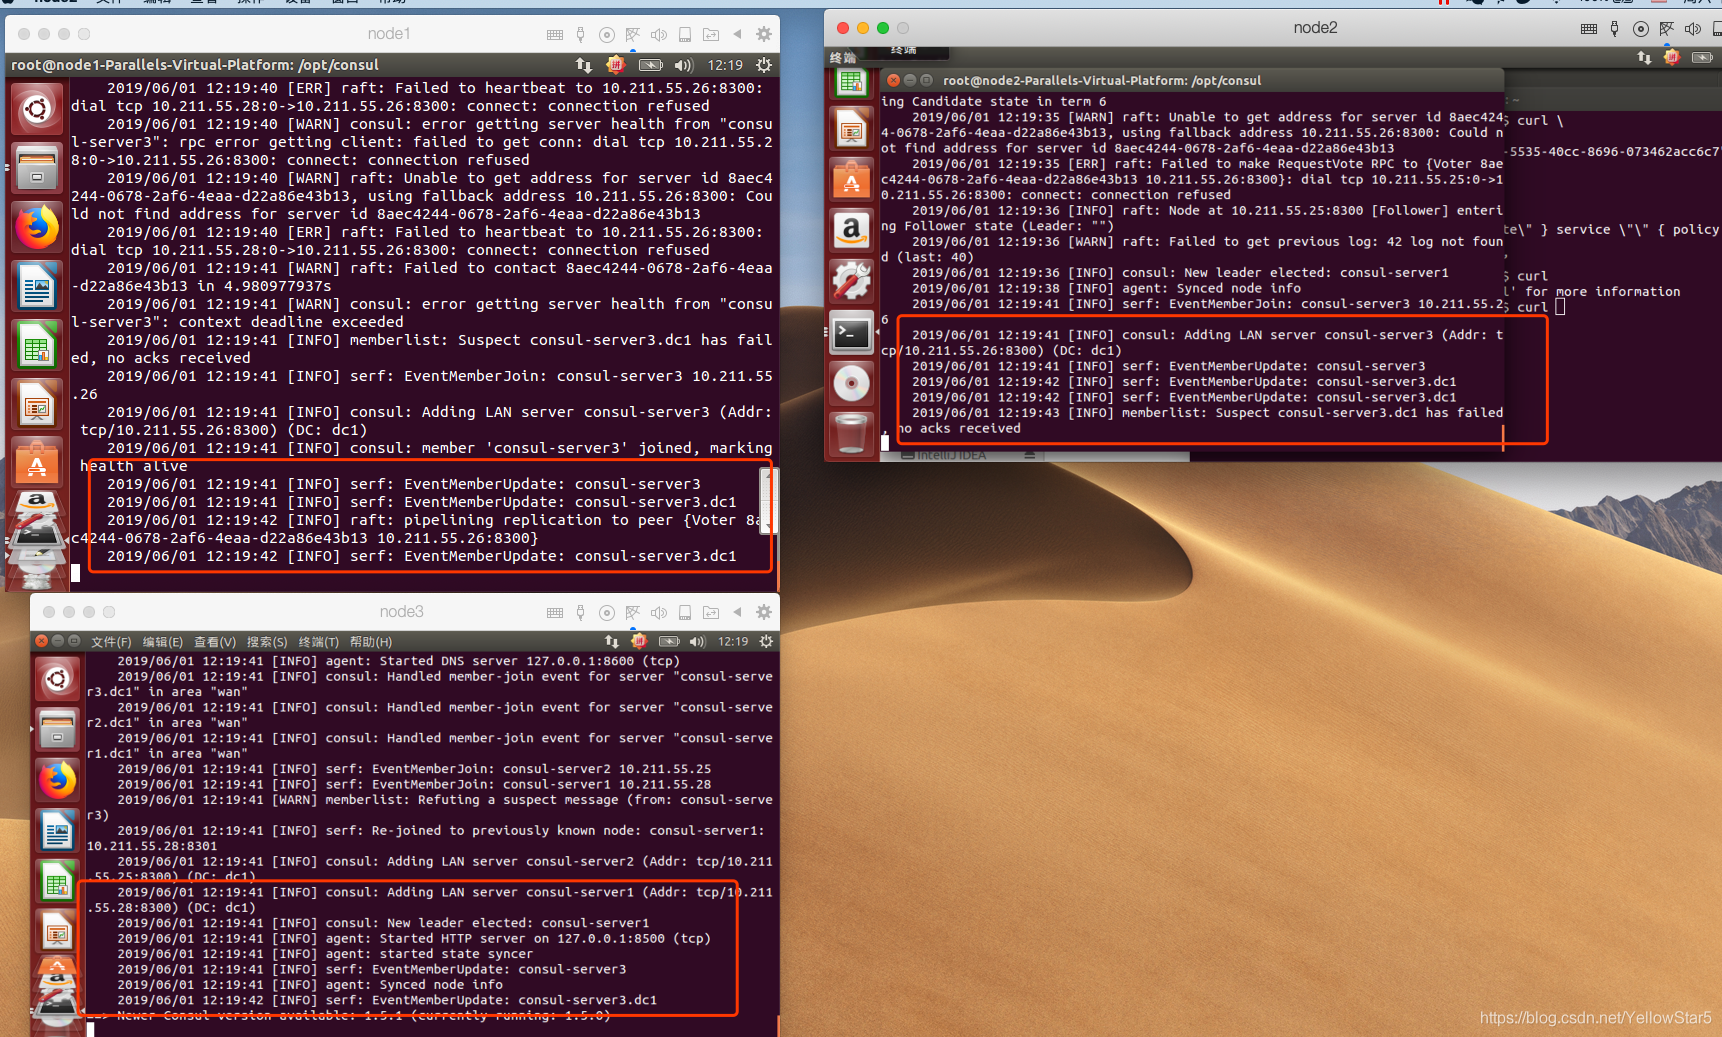
当上面的语句执行完之后,会发现协调更新由于ACL被阻塞。如下图:
经过查看官方文档,发现是由于未生成和配置agent-token导致。
在任意一台server上执行下面的语句来生成agent-token:
curl \
    --request PUT \
    --header "X-Consul-Token: cd76a0f7-5535-40cc-8696-073462acc6c7" \
    --data \
'{
  "Name": "Agent Token",
  "Type": "client",
  "Rules": "node \"\" { policy = \"write\" } service \"\" { policy = \"read\" }"
}' http://127.0.0.1:8500/v1/acl/create
此时会返回生成的agent-token

将生成的agent_token设置到每个server agent的配置文件中。
此时consul-server1.json, consul-server2.json, consul-server3.json中acl部分就变为:
"acl":{
        "enabled":true,
        "default_policy":"deny",
        "enable_token_persistence":true,
        "tokens":{
            "master":"cd76a0f7-5535-40cc-8696-073462acc6c7",
             "agent":"deaa315d-98c5-b9f6-6519-4c8f6574a551"
        }
    }
也就是多了agent这个配置。
接着一次重启各个server agent(把之前的进程先停掉)
在机器10.2111.55.25 (node2)上执行,./consul agent -config-file start-conf/consul-server2.json
在机器10.2111.55.26 (node3)上执行,./consul agent -config-file start-conf/consul-server3.json
在机器10.2111.55.28 (node1)上执行,./consul agent -config-file start-conf/consul-server1.json
等server agent集群稳定下来之后,我们会看到之前的ACL block已经解决。
4.启动一个带ui的client agent
{
    "datacenter":"dc1",
    "primary_datacenter":"dc1",
    "advertise_addr": "10.211.55.27",
    "start_join":[
         "10.211.55.25",
        "10.211.55.26",
        "10.211.55.28"
    ],
    "retry_join":[
         "10.211.55.25",
        "10.211.55.26",
        "10.211.55.28"
    ],
    "bind_addr":"10.211.55.27",
    "node_name":"consul-client1",
    "client_addr":"0.0.0.0",
    "connect":{
        "enabled":true
    },
    "data_dir":"/opt/consul/data/",
    "log_file":"/opt/consul/log/",
    "log_level":"info",
    "log_rotate_bytes":100000000,
    "log_rotate_duration":"24h",
    "encrypt":"krCysDJnrQ8dtA7AbJav8g==",
    "ui":true,
    "enable_script_checks":false,
    "enable_local_script_checks":true,
    "disable_remote_exec":true,
    "ports":{
        "http":7110
    },
    "acl":{
        "enabled":true,
        "default_policy":"deny",
        "enable_token_persistence":true,
        "tokens":{
	    "agent":"deaa315d-98c5-b9f6-6519-4c8f6574a551"
        }
    }
}
上面的配置主要是多了ui,表明带web-ui(可以在浏览器中查看)。
另外也是设置了第三步中生成的agent token。
在机器10.2111.55.27 (node4)上执行,./consul agent -config-file start-conf/consul-client1.json
5.配置环境变量。
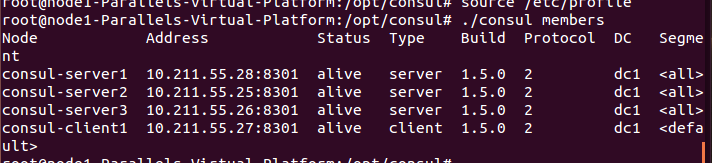
经过前面一番配置,本以为已经搞定了所有东西,此时只想摸摸自己帅气的头发。 可一执行./consul members, 想看看我这里都有哪些成员,居然发现一个都没有
经过查看官方文档及搜索,发现是没有配置环境变量导致。
1.给三个server的环境变量添加CONSUL_HTTP_TOKEN, vim /etc/profile添加下面一句
export CONSUL_HTTP_TOKEN=cd76a0f7-5535-40cc-8696-073462acc6c7
然后,source /etc/profile一下。
为了简单方便,我这里配了最大的权限即master_token
此时发现./consul members已经有数据了
2.给client agent 设置环境变量
由于client agent 带web-ui,这里你的公司不一定对外开放8500端口,所以我这里把它改成了7110,方便在外网查看。
不过此时需要添加一个环境变量CONSUL_HTTP_ADDR,来告诉命令行不是使用默认的127.0.0.1:8500
更改client-agent的环境变量,在最后添加下面两行
#consul http-token
export CONSUL_HTTP_TOKEN=cd76a0f7-5535-40cc-8696-073462acc6c7
#only consul-client1 need, because http port has changed to 7110
export CONSUL_HTTP_ADDR=127.0.0.1:7110
此时发现在client agent上执行./consul members也是ok的。
6.给web-ui 设置master_token
在client-agent上,输入127.0.0.1:7110, 点击ACL, 输入master-token即可。如下图: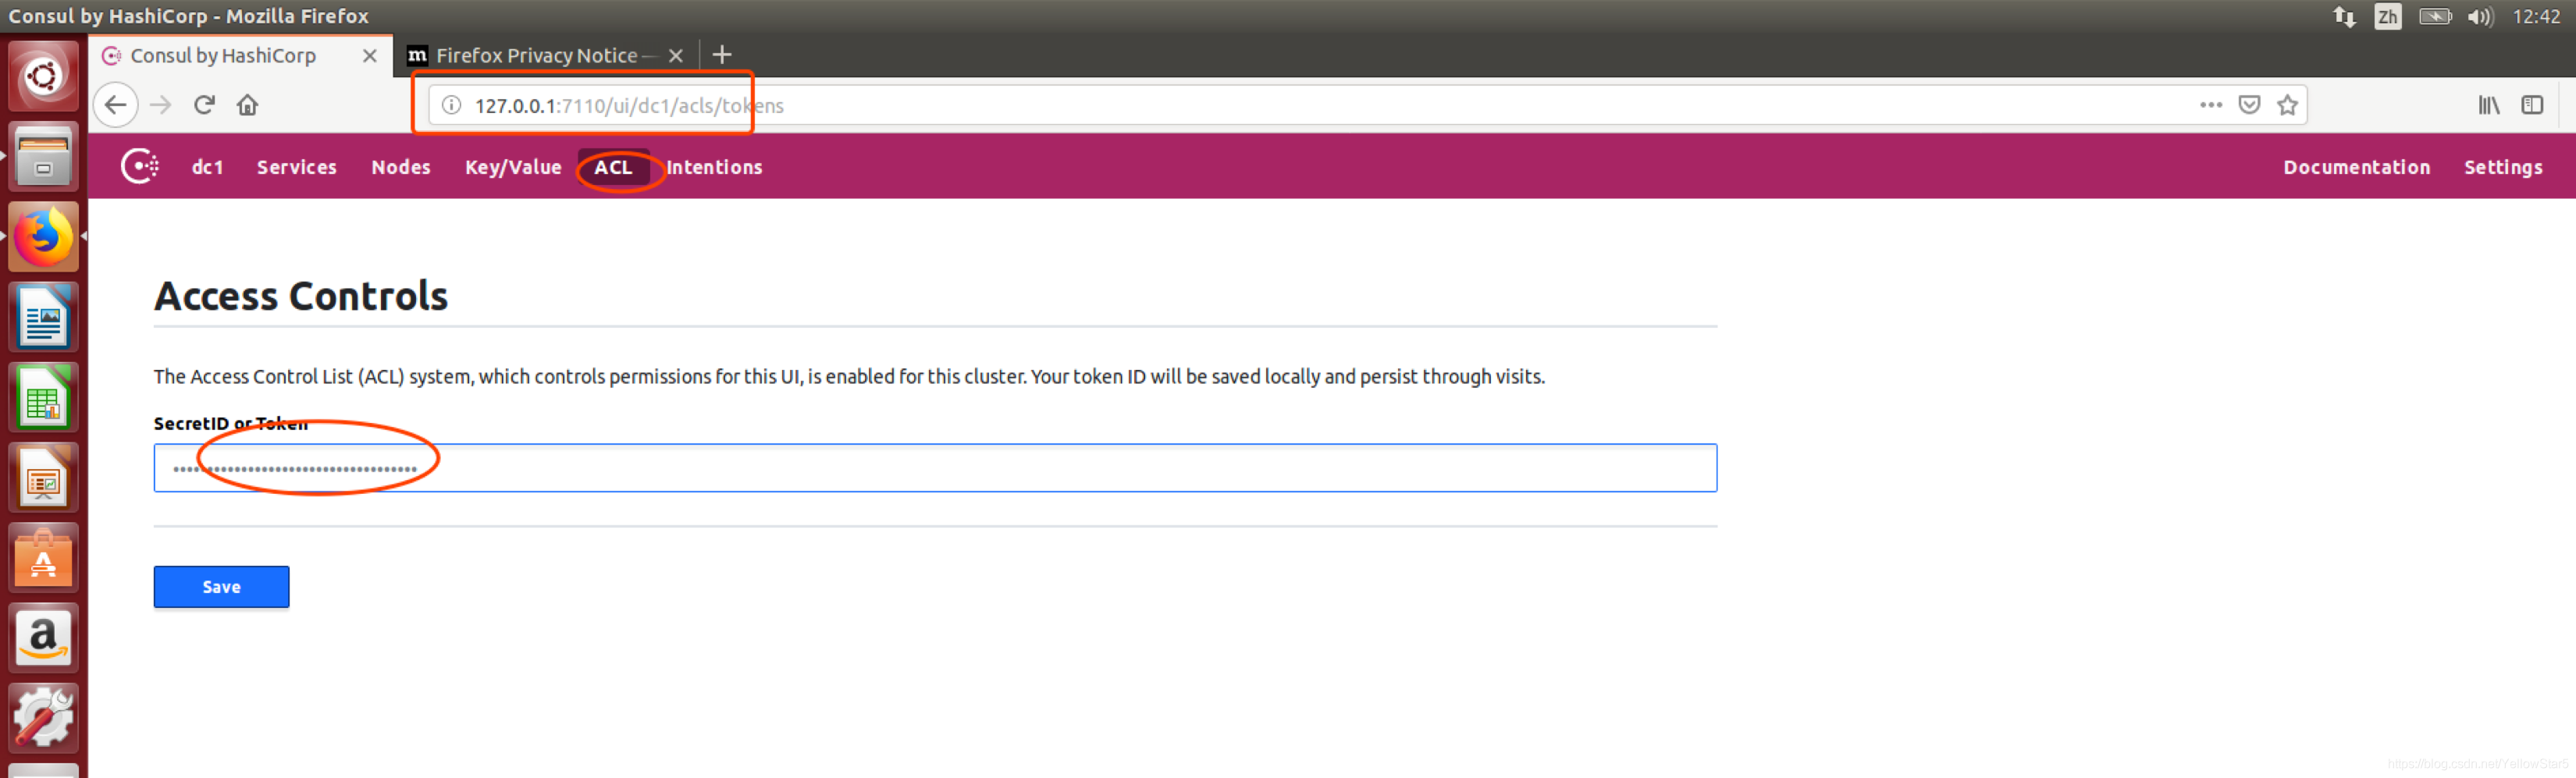
7.搭建单机3节点集群
在上一步的过程中,搭建了一个3节点集群,但是这种方式需要较多数量的服务器,成本方面来说不太友好。在使用过程中出于成本考虑,需要使用一个3节点集群,但因为在网上没有找到类似的教程来搭建单机3节点的教程,只能查看官方文档中一些配置详解来实现单机3节点,以下是搭建方式。
1、简单规划
| 节点用途 | 节点主机IP | 节点客户端HTTP端口 | 节点DNS端口 | 节点serf_lan端口 | 节点serf_wan端口 | 节点server端口 |
|---|---|---|---|---|---|---|
| Consul-Server1 | 10.100.0.2 | 8501 | 8601 | 8001 | 8002 | 8000 |
| Consul-Server2 | 10.100.0.2 | 8502 | 8602 | 8101 | 8102 | 8100 |
| Consul-Server3 | 10.100.0.2 | 8503 | 8603 | 8201 | 8202 | 8200 |
| Consul-Agent | 10.100.0.2 | 8500(默认) | 8600(默认) | - | - | - |
a、创建相应目录,配置多节点
创建各节点目录:
cd /data/services/consul
mkdir -p node{1..3}/{bin,conf,data,log}
mkdir -p agent/{bin,conf,data,log}
创建完成后,目录结构大致如下:
tree
.
├── agent
│   ├── bin
│   ├── conf
│   ├── data
│   │   └── serf
│   └── log
├── node1
│   ├── bin
│   ├── conf
│   ├── data
│   │   ├── raft
│   │   │   └── snapshots
│   │   └── serf
│   └── log
├── node2
│   ├── bin
│   ├── conf
│   ├── data
│   │   ├── raft
│   │   │   └── snapshots
│   │   └── serf
│   └── log
└── node3
    ├── bin
    ├── conf
    ├── data
    │   ├── raft
    │   │   └── snapshots
    |   └── serf
    └── log
将可执行文件复制到各节点的bin目录:
cd /data/services/consul
cp consul node1/bin/
cp consul node1/bin/
cp consul node1/bin/
cp consul agent/bin/
b、创建Consul-Server服务配置文件
以Server1节点为例:
cd /data/services/consul/node1/conf
vim server.json
{
 "bind_addr": "10.100.0.2",
 "client_addr": "127.0.0.1",
 "ports": {
 "http": 8501,  #其余server节点需要按照规划的端口进行配置
 "dns": 8601,  #其余server节点需要按照规划的端口进行配置
 "serf_lan": 8001,  #其余server节点需要按照规划的端口进行配置
 "serf_wan": 8002,  #其余server节点需要按照规划的端口进行配置
 "server": 8000  #其余server节点需要按照规划的端口进行配置
 },
 "datacenter": "dc1",
 "data_dir": "/data/services/consul/node1/data",  #此处注意目录名称,写对应server节点的目录名称,如:/data/services/consul/node2/data
 "encrypt": "EXz7LFN8hpQ4id8EDYiFoQ==",  #此处需要与其他节点一致
 "log_level": "INFO",
 "log_file": "/data/services/consul/node1/log/consul.log",  #此处注意目录名称,每个节点目录名称不一样
 "log_rotate_duration": "24h",
 "enable_syslog": false,
 "enable_debug": true,
 "node_name": "ConsulServer1",  #此处需要注意,按照规划的名称填写即可
 "disable_host_node_id": true,  #禁用主机信息生成节点ID
 "server": true,
 "ui": true,
 "bootstrap_expect": 3,
 "leave_on_terminate": false,
 "skip_leave_on_interrupt": true,
 "rejoin_after_leave": true,
 "retry_join": [
 "10.100.0.2:8001",
 "10.100.0.2:8101",
 "10.100.0.2:8201"
 ]
}
c、创建Consul-Agent配置文件
cd /data/services/consul/agent/conf
vim agent.json
{
 "bind_addr": "0.0.0.0",
 "client_addr": "0.0.0.0",
 "datacenter": "dc1",
 "data_dir": "/data/services/consul/agent/data",
 "encrypt": "EXz7LFN8hpQ4id8EDYiFoQ==",
 "log_level": "INFO",
 "log_file": "/data/services/consul/agent/log/consul.log",
 "log_rotate_duration": "24h",
 "enable_syslog": false,
 "enable_debug": true,
 "node_name": "ConsulClient",
 "ui": true,
 "disable_host_node_id": true,   #禁用主机信息生成的节点ID
 "server": false,
 "rejoin_after_leave": true,
 "retry_join": [
 "10.100.0.2:8001",
 "10.100.0.2:8101",
 "10.100.0.2:8201"
 ]
 }
以Server1节点为例,使用如下命令启动:
cd /data/services/consul/node1/bin #此处注意目录,启动相应的节点需要切换到相应的目录
./consul agent -config-dir=/data/services/consul/node1/conf
==> Starting Consul agent...
Version: 'v1.7.3'
Node ID: '0e2d44c2-af33-e222-5eb5-58b2c1f903d5'
Node name: 'Consul'
Datacenter: 'dc1' (Segment: '<all>')
Server: true (Bootstrap: false)
Client Addr: [10.100.0.2] (HTTP: 8500, HTTPS: -1, gRPC: 8502, DNS: 8600)
Cluster Addr: 10.100.0.2 (LAN: 8301, WAN: 8302)
Encrypt: Gossip: true, TLS-Outgoing: false, TLS-Incoming: false, Auto-Encrypt-TLS: false
==> Log data will now stream in as it occurs:
2020-06-18T15:11:48.435+0800 [INFO] agent.server.raft: initial configuration: index=1 servers="[{Suffrage:Voter ID:0e2d44c2-af33-e222-5eb5-58b2c1f903d5 Address:10.100.0.2:8300}]"
#部分内容因篇幅被删除,仅保留开头部分
注意:
以上操作需要在每一台节点执行,执行的时候注意切换到相应节点的目录。
1、单节点启动server时不能选举出leader
针对此问题,需要在配置文件中添加如下参数(案例中已经添加):
bootstrap-expect
并且将该参数的值设置为1,如下:
"bootstrap_expect": 1
2、搭建单机3节点能成功启动,但日志中提示未选举出leader,客户端访问报500
此问题的原因是集群中的node节点都使用了同一个node_id(通过分析日志发现的,在节点的通信中都标识了同一个node_id),但在配置文件中又设定了bootstrap-expect的值为3,此时集群中没有足够的投票选举出leader。针对此问题有两种解决方法。
a、方法一:
修改节点data目录下的node-id文件,以Server1节点为例:
cd /data/services/consul/node1/data
使用tree命令查看,目录结构如下:
tree
.
├── checkpoint-signature
├── node-id
├── raft
│   ├── peers.info
│   ├── raft.db
│   └── snapshots
│       ├── 7-131089-1592693864841
│       │   ├── meta.json
│       │   └── state.bin
│       └── 7-147478-1592808873974
│           ├── meta.json
│           └── state.bin
└── serf
编辑node-id文件:
vim node-id
6905298b-fd50-6423-2c42-1ddaf123e120
注意:
需要将每个Server节点的id改成唯一的,不可与其他Server节点重复。
b、方法二:
从产生问题的根本原因入手,之所以所有节点会有相同的node_id是因为Consul默认使用服务器的主机硬件信息等经过特定的算法生成一个node_id,因为3个Server节点都部署在同一台主机上,所以其node_id都使用了同一个。
解决此问题需要在服务启动时加入如下参数:
disable-host-node-id
在配置文件中添加该参数,并将其值设置为true,如下:
"disable_host_node_id": true
在本文档中搭建Consul单机3节点集群的配置中,已经加入了该配置。
3、使用agent客户端访问webUI查看节点信息,发现每一个节点在webUI中都被标记为leader
原因:webUI中默认使用IP标记leader,由于我们三个节点都在同一主机上,且只有一张网卡,服务监听的IP都是同一个IP,所以在webUI上显示每个节点都被标记成了leader。不影响使用。
排错与确定问题方法:
在主机的agent节点上执行命令行,通过命令行查看集群信息,命令如下:
cd /data/services/consul/agent/bin
./consul operator raft list-peers
Node           ID                                    Address          State     Voter  RaftProtocol
ConsulServer1  6905298b-fd50-6423-2c42-1ddaf123e120  10.100.0.2:8000  follower  true   3
ConsulServer3  e927bbfa-e067-a84f-93ea-6712cf1db7f8  10.100.0.2:8200  follower  true   3
ConsulServer2  38e5b263-b848-dfb6-d197-115ca2da40e7  10.100.0.2:8100  leader    true   3
通过命令行可以看到,集群中3个节点,只有一个节点是leader。

 浙公网安备 33010602011771号