Cobbler自动化安装
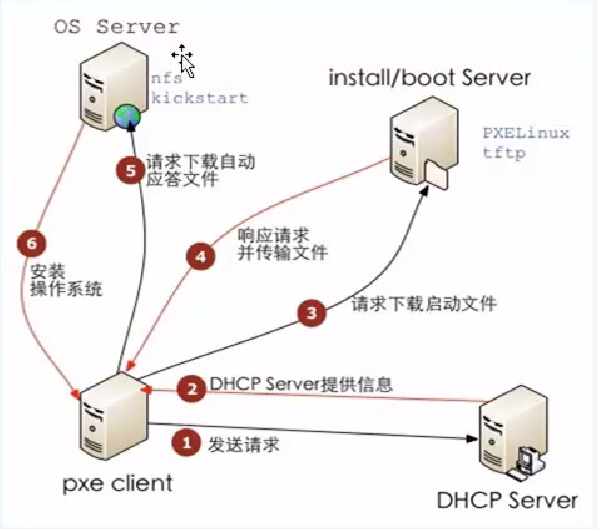
PXE(preboot execute environment,预启动执行环境)是由Intel公司开发的最新技术,工作于Client/Server的网络模式,支持工作站通过网络从远端服务器下载映像,并由此支持通过网络启动操作系统,在启动过程中,终端要求服务器分配IP地址,再用TFTP(trivial file transfer protocol)或MTFTP(multicast trivial file transfer protocol)协议下载一个启动软件包到本机内存中执行,由这个启动软件包完成终端(客户端)基本软件设置,从而引导预先安装在服务器中的终端操作系统。PXE可以引导多种操作系统,如:Windows95/98/2000/windows2003/windows2008/winXP/win7/win8,linux系列系统等。
二,PXE工作流程

三,Cobbler功能

四,安装环境
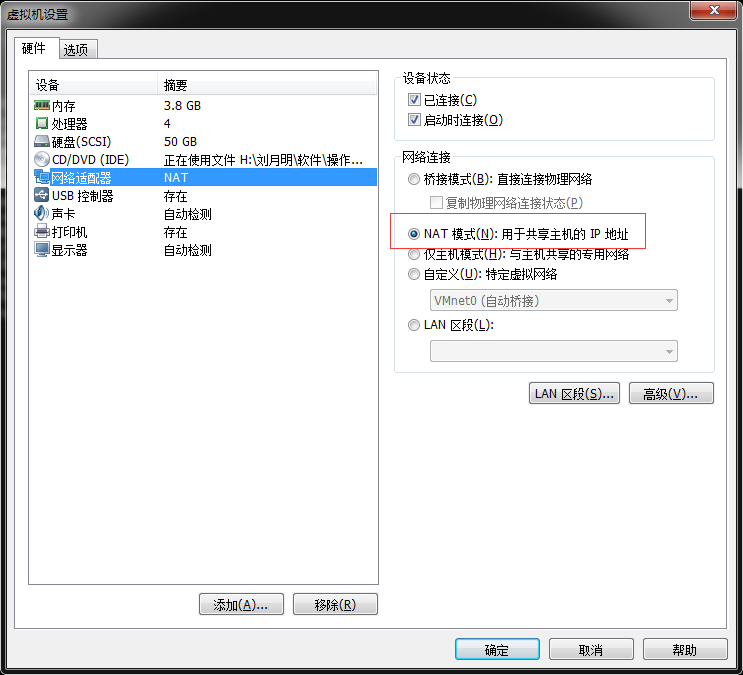
虚拟机两台,一台为Cobbler主机一台为测试安装机
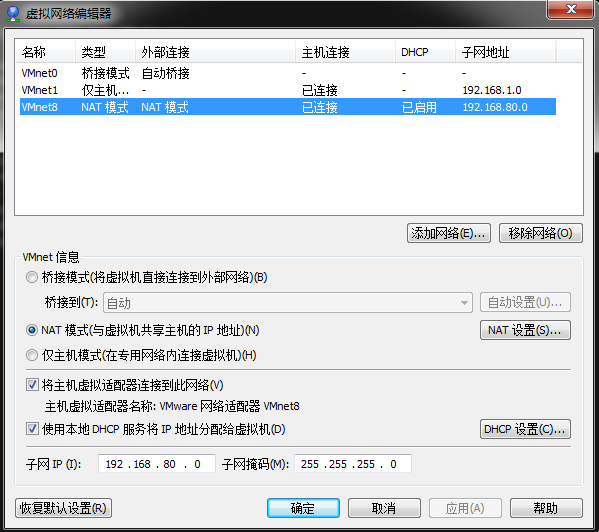
虚拟机网络设置为(两台网络一样)
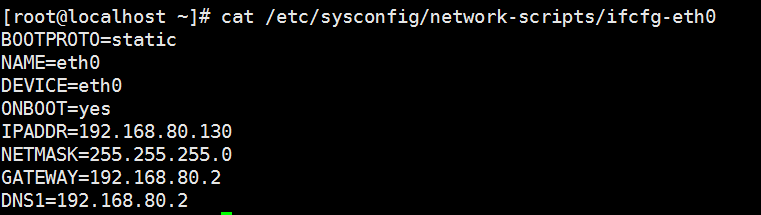
主机系统为CentOS7.4
设置固定IP为192.168.80.130网关为VM默认网关192.168.80.2

五,安装Cobbler
配置yum源
rpm -ivh https://mirrors.aliyun.com/epel/epel-release-latest-7.noarch.rpm
安装包
yum -y install httpd dhcp tftp cobbler xinetd
关闭防火墙和selinux
systemctl stop firewalld
systemctl disable firewalld
setenforce 0
sed 's#enforcing#disabled#g' /etc/selinux/config -i
启动
systemctl start cobblerd
systemctl start httpd
启动cobbler检查(需要完成以下列出问题才能使用)
cobbler check
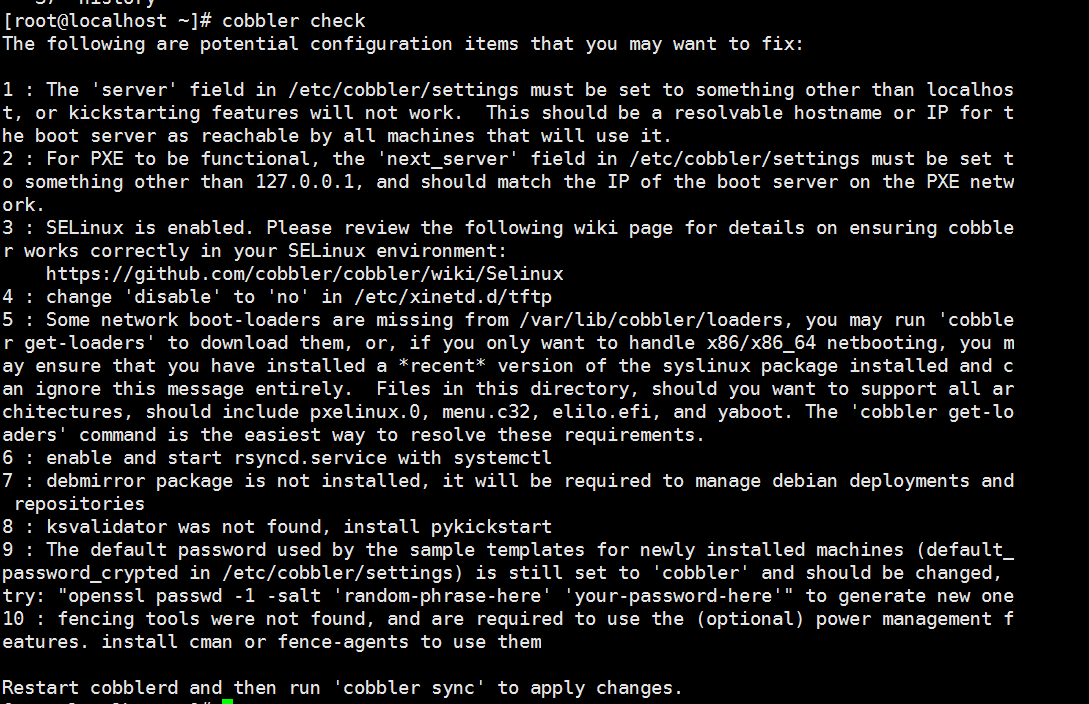
1,有个server文件必须设置成本地
2,设置PXE文件去那里找
3,设置Selinex
4,把配置文件的disable设置为no
5,网络启动的东西设置在这个目录,通过命令去下载
6,启动rsync
7,如果使用ubuntu系统需要安装这个包,这里不需要安装
8,需要安装pykickstart包
9,生成默认的密码放在文件
10,需要安装电源管理
运行命令下载一些网络用的文件
cobbler get-loaders
安装xinetd
yum -y install xinetd
修改配置文件/etc/cobbler/settings两个地址设置为本机地址
server 192.168.80.130
next_server 192.168.80.130


修改完重启
systemctl restart cobblerd
修改配置文件/etc/xinetd.d/tftp
disable = no
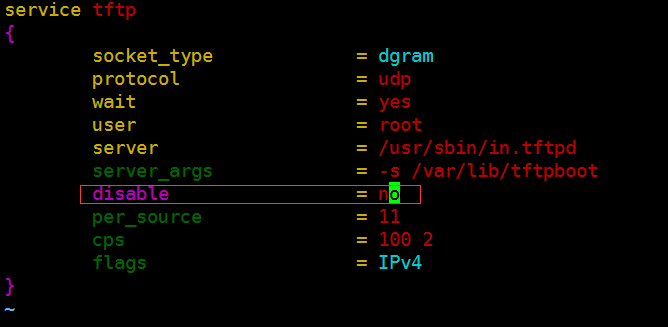
修改完重启
systemctl restart xinetd
启动rsync并设置为自启动
systemctl start rsyncd
systemctl enable rsyncd
安装pykickstart
yum -y install pykickstart
设置默认密码 执行命令
openssl passwd -1 -salt 'cobler' 'cobler'
生成一个密码设置在/etc/cobbler/settings
default_password_crypted: "$1$123123$MAV.kVI/b3swmFLErPD2b0"
重启cobblerd
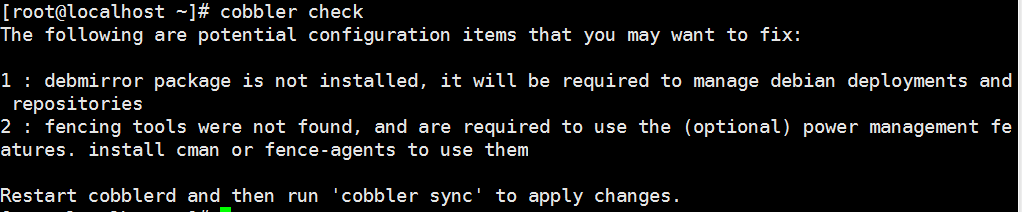
检查(这两个问题不用处理)
设置cobbler可以管理dhcp
/etc/cobbler/settings
manage_dhcp: 1
修改dhcp配置文件/etc/cobbler/dhcp.template修改标红部分,其他保持默认
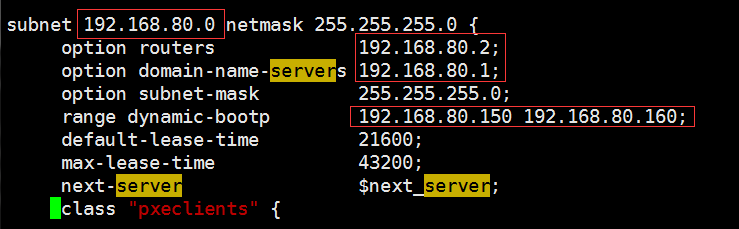
重启cobbler(就把刚刚配置的dhcp覆盖dhcp配置文件/etc/dhcp/dhcpd.conf)
systemctl restart cobblerd
执行
cobbler sync
导入镜像
先挂载一个镜像光盘
mount /dev/cdrom /mnt
导入镜像
cobbler import --path=/mnt/ --name=Centos-7.2-x86_64 --arch=x86_64
导入的镜像目录为/var/www/cobbler/ks_mirror
查看导入镜像
cobbler profile list

kickstarts文件在目录/var/lib/cobbler/kickstarts/里面
自定义一个kickstarts文件并且绑定在刚刚传入的镜像
Centos7.2-x86_64.cfg
这里设置的root密码生成命令是
perl -e 'print crypt("123qwe",q($1$password)),"\n"'
#platform=x86, AMD64, or Intel EM64T
#version=DEVEL
# Install OS instead of upgrade
install
# Keyboard layouts
keyboard 'us'
# Root password
rootpw --iscrypted $1$m1pE0DG6$vALBphGGynqvUzfJaWZ6U1
# Use network installation
url --url="$tree"
# System language
lang en_US
# Firewall configuration
firewall --disabled
# System authorization information
auth  --useshadow  --passalgo=sha512
# Use graphical install
graphical
firstboot --disable
# SELinux configuration
selinux --disabled

# Network information
network  --bootproto=dhcp --device=eth0
network  --bootproto=dhcp --device=eth1
# Reboot after installation
reboot
# System timezone
timezone Asia/Shanghai
# System bootloader configuration
bootloader --location=mbr
# Clear the Master Boot Record
zerombr
# Partition clearing information
clearpart --all --initlabel
# Disk partitioning information
part /boot --asprimary --fstype="ext4" --size=200
part swap --fstype="swap" --size=1024
part / --fstype="ext4" --grow --size=1
%packages
@base
@core
@compat-libraries
@debugging
@development
@gnome-desktop
@X Window System
%end
定义为刚刚传入镜像的初始化文件
cobbler profile edit --name=CentOS-7.2-x86_64 --kickstart=/var/lib/cobbler/kickstarts/Centos7.2-x86_64.cfg
查看

增加内核参数让网卡变成eth0
cobbler profile edit --name Centos-7.2-x86_64 --kopts='net.ifnames=0 biosdevname=0'
查看

修改配置都需要同步生效
cobbler sync
新建一个虚拟机
启动就会从dhcp获取到地址自动安装

自动安装完一台虚拟机以备用
PS:导入CentOS7.4镜像无法安装,原因不明,就像把7.4制作成U盘一样无法安装系统,有timeout提示
六,cobbler提供的web界面
cobbler还提供一个web页面
https://192.168.80.130/cobbler_web
PS:必须是https访问
配置文件问为/etc/cobbler/users.digest
修改密码htdigest /etc/cobbler/users.digest "Cobbler" cobbler
默认用户名和密码均为cobbler
如果没有页面显示则安装
yum -y cobbler-web
安装完重启httpd
七,cobbler仓库
在使用cobbler安装的虚拟机下面的文件/etc/yum.repos.d/cobbler-config.repo记录一个yum包的地址

报错 提示无法读取到源主机的文件
源主机其实有这个repo文件

添加库(不要执行一旦执行会下载好几百个G的东西)
cobbler repo add --name=CentOS-7-x86_64-epel --mirro=https://mirrors.aliyun.com/epel/7Server/x86_64/ --arch=x86_64 --breed=yum
同步
cobbler reposync
cobbler会自动把镜像下载到本地并且构建本地仓库
执行以下的命令同步一个openstack
cobbler repo add --name=openstack-newton --mirror=https://mirrors.aliyun.com/centos/7.4.1708/cloud/x86_64/openstack-newton/ --arch=x86_64 --breed=yum

cobbler reposync
放置的目录是/var/www/cobbler/repo_mirror/openstack-newton

这个目录有一个config.repo文件要放置在配置文件
在web界面把刚刚的yum源放进去(编辑初始化文档也可以)
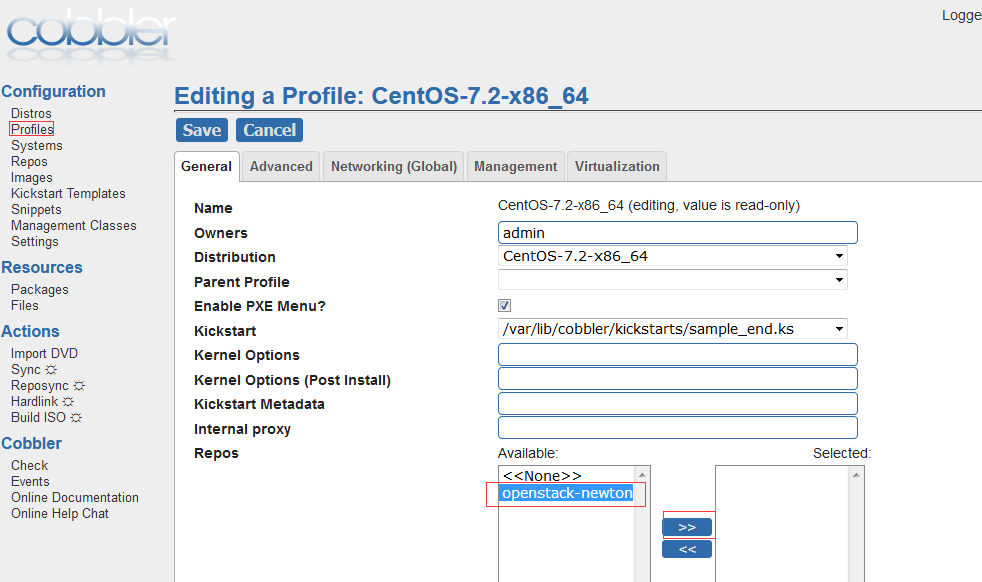
默认安装的时候就是推过去的在配置文件/etc/cobbler/settings
yum_post_install_mirror: 1
八,cobbler根据主机mac地址自动化安装
准备一台主机获取到mac地址

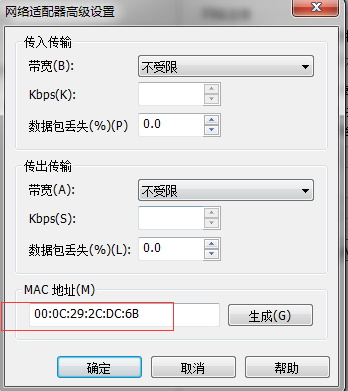
根据mac地址设置安装信息
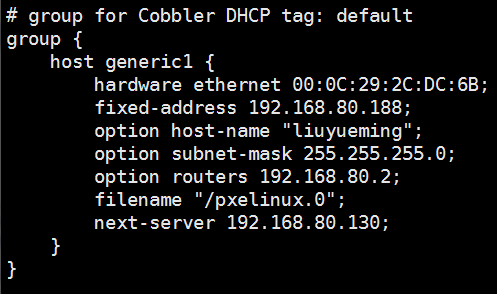
cobbler system add --name=liuyueming \
  --mac=00:0C:29:2C:DC:6B \
  --profile=CentOS-7.2-x86_64 \
  --ip-address=192.168.80.188 \
  --subnet=255.255.255.0 \
  --gateway=192.168.80.2 \
  --interface=eth0 \
  --static=1 \
  --hostname=liuyueming \
  --name-servers="192.168.80.2" \
  --kickstart=/var/lib/cobbler/kickstarts/default.ks
同步
cobbler sync
查看
cobbler system list
cat /etc/dhcp/dhcpd.conf可以看到刚才DHCP配置
启动该主机就会按照自定义的IP地址以及主机名安装
没安装成功。。。
九,使用koan重装系统
使用cobbler安装完系统以后假如想要重新安装一下系统可以使用koan工具
在需要重新安装系统的主机上面操作
设置epel源
rpm -ivh https://mirrors.aliyun.com/epel/epel-release-latest-7.noarch.rpm
安装koan
yum -y install koan
使用命令列出cobbler主机是有哪些系统可以去重装的
koan --server=192.168.80.130 --list=profiles

PS:是通过api去访问的
使用命令重装
koan --replace-self --server=192.168.80.130 --profile=CentOS-7.2-x86_64
重启(就会自动化重新安装)
reboot
十,cobbler的python脚本
cobbler_list.py
#!/usr/bin/python
import xmlrpclib
server = xmlrpclib.Server('http://192.168.80.130/cobbler_api')
print server.get_distros()
print server.get_profiles()
print server.get_systems()
print server.get_images()
print server.get_repos()
还有一个创建主机的的脚本(学习)
排错:同步cobbler sync时候报错,/etc/init.d/dhcpd权限不足,同步失败,把这个文件权限设置为777即可

 浙公网安备 33010602011771号