MySQL之pt-osc原理
参考:https://www.cnblogs.com/mysql-dba/p/9901632.html
https://blog.csdn.net/hanbowu/article/details/79919621
pt-osc原理
一,环境检查
# uname -a
Linux prd-mysql-master 3.10.0-862.el7.x86_64 #1 SMP Fri Apr 20 16:44:24 UTC 2018 x86_64 x86_64 x86_64 GNU/Linux
# mysql -V
mysql  Ver 14.14 Distrib 5.7.22, for linux-glibc2.12 (x86_64) using  EditLine wrapper
二,下载安装包
下载地址
https://www.percona.com/downloads/percona-toolkit/LATEST/
根据需要选择的版本下载即可
本次我们下载centos7下的3.0.11版本


三,安装
安装依赖
yum -y install perl
yum -y install perl-DBI
yum -y install perl-DBD-MySQL
yum -y install perl-Time-HiRes
yum -y install perl-IO-Socket-SSL
下载的文件解压后是rpm文件,安装即可
rpm -ivh percona-toolkit-3.0.11-1.el7.x86_64.rpm
四,使用
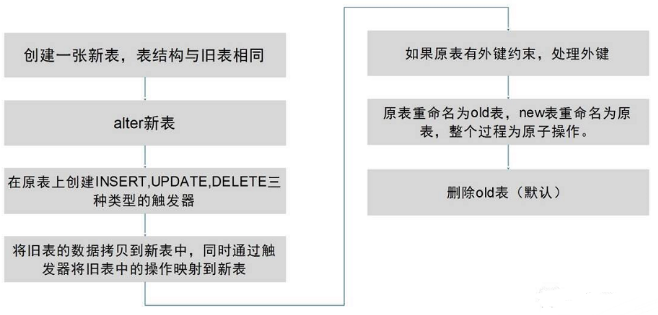
pt-osc的工作原理
- 创建一个和原表一样的结构的新表
- 在新表执行DDL语句
- 在源表创建三个触发器分别对应insert,update,delete操作
- 从源表拷贝数据到新表,拷贝过程中源表通过触发器把新的DML操作更新到新表中
- rename源表到old表中,把新表rename为源表,默认最后删除源表
pt-osc工具的限制
1,源表不能有触发器存在
显然不是不能有任何触发器,只是不能有针对insert、update、delete的触发器存在,因为一个表上不能有两个相同类型的触发器
2,源表必须要有主键
3,源表有外键,必须使用--alter-foreign-keys-method指定特定的值
使用示例
使用之前创建数据库test以及表test01
mysql>create database test;
mysql> create table test01(id int(4) not null primary key);
注意:表需要有主键否则无法使用pt-osc
1,添加新列
[root@prd-mysql-master opt]# pt-online-schema-change --host=127.0.0.1 --port=3306 --user=root --password=123456 --alter "add column age int(4) default 0" D=test,t=test01 --print --execute
Found 1 slaves:
prd-mysql-slave -> 172.16.90.188:3306
Will check slave lag on:
prd-mysql-slave -> 172.16.90.188:3306
Operation, tries, wait:
  analyze_table, 10, 1
  copy_rows, 10, 0.25
  create_triggers, 10, 1
  drop_triggers, 10, 1
  swap_tables, 10, 1
  update_foreign_keys, 10, 1
Altering `test`.`test01`...
Creating new table...
CREATE TABLE `test`.`_test01_new` (
  `id` int(4) NOT NULL,
  PRIMARY KEY (`id`)
) ENGINE=InnoDB DEFAULT CHARSET=utf8
Created new table test._test01_new OK.
Altering new table...
ALTER TABLE `test`.`_test01_new` add column age int(4) default 0
Altered `test`.`_test01_new` OK.
2022-01-05T22:59:01 Creating triggers...
2022-01-05T22:59:01 Created triggers OK.
2022-01-05T22:59:01 Copying approximately 1 rows...
INSERT LOW_PRIORITY IGNORE INTO `test`.`_test01_new` (`id`) SELECT `id` FROM `test`.`test01` LOCK IN SHARE MODE /*pt-online-schema-change 20128 copy table*/
2022-01-05T22:59:01 Copied rows OK.
2022-01-05T22:59:01 Analyzing new table...
2022-01-05T22:59:01 Swapping tables...
RENAME TABLE `test`.`test01` TO `test`.`_test01_old`, `test`.`_test01_new` TO `test`.`test01`
2022-01-05T22:59:01 Swapped original and new tables OK.
2022-01-05T22:59:01 Dropping old table...
DROP TABLE IF EXISTS `test`.`_test01_old`
2022-01-05T22:59:01 Dropped old table `test`.`_test01_old` OK.
2022-01-05T22:59:01 Dropping triggers...
DROP TRIGGER IF EXISTS `test`.`pt_osc_test_test01_del`
DROP TRIGGER IF EXISTS `test`.`pt_osc_test_test01_upd`
DROP TRIGGER IF EXISTS `test`.`pt_osc_test_test01_ins`
2022-01-05T22:59:01 Dropped triggers OK.
Successfully altered `test`.`test01`.
--print可以打印详细的执行日志已经明显显示了整个执行过程
查看MySQL表也可以看到增加了列
mysql> desc test01;
+-------+--------+------+-----+---------+-------+
| Field | Type   | Null | Key | Default | Extra |
+-------+--------+------+-----+---------+-------+
| id    | int(4) | NO   | PRI | NULL    |       |
| age   | int(4) | YES  |     | 0       |       |
+-------+--------+------+-----+---------+-------+
2 rows in set (0.00 sec)
2,增加索引
pt-online-schema-change --host=127.0.0.1 --port=3306 --user=root --password=123456 --alter "add key indx_vid(age)" D=test,t=test01 --execute

 浙公网安备 33010602011771号