

第1章 Vue.js2.0由浅入深:基本用法
1.Vue.js是什么
Vue.js也称为Vue,读音/vju:/,类似view,错误读音vue
版本:v1.0 v2.0
- 是一个构建用户界面的框架
- 是一个轻量级MVVM(ModelViewViewModel)框架,和angular、react类似,其实就是所谓的数据双向绑定
- 数据驱动+组件化的前端开发(核心思想)
- 通过简单的API实现响应式的数据绑定和组合的视图组件
- 更容易上手、小巧
参考:中文官网
2.vue和angular的区别
2.1 angular
- 上手较难
- 指令以ngxxx开头
- 所有属性和方法都存储在$scope中 由google维护
2.2vue
- 简单、易学、更轻量
- 指令以vxxx开头 HTML代码+JSON数据,再创建一个vue实例
- 由个人维护:尤雨溪,华人,目前就职于阿里巴巴,2014.2开源了vue.js库
共同点: 都不兼容低版本IE
二,起步
1,下载核心库vue.js
官网下载地址:https://cn.vuejs.org/v2/guide/installation.html
本次我们使用的版本是2.3.4
可以在html的<scripts></scripts>直接引入链接,但是更好的方法是下载下来使用相对路径引入
https://cdn.jsdelivr.net/npm/vue@2.3.4/dist/vue.js
注意:@后跟版本号下载不同版本
2,Hello World(对比angular)
2.1angular实现
js:
let app=angular.module('myApp',[]);
app.controller('MyController',['$scope',function($scope){
$scope.msg='Hello World';
}]);
html:
<html ngapp="myApp">
<div ngcontroller="MyController">
{{msg}}
</div>
</html>
2.2vue实现
js:
new Vue({
el:'#itany', //指定关联的选择器
data:{ //存储数据
msg:'Hello World',
name:'tom'
}
});
html:
<div id="itany">
{{msg}}
</div>
以上为伪代码,下面是实际实现代码1.html
目录结构如下

下载的vue.js已经在目录js下
<!DOCTYPE html>
<html lang="en">
<head>
    <meta charset="UTF-8">
    <meta name="viewport" content="width=device-width, initial-scale=1.0">
    <title>Hello World</title>
    <script src="js/vue.js"></script>
    <!-- js -->
    <script>
        window.onload=function(){
          // 配置是否允许vue-devtools检查代码,允许调试,生产环境设置为false
          // Vue.config.devtools=false;
          // Vue.config.productionTip=false;
          var vm = new Vue({
          el: '#itany',
            data: {
            message: 'Hello world'
          }
        });
      }
  </script>


</head>
<body>
    <!-- html -->
    <div id="itany">
        {{ message }}
    </div>

</body>
</html>
页面预览

3,安装vuedevtools插件,便于在chrome中调试vue
使用chrome打开

安装vue-devtools步骤


直接把解压后的文件夹拖过来即可安装


如果需要新版本可以去以下地址下载:https://chrome.pictureknow.com/extension?id=d50143a5f53d406dbe992277bfc90521
下载下来的文件也可以通过拖拽安装
安装以后查看

生产环境需要配置如下api,默认均为true
//配置是否允许vuedevtools检查代码,方便调试,生产环境中需要设置为false Vue.config.devtools=false; Vue.config.productionTip=false; //阻止vue启动时生成生产消息
这个全局配置api可以参考官网:https://cn.vuejs.org/v2/api/#devtools
三,常用指令
1,什么是指令
用来扩展html标签的功能
angular中常用的指令: ngmodel ngrepeat ngclick ngshow/nghide ngif
2,vue中常用指令
- v-model
双向数据绑定,一般用于表单元素
示例02.html
<!DOCTYPE html>
<html lang="en">
<head>
    <meta charset="UTF-8">
    <meta name="viewport" content="width=device-width, initial-scale=1.0">
    <title>常用指令:v-model</title>
    <script src="js/vue.js"></script>
    <script>
        window.onload=function(){
            new Vue({
                el: "#itany",
                data: {
                    name:'tom'
                }
            });
        }
    </script>
</head>
<body>
    <div id="itany">
        用户名:<input type='text' v-model="name">
        <br>
        {{ name }}
    </div>
</body>
</html>
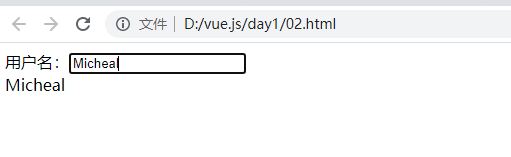
页面显示
name设置了一个默认值tom

手动输入任意字符在下面也会相应展示对应字符
可以显示任意数据类型,添加其他几个数据类型整数,布尔型,列表,数组(相当于字典)
<!DOCTYPE html>
<html lang="en">
<head>
    <meta charset="UTF-8">
    <meta name="viewport" content="width=device-width, initial-scale=1.0">
    <title>常用指令:v-model</title>
    <script src="js/vue.js"></script>
    <script>
        window.onload=function(){
            new Vue({
                el: "#itany",
                data: {
                    name:'tom',
                    age:21,
                    flag:true,
                    nums:[12,4,23,5],
                    user:{id:9527,name:'唐伯虎'}
                }
            });
        }
    </script>
</head>
<body>
    <div id="itany">
        用户名:<input type='text' v-model="name">
        <br>
        {{ name }} <br>
        {{ age }}  <br>
        {{ flag }} <br>
        {{ nums }} <br>
        {{ user }}
     </div>
</body>
</html>
页面显示

注意:在定义时使用#代表关联的是id,如果是class则使用.符合,也可以关联所有标签,例如关联<div>标签,例如
el: 'div'
但是不能关联大的标签例如<body> <html>否则会报错
[Vue warn]: Do not mount Vue to <html> or <body> - mount to normal elements instead.
如果在标签里面引用了没有定义的变量,则在页面不显示,在f12调试模式则会报错
- v-for
对数组或对象进行循环操作,使用的是v-for,不是v-repeat
示例 03.html
<!DOCTYPE html>
<html lang="en">
<head>
    <meta charset="UTF-8">
    <meta name="viewport" content="width=device-width, initial-scale=1.0">
    <title>常用指令:v-model</title>
    <script src="js/vue.js"></script>
    <script>
        window.onload=function(){
            new Vue({
                el: "#itany",
                data: {
                    arr:[12,4,5,6,3],
                    user:{id:9527,name:"唐伯虎",age:25}
                }
            });
        }
    </script>
</head>
<body>
    <div id="itany">
        <ul>
            <li v-for="value in arr">{{value}}</li>
            <!-- 默认为值循环 -->
            <li v-for='value in user'>{{value}}</li>
            <!-- 键值循环,注意这里是v在前k在后的 -->
            <li v-for="(v,k) in user">{{k}}={{v}}</li>
        </ul>
    </div>

</body>
</html>
页面显示如下

迭代默认是不加序号的,可以在迭代时添加序号,相当于索引,索引是从0开始的
<!DOCTYPE html>
<html lang="en">
<head>
    <meta charset="UTF-8">
    <meta name="viewport" content="width=device-width, initial-scale=1.0">
    <title>常用指令:v-model</title>
    <script src="js/vue.js"></script>
    <script>
        window.onload=function(){
            new Vue({
                el: "#itany",
                data: {
                    arr:[12,4,5,6,3],
                    user:{id:9527,name:"唐伯虎",age:25},
                    users:[
						{id:9527,name:'唐伯虎',age:25},
						{id:1001,name:'秋香',age:22},
                        {id:1002,name:'石榴姐',age:24}
                    ]
                }
            });
        }
    </script>
</head>
<body>
    <div id="itany">
        <ul>
            <!-- <li v-for="value in arr">{{value}}</li> -->
            <!-- 默认为值循环 -->
            <!-- <li v-for='value in user'>{{value}}</li> -->
            <!-- 键值循环,注意这里是v在前k在后的 -->
            <!-- <li v-for="(v,k) in user">{{k}}={{v}}</li> -->
            <li v-for='(user,index) in users'>{{index+1}},{{user.id}},{{user.name}},{{user.age}}<li>
        </ul>
    </div>

</body>
</html>
加序号输出如下

- v-on
绑定事件
用来绑定事件,用法:von:事件="函数"
示例04.html
<!DOCTYPE html>
<html lang="en">
<head>
<meta charset="UTF-8">
<meta name="viewport" content="width=device-width, initial-scale=1.0">
<title>常用指令:v-model</title>
<script src="js/vue.js"></script>
<script>
window.onload=function(){
new Vue({
el: "#itany",
data: {
},
methods:{ //用来定义方法
show:function(){
console.log('show方法')
}
}
});
}
</script>
</head>
<body>
<div id="itany">
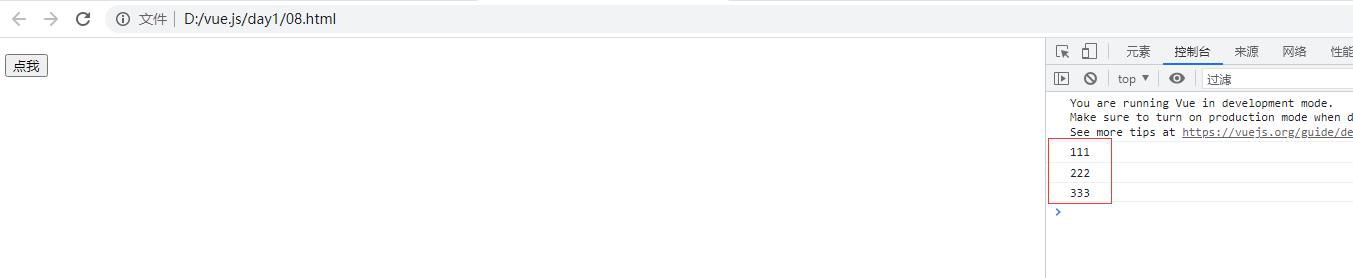
<button v-on:click="show">点我</button>
</div>
</body>
</html>
解析
<button v-on:click="show">点我</button>
v-on # 绑定事件
click # 对应的事件是点击事件
="show" # 点击事件调用的是show方法
页面显示

下面使用一个方法往数组中添加数据
<!DOCTYPE html>
<html lang="en">
<head>
    <meta charset="UTF-8">
    <meta name="viewport" content="width=device-width, initial-scale=1.0">
    <title>常用指令:v-model</title>
    <script src="js/vue.js"></script>
    <script>
        window.onload=function(){
            new Vue({
                el: "#itany",
                data: {
                    arr:[12,34,45,23,5]
                },
                methods:{  //用来定义方法
                    show:function(){
                        console.log('show方法');
                    },
                    add(){
                        console.log(this);
                        // 默认不能直接访问arr需要使用this代表这个vue示例本身来调用
                        // 使用this访问当前实例中的成员
                        this.arr.push(666);
                    }
                }
            });
        }
    </script>
</head>
<body>
    <div id="itany">
        <!-- 如果调用的方法没有参数可以不加() -->
       <button v-on:click="show()">点我</button>
       <button v-on:click="add()">向数组中添加一个元素</button>
       <br>
       {{arr}}

    </div>

</body>
</html>
当我们点击按钮时,调用了add方法,然后使用push往数组添加一个数据,点击一次添加一次
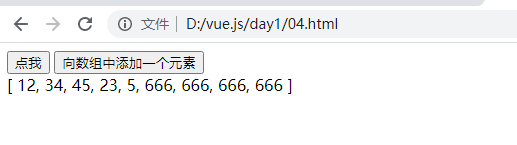
注意:调用实例时需要使用this加对应的方法,如果直接调用则会报错说没有定义
- v-show/v-if
用来显示和隐藏元素,v-show是通过display实现,v-if是每次删除重新创建
示例05.html
<!DOCTYPE html>
<html lang="en">
<head>
    <meta charset="UTF-8">
    <meta name="viewport" content="width=device-width, initial-scale=1.0">
    <title>常用指令:v-show</title>
    <script src="js/vue.js"></script>
    <script>
        window.onload=function(){
            new Vue({
                el: "#itany",
                data: {
                  flag:true
                },
                methods:{
                    change(){
                        this.flag=false;
                    }
                }
            });
        }
    </script>
</head>
<body>
    <div id="itany">
        <button v-on:click="change">隐藏</button>
        <!-- <button v-on:click="flag=false">隐藏</button> -->
        <div style="width: 100px;height: 100px;background-color: red;" v-show="flag">欢迎来到南京网</div>
    </div>

</body>
</html>
页面显示
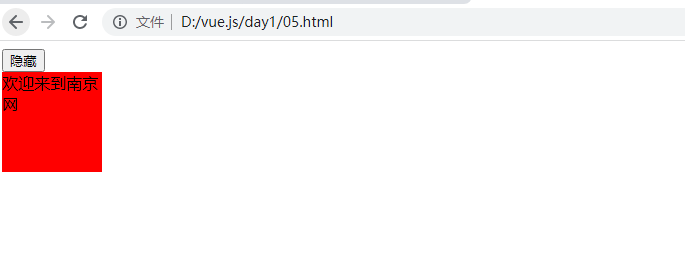
点击一次就隐藏了

注意:可以两种方法
1,调用函数change()点击一次把flag设置成false
2,不绑定方法直接在事件里面把flag设置为false
如果想要点击隐藏再次点击显示呢?
1,change方法取反
change(){
                        this.flag=!this.flag;
                    }
2,直接设置flag去取反
flag=!flag
对比v-show和v-if的不同
v-show通过设置display来隐藏

v-if直接删除div标签来隐藏

四,用户管理
练习题:写一个用户管理页面,可以展示用户并且添加和删除用户,用户字段为姓名,年龄,邮箱
代码如下06.html
注意:使用了bootstrap,query需要下载好放在对应的目录
<!DOCTYPE html>
<html lang="en">
<head>
<meta charset="UTF-8">
<title>练习:用户管理</title>
<script src="js/vue.js"></script>
<link rel="stylesheet" href="bootstrap/bootstrap.min.css">
<script src="bootstrap/jquery.min.js"></script>
<script src="bootstrap/bootstrap.min.js"></script>
<script>
window.onload=function(){
let vm=new Vue({
el:'.container',
data:{
users:[
{name:'tom',age:24,email:'tom@itany.com'},
{name:'jack',age:23,email:'jack@sina.com'}
],
user:{},
nowIndex:-1 //当前要删除项的索引
},
methods:{
addUser(){
this.users.push(this.user);
this.user={};
},
deleteUser(){
if(this.nowIndex===-1){ //删除所有
this.users=[];
}else{
this.users.splice(this.nowIndex,1); //从指定索引位置开始删除,删除一个
}
}
}
});
}
</script>
</head>
<body>
<div class="container">
<h2 class="text-center">添加用户</h2>
<form class="form-horizontal">
<div class="form-group">
<label for="name" class="control-label col-sm-2 col-sm-offset-2">姓 名:</label>
<div class="col-sm-6">
<input type="text" class="form-control" id="name" v-model="user.name" placeholder="请输入姓名">
</div>
</div>
<div class="form-group">
<label for="age" class="control-label col-sm-2 col-sm-offset-2">年 龄:</label>
<div class="col-sm-6">
<input type="text" class="form-control" id="age" v-model="user.age" placeholder="请输入年龄">
</div>
</div>
<div class="form-group">
<label for="email" class="control-label col-sm-2 col-sm-offset-2">邮 箱:</label>
<div class="col-sm-6">
<input type="text" class="form-control" id="email" v-model="user.email" placeholder="请输入邮箱">
</div>
</div>
<div class="form-group text-center">
<input type="button" value="添 加" class="btn btn-primary" v-on:click="addUser">
<input type="reset" value="重 置" class="btn btn-primary">
</div>
</form>
<hr>
<table class="table table-bordered table-hover">
<caption class="h3 text-center text-info">用户列表</caption>
<thead>
<tr>
<th class="text-center">序号</th>
<th class="text-center">姓名</th>
<th class="text-center">年龄</th>
<th class="text-center">邮箱</th>
<th class="text-center">操作</th>
</tr>
</thead>
<tbody>
<tr v-for="(user,index) in users" class="text-center">
<td>{{index+1}}</td>
<td>{{user.name}}</td>
<td>{{user.age}}</td>
<td>{{user.email}}</td>
<td>
<!-- 点击时获取到索引 -->
<button class="btn btn-danger btn-sm" data-toggle="modal" data-target="#del" v-on:click="nowIndex=index">删除</button>
</td>
</tr>
<tr>
<td colspan="5" class="text-right">
<button class="btn btn-danger btn-sm" data-toggle="modal" data-target="#del" v-on:click="nowIndex=-1">删除所有</button>
</td>
</tr>
</tbody>
</table>
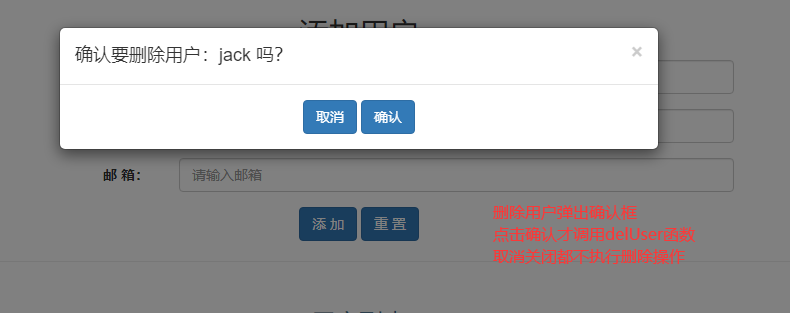
<!-- 模态框,弹出框 -->
<div class="modal fade" id="del">
<div class="modal-dialog">
<div class="modal-content">
<div class="modal-header">
<button class="close" data-dismiss="modal">
<span>×</span>
</button>
<!-- users[nowIndex]?users[nowIndex].name:''
users[nowIndex] 有没有这个索引
如果有则取这个索引的name属性值
如果没有则取空值-->
<!-- 如果选择是单个用户删除则nowIndex为当前用户的索引值则弹出框显示确认要删除选中的用户xxx吗
如果选择的是删除所有则nowIndex为-1则显示确认要删除所有用户吗 -->
<h4 class="modal-title" v-show="nowIndex!==-1">确认要删除用户:{{users[nowIndex]?users[nowIndex].name:''}} 吗?</h4>
<h4 class="modal-title" v-show="nowIndex===-1">确认要删除所有用户吗?</h4>
</div>
<div class="modal-body text-center">
<button class="btn btn-primary" data-dismiss="modal">取消</button>
<button class="btn btn-primary" data-dismiss="modal" v-on:click="deleteUser">确认</button>
</div>
</div>
</div>
</div>
</div>
</body>
</html>
页面展示

代码解析
增加用户代码,往列表users里面增加一个字典user,这个字典的取值是从input取出来的
addUser(){
    this.users.push(this.user);
    this.user={};
},
删除用户代码,
deleteUser(){
	if(this.nowIndex===-1){ //删除所有
		this.users=[];
	}else{
		this.users.splice(this.nowIndex,1); //从指定索引位置开始删除,删除一个
						}
}
在点击删除的时候绑定了一个用户index给变量nowIndex
v-on:click="nowIndex=index"
如果点击的是删除所有则变量nowIndex的值为-1
v-on:click="nowIndex=-1"
然后则两个删除并不直接调用删除函数而是出状态框,弹出框,在弹出框点击确认才调用删除方法
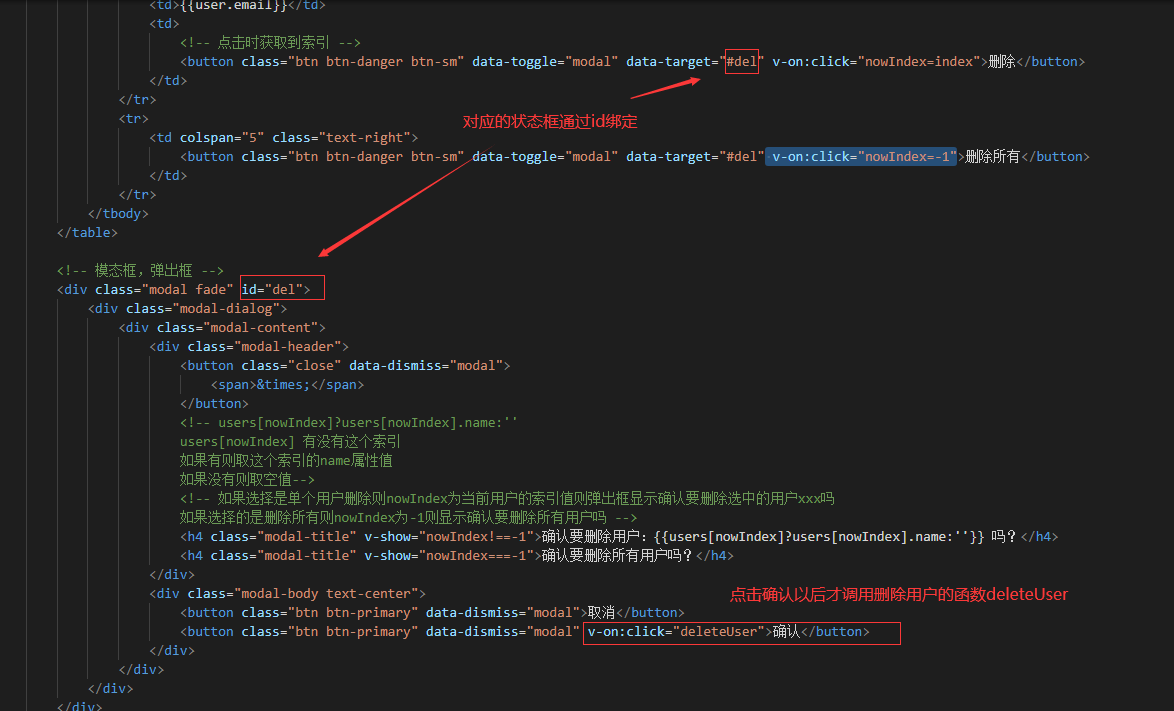
删除用户确认框要展示本次删除的用户名需要使用以下代码
如果能取到值则取值的name属性,如果取不到则取空
{{users[nowIndex]?users[nowIndex].name:''}}
而不能使用
{{users[nowIndex].name}}
页面加载的时候就报错name没有定义
为什么会出现这个报错因为在页面加载的时候nowIndex的值为-1然后使用这个索引去users取值是取不到的,所以报错2.0有这个问题1.0不报错,1.0取不到就取不到了

注意:在vue里面判断相等不相等使用以下符号
===
!===
课后作业:实现通过复选框选中删除 (未完成不知道怎么写)
只知道以下方法可以取到索引值到一个列表
<input type='checkbox' v-model="checkdChange":value="index">
五,事件和属性
1.事件
1.1事件简写
v-on:click=“”简写方式@v-on=“”
事件简写示例
<!DOCTYPE html>
<html lang="en">
<head>
    <meta charset="UTF-8">
    <meta name="viewport" content="width=device-width, initial-scale=1.0">
    <title>事件简写和事件对象</title>
    <script src="js/vue.js"></script>
    <!-- js -->
    <script>
        window.onload=function(){
          let vm=new Vue({
          el: '#itany',
          methods: {
            show(){
                console.log('123');
            }
          }
        });
      }
  </script>


</head>
<body>
    <!-- html -->
    <div id="itany">
        <!-- <button v-on:click="show">点我</button> -->
        <button @click="show">点我</button>
    </div>

</body>
</html>
以下两种写法绑定事件对象的效果是一样的
<button v-on:click="show">点我</button>
<button @click="show">点我</button>
1.2事件对象$event
以下示例点击按钮显示按钮的文本
<!DOCTYPE html>
<html lang="en">
<head>
    <meta charset="UTF-8">
    <meta name="viewport" content="width=device-width, initial-scale=1.0">
    <title>事件简写和事件对象</title>
    <script src="js/vue.js"></script>
    <!-- js -->
    <script>
        window.onload=function(){
          let vm=new Vue({
          el: '#itany',
          methods: {
            show(){
                console.log('123');
            },
            print(e){
                console.log(e.target.innerHTML); // DOM对象
            }
          }
        });
      }
  </script>


</head>
<body>
    <!-- html -->
    <div id="itany">
        <!-- <button v-on:click="show">点我</button> -->
        <button @click="show">点我</button>
        <button @click="print">Click Me</button>

    </div>

</body>
</html>
页面显示

1.3 事件冒泡
阻止事件冒泡
a)原生js方式
示例08.html
<!DOCTYPE html>
<html lang="en">
<head>
    <meta charset="UTF-8">
    <meta name="viewport" content="width=device-width, initial-scale=1.0">
    <title>事件冒泡和默认行为</title>
    <script src="js/vue.js"></script>
    <!-- js -->
    <script>
        window.onload=function(){
          let vm=new Vue({
          el: '#itany',
          methods: {
            show(){
                console.log('111');
            },
            print(){
                console.log('222');
            },
            write(){
                console.log('333');
            },
          }
        });
      }
  </script>


</head>
<body>
    <!-- html -->
    <div id="itany">
        <div @click="write">
            <p @click="print">
                <button @click="show">点我</button>
            </p>
        </div>

    </div>

</body>
</html>
页面显示
点击按钮一次把按钮的方法和段落p即标签div的方法都调用了
阻止冒泡,修改代码
<!DOCTYPE html>
<html lang="en">
<head>
    <meta charset="UTF-8">
    <meta name="viewport" content="width=device-width, initial-scale=1.0">
    <title>事件冒泡和默认行为</title>
    <script src="js/vue.js"></script>
    <!-- js -->
    <script>
        window.onload=function(){
          let vm=new Vue({
          el: '#itany',
          methods: {
            show(e){
                console.log('111');
                e.stopPropagation();
            },
            print(){
                console.log('222');
            },
            write(){
                console.log('333');
            },
          }
        });
      }
  </script>


</head>
<body>
    <!-- html -->
    <div id="itany">
        <div @click="write">
            <p @click="print">
                <button @click="show($event)">点我</button>
            </p>
        </div>

    </div>

</body>
</html>
页面显示

b)vue方式,不依赖事件对象
加一个stop修饰符即可,更加简洁
<button @click.stop="show">点我</button>
1.4事件默认行为
阻止事件默认行为
a)原生js方式
演示代码如下
<!DOCTYPE html>
<html lang="en">
<head>
    <meta charset="UTF-8">
    <meta name="viewport" content="width=device-width, initial-scale=1.0">
    <title>事件冒泡和默认行为</title>
    <script src="js/vue.js"></script>
    <!-- js -->
    <script>
        window.onload=function(){
          let vm=new Vue({
          el: '#itany',
          methods: {
            show(){
                console.log('111');
                // e.stopPropagation();
            },
            print(){
                console.log('222');
            },
            write(){
                console.log('333');
            },
            study(){
                console.log('444');
                // e.preventDefault();
            },
          }
        });
      }
  </script>


</head>
<body>
    <!-- html -->
    <div id="itany">
        <div @click="write">
            <p @click="print">
                <button @click.stop="show">点我</button>
            </p>
        </div>
        <hr>
        <a href="#" @click="study()">俺是链接</a>
    </div>

</body>
</html>
页面显示
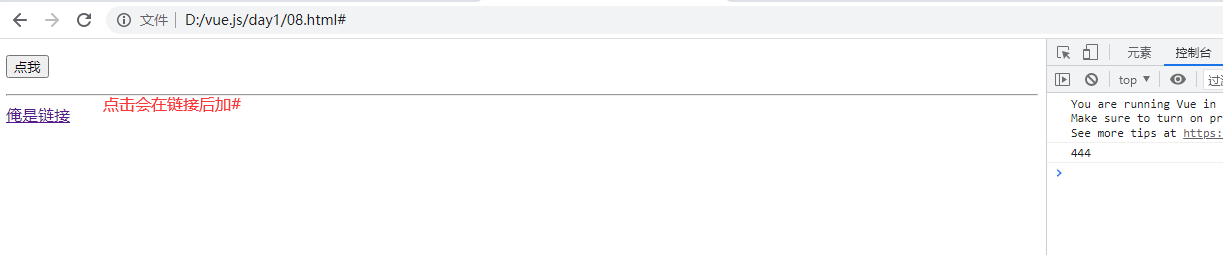
修改传递事件对象event修改以下代码
<a href="#" @click="study($event)">俺是链接</a>
study(e){
        console.log('444');
        e.preventDefault();
},

b)vue方法
加修饰符
<a href="#" @click.prevent="study()">俺是链接</a>
1.5键盘事件
按下键盘键打印asscii码
09.html
<!DOCTYPE html>
<html lang="en">
<head>
    <meta charset="UTF-8">
    <meta name="viewport" content="width=device-width, initial-scale=1.0">
    <title>键盘事件</title>
    <script src="js/vue.js"></script>
    <!-- js -->
    <script>
        window.onload=function(){
          let vm=new Vue({
          el: '#itany',
          methods: {
                show(e){
                    console.log(e.keyCode);
                }
          }
        });
      }
  </script>


</head>
<body>
    <!-- html -->
    <div id="itany">
        <!-- @keydown @keypress @keyup -->

       用户名:<input type='text' @keydown='show($event)'>
       <!-- 简化按键的判断 -->
    </div>

</body>
</html>
页面显示

vue的方法
代码修改如下09.html
<!DOCTYPE html>
<html lang="en">
<head>
    <meta charset="UTF-8">
    <meta name="viewport" content="width=device-width, initial-scale=1.0">
    <title>键盘事件</title>
    <script src="js/vue.js"></script>
    <!-- js -->
    <script>
        window.onload=function(){
          let vm=new Vue({
          el: '#itany',
          methods: {
                show(e){
                    console.log(e.keyCode);
                },
                print(){
                    console.log('11111')
                }
          }
        });
      }
  </script>


</head>
<body>
    <!-- html -->
    <div id="itany">
        <!-- @keydown @keypress @keyup -->

       <!-- 用户名:<input type='text' @keydown='show($event)'> -->
       <!-- 简化按键的判断 -->
        用户名:<input type='text' @keydown.13='print'>
    </div>

</body>
</html>
asscii码为13对应的是回车键
所以在按下回车键的时候调用print方法

13不直观只有知道回车的asscii码为13才可以使用,可以使用别名enter
用户名:<input type='text' @keydown.enter='print'>
效果也是一样的,大部分按键都有别名例如方向上键是up
如果没有别名也可以自定义别名,例如字母a-z是没有别名的1.0可以2.0不行
在<scripts></scripts>加入以下代码即可,前提是知道按键对应的asscii码
Vue.config.keyCodes={
			a:65,
			f1:112
}
注意:f1是键盘上的f1键不是字符f1,因为f1是浏览器的帮助按键会冲突,需要演示f1按键按下的过程需要crtl+f1
1.6事件修饰符
.stop 调用 event.stopPropagation()。
.prevent 调用 event.preventDefault()。
.{keyCode | keyAlias} 只当事件是从特定键触发时才触发回调。
.native 监听组件根元素的原生事件。
.once 只触发一次回调。
2.属性
2.1属性的绑定和简写
模板可以使用{{}}引用vue示例的属性,但是无法在标签内使用这种方法引用,例如我在vue定义了一张图片的url需要在标签<img>内引用
10.html
不允许这样调用
<!DOCTYPE html>
<html lang="en">
<head>
    <meta charset="UTF-8">
    <meta name="viewport" content="width=device-width, initial-scale=1.0">
    <title>属性的绑定和属性的简写</title>
    <script src="js/vue.js"></script>
    <!-- js -->
    <script>

        window.onload=function(){
          let vm=new Vue({
          el: '#itany',
          data: {
              url:"https://www.baidu.com/img/PCtm_d9c8750bed0b3c7d089fa7d55720d6cf.png",
              w:'200px',
              h:'100px'
          }
        });
      }
  </script>


</head>
<body>
    <!-- html -->
    <div id="itany">

        <img src={{url}}>
    </div>

</body>
</html>
页面报错
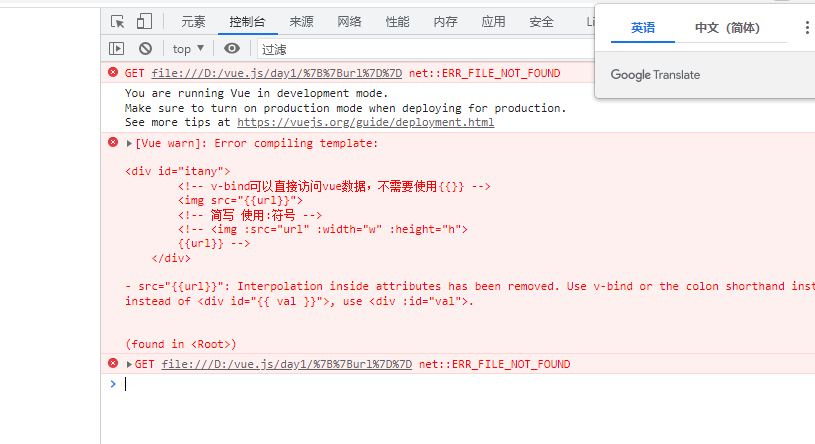
需要使用v-bing来引用,修改代码,使用v-bingd绑定,直接使用url调用不需要{{}}
<img v-bind:src="url">
简写方法,省略v-bind使用符号:
<img :src="url">
多定义几个变量
 data: {
              url:"https://www.baidu.com/img/PCtm_d9c8750bed0b3c7d089fa7d55720d6cf.png",
              w:'200px',
              h:'100px'
          }
引用
<img :src="url" :width="w" :height="h">
2.2 class和style
绑定class和style属性时语法比较复杂:
示例11.html
<!DOCTYPE html>
<html lang="en">
<head>
<meta charset="UTF-8">
<title>class和style属性</title>
<script src="js/vue.js"></script>
<script>
window.onload=function(){
let vm=new Vue({
el:'#itany',
data:{
bb:'aa',
dd:'cc',
flag:true,
num:-2,
hello:{aa:true,cc:true},
xx:{color:'blue',fontSize:'30px'},
yy:{backgroundColor:'#ff7300'}
}
});
}
</script>
<style>
.aa{
color:red;
font-size:20px;
}
.cc{
background-color:#ccc;
}
</style>
</head>
<body>
<div id="itany">
<!--
class属性
-->
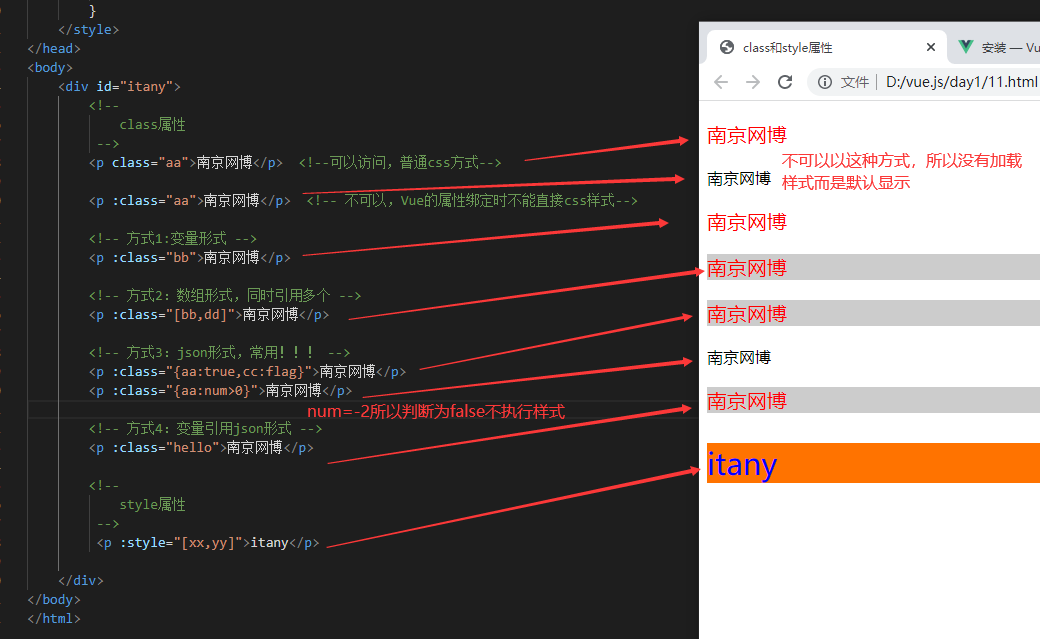
<p class="aa">南京网博</p> <!--可以访问,普通css方式-->
<p :class="aa">南京网博</p> <!-- 不可以,Vue的属性绑定时不能直接css样式-->
<!-- 方式1:变量形式 -->
<p :class="bb">南京网博</p>
<!-- 方式2:数组形式,同时引用多个 -->
<p :class="[bb,dd]">南京网博</p>
<!-- 方式3:json形式,常用!!! -->
<p :class="{aa:true,cc:flag}">南京网博</p>
<p :class="{aa:num>0}">南京网博</p>
<!-- 方式4:变量引用json形式 -->
<p :class="hello">南京网博</p>
<!--
style属性
-->
<p :style="[xx,yy]">itany</p>
</div>
</body>
</html>
页面显示
六,模板
1.简介
Vue.js使用基于HTML模板语法,可以将DOM绑定到Vue实例中的数据
模板就是{{ }},用来数据绑定,显示在页面中
也称为Mustache语法
2.数据绑定的方式
a.双向绑定
v-model
b.单项绑定
方式1:使用两对大括号{{}},可能会出现闪烁的问题,可以使用v-cloak解决
必须设置css样式否则不生效
示例:12.html
<!DOCTYPE html>
<html lang="en">
<head>
	<meta charset="UTF-8">
	<title>class和style属性</title>
	<script src="js/vue.js"></script>
	<script>
		window.onload=function(){
			let vm=new Vue({
				el:'#itany',
				data:{
                    msg:'welcome to itany'
                },
                created:function(){
                    alert(111)
                }
			});
		}
    </script>
    <style>
        [v-cloak]{
            display: none
        }
    </style>
</head>
<body>
	<div id="itany">
       <h3 >{{msg}}</h3>
       <!-- 当成纯文本 -->
       <h3 v-text="msg"></h3>
       <!-- 可以识别html标签 -->
       <h3 v-html="msg"></h3>
	</div>
</body>
</html>
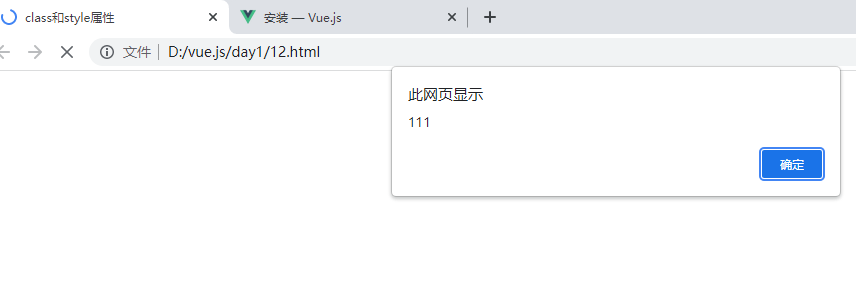
不使用v-cloak
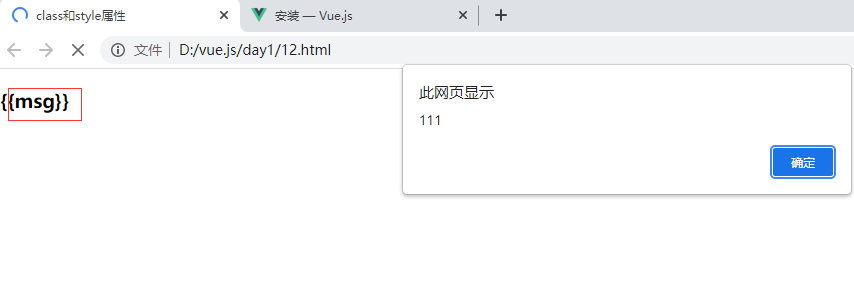
解析:在创建的时候调用弹出错误,msg没有获得值所以显示原始文档{{msg}}
注意:chrome可能演示不出此效果,可以换其他浏览器例如火狐
 created:function(){
                    alert(111)
                }
使用v-cloak,需要配合样式使用,否则不生效
<!DOCTYPE html>
<html lang="en">
<head>
	<meta charset="UTF-8">
	<title>class和style属性</title>
	<script src="js/vue.js"></script>
	<script>
		window.onload=function(){
			let vm=new Vue({
				el:'#itany',
				data:{
                    msg:'welcome to itany'
                },
                created:function(){
                    alert(111)
                }
			});
		}
    </script>
    <style>
        [v-cloak]{
            display: none
        }
    </style>
</head>
<body>
	<div id="itany">
       <h3 v-cloak>{{msg}}</h3>
       <!-- 当成纯文本 -->
       <h3 v-text="msg"></h3>
       <!-- 可以识别html标签 -->
       <h3 v-html="msg"></h3>
	</div>
</body>
</html>
页面显示
方式2:使用v-text,v-html
<!-- 当成纯文本 -->
<h3 v-text="msg"></h3>
<!-- 可以识别html标签 -->
<h3 v-html="msg"></h3>
两者不同在于一个当成超文本一个可以识别html标签
v-once 数据只绑定一次
演示12.html
<!DOCTYPE html>
<html lang="en">
<head>
<meta charset="UTF-8">
<title>class和style属性</title>
<script src="js/vue.js"></script>
<script>
window.onload=function(){
let vm=new Vue({
el:'#itany',
data:{
msg:'welcome to itany'
},
// created:function(){
// alert(111)
// }
});
}
</script>
<style>
[v-cloak]{
display: none
}
</style>
</head>
<body>
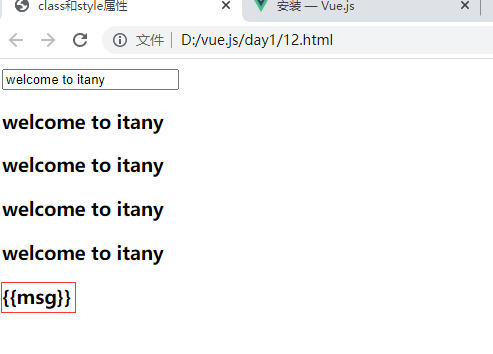
<div id="itany">
<input v-model="msg">
<h3 v-cloak>{{msg}}</h3>
<!-- 当成纯文本 -->
<h3 v-text="msg"></h3>
<!-- 可以识别html标签 -->
<h3 v-html="msg"></h3>
<h3 v-once>{{msg}}</h3>
</div>
</body>
</html>
页面显示

解析:input框内双向数据绑定,其他标签会跟随输入框的文本变化而变化,而设置了v-once的标签只在第一次引用,不再变化
v-pre 不编译,直接原样显示
如果我们就是需要显示{{}}则使用v-pre相当于其他语言的转义
<h3 v-pre>{{msg}}</h3>
页面显示原始字符
七,过滤器
1,简介
用来过滤模型数据,在显示渲染之前进行数据处理和筛选
语法:{{ data | filter1(参数) | filter2(参数)}}
2,关于内置过滤器
vue1.0中内置许多过滤器,如:
currency,upercase,lowercase
limitBy
orderBy
filterBy
vue2.0把内置过滤器都删除了
如何解决
a,使用第三方工具库、如loadash,date-fns日期格式化、accounting.js货币格式化等
b,自定义过滤器
3,自定义过滤器
分类:全局过滤器,局部过滤器
3.1 自定义全局过滤器
使用全局方法Vue.filter(过滤器ID,过滤器函数)
自定义一个全局过滤器,传递一个数字如果大于10则保持原样,如果小于10即是个位数则补0
13.html
<!DOCTYPE html>
<html lang="en">
<head>
	<meta charset="UTF-8">
	<title>自定义过滤器</title>
	<script src="js/vue.js"></script>
	<script>
		window.onload=function(){
            // 自定义全局过滤器
            Vue.filter('addZero',function(data){
                // console.log(data)
                return data<10?'0'+data:data
            });
            // Vue.filter('number',(data,n) => {
            //     // console.log(data,n)
            //     return data.toFixed(n)
            // });
            Vue.filter('date',data => {
                // console.log(data,n)
                let d=new Date(data)
                return d.getFullYear()+'-'+(d.getMonth()+1)+'-'+d.getDate()+' '+d.getHours()+':'+d.getMinutes()+':'+d.getSeconds();
            });
			let vm=new Vue({
				el:'#itany',
				data:{
                    currentTime: Date.now()
                },
                filter:{ // 局部过滤器
                    number:(data,n) =>{
                        return data.toFixed(n);
                    }
                }
			});
		}
    </script>
    <style>
        [v-cloak]{
            display: none
        }
    </style>
</head>
<body>
	<div id="itany">
        <h3>{{18 | addZero }}</h3>
        <h3>{{12.345678 | number(3)}}</h3>
        <h3>{{currentTime|date}}</h3>
	</div>
</body>
</html>
解析:自定义全局过滤器addZero
{{18 | addZero }} # 把18作为参数传递给自定义全局过滤器addZero
Vue.filter('addZero',function(data){
                // console.log(data)
                return data<10?'0'+data:data
            });
# data为10
# 返回为如果data小于10则加一个字符0返回否则返回data
同理下面的全局过滤器除了传递原始数字还传递参数n代表取小数点后几位数
 Vue.filter('number',(data,n) => {
                // console.log(data,n)
                return data.toFixed(n)
            });
下面过滤器传递当前时间戳显示易理解的日期时间信息
Vue.filter('date',data => {
                // console.log(data,n)
                let d=new Date(data)
                return d.getFullYear()+'-'+(d.getMonth()+1)+'-'+d.getDate()+' '+d.getHours()+':'+d.getMinutes()+':'+d.getSeconds();
            });
3.2自定义局部过滤器
局部过滤器只能是vue示例局部使用
定义方式和全局过滤器类似
filter:{ // 局部过滤器
                    number:(data,n) =>{
                        return data.toFixed(n);
                    }
                }

