Python之MySQL数据库连接驱动pymysql的使用
本文介绍python数据库MySQL连接驱动pymysql的简单使用
1,安装pymysql模块
未安装模块首先使用pip安装
pip3 install pymysql
2,创建数据库连接
使用模块pymysql创建数据库连接的语法为
传递的参数为host主机,user用户名 password密码,db数据库名称
conn = pymysql.connect(host='localhost',user='www-data',password='www-data',db='awesome')
以键值对方法传递,也可以把这些键值对存储为一个dict使用以下方式传递
conn = pymysql.connect(**kw)
3,创建数据库浮标
使用以下方法创建浮标,使用数据库连接对象conn加方法cursor创建一个数据库连接浮标
cursor = conn.cursor(pymysql.cursors.DictCursor)
4,执行sql语句
有了数据库浮标cursor就可以执行sql语句了,执行语法如下
cursor.execute(sql,args)
sql # 需要执行的sql语句例如'select * from table_name'
args # 替换sql语句的格式化字符串,即sql语句可以使用%s代表一个字符串,然后在args中使用对应的变量或参数替换,args为一个list或元组,即是一个有序的序列需要和sql中的%s一一对应
# 例如sql='select * from table_name where id=%s'  args=['12345']
# 相当于使用args中的参数替换sql中的%s
# select * from table_name where id='12345'
5,实践执行sql语句
实践执行sql语句前我们首先在本机创建一个数据库和对应的表用于测试
数据库对应的主机,用户名,密码,库名,表名如下
host: localhost
user: www-data
password: www-data
db:awesome
table_name: users
创建表名的sql语句如下,需要在数据库中创建好对应的表
CREATE TABLE `users` (
  `id` varchar(50) NOT NULL,
  `email` varchar(50) NOT NULL,
  `passwd` varchar(50) NOT NULL,
  `admin` tinyint(1) NOT NULL,
  `name` varchar(50) NOT NULL,
  `image` varchar(500) NOT NULL,
  `created_at` double NOT NULL,
  PRIMARY KEY (`id`),
  UNIQUE KEY `idx_email` (`email`),
  KEY `idx_created_at` (`created_at`)
) ENGINE=InnoDB DEFAULT CHARSET=utf8
创建好的表对应的结构如下
mysql> desc users;
+------------+--------------+------+-----+---------+-------+
| Field      | Type         | Null | Key | Default | Extra |
+------------+--------------+------+-----+---------+-------+
| id         | varchar(50)  | NO   | PRI | NULL    |       |
| email      | varchar(50)  | NO   | UNI | NULL    |       |
| passwd     | varchar(50)  | NO   |     | NULL    |       |
| admin      | tinyint(1)   | NO   |     | NULL    |       |
| name       | varchar(50)  | NO   |     | NULL    |       |
| image      | varchar(500) | NO   |     | NULL    |       |
| created_at | double       | NO   | MUL | NULL    |       |
+------------+--------------+------+-----+---------+-------+
7 rows in set (2.68 sec)
①执行insert操作
往数据库插入一条数据
import time
# insert start
sql = 'insert into `users` (`email`, `passwd`, `admin`, `name`, `image`, `created_at`, `id`) values (?, ?, ?, ?, ?, ?, ?)'
args = ['test@qq.com','password',1,'test','about:blank',time.time(),'111111']
# 使用replace 把'?'替换成'%s'
cursor.execute(sql.replace('?','%s'),args)
conn.commit()
# insert end
插入以下代码
use_pymysql.py
import time
# insert start
sql = 'insert into `users` (`email`, `passwd`, `admin`, `name`, `image`, `created_at`, `id`) values (?, ?, ?, ?, ?, ?, ?)'
args = ['test@qq.com','password',1,'test','about:blank',time.time(),'111111']
# 使用replace 把'?'替换成'%s'
cursor.execute(sql.replace('?','%s'),args)
conn.commit()
# insert end
注意:执行修改操作需要使用conn.commit()提交,否则修改不生效
在MySQL数据库查询可以看到插入的数据
mysql> select * from users;
+--------+-------------+----------+-------+------+-------------+------------------+
| id     | email       | passwd   | admin | name | image       | created_at       |
+--------+-------------+----------+-------+------+-------------+------------------+
| 111111 | test@qq.com | password |     1 | test | about:blank | 1637723096.69565 |
+--------+-------------+----------+-------+------+-------------+------------------+
1 row in set (0.00 sec)
注意:执行操作也是有返回的,返回结果是本次操作影响的数据库条数,如果把返回结果打印,本次输出为1
rs = cursor.execute(sql.replace('?','%s'),args)
conn.commit()
print(rs)
②执行update操作
修改数据我们根据条件id修改刚刚插入的数据
执行修改前需要把刚刚执行的插入语句注释,否则因为建值重复会报错
# update start
sql = 'update `users` set `email`=?, `passwd`=?, `admin`=?, `name`=?, `image`=?, `created_at`=? where `id`=?'
args = ['test2@qq.com','password',1,'test2','about:blank',time.time(),'111111']
print(cursor.execute(sql.replace('?','%s'),args))
conn.commit()
# update end
执行以后把email和name修改了
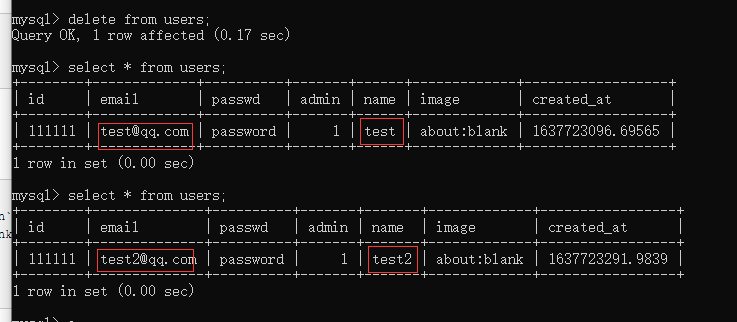
③执行delete操作
执行删除操作把刚刚插入的数据删除
# delete start
sql = 'delete from `users` where `id`=?'
args = ['111111']
print(cursor.execute(sql.replace('?','%s'),args))
conn.commit()
# delete end
同样根据关键字id指定的值删除了这条数据
④执行select操作
在执行select操作前我们保证数据库里面至少有一条数据
cursor = conn.cursor(pymysql.cursors.DictCursor)
sql = 'select * from users'
args = []
# 执行查询返回结果数量
# 执行查询
rs=cursor.execute(sql,args)
# 获取查询结果
# 获取查询的第一条结果,返回一个dict,dict元素是查询对应的键值对
# 如果查询结果有多条则执行一次,游标移动到下一条数据,在执行一次又返回一条数据
print(cursor.fetchone())
同样执行select操作返回结果也是本次操作影响了几行数据,即根据条件查询到几条数据,本次为1条
要想获得结果使用游标的fetchone(),fetchall(),fetehmant(num)来获取,他们的区别在于
# 获取查询的第一条结果,返回一个dict,dict元素是查询对应的键值对
# 如果查询结果有多条则执行一次,游标移动到下一条数据,再执行一次又返回一条数据
print(cursor.fetchone())
# 获取查询的所有结果,返回一个list,list元素是dict,dict元素是查询对应的键值对
print(cursor.fetchall())
# 获取查询的前几条结果,返回一个list,list元素是dict,dict元素是查询对应的键值对
print(cursor.fetchmany(1))
fetchone()获取的是dict
fetchall()和fecthmany(num)获取的是list,list的元素是是dict
他们对应的结果如下
print(cursor.fetchone())
# {'id': '111111', 'email': 'test@qq.com', 'passwd': 'password', 'admin': 1, 'name': 'test', 'image': 'about:blank', 'created_at': 1637723578.5734}

print(cursor.fetchall())
# [{'id': '111111', 'email': 'test@qq.com', 'passwd': 'password', 'admin': 1, 'name': 'test', 'image': 'about:blank', 'created_at': 1637723578.5734}]

print(cursor.fetchmany(1))
# [{'id': '111111', 'email': 'test@qq.com', 'passwd': 'password', 'admin': 1, 'name': 'test', 'image': 'about:blank', 'created_at': 1637723578.5734}]
注意:cursor的一个浮标,当获取数据以后浮标会移动,假如查询的数据只有一条已经使用cursor.fetchone()方法取出这一条数据,浮标已经移动到没有数据,再使用fetchone(),fetchall() ,fetchmany(num)去获取则会返回None或者是空列表[]
浮标处没有数据了再使用fetchone()返回None,使用fetchall(),fetchmany(num)返回[]
⑥写成函数使用
为了方便调用可以把执行sql语句写成函数来使用,分两个函数,一个函数执行select把结果返回,一个函数执行insert,update,delete把影响的行数返回
def select(sql,args,size=None):
    log(sql,args)
    cursor =  conn.cursor(pymysql.cursors.DictCursor)
    cursor.execute(sql.replace('?','%s'),args or ())
    if size:
        rs = cursor.fetchmany(size)
    else:
        rs = cursor.fetchall()
    cursor.close
    logging.info('rows returned: %s' % len(rs))
    return rs

def execute(sql,args):

    cursor = conn.cursor(pymysql.cursors.DictCursor)
    try:
        cursor.execute(sql.replace('?','%s'),args)
        # rowcount方法把影响函数返回
        rs = cursor.rowcount
        cursor.close()
        conn.commit()
    except:
        raise
    return rs
其中select函数加一个默认参数size即返回查询的数据条数,需要传递一个整数返回这个整数的个数的条数,如果不传递则返回所有查询结果,结果是一个list,这个list的元素是查询结果键值对组成的dict
执行修改操作的函数把影响的条数返回,如果返回为0则代表没有影响数据库,代表修改失败,修改操作不要忘记conn.commit()提交修改结果,否则修改不生效

 浙公网安备 33010602011771号