

Web开发基础之CMDB系统开发之一
一,CMDB相关概念
1,概念介绍
CMDB(配置管理数据库)存储与管理企业IT架构中设备的各种配置信息,它与所有服务支持和服务交付流程都紧密相联,支持这些流程的运转、发挥配置信息的价值,同时依赖于相关流程保证数据的准确性。
服务器集群或者分布式服务器 几十台、上百台,服务器相关数据信息,管理不方便。通过资产管理的方式,通过CMDB系统实现。
github一些开源的cmdb系统:https://github.com/search?q=cmdb
2,需求分析
本次开发的CMDB系统实现以下模块
1、用户管理模块
2、用户组管理模块
3、权限管理模块
4、资产主机模块
5、资产机房模块
6、资产用户模块
概括一下,本次学习开发的CMDB,是一个收集服务器信息,实现服务器信息可视化,给自动化运维监控提供数据统计和展示等基础服务。
3,设计实现
CMDB使用关系图示
本次开发的CMDB系统结构图示
二,创建CMDB项目
1,创建项目
①使用pycharm创建Django项目
项目名称为syscmdb
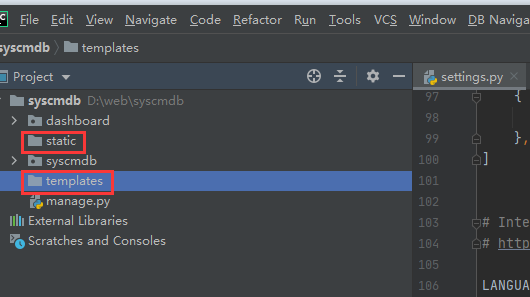
目录结构如下
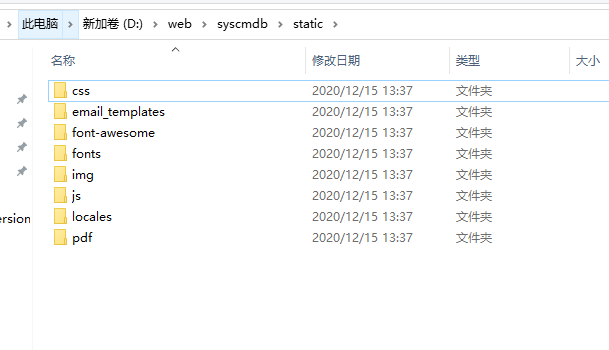
创建静态资源static目录
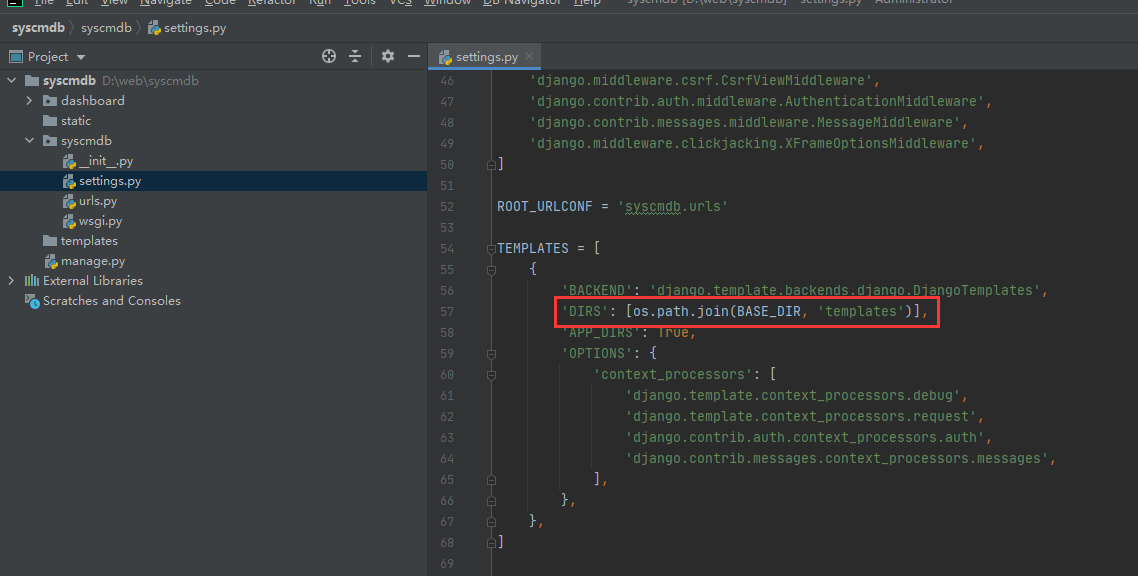
②默认初始化配置
setting.py配置

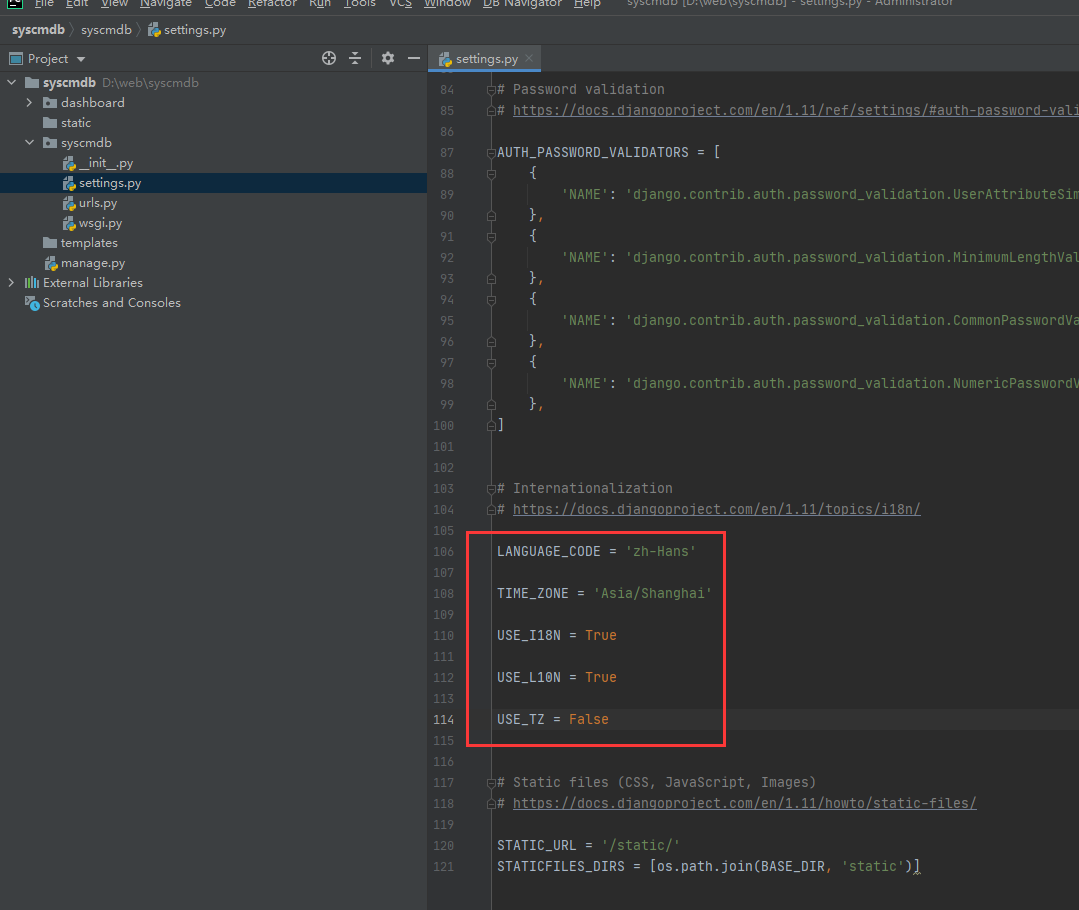
时区及语言配置
3,数据库配置
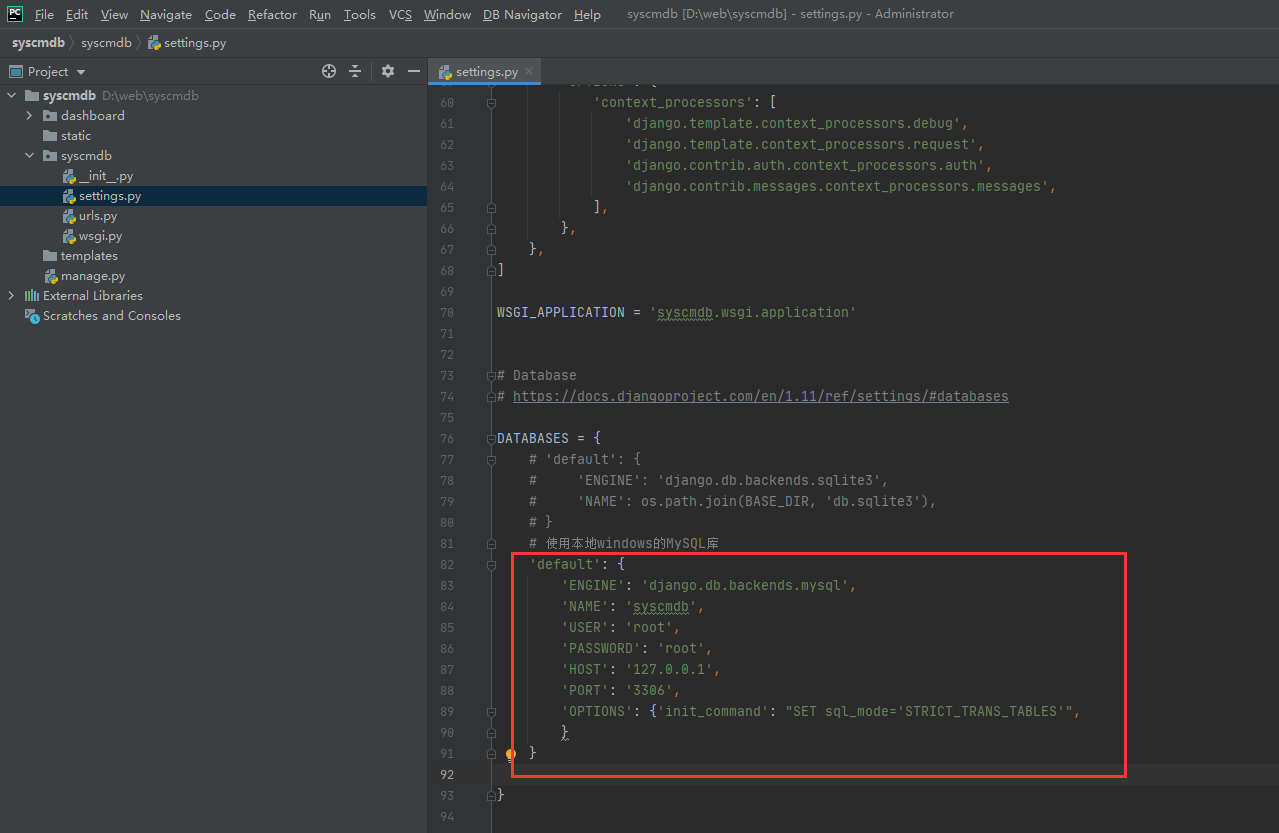
1 2 3 4 5 6 7 8 9 10 11 | 'default': { 'ENGINE': 'django.db.backends.mysql', 'NAME': 'syscmdb', #你的数据库名称 数据库需要自己提前建好 'USER': 'root', #你的数据库用户名 'PASSWORD': 'root', #你的数据库密码 'HOST': '127.0.0.1', #你的数据库主机,留空默认为localhost 'PORT': '3306', #你的数据库端口 'OPTIONS': { "init_command": "SET sql_mode='STRICT_TRANS_TABLES'", } } |
MySQL创建库syscmdb
1 | CREATE DATABASE syscmdb DEFAULT CHARACTER SET utf8 COLLATE utf8_general_ci; |
初始化配置

③迁移数据库
1 2 3 4 5 6 7 8 9 10 11 12 13 14 15 16 17 18 19 20 | D:\web\syscmdb>python manage.py makemigrationsNo changes detectedD:\web\syscmdb>python manage.py migrateOperations to perform: Apply all migrations: admin, auth, contenttypes, sessionsRunning migrations: Applying contenttypes.0001_initial... OK Applying auth.0001_initial... OK Applying admin.0001_initial... OK Applying admin.0002_logentry_remove_auto_add... OK Applying contenttypes.0002_remove_content_type_name... OK Applying auth.0002_alter_permission_name_max_length... OK Applying auth.0003_alter_user_email_max_length... OK Applying auth.0004_alter_user_username_opts... OK Applying auth.0005_alter_user_last_login_null... OK Applying auth.0006_require_contenttypes_0002... OK Applying auth.0007_alter_validators_add_error_messages... OK Applying auth.0008_alter_user_username_max_length... OK Applying sessions.0001_initial... OK |
注意:这是一个初始库,无需配置模型,迁移无需设置对应项目
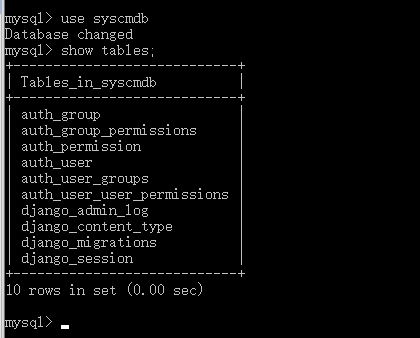
查看MySQL对应的表
三,管理后台布局
1,后台前端模板介绍
使用INSPINIA模板,实现管理后台的前端模板页面
2,基础页面布局
①部署静态资源
②在应用下创建模板base方便之后分开管理

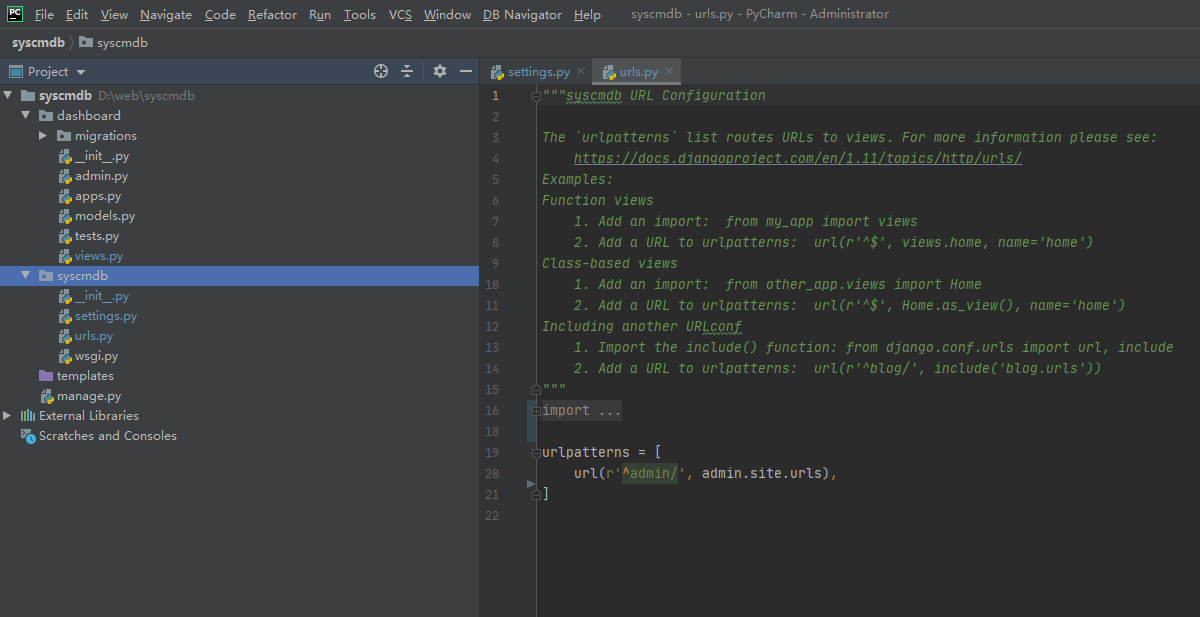
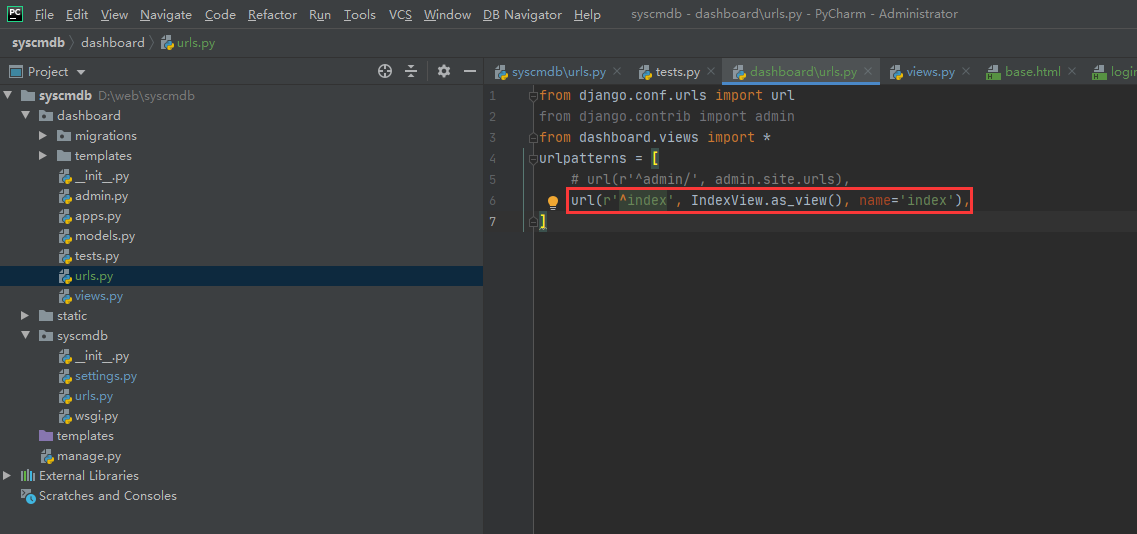
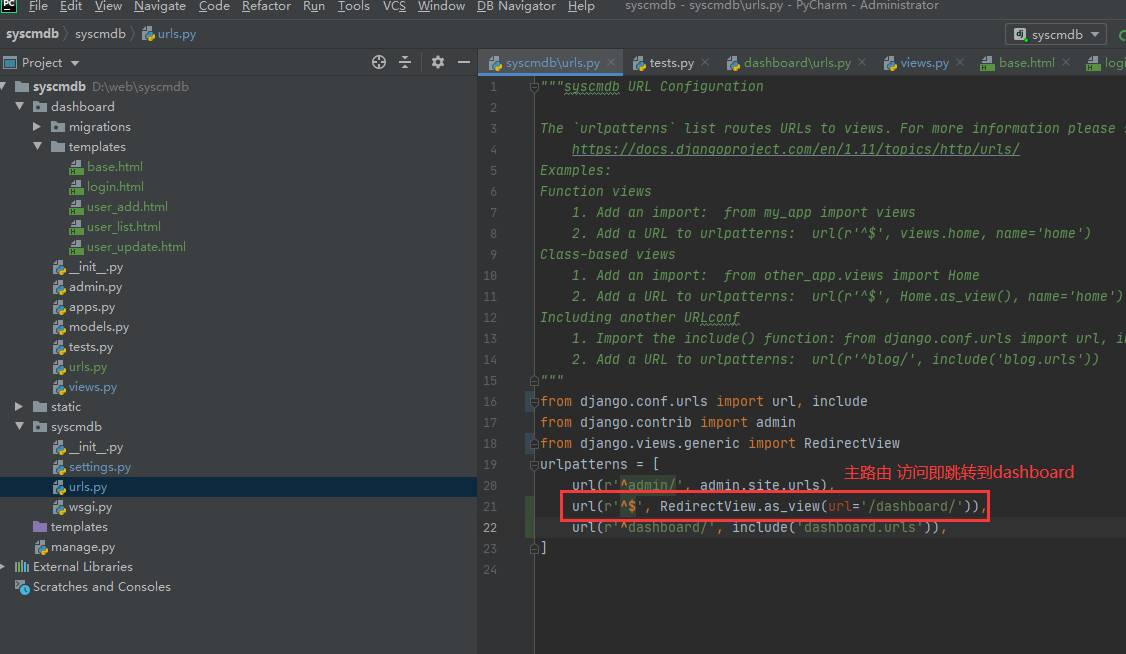
③定义路由
主路由
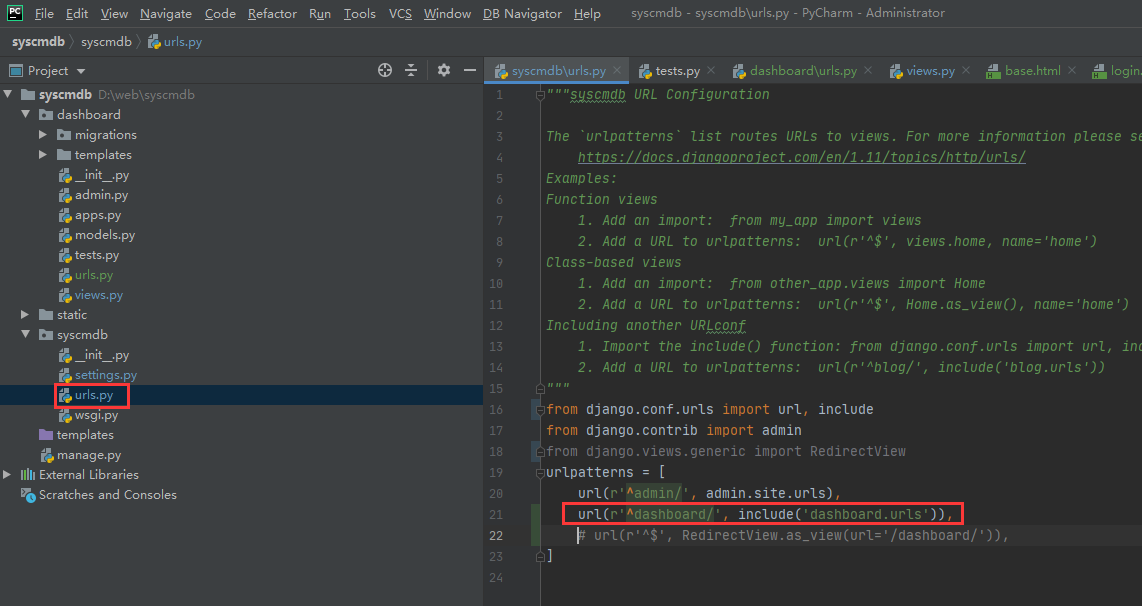
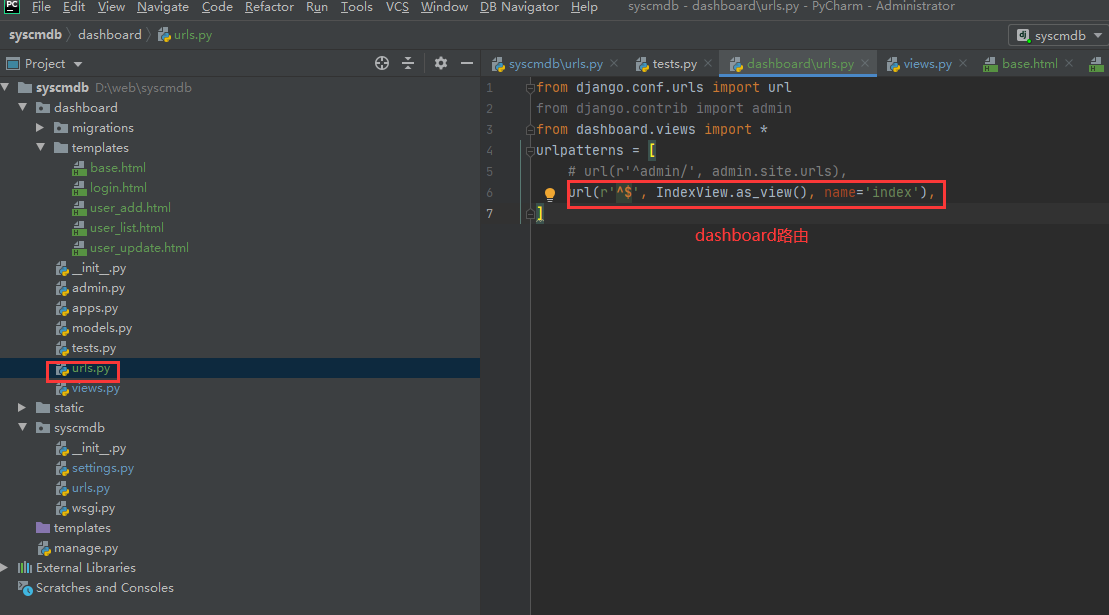
dashboard路由
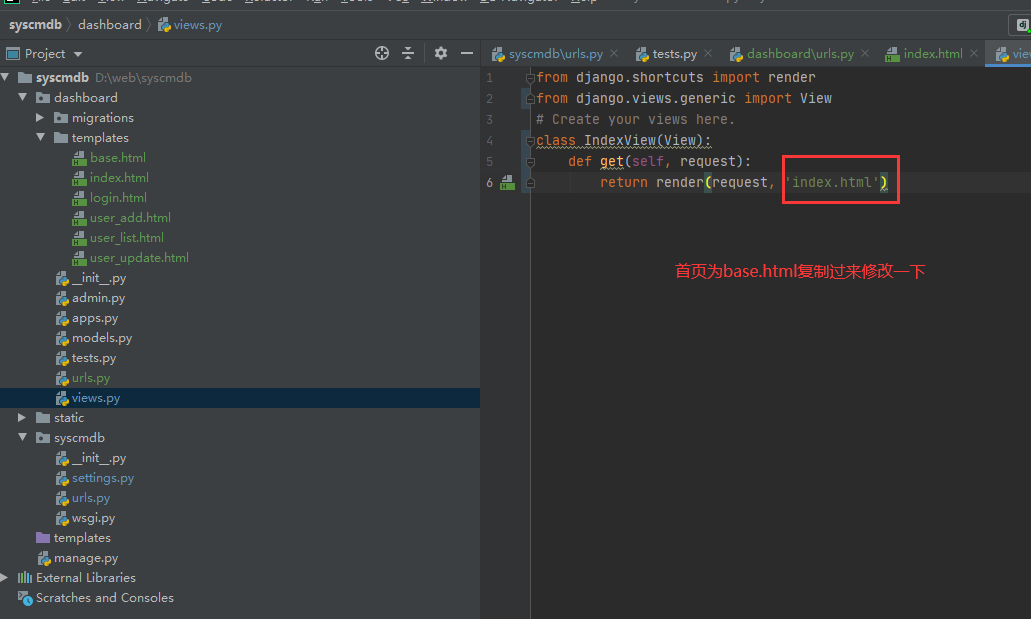
④定义类视图
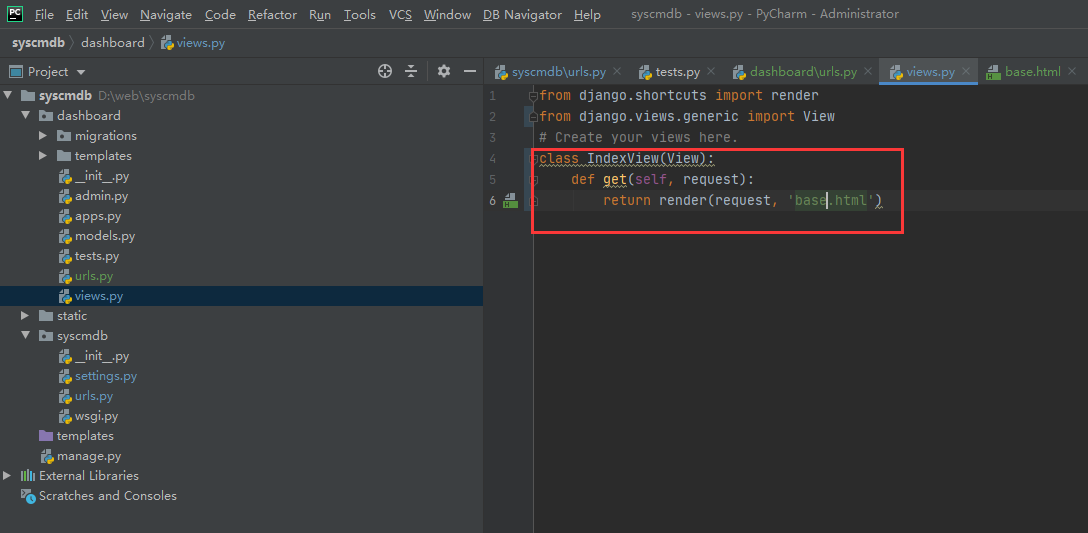
1 2 3 4 5 6 | from django.shortcuts import renderfrom django.views.generic import View# Create your views here.class IndexView(View): def get(self, request): return render(request, 'base.html') |
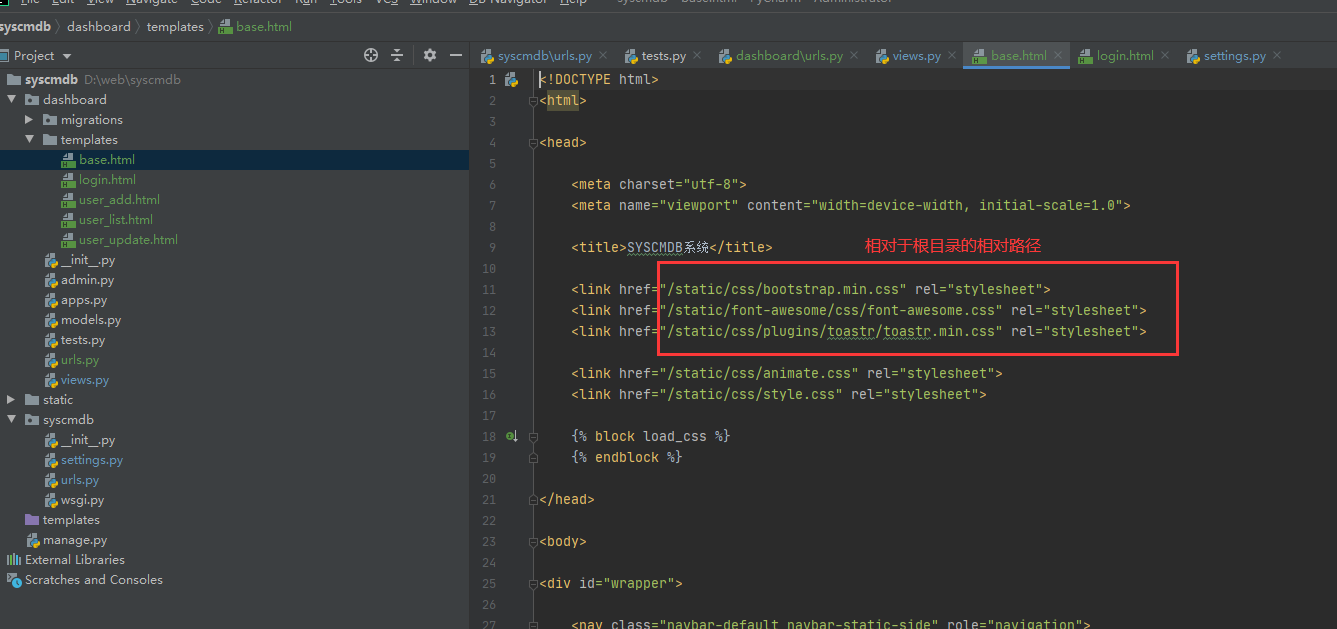
⑤模板页面
可以通过模板页面,进行修改。或者直接使用修改好的模板
注意静态资源路径的修改和替换
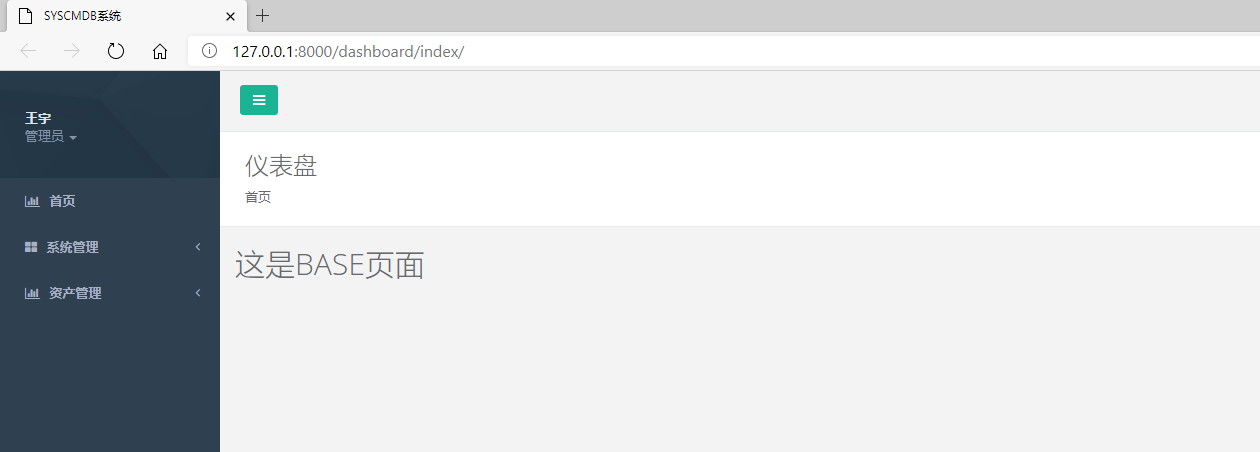
⑥查看效果
注意:如果遇到静态资源无法加载的情况,注意查看settings.py里的静态资源目录配置是否正确。
如果css js都加载正常页面显示不正常,可以清除浏览器缓存再次刷新页面
如果出现404修改dashboard路由取消^符合 或者使用域名 http://127.0.0.1:8000/dashboardindex 即不加/访问
3,首页面实现
现在访问需要输入完整的地址例如http://127.0.0.1:8000/dashboard/index/
通过重定向实现输入127.0.0.1:8000即可跳转到首页index
①路由
RediretView重定向Url跳转
注意:需要加载模块
1 | from django.views.generic import RedirectView |
②视图
③首页模板

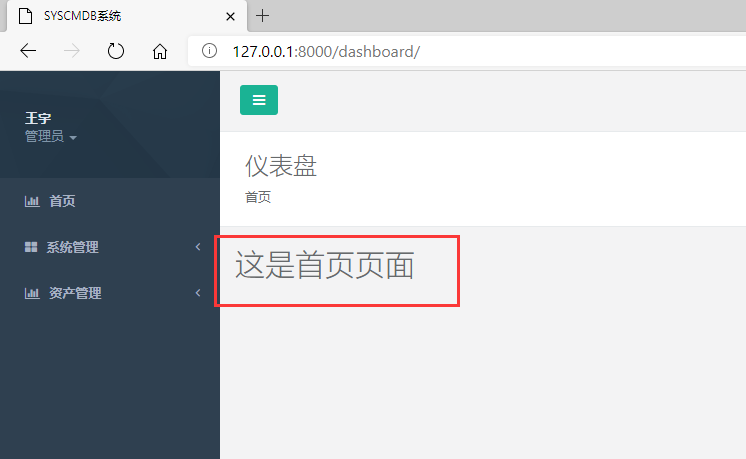
④查看效果
页面输入地址127.0.0.1:8000即可 默认首页自动跳转
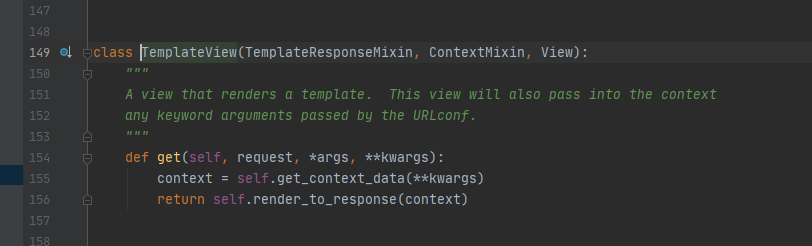
4,高级视图类值TemplateView
TemplateView,这个类封装了View提供了更强大的功能。使用TemplateView,加载渲染页面
①使用TemplateView
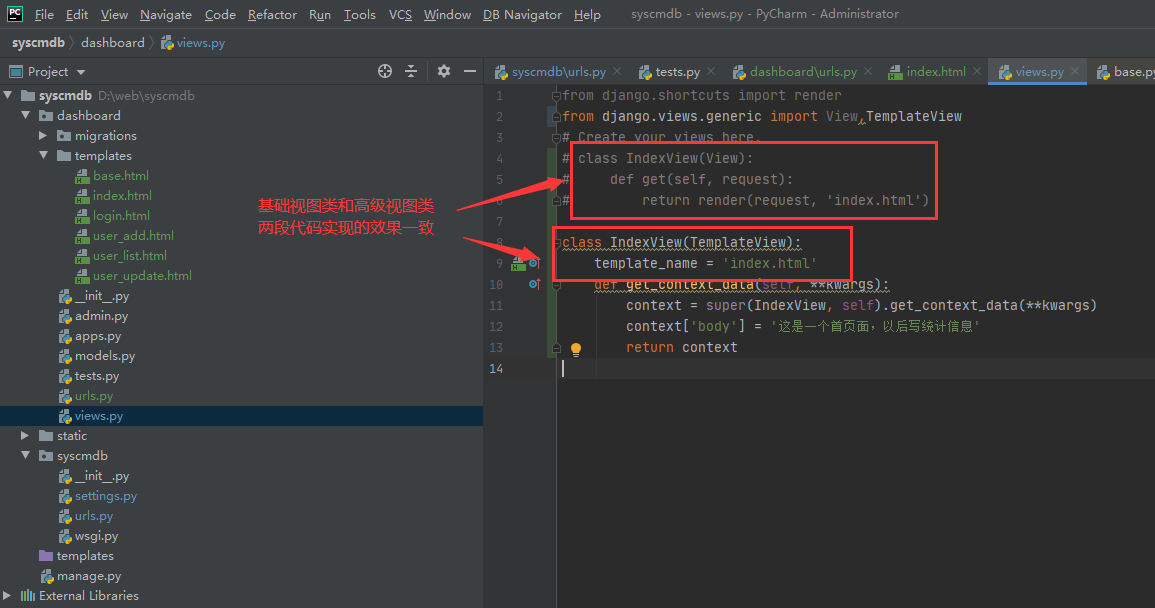
实现原理
②视图传输数据到模板
之前视图可以传递一个字典传输数据到模板,高级视图类通过重新父类传输数据信息

1 2 3 4 5 6 | class IndexView(TemplateView): template_name = 'index.html' def get_context_data(self, **kwargs): context = super(IndexView, self).get_context_data(**kwargs) context['body'] = '这是一个首页面,以后写统计信息' return context |
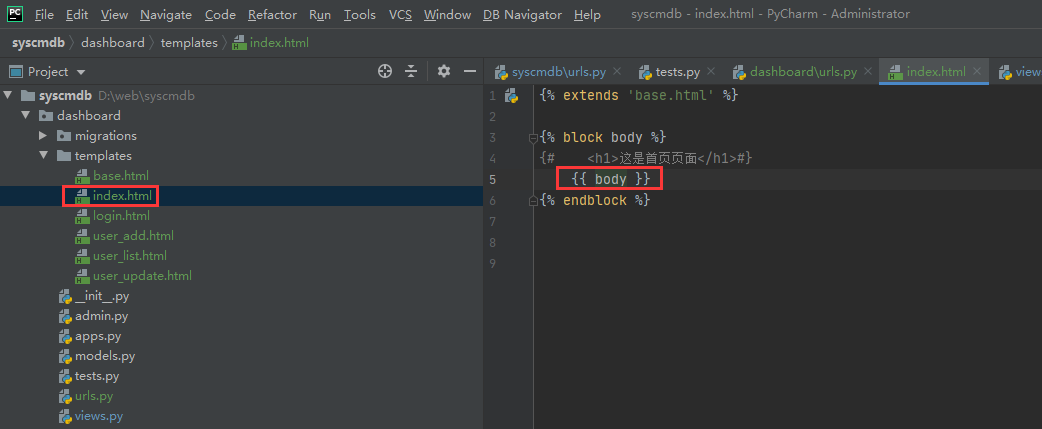
③模板调用
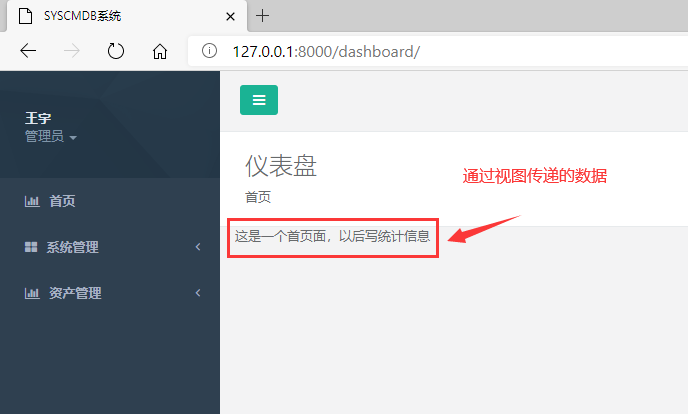
④查看显示效果
四,登录管理
1,登录基本实现
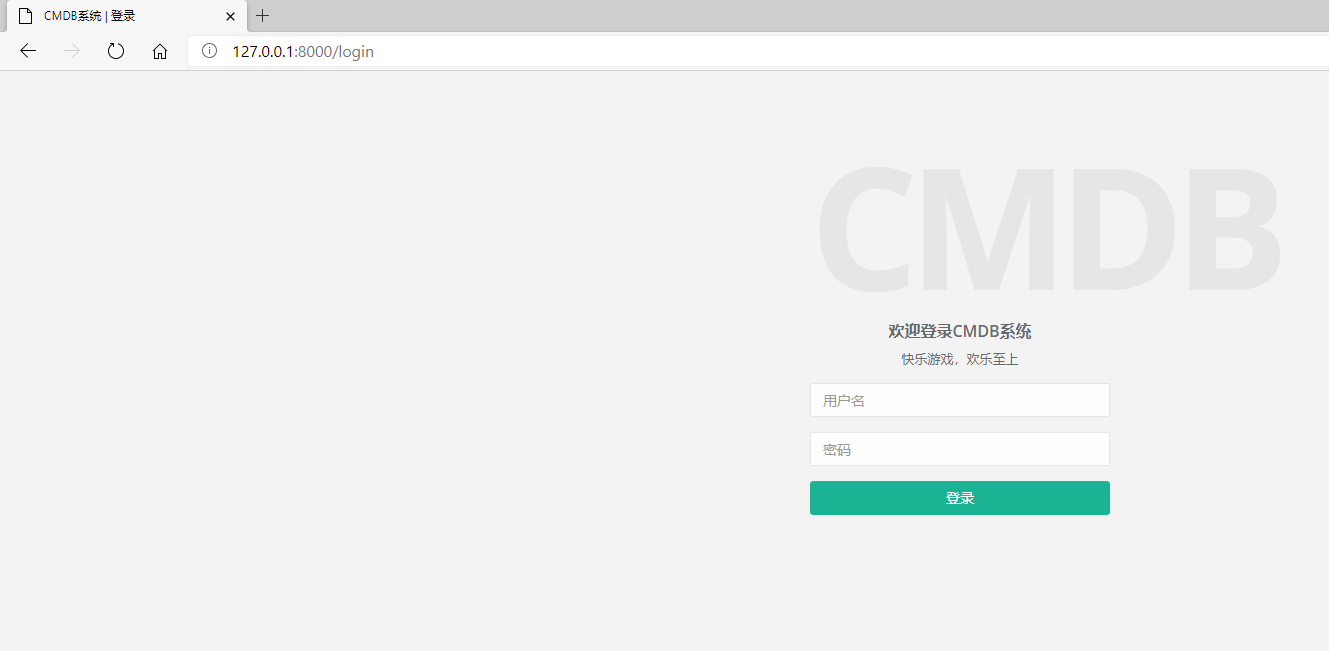
实现完成首页面后,为了能够更加安全,就需要实现一个登录功能,只有登录之后,才能够查看管理后台。
①定义路由
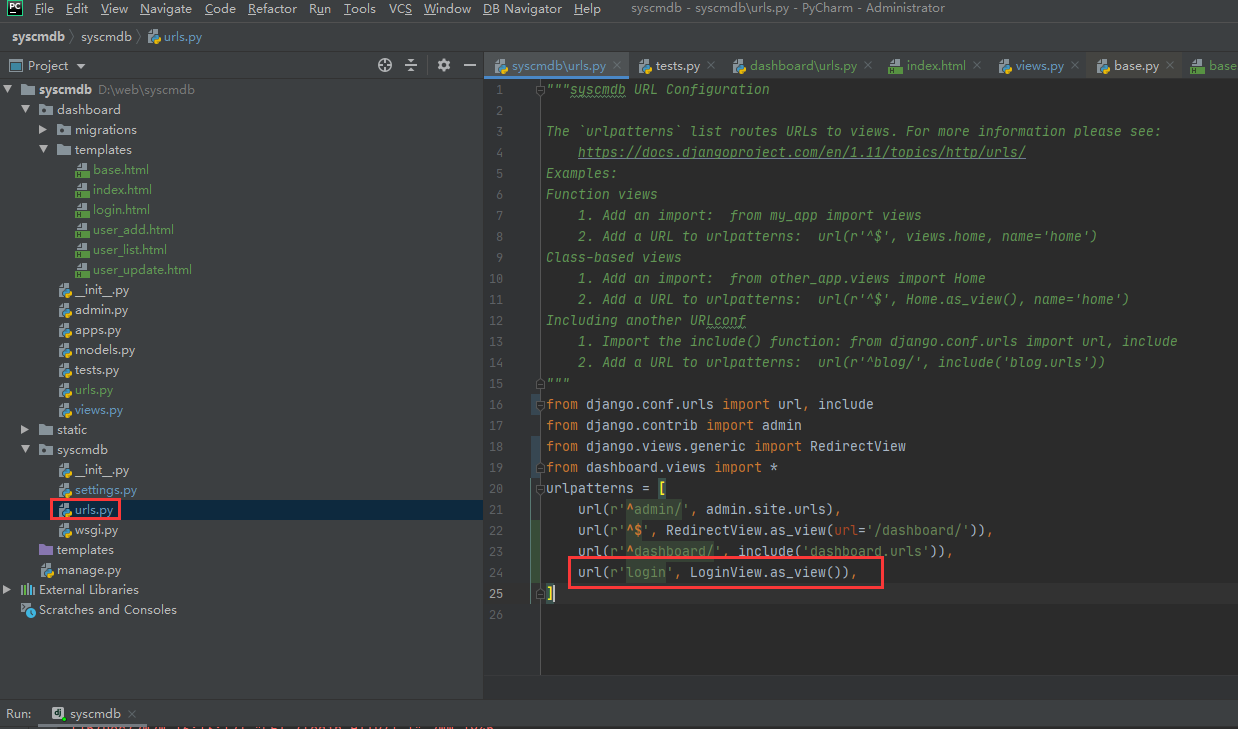
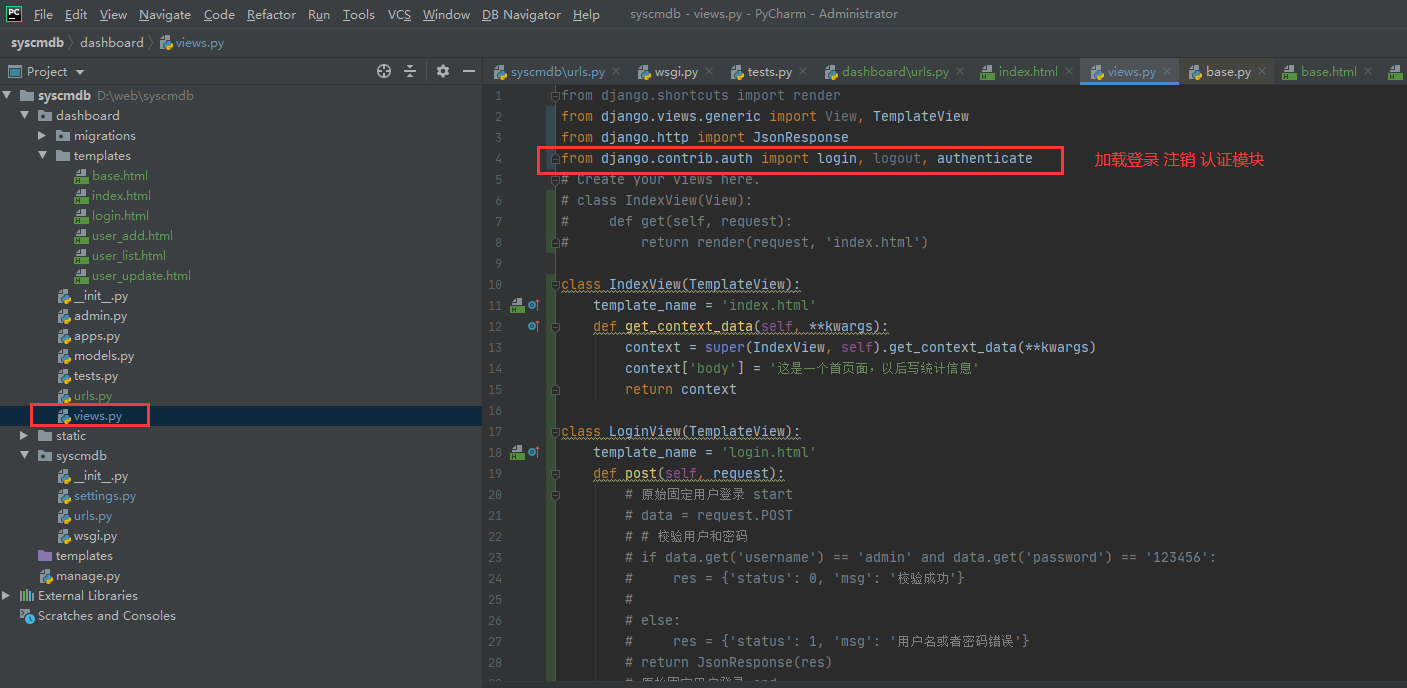
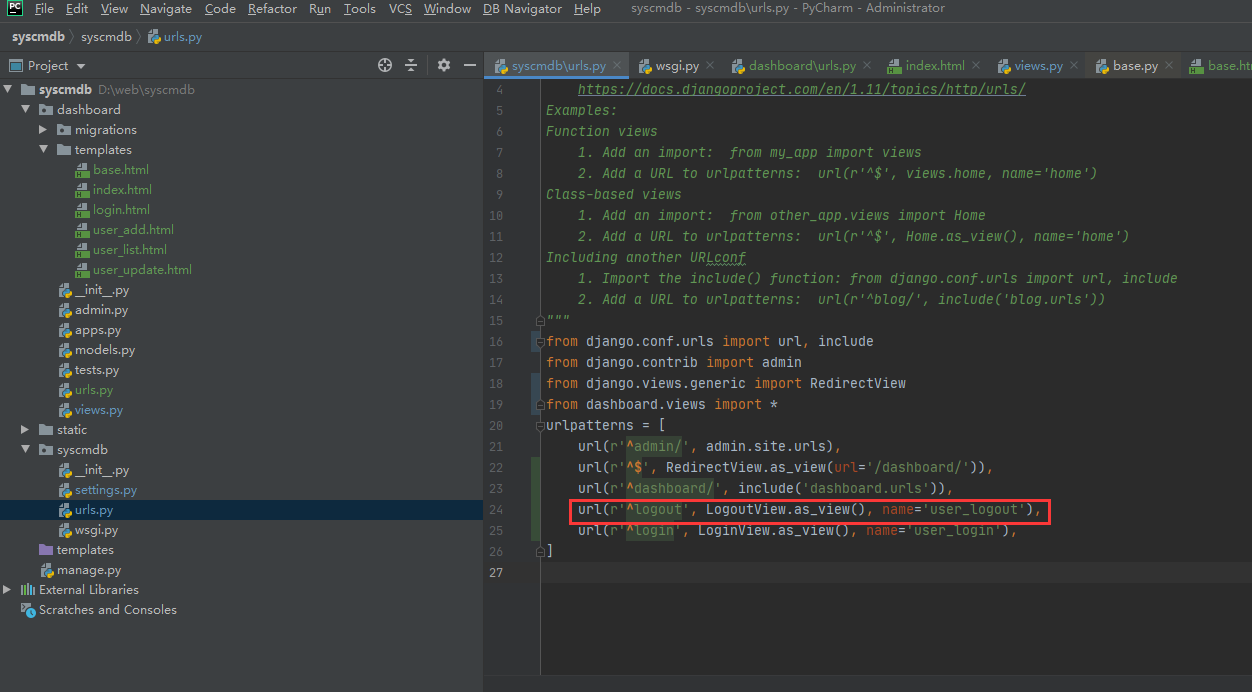
1 2 3 4 5 6 7 8 9 10 | from django.conf.urls import url, includefrom django.contrib import adminfrom django.views.generic import RedirectViewfrom dashboard.views import *urlpatterns = [ url(r'^admin/', admin.site.urls), url(r'^$', RedirectView.as_view(url='/dashboard/')), url(r'^dashboard/', include('dashboard.urls')), url(r'login', LoginView.as_view()),] |
注意:本次登录页面指向的是dashboard内的视图所以需要导入视图
1 | from dashboard.views import * |
②定义视图

页面查看
③在后端接收用户传输数据
1 | 登录基础原理:前端页面输入账号密码===》后端接收信息参数===》类视图判断校验 |
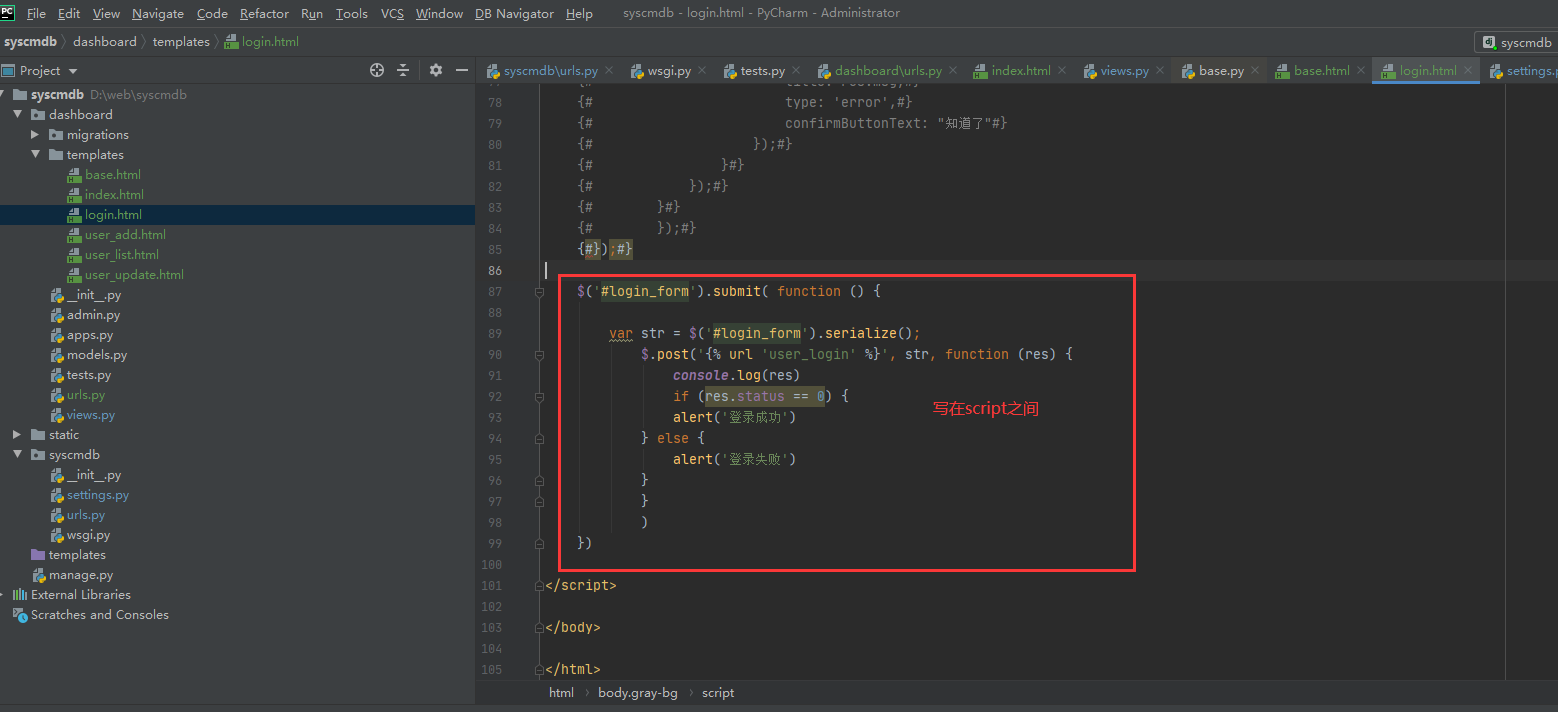
模板页面通过ajax post请求发送数据
定义视图接收数据
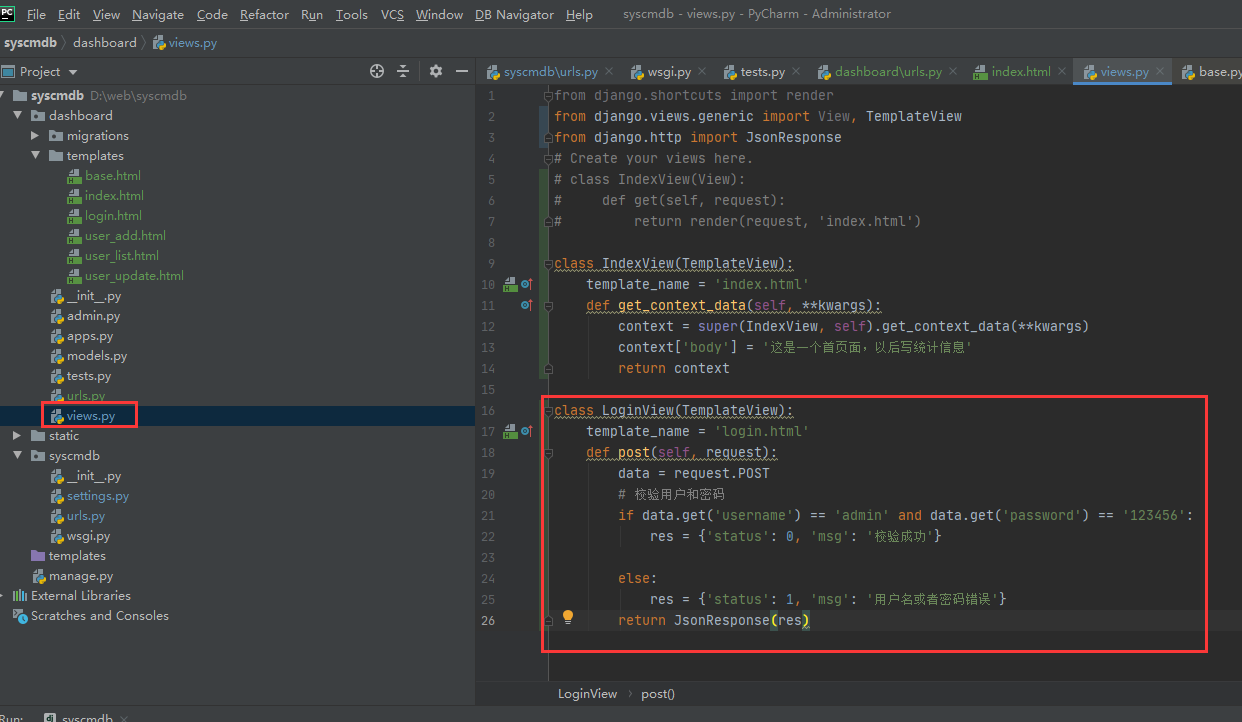
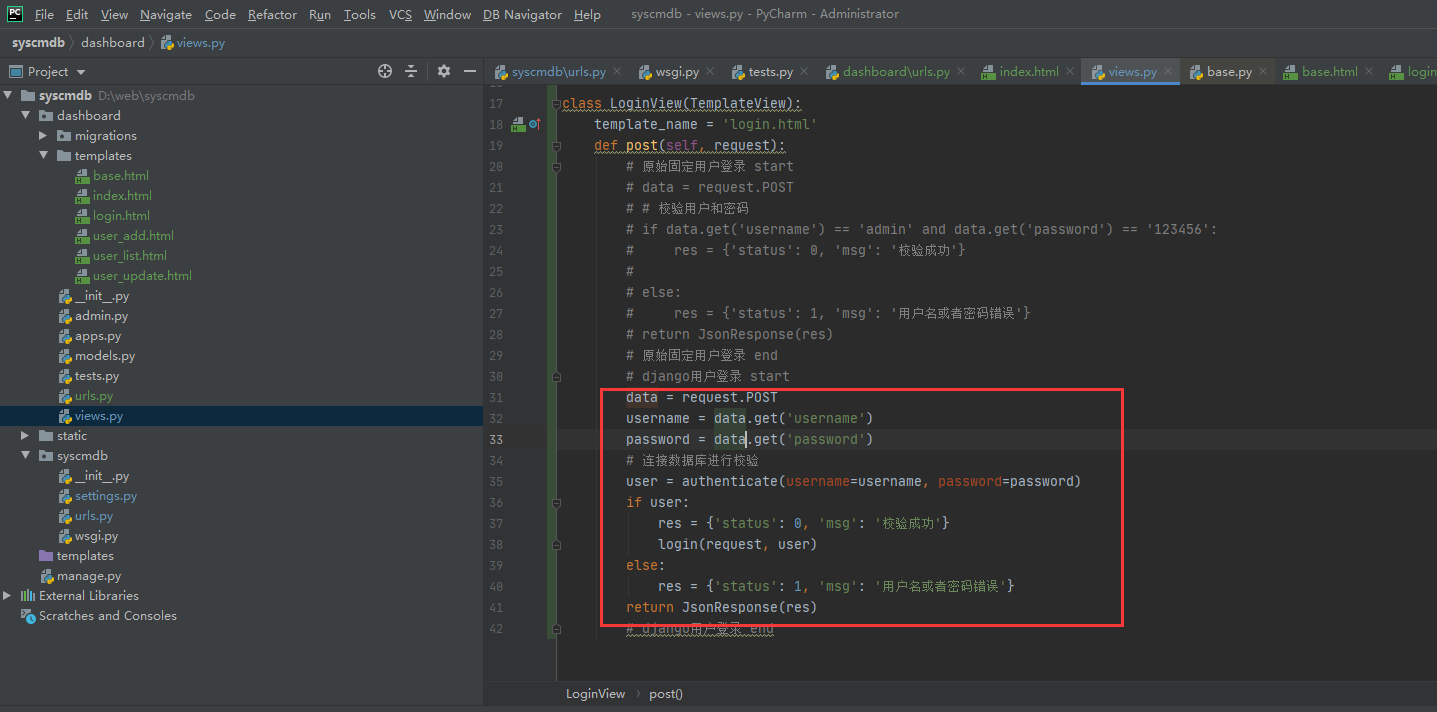
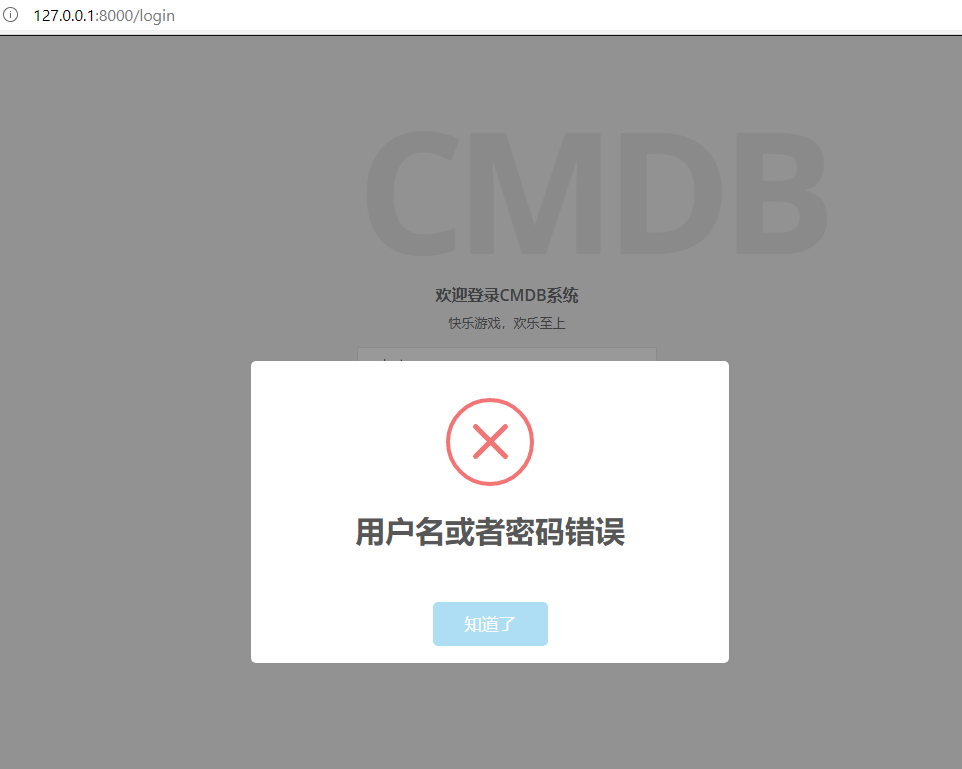
1 2 3 4 5 6 7 8 9 10 11 | class LoginView(TemplateView): template_name = 'login.html' def post(self, request): data = request.POST # 校验用户和密码 if data.get('username') == 'admin' and data.get('password') == '123456': res = {'status': 0, 'msg': '校验成功'} else: res = {'status': 1, 'msg': '用户名或者密码错误'} return JsonResponse(res) |
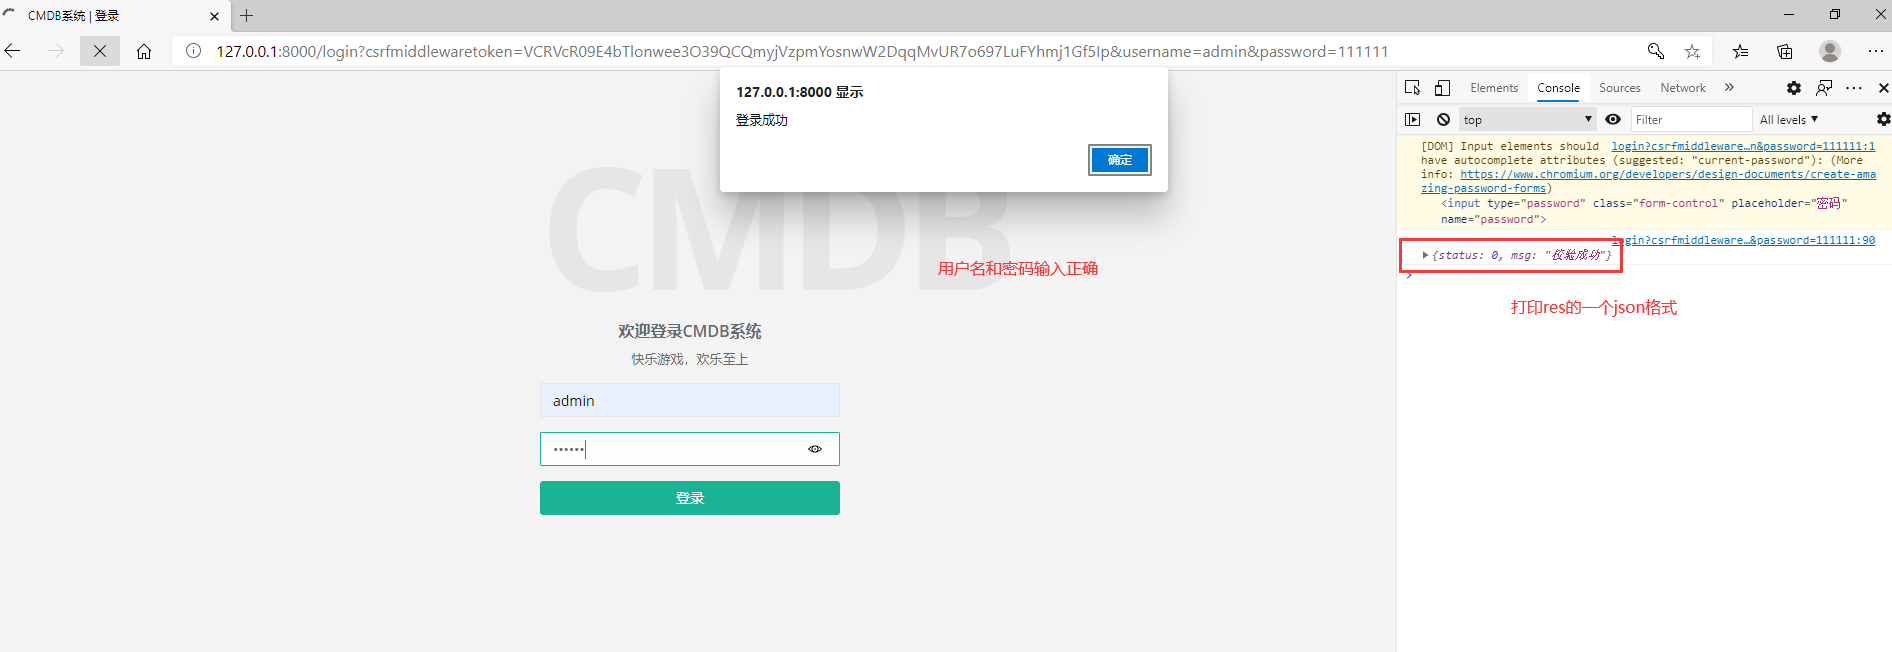
当页面输入用户名和密码时 终端如下打印

④效验账号和密码并返回数据
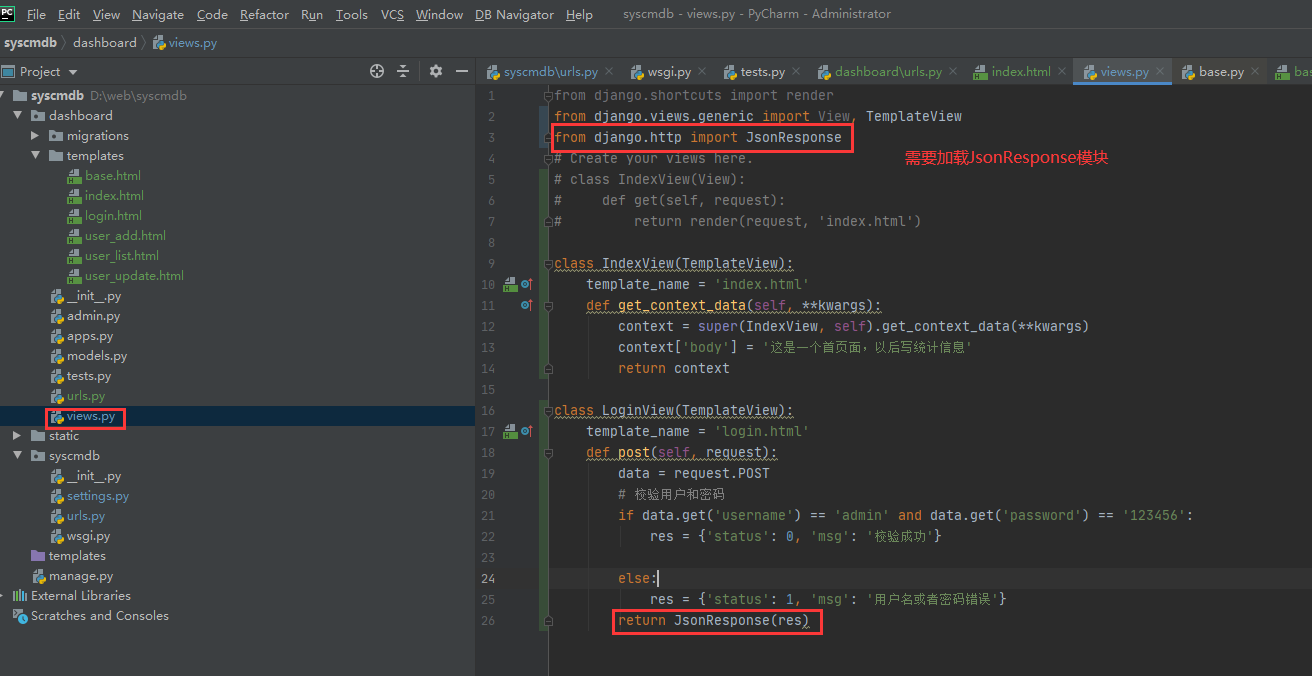
注意:首页Json返回数据格式声明
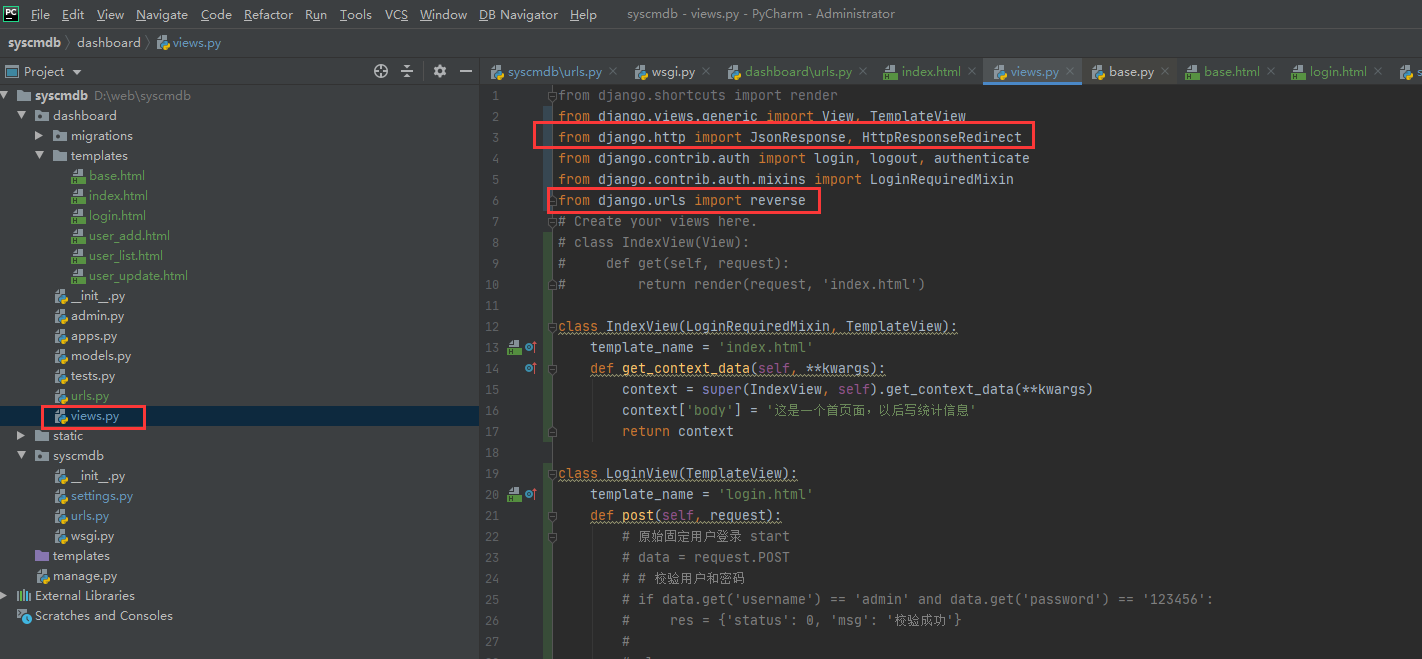
1 | from django.http import JsonResponse |
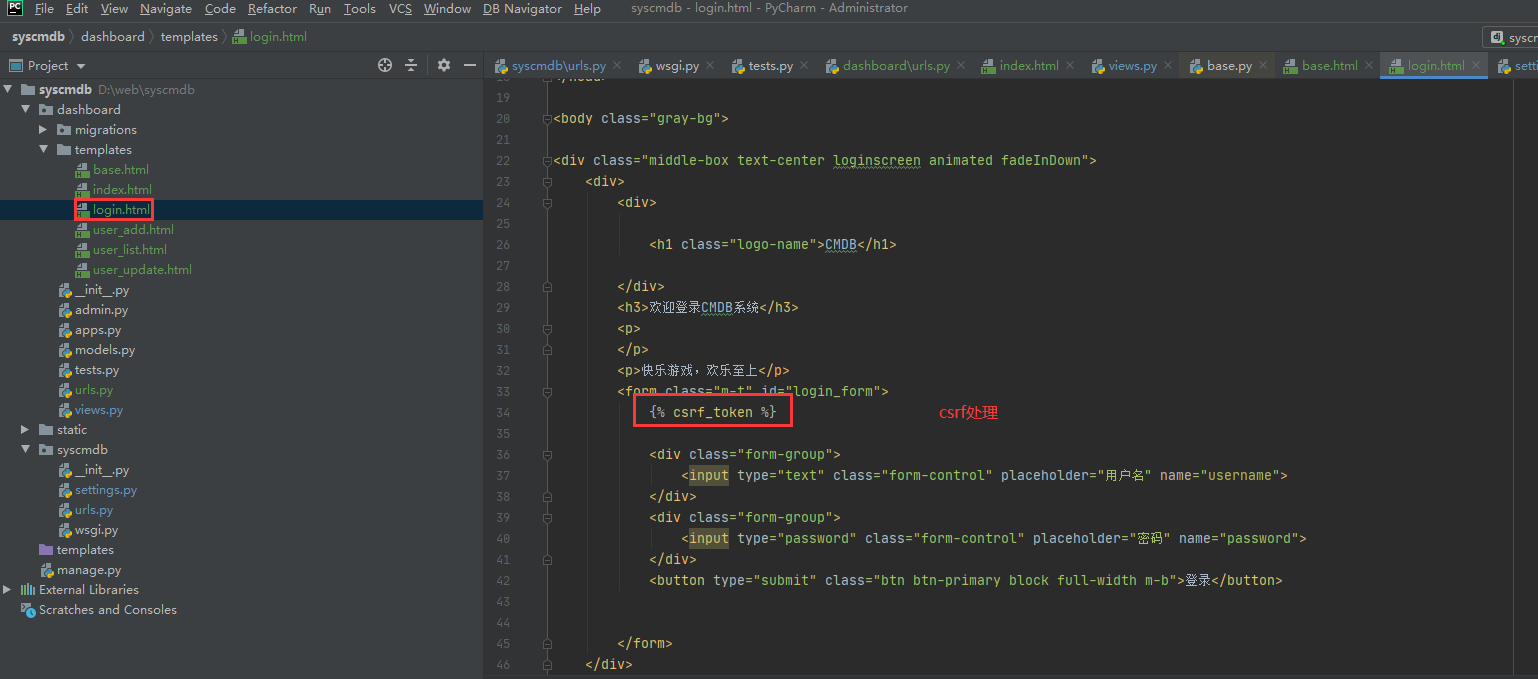
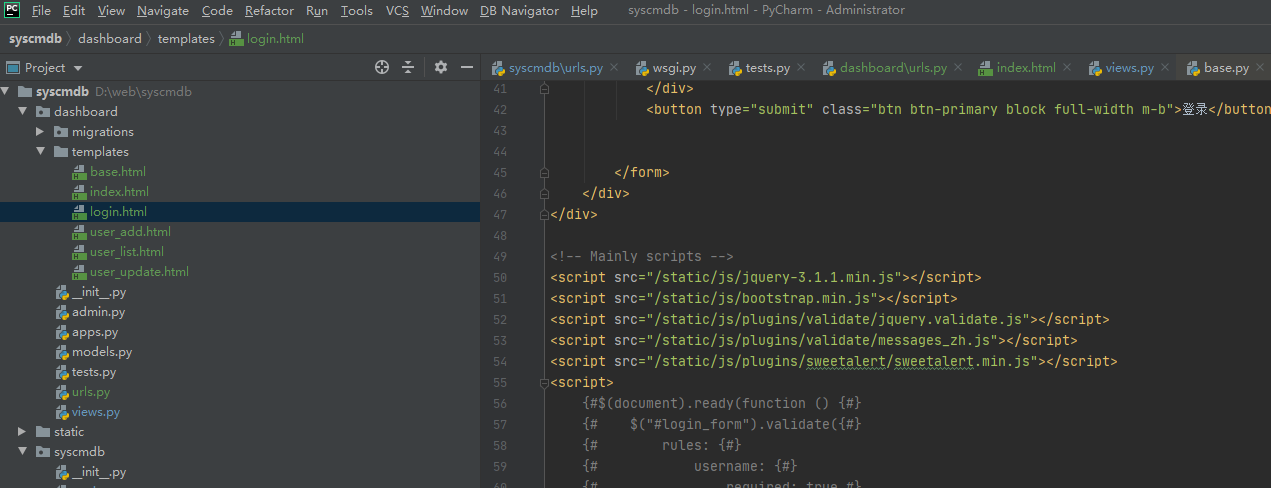
login.html模板修改
完整代码如下
1 2 3 4 5 6 7 8 9 10 11 12 13 14 15 16 17 18 19 20 21 22 23 24 25 26 27 28 29 30 31 32 33 34 35 36 37 38 39 40 41 42 43 44 45 46 47 48 49 50 51 52 53 54 55 56 57 58 59 60 61 62 63 64 65 66 67 68 69 70 71 72 73 74 75 | <!DOCTYPE html><html><head> <meta charset="utf-8"> <meta name="viewport" content="width=device-width, initial-scale=1.0"> <title>CMDB系统 | 登录</title> <link href="/static/css/bootstrap.min.css" rel="stylesheet"> <link href="/static/font-awesome/css/font-awesome.css" rel="stylesheet"> <link href="/static/css/animate.css" rel="stylesheet"> <link href="/static/css/style.css" rel="stylesheet"> <link href="/static/css/plugins/sweetalert/sweetalert.css" rel="stylesheet"></head><body class="gray-bg"><div class="middle-box text-center loginscreen animated fadeInDown"> <div> <div> <h1 class="logo-name">CMDB</h1> </div> <h3>欢迎登录CMDB系统</h3> <p> </p> <p>快乐游戏,欢乐至上</p> <form class="m-t" id="login_form"> {% csrf_token %} <div class="form-group"> <input type="text" class="form-control" placeholder="用户名" name="username"> </div> <div class="form-group"> <input type="password" class="form-control" placeholder="密码" name="password"> </div> <button type="submit" class="btn btn-primary block full-width m-b">登录</button> </form> </div></div><!-- Mainly scripts --><script src="/static/js/jquery-3.1.1.min.js"></script><script src="/static/js/bootstrap.min.js"></script><script src="/static/js/plugins/validate/jquery.validate.js"></script><script src="/static/js/plugins/validate/messages_zh.js"></script><script src="/static/js/plugins/sweetalert/sweetalert.min.js"></script><script> $('#login_form').submit( function () { var str = $('#login_form').serialize(); $.post('{% url 'user_login' %}', str, function (res) { console.log(res) if (res.status == 0) { alert('登录成功') } else { alert('登录失败') } } ) })</script> </body></html> |
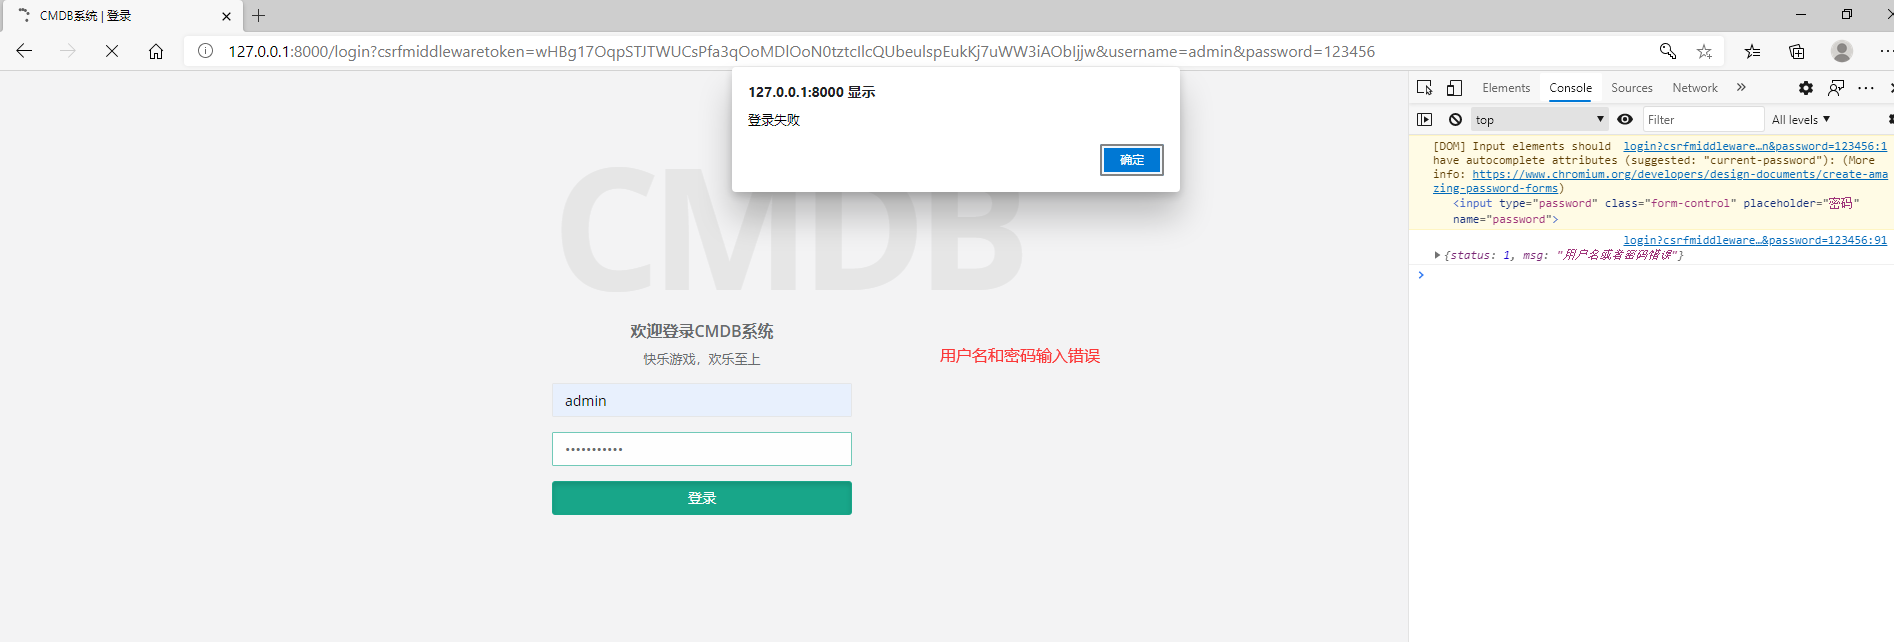
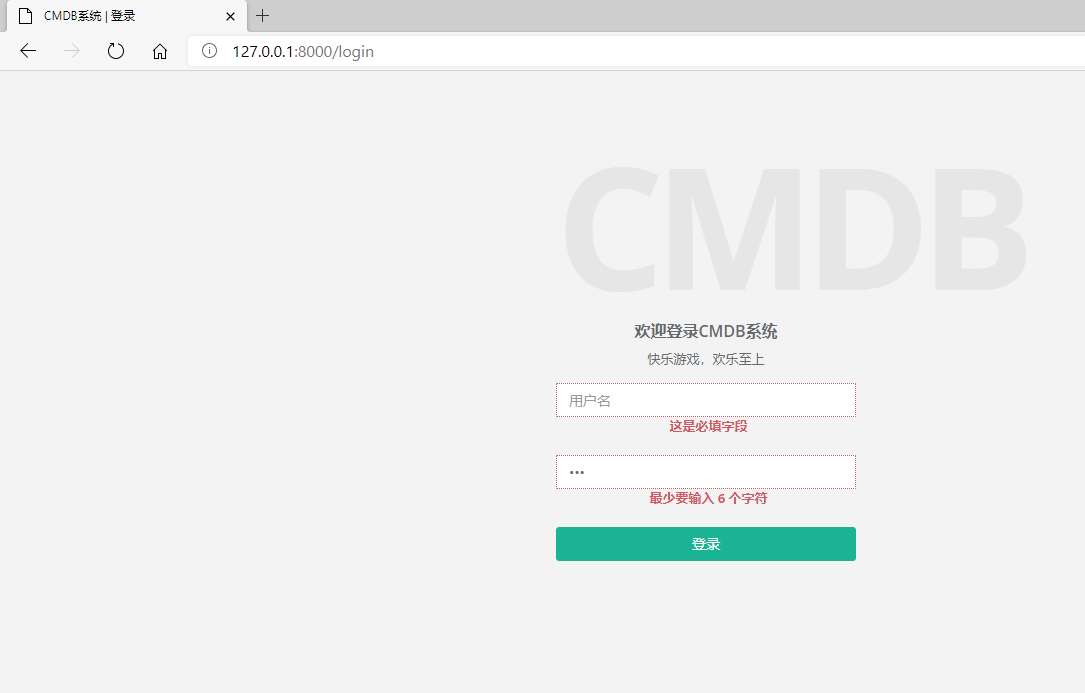
页面显示验证
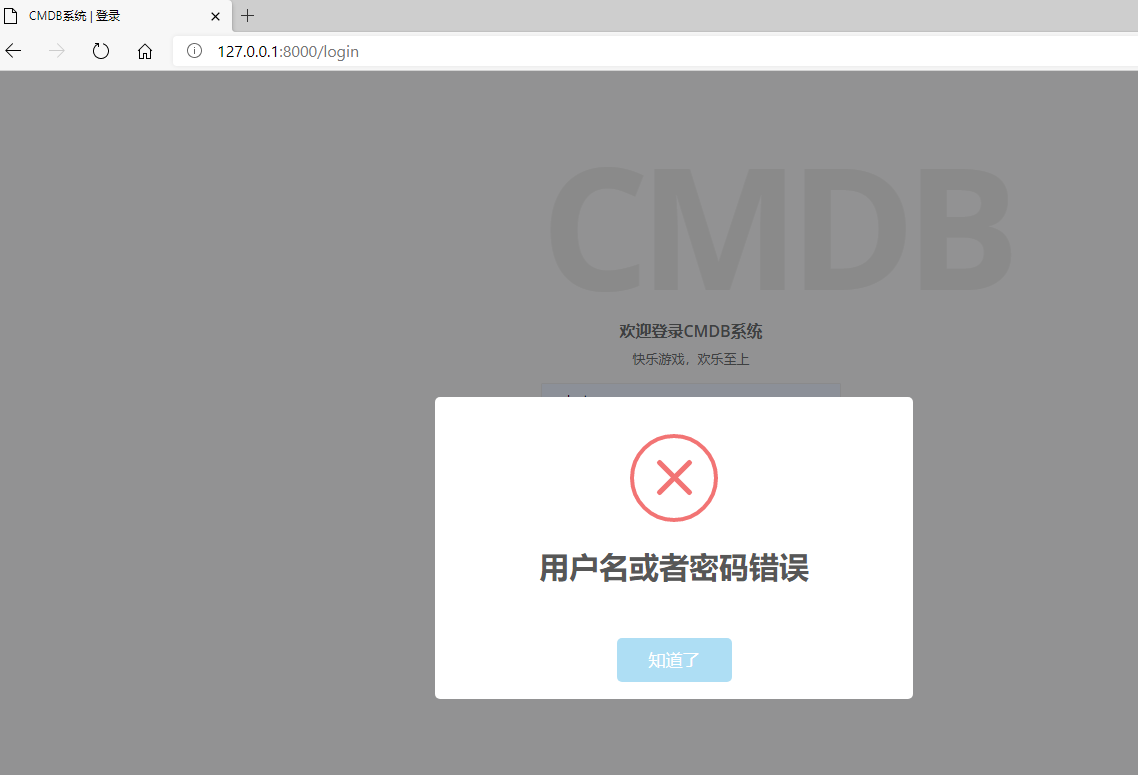
⑥美化提示窗口
模板引入sweetaltert js库
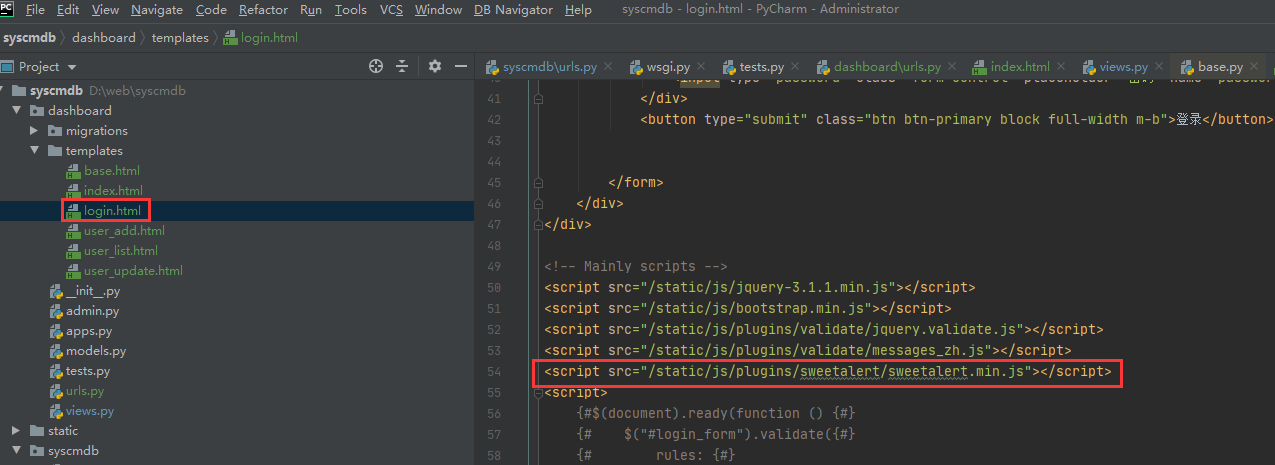
实现方式
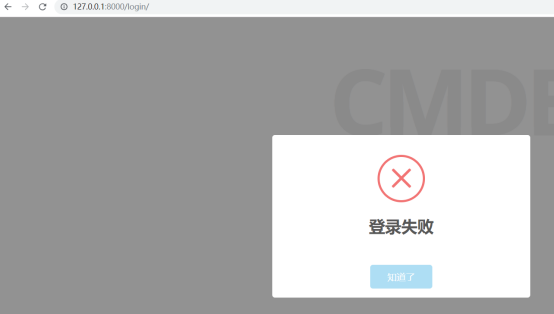
实现效果
⑥js表单验证
引入js文件, jquery.validate 是基于jquery的,所有需要先引入jquery
效验代码
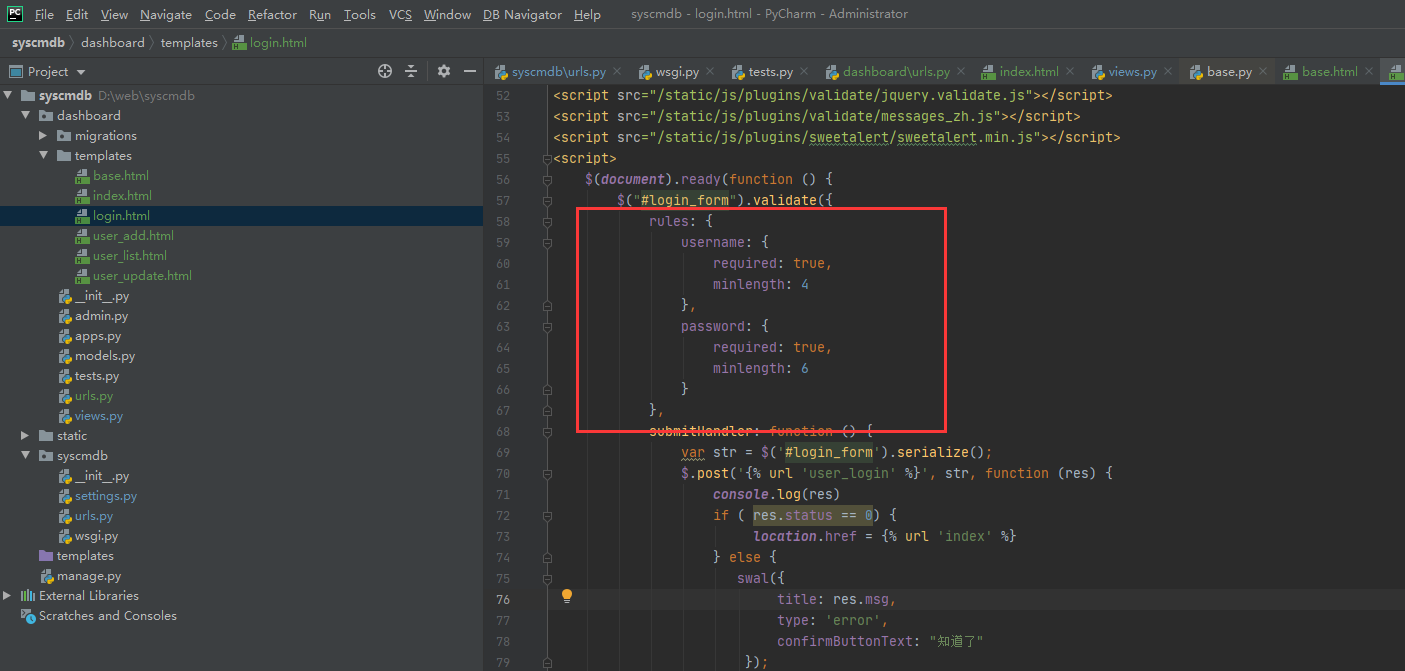
实现效果
完整代码
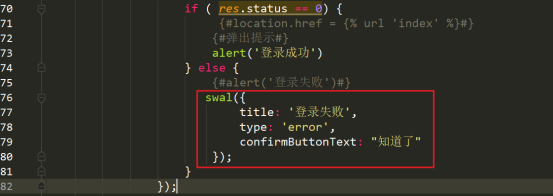
1 2 3 4 5 6 7 8 9 10 11 12 13 14 15 16 17 18 19 20 21 22 23 24 25 26 27 28 29 30 31 32 33 34 35 36 37 38 39 40 41 42 43 44 45 46 47 48 49 50 51 52 53 54 55 56 57 58 59 60 61 62 63 64 65 66 67 68 69 70 71 72 73 74 75 76 77 78 79 80 81 82 83 84 85 86 87 88 89 90 91 | <!DOCTYPE html><html><head> <meta charset="utf-8"> <meta name="viewport" content="width=device-width, initial-scale=1.0"> <title>CMDB系统 | 登录</title> <link href="/static/css/bootstrap.min.css" rel="stylesheet"> <link href="/static/font-awesome/css/font-awesome.css" rel="stylesheet"> <link href="/static/css/animate.css" rel="stylesheet"> <link href="/static/css/style.css" rel="stylesheet"> <link href="/static/css/plugins/sweetalert/sweetalert.css" rel="stylesheet"></head><body class="gray-bg"><div class="middle-box text-center loginscreen animated fadeInDown"> <div> <div> <h1 class="logo-name">CMDB</h1> </div> <h3>欢迎登录CMDB系统</h3> <p> </p> <p>快乐游戏,欢乐至上</p> <form class="m-t" id="login_form"> {% csrf_token %} <div class="form-group"> <input type="text" class="form-control" placeholder="用户名" name="username"> </div> <div class="form-group"> <input type="password" class="form-control" placeholder="密码" name="password"> </div> <button type="submit" class="btn btn-primary block full-width m-b">登录</button> </form> </div></div><!-- Mainly scripts --><script src="/static/js/jquery-3.1.1.min.js"></script><script src="/static/js/bootstrap.min.js"></script><script src="/static/js/plugins/validate/jquery.validate.js"></script><script src="/static/js/plugins/validate/messages_zh.js"></script><script src="/static/js/plugins/sweetalert/sweetalert.min.js"></script><script> $(document).ready(function () { $("#login_form").validate({ rules: { username: { required: true, minlength: 4 }, password: { required: true, minlength: 6 } }, submitHandler: function () { var str = $('#login_form').serialize(); $.post('{% url 'user_login' %}', str, function (res) { console.log(res) if ( res.status == 0) { location.href = {% url 'index' %} } else { swal({ title: res.msg, type: 'error', confirmButtonText: "知道了" }); } }); } }); }); </script> </body></html> |
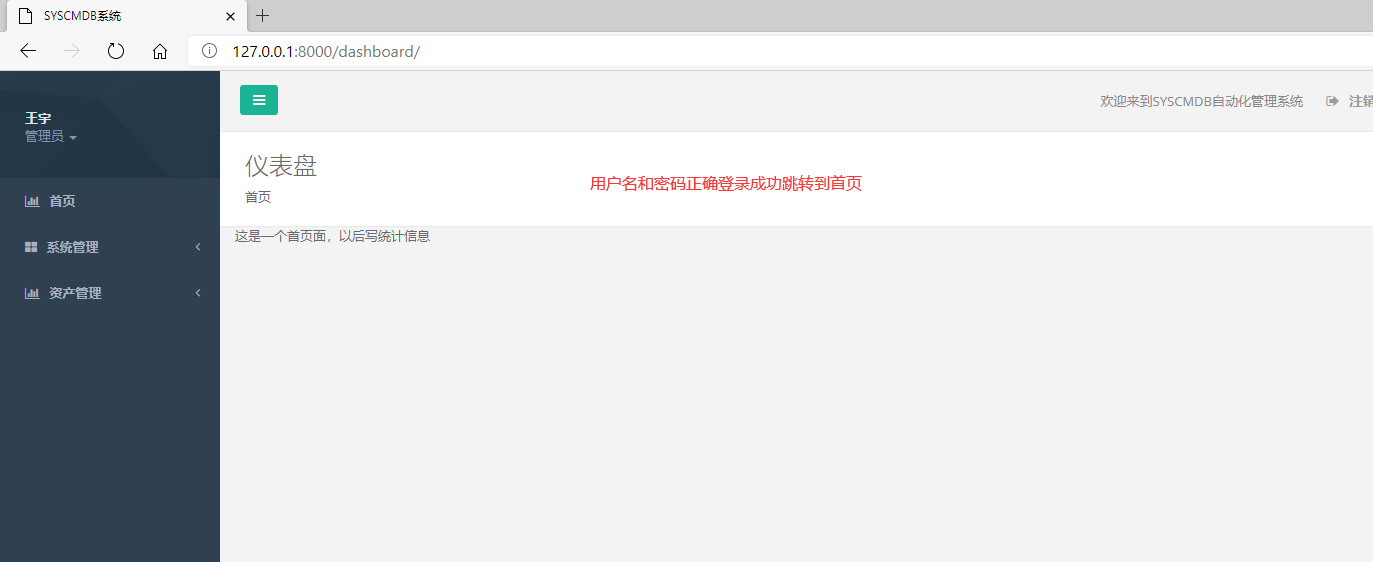
登录失败跳出提示,登录成功跳转到对应的首页
2,Django用户系统实现登录
以上操作,只是实现了登录的基本校验操作,但是没有用户信息,所有实际是不能够使用。
在Django中,提供了整个一套的登录相关方法,可以直接导入调用即可。
1 2 3 4 | from django.contrib.auth import login, logout, authenticateauthenticate():就是用来验证用户的账号密码,如果验证成功就会返回一个User对象,如果失败就会返回None。login():用来真正执行登录的函数,这里也会生成session存储进数据库。logout():用来注销用户的。 |
①实现登录功能
视图
模板不变

②使用manage.py创建用户
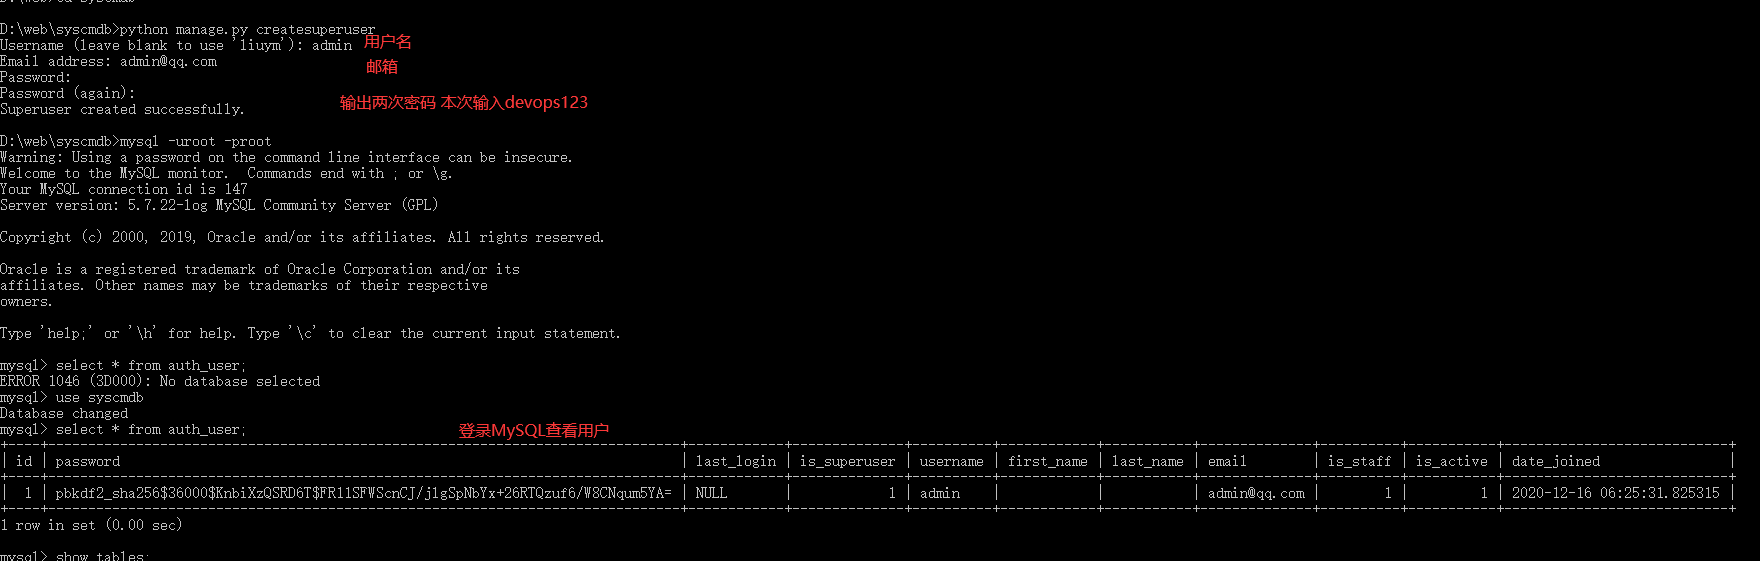
最后查看登录效果 和之前是一样的 不过本次验证的用户为创建的django用户而不是在视图类写死的用户
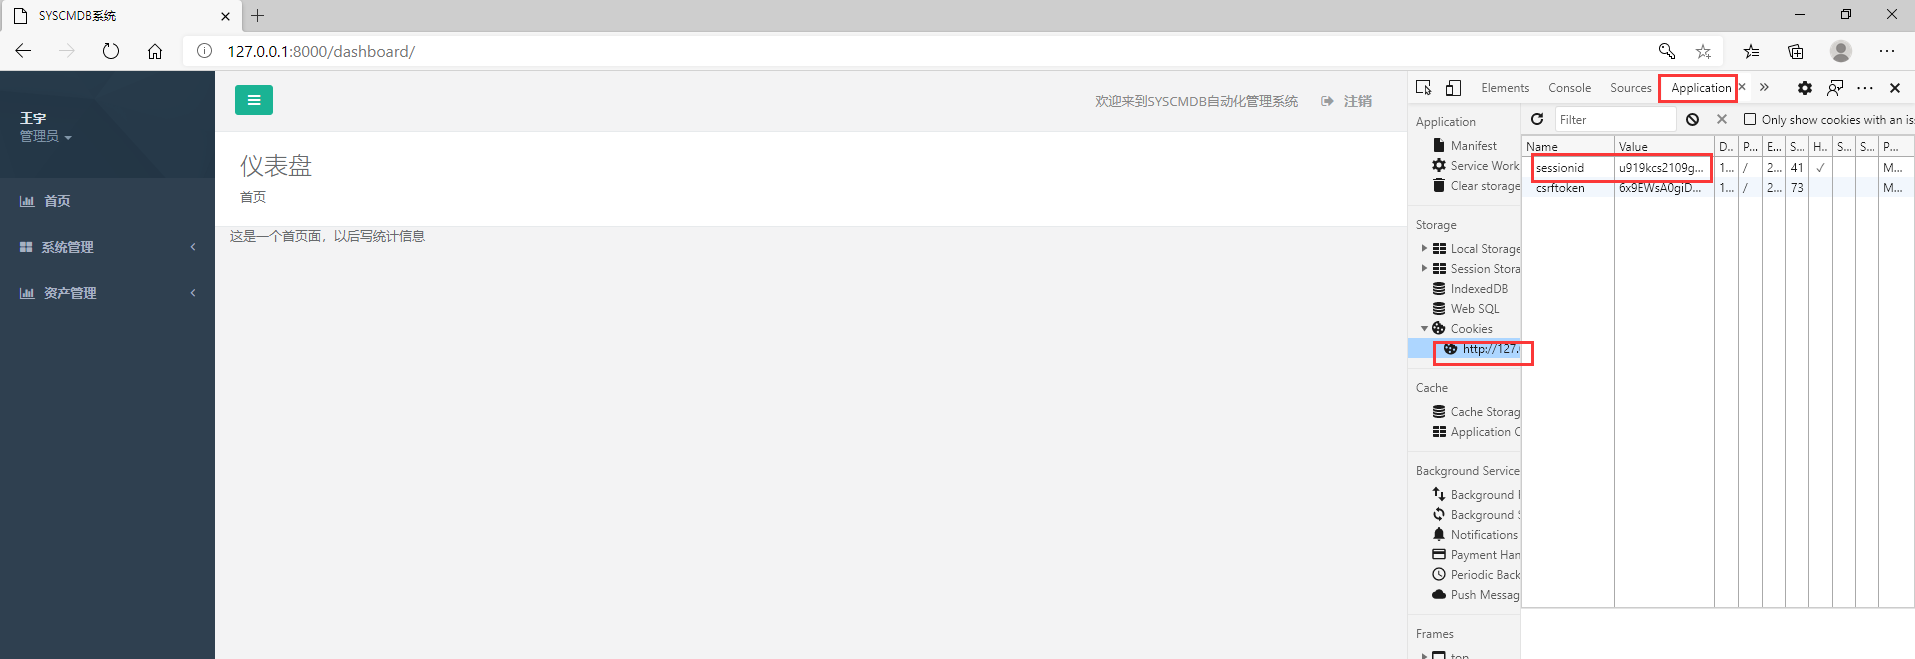
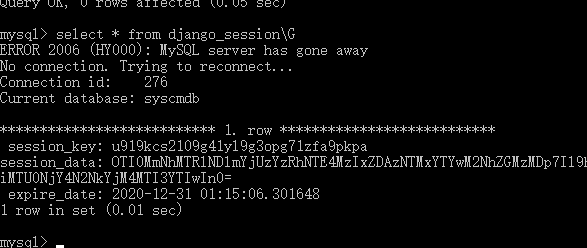
登录成功查看session
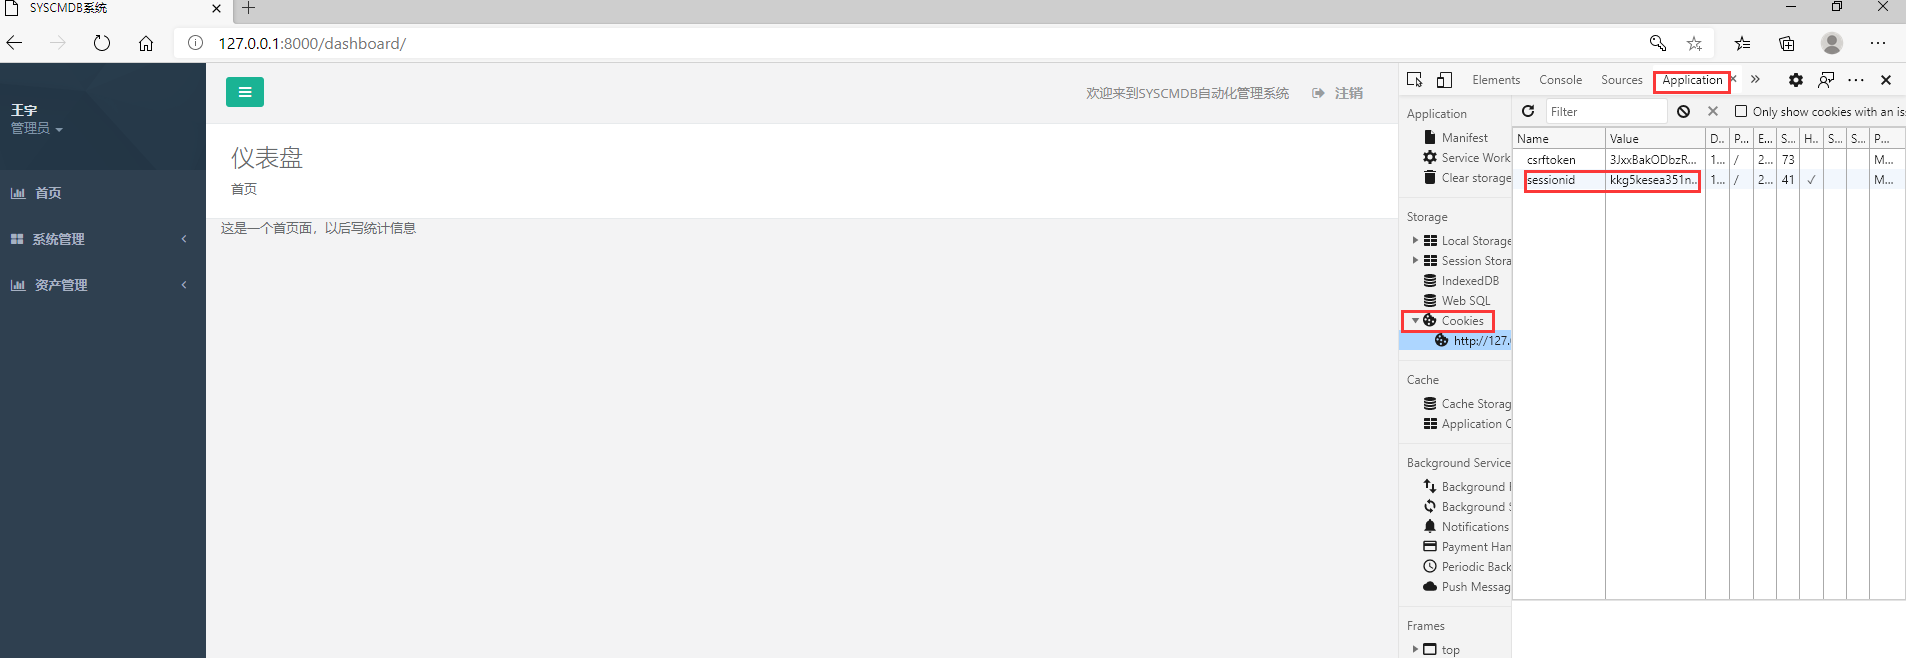
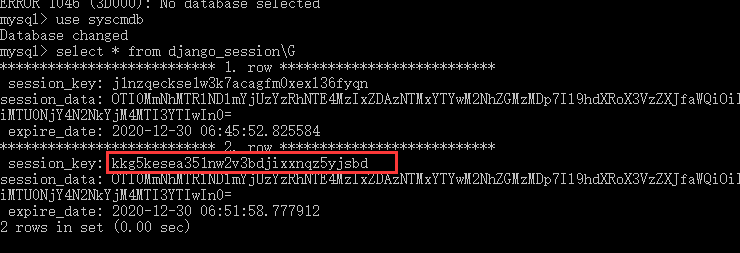
该session存储在表django_session中
3,Url拦截器
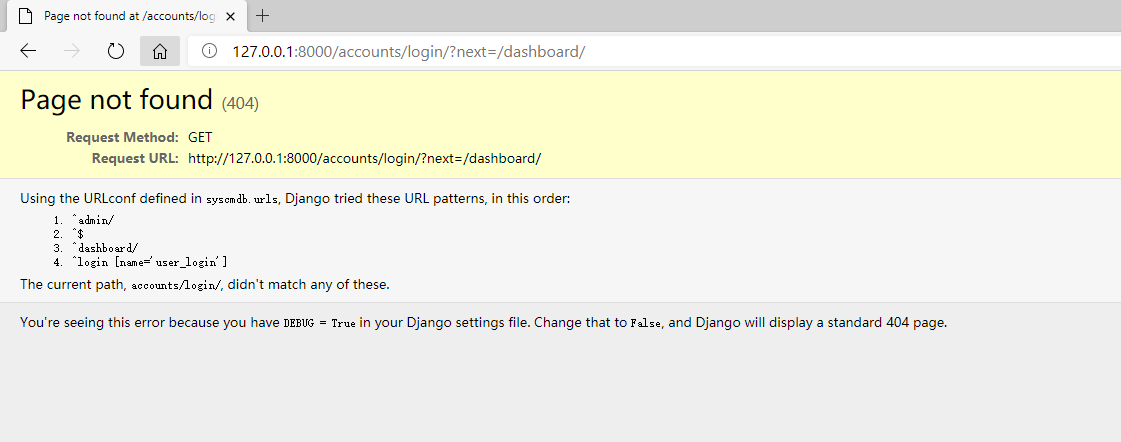
虽然已经实现了登录系统功能,但是发现即使不通过登录系统,也可以直接通过URL访问管理后台的首页。所以,还需要在首页面上进行登录验证。登录允许访问,没有登录不允许访问。
防止通过URL直接访问 防FQ
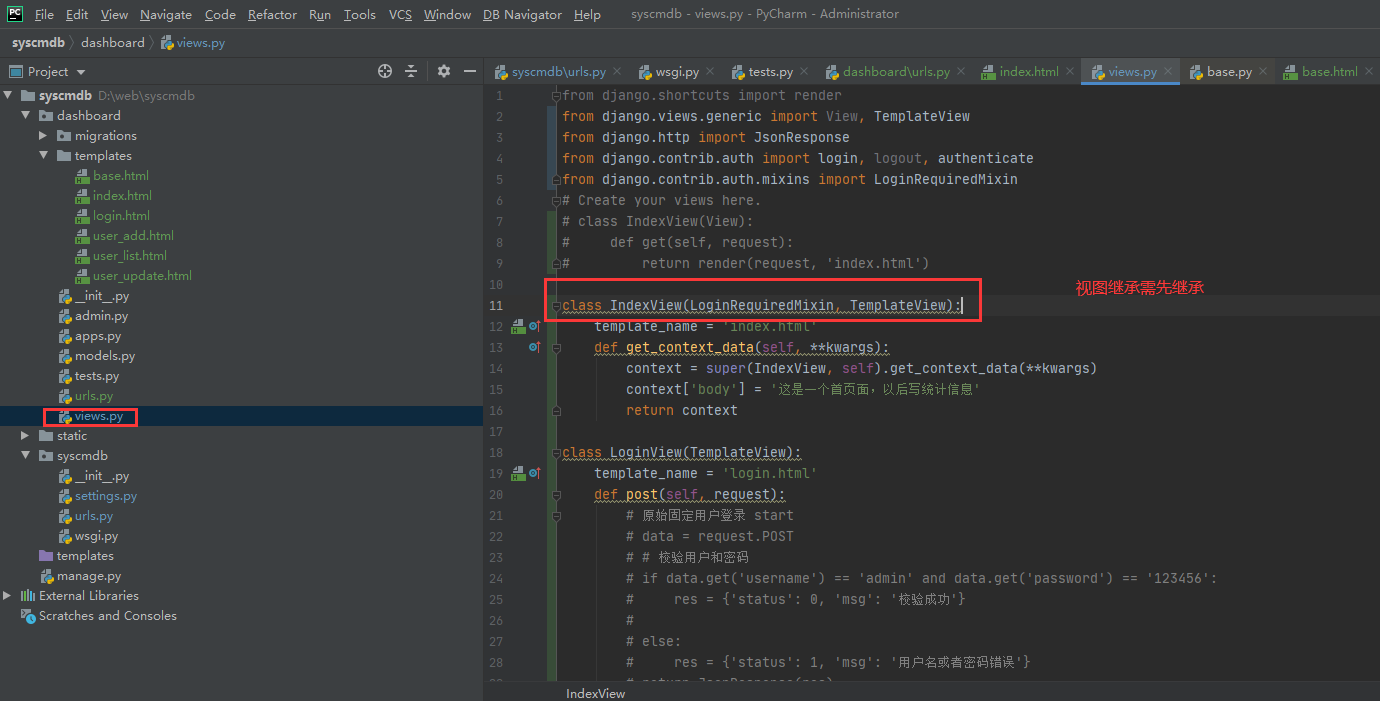
Django中提供了验证方法:
1 | from django.contrib.auth.mixins import LoginRequiredMixin |
①添加实现
通过session如果有session则可以登录,如果没有session则跳转登录页面
导入类
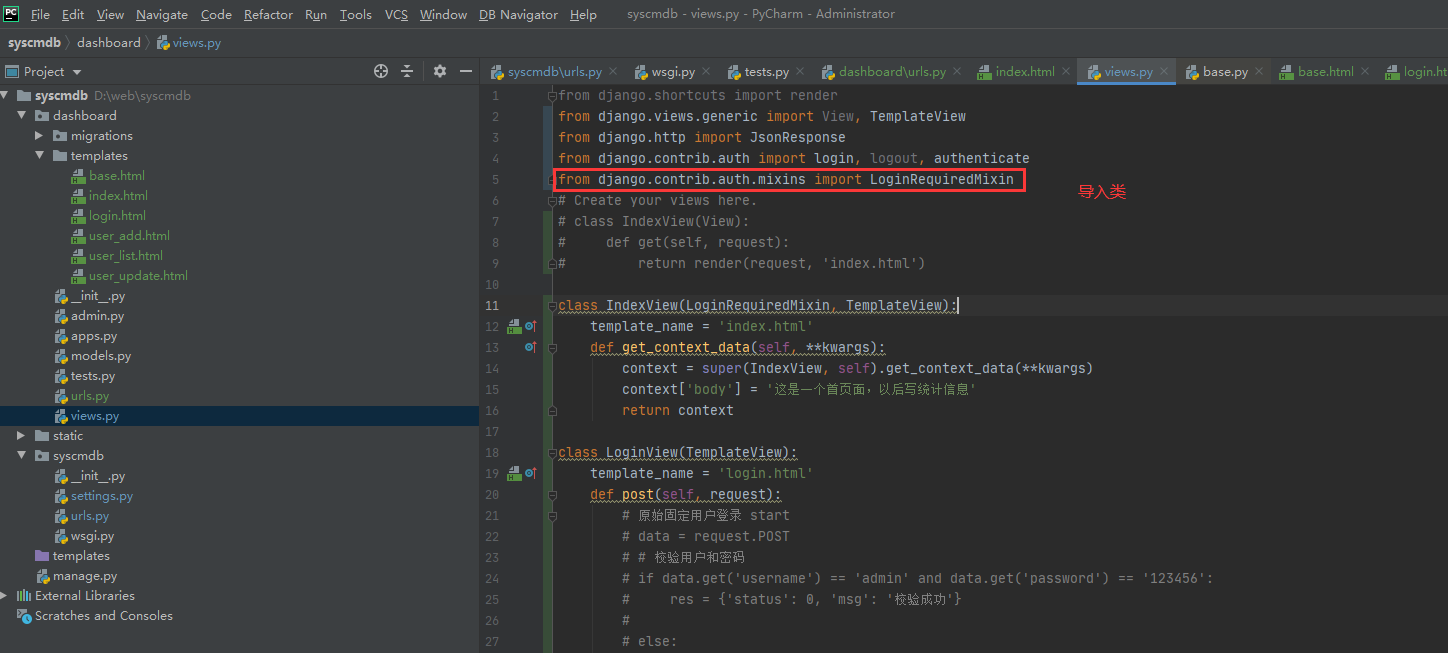
视图继承
删除数据库内已经存储的session
1 | mysql> truncate django_session; |
访问页面
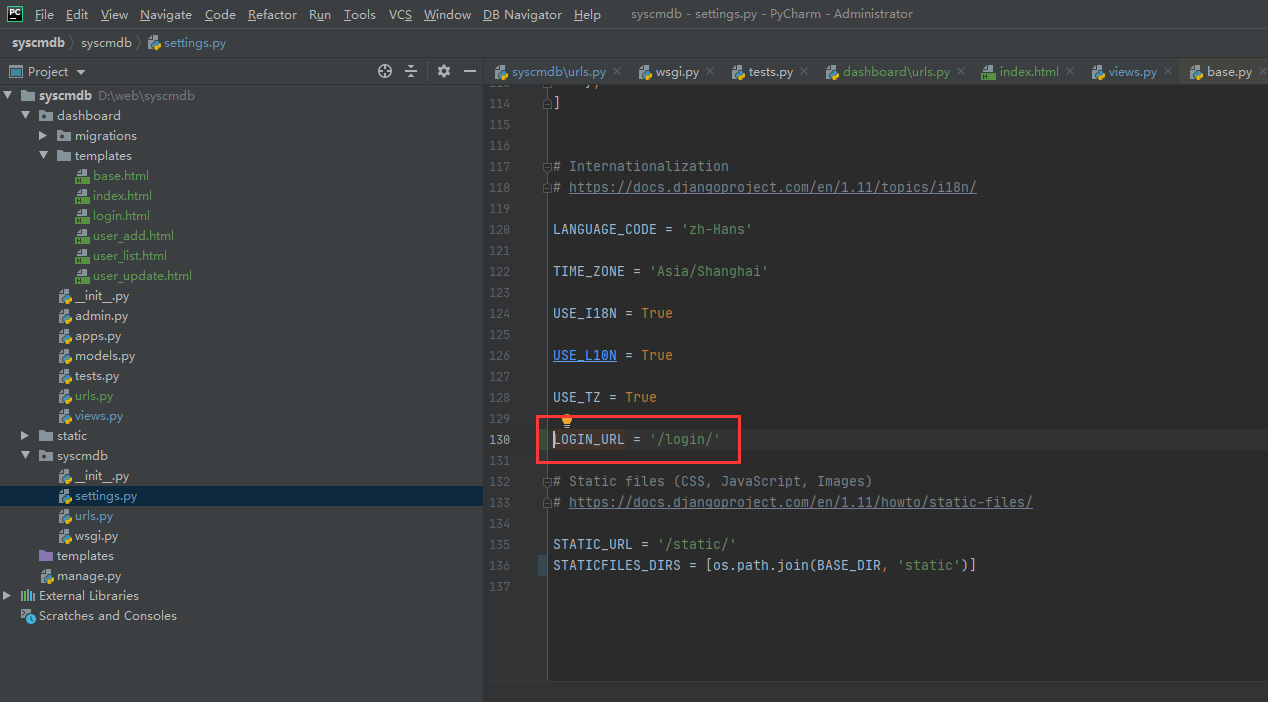
修改settings.py设置
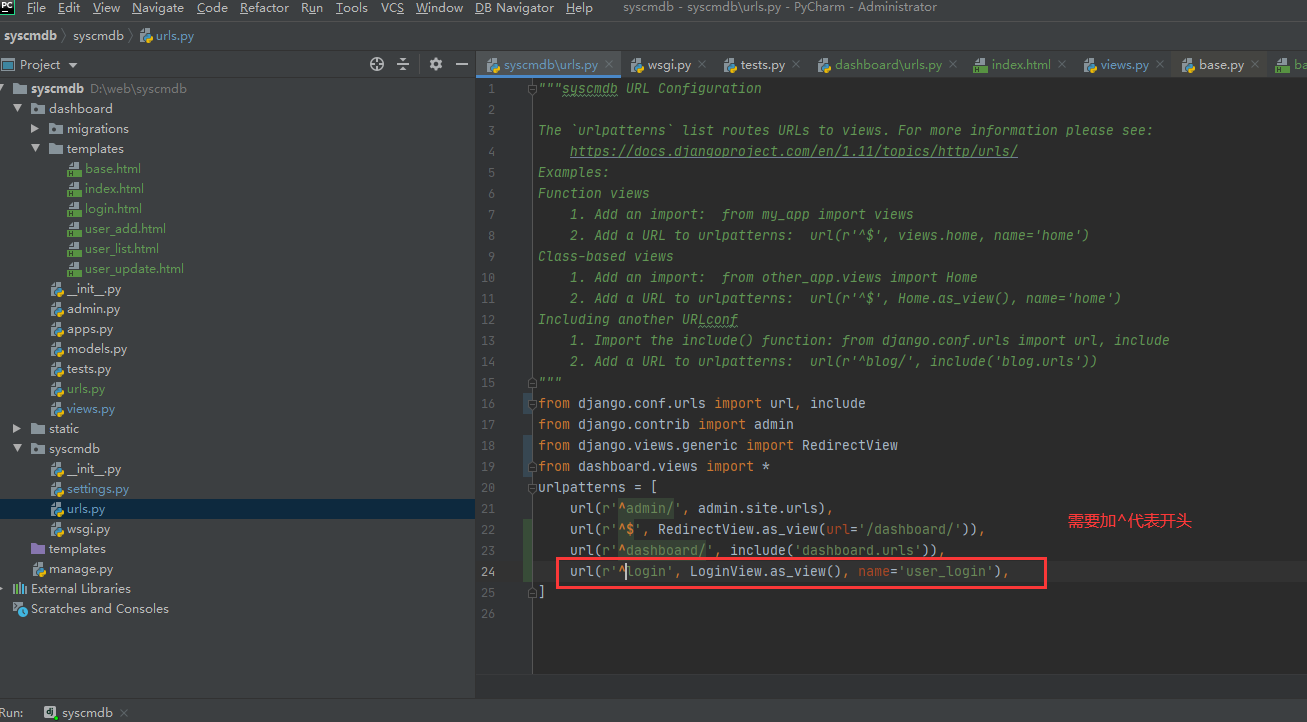
视图设置
再次访问
1 | http://127.0.0.1:8000/dashboard/ |
因为没有登录没有session自动跳转到以下页面
1 | http://127.0.0.1:8000/login/?next=/dashboard/ |
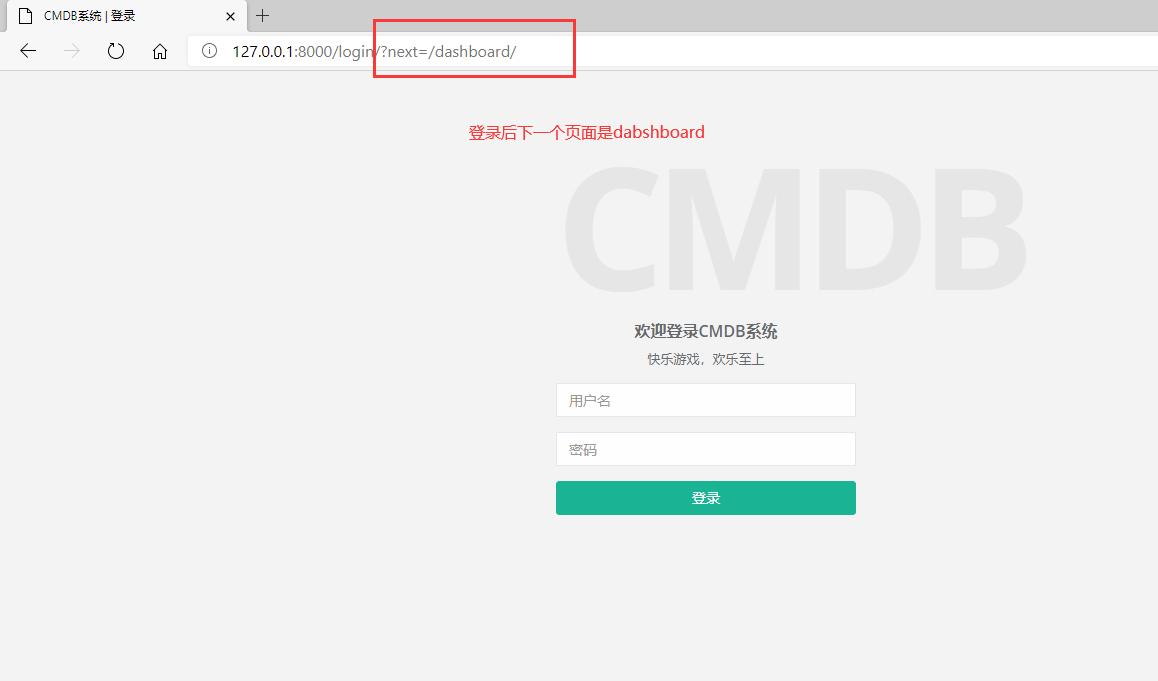
登录成功才能显示dashboard首页
4,注销功能
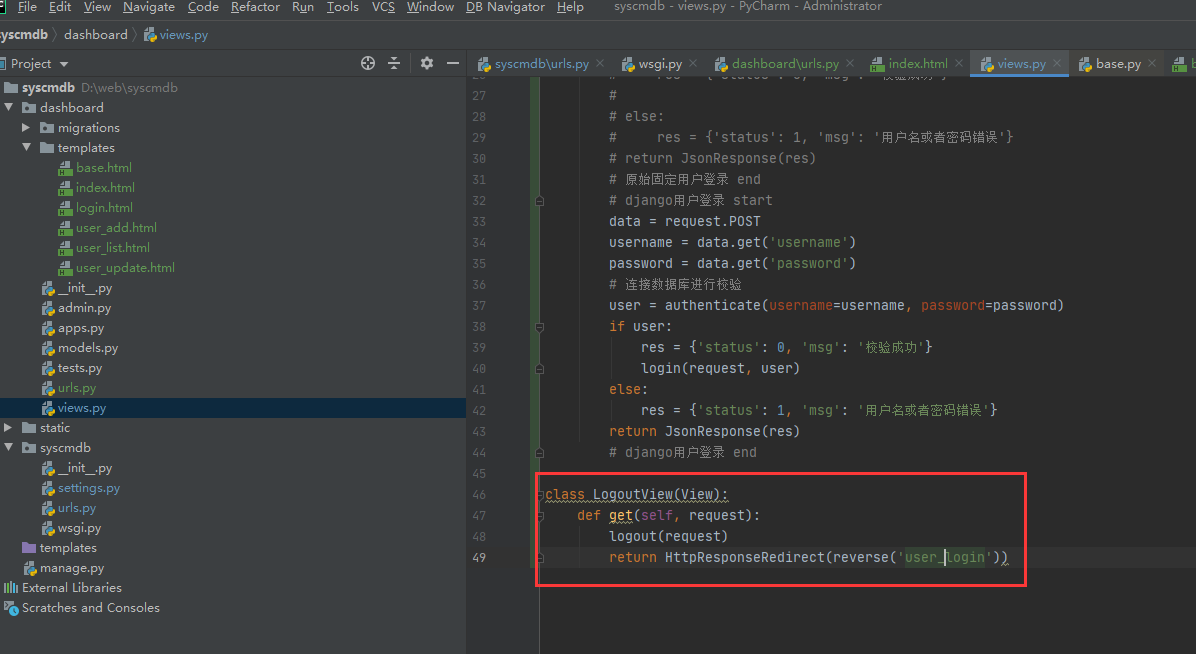
注销退出登录功能,使用Django的logout方法实现即可。
注销后,返回登录页面,需要导入类方法
1 2 | from django.http import HttpResponseRedirectfrom django.urls import reverse |
注销后通过HttpResponseRedirect跳转页面。
在跳转页面的同时,需要反向去解析URL别名,需要reverse解析方法。
注意:注销后跳转到login页面,所以注销没有模板页面
①视图
②路由
③模板
基础模板修改

页面显示


3,登录原理解析
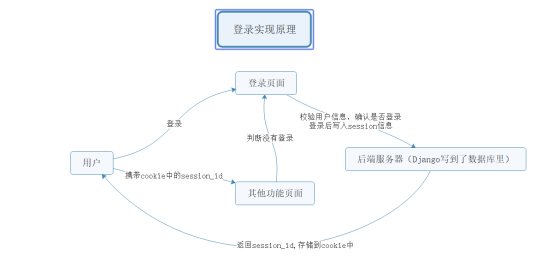
会话机制,http每次连接默认没有上下联系状态。
cookie 存储在浏览器中的一些信息,具有风险,容易被篡改
session 存储到服务器的一些信息
退出登录的方式:
①如果在浏览器清除了cookie信息,就会退出登录
cookie里记录了session_id,没有session_id就不能够找到session,所以就被判断为未登录
②直接删除session信息,虽然cookie在,session没有了,也会判定为未登录
五,用户管理模块
1,展示用户列表
用户登录之后,继续实现用户管理模块。
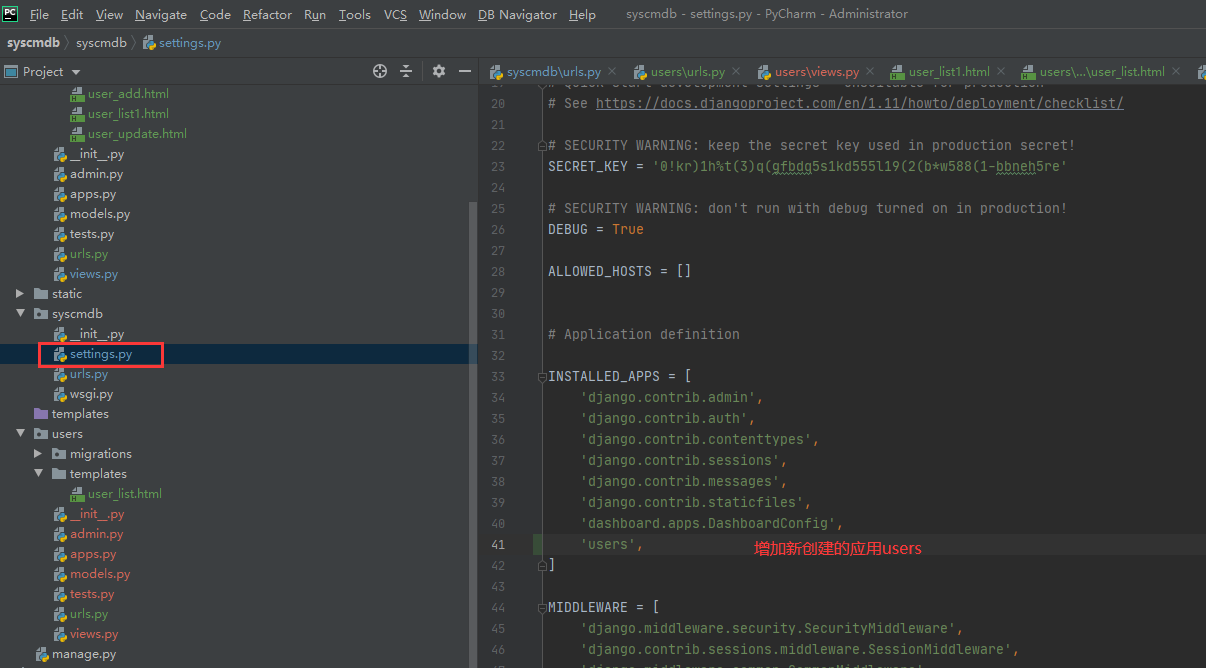
首先展示用户列表信息,为了方便管理项目应用,创建新应用users,负责用户管理模块,用户组管理模块和权限管理模块的开发和管理。
①创建新应用
1 | python manage.py startapp users |
②配置允许应用
③路由
主路由
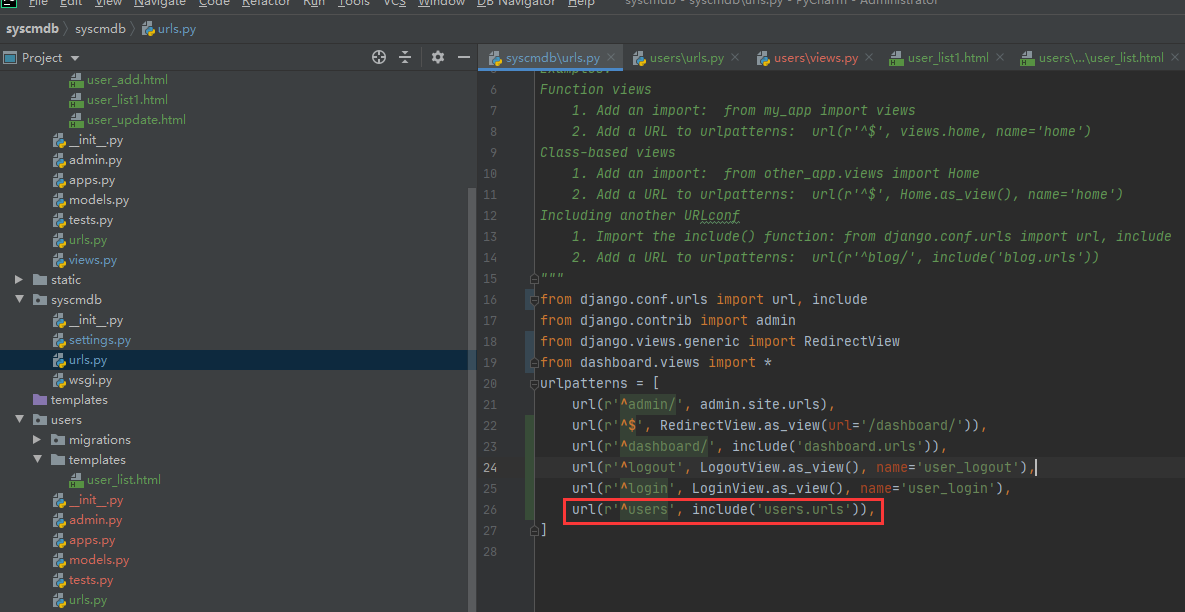
users路由
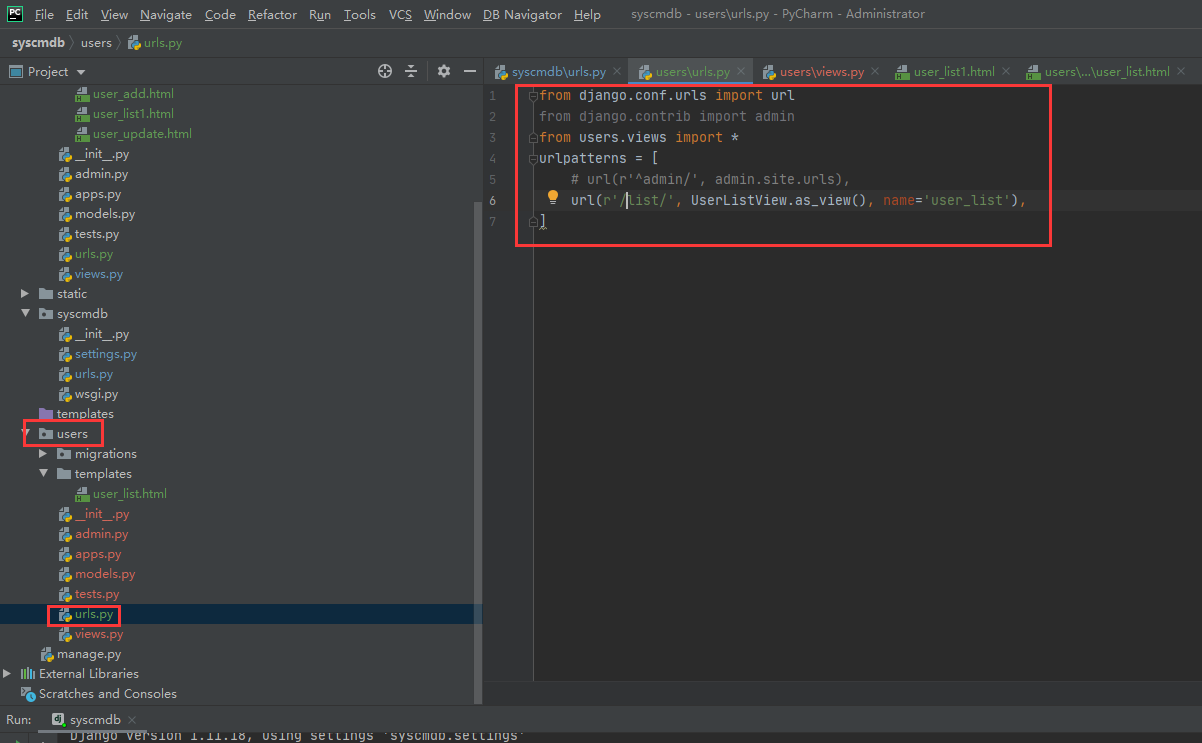
1 2 3 4 5 6 7 | from django.conf.urls import urlfrom django.contrib import adminfrom users.views import *urlpatterns = [ # url(r'^admin/', admin.site.urls), url(r'/list/', UserListView.as_view(), name='user_list'),] |
④视图
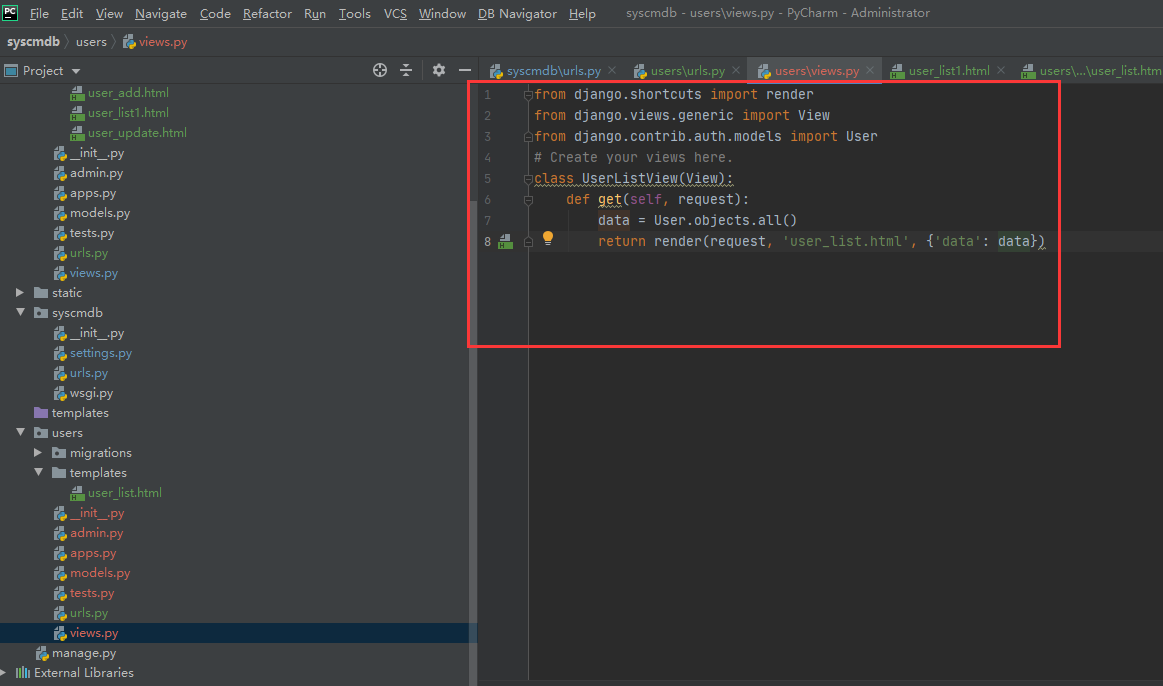
注意:需要通过视图传递查询的数据到模板页面{'data': data}
1 2 3 4 5 6 7 8 | from django.shortcuts import renderfrom django.views.generic import Viewfrom django.contrib.auth.models import User# Create your views here.class UserListView(View): def get(self, request): data = User.objects.all() return render(request, 'user_list.html', {'data': data}) |
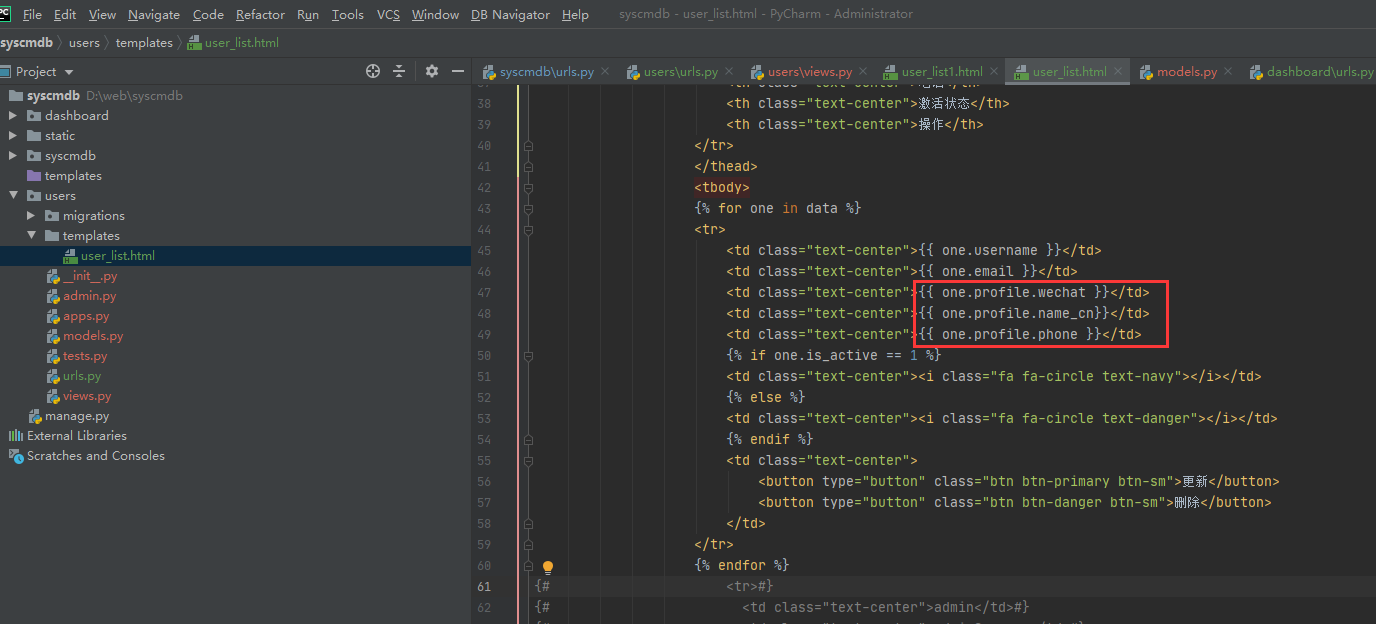
模板自定义数据展示
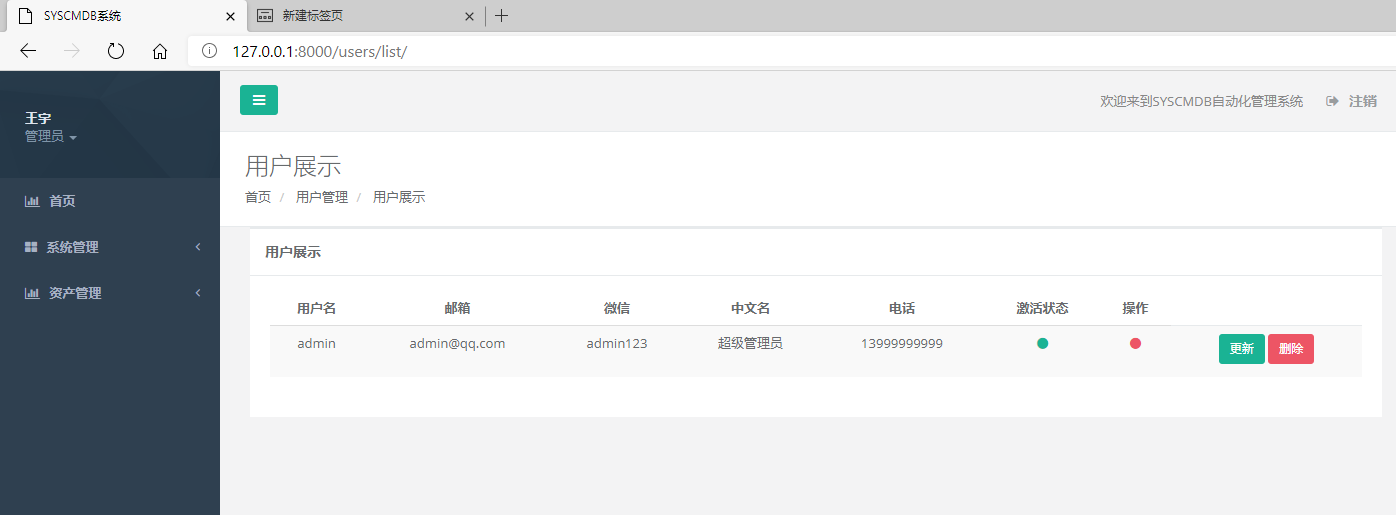
1 2 3 4 5 6 7 8 9 10 11 12 13 14 15 16 17 18 19 20 21 22 23 24 25 26 27 28 29 30 31 32 33 34 35 36 37 38 39 40 41 42 43 44 45 46 47 48 49 50 51 52 53 54 55 56 57 58 59 60 61 62 63 64 65 66 67 68 69 70 71 72 73 74 75 76 77 78 79 | {% extends 'base.html' %}{% block mbx %} <div class="row wrapper border-bottom white-bg page-heading"> <div class="col-sm-4"> <h2>用户展示</h2> <ol class="breadcrumb"> <li> <a hreaf="{% url 'index' %}">首页</a> </li> <li> <a href="">用户管理</a> </li> <li> <a href="">用户展示</a> </li> </ol> </div> </div>{% endblock %}{% block body %} <div class="col-lg-12"> <div class="ibox float-e-margins"> <div class="ibox-title"> <h5>用户展示 </h5> </div> <div class="ibox-content"> <table class="table table-striped"> <thead> <tr> <th class="text-center">用户名</th> <th class="text-center">邮箱</th> <th class="text-center">微信</th> <th class="text-center">中文名</th> <th class="text-center">电话</th> <th class="text-center">激活状态</th> <th class="text-center">操作</th> </tr> </thead> <tbody>{# {% for one in data %}#}{# <tr>#}{# <td class="text-center">{{ one.username }}</td>#}{# <td class="text-center">{{ one.email }}</td>#}{# <td class="text-center"></td>#}{# <td class="text-center"></td>#}{# <td class="text-center"></td>#}{# {% if one.is_active == 1 %}#}{# <td class="text-center"><i class="fa fa-circle text-navy"></i></td>#}{# {% else %}#}{# <td class="text-center"><i class="fa fa-circle text-danger"></i></td>#}{# {% endif %}#}{# <td class="text-center">#}{# <button type="button" class="btn btn-primary btn-sm">更新</button>#}{# <button type="button" class="btn btn-danger btn-sm">删除</button>#}{# </td>#}{# </tr>#}{# {% endfor %}#} <tr> <td class="text-center">admin</td> <td class="text-center">admin@qq.com</td> <td class="text-center">admin123</td> <td class="text-center">超级管理员</td> <td class="text-center">13999999999</td> <td class="text-center"><i class="fa fa-circle text-navy"></i></td> <td class="text-center"><i class="fa fa-circle text-danger"></i></td> <td class="text-center"> <button type="button" class="btn btn-primary btn-sm">更新</button> <button type="button" class="btn btn-danger btn-sm">删除</button> </td> </tr> </tbody> </table> </div> </div> </div>{% endblock %} |
模板从数据库收据用户信息展示
通过循环遍历数据库用户列表进行展示
1 2 3 4 5 6 7 8 9 10 11 12 13 14 15 16 17 18 19 20 21 22 23 24 25 26 27 28 29 30 31 32 33 34 35 36 37 38 39 40 41 42 43 44 45 46 47 48 49 50 51 52 53 54 55 56 57 58 59 60 61 62 63 64 65 66 67 68 69 70 71 72 73 74 75 76 77 78 79 | {% extends 'base.html' %}{% block mbx %} <div class="row wrapper border-bottom white-bg page-heading"> <div class="col-sm-4"> <h2>用户展示</h2> <ol class="breadcrumb"> <li> <a hreaf="{% url 'index' %}">首页</a> </li> <li> <a href="">用户管理</a> </li> <li> <a href="">用户展示</a> </li> </ol> </div> </div>{% endblock %}{% block body %} <div class="col-lg-12"> <div class="ibox float-e-margins"> <div class="ibox-title"> <h5>用户展示 </h5> </div> <div class="ibox-content"> <table class="table table-striped"> <thead> <tr> <th class="text-center">用户名</th> <th class="text-center">邮箱</th> <th class="text-center">微信</th> <th class="text-center">中文名</th> <th class="text-center">电话</th> <th class="text-center">激活状态</th> <th class="text-center">操作</th> </tr> </thead> <tbody> {% for one in data %} <tr> <td class="text-center">{{ one.username }}</td> <td class="text-center">{{ one.email }}</td> <td class="text-center"></td> <td class="text-center"></td> <td class="text-center"></td> {% if one.is_active == 1 %} <td class="text-center"><i class="fa fa-circle text-navy"></i></td> {% else %} <td class="text-center"><i class="fa fa-circle text-danger"></i></td> {% endif %} <td class="text-center"> <button type="button" class="btn btn-primary btn-sm">更新</button> <button type="button" class="btn btn-danger btn-sm">删除</button> </td> </tr> {% endfor %}{# <tr>#}{# <td class="text-center">admin</td>#}{# <td class="text-center">admin@qq.com</td>#}{# <td class="text-center">admin123</td>#}{# <td class="text-center">超级管理员</td>#}{# <td class="text-center">13999999999</td>#}{# <td class="text-center"><i class="fa fa-circle text-navy"></i></td>#}{# <td class="text-center"><i class="fa fa-circle text-danger"></i></td>#}{# <td class="text-center">#}{# <button type="button" class="btn btn-primary btn-sm">更新</button>#}{# <button type="button" class="btn btn-danger btn-sm">删除</button>#}{# </td>#}{# </tr>#} </tbody> </table> </div> </div> </div>{% endblock %} |
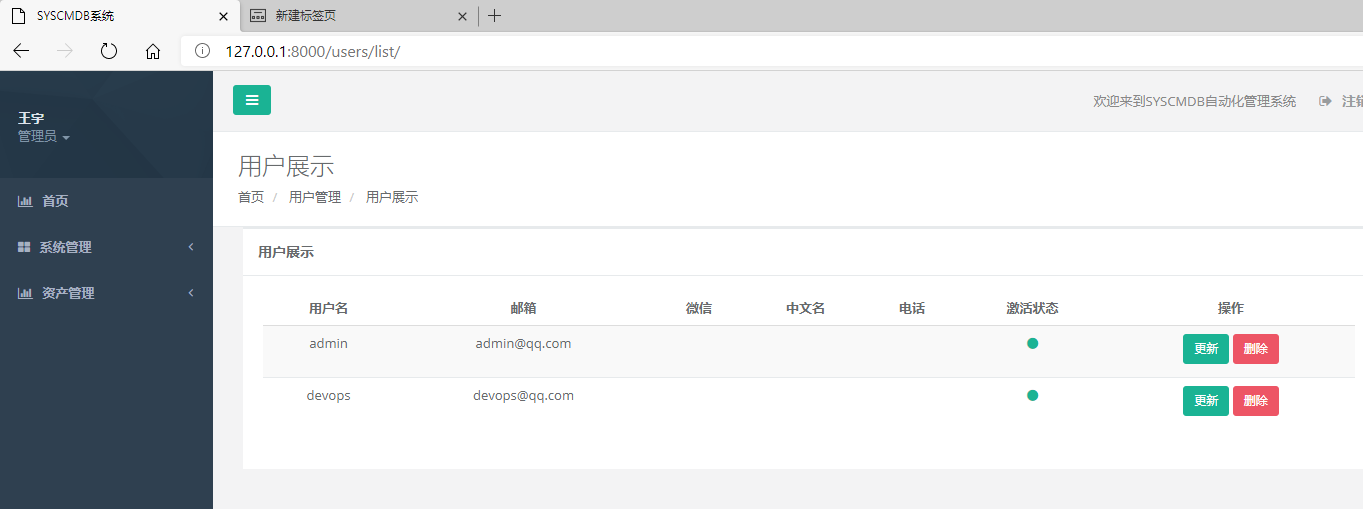
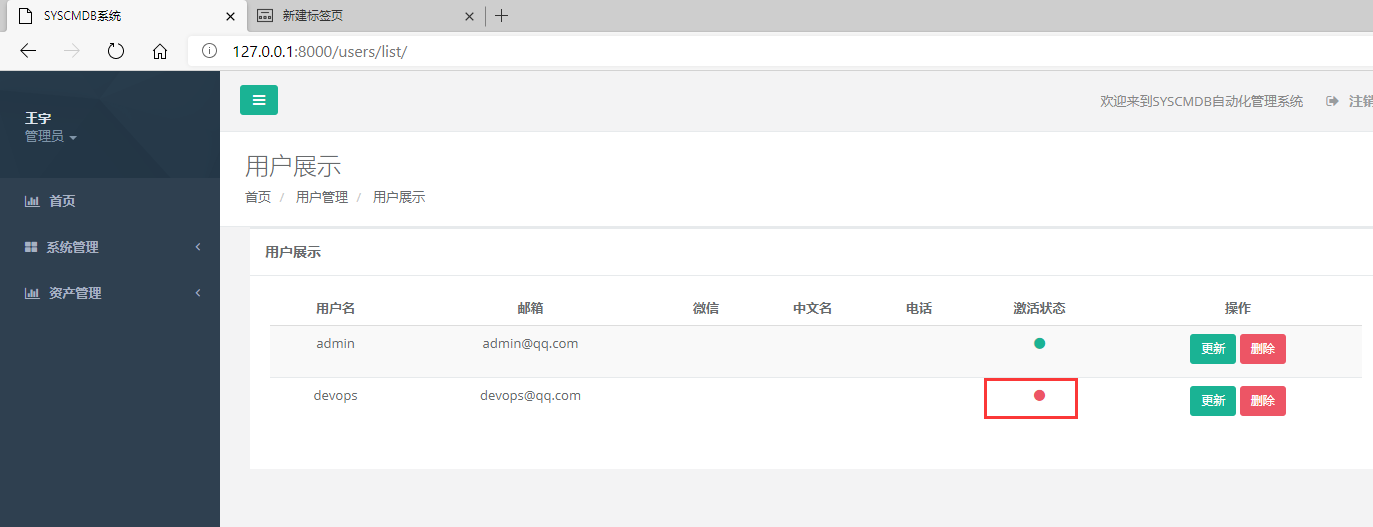
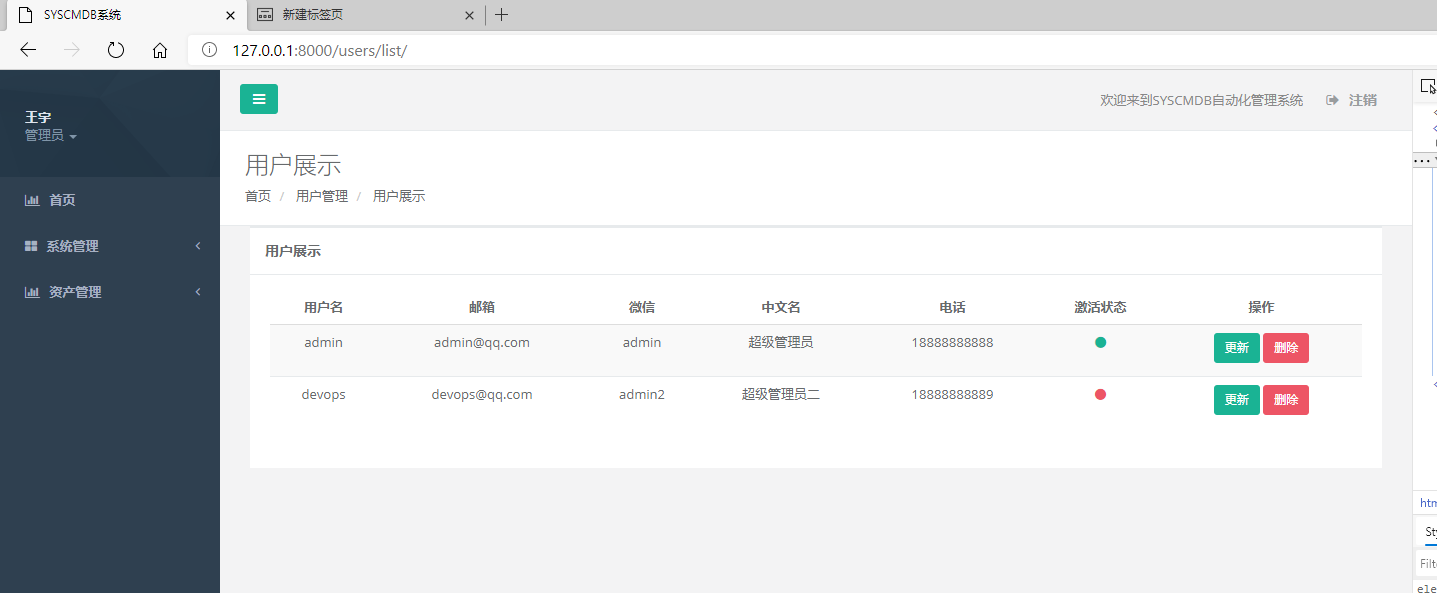
注意:为了展示多个用户又创建一个用户devops
1 | python manage.py createsuperuser |
以下代码通过判断用户状态在页面显示用户是否处于激活状态,激活状态字段值为1 修改成其他值则会在页面显示红色
1 2 3 4 5 | {% if one.is_active == 1 %} <td class="text-center"><i class="fa fa-circle text-navy"></i></td> {% else %} <td class="text-center"><i class="fa fa-circle text-danger"></i></td>{% endif %} |
修改
1 | mysql> update auth_user set is_active=0 where id=2; |
页面显示
2,扩展基础用户表
Django的用户表中,提供了基本必须字段:用户名称、邮箱、密码、角色(超级管理员、普通用户)
需要添加更多的用户信息,需要使用OneToOneField字段对用户表进行拓展。
①扩展模型
加入中文名、微信、电话 备注等
导入基础用户模型
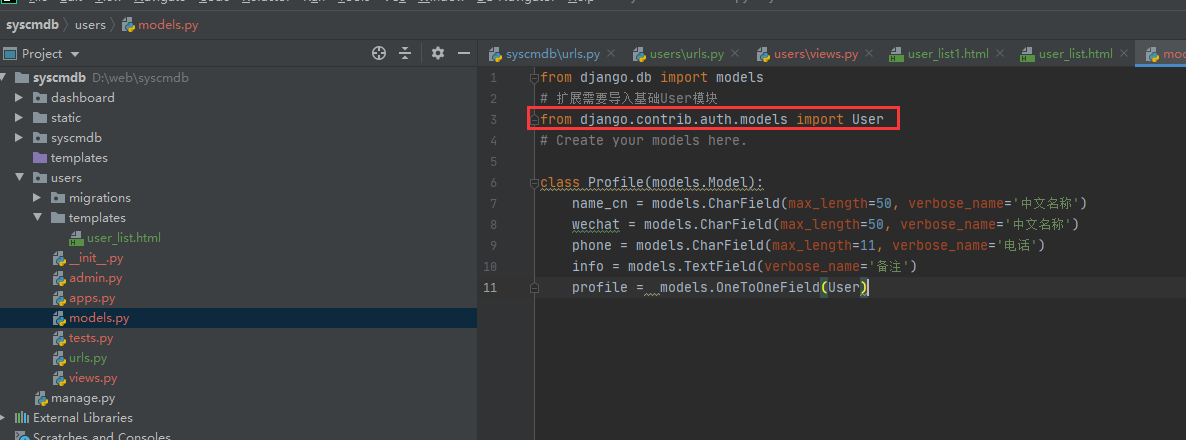
扩展模型
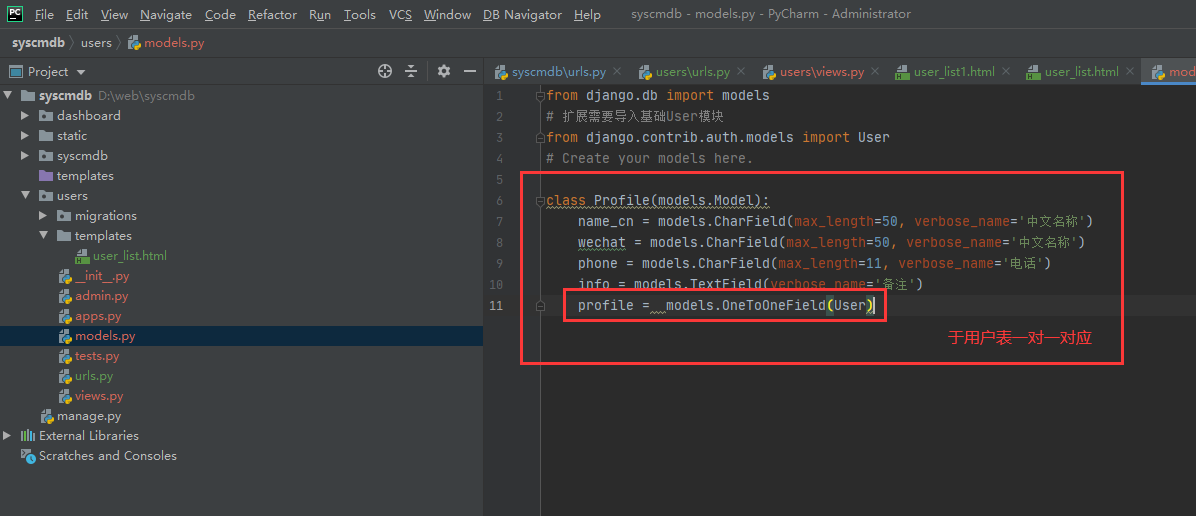
1 2 3 4 5 6 7 8 9 10 11 | from django.db import models# 扩展需要导入基础User模块from django.contrib.auth.models import User# Create your models here.class Profile(models.Model): name_cn = models.CharField(max_length=50, verbose_name='中文名称') wechat = models.CharField(max_length=50, verbose_name='中文名称') phone = models.CharField(max_length=11, verbose_name='电话') info = models.TextField(verbose_name='备注') profile = models.OneToOneField(User) |
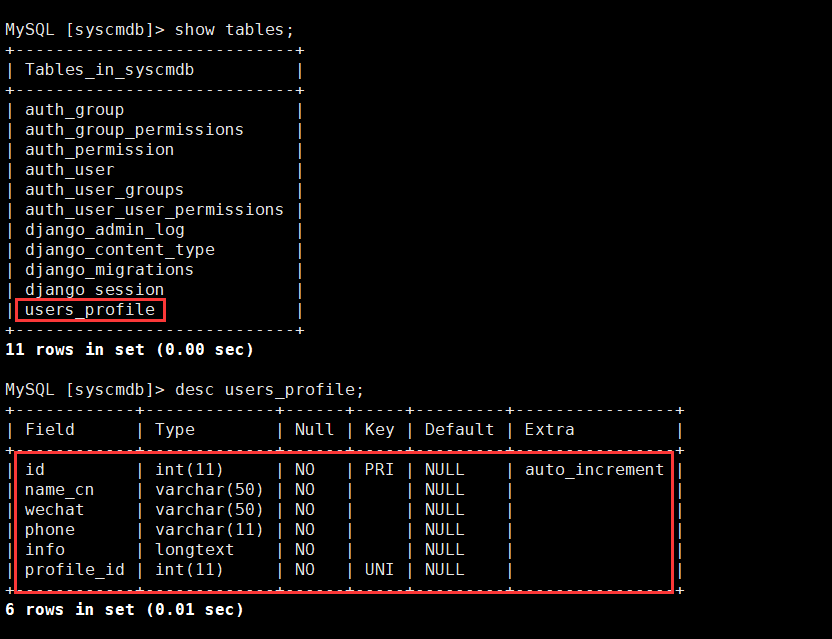
②迁移数据表
1 2 | D:\web\syscmdb>python manage.py makemigrations usersD:\web\syscmdb>python manage.py migrate users |
查看新建的数据表
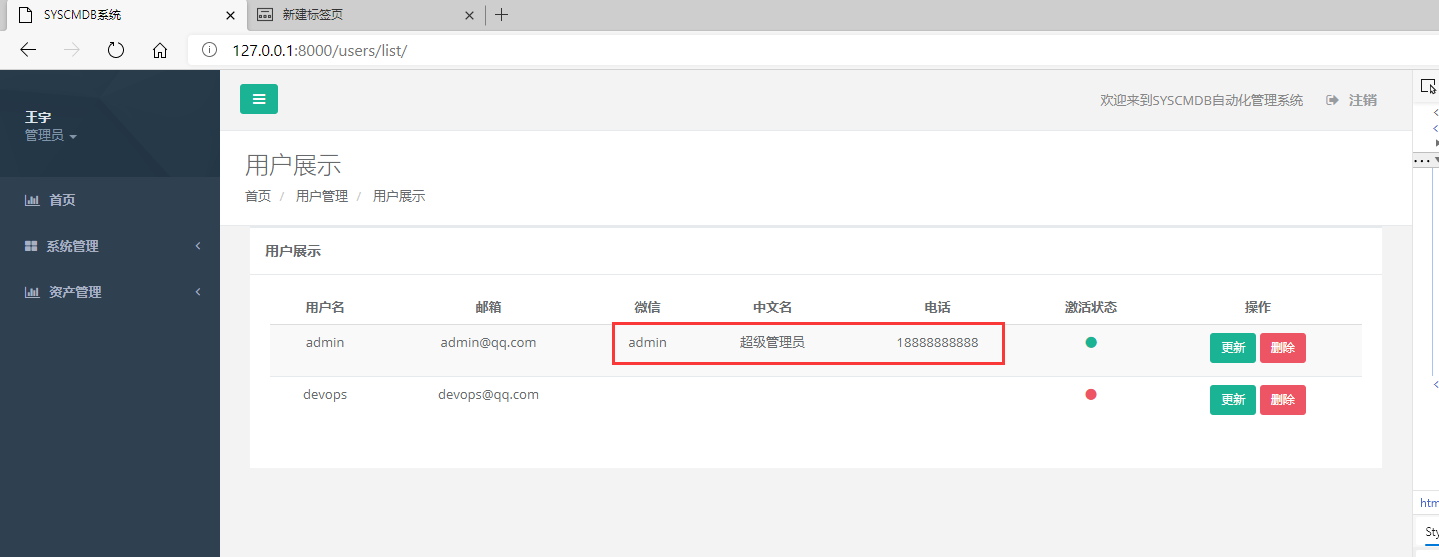
③插入数据
1 | insert into users_profile values(null,'超级管理员','admin','18888888888','我是超级管理员',1); |
④修改模板输出
页面展示效果
如果报错
1 | __init__() missing 1 required positional argument: 'on_delete' |
则是django版本不对应需要修改model

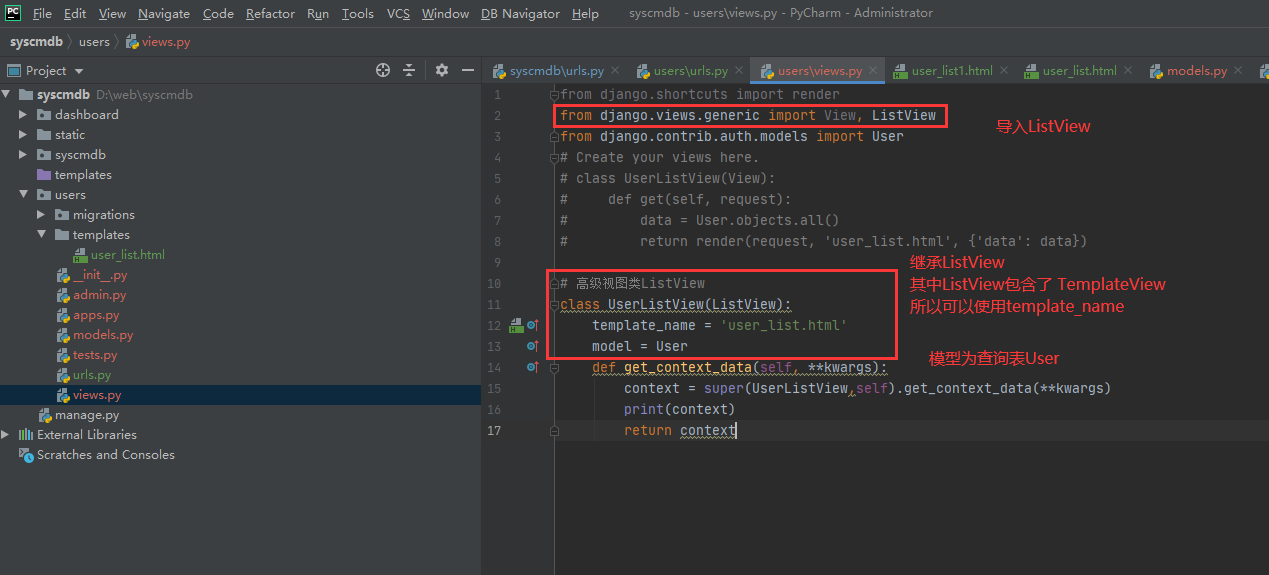
3,高级视图类之ListView
上面的案例中使用高级视图类TemplateView,这里再使用另外一个高级视图类ListView
使用ListView 定义模型名称 数据会自动查询 并且组合
①视图
②模板
路由保持不变 修改模板遍历object_list
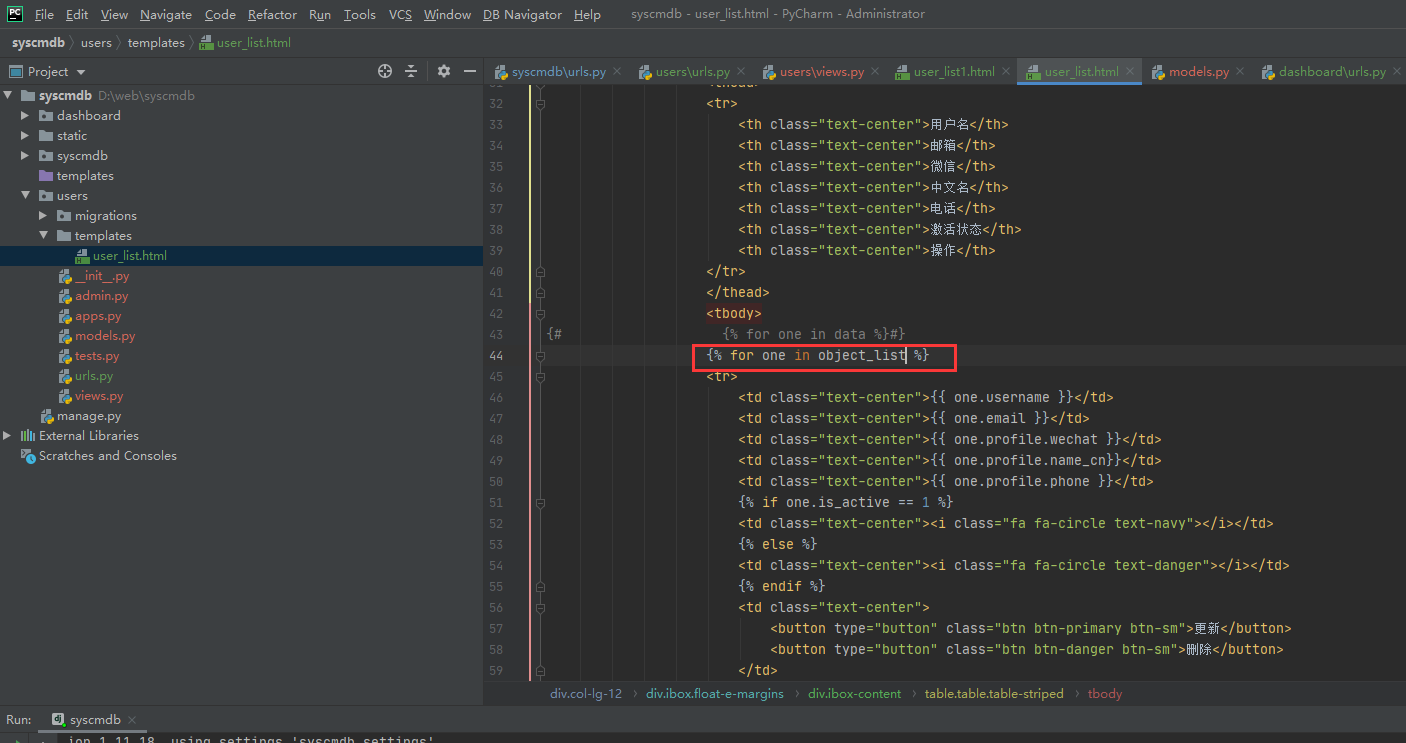
页面展示效果不变
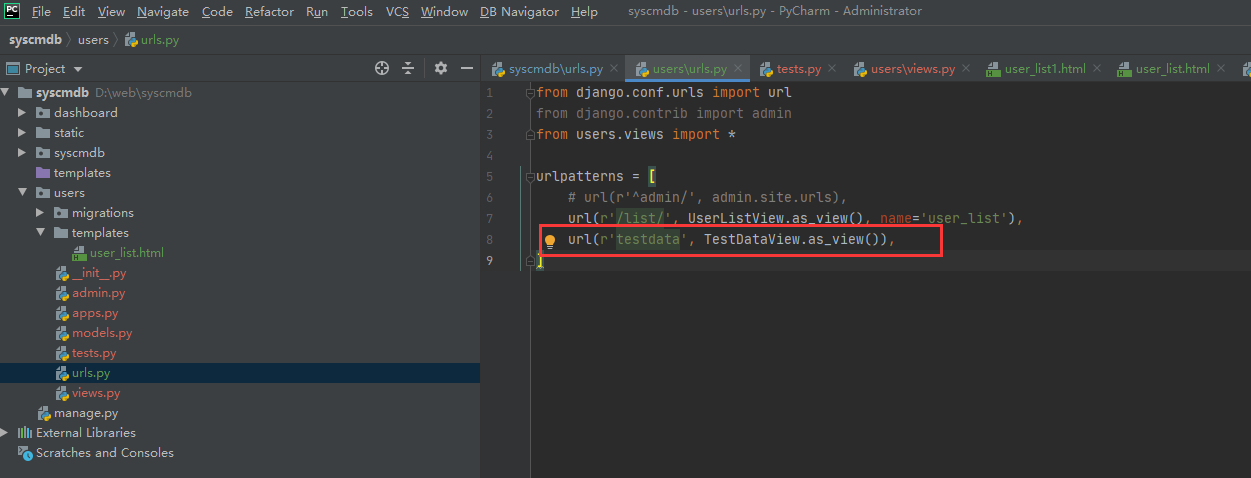
4,批量创建用户
批量创建一批用户用于测试
①路由
②视图
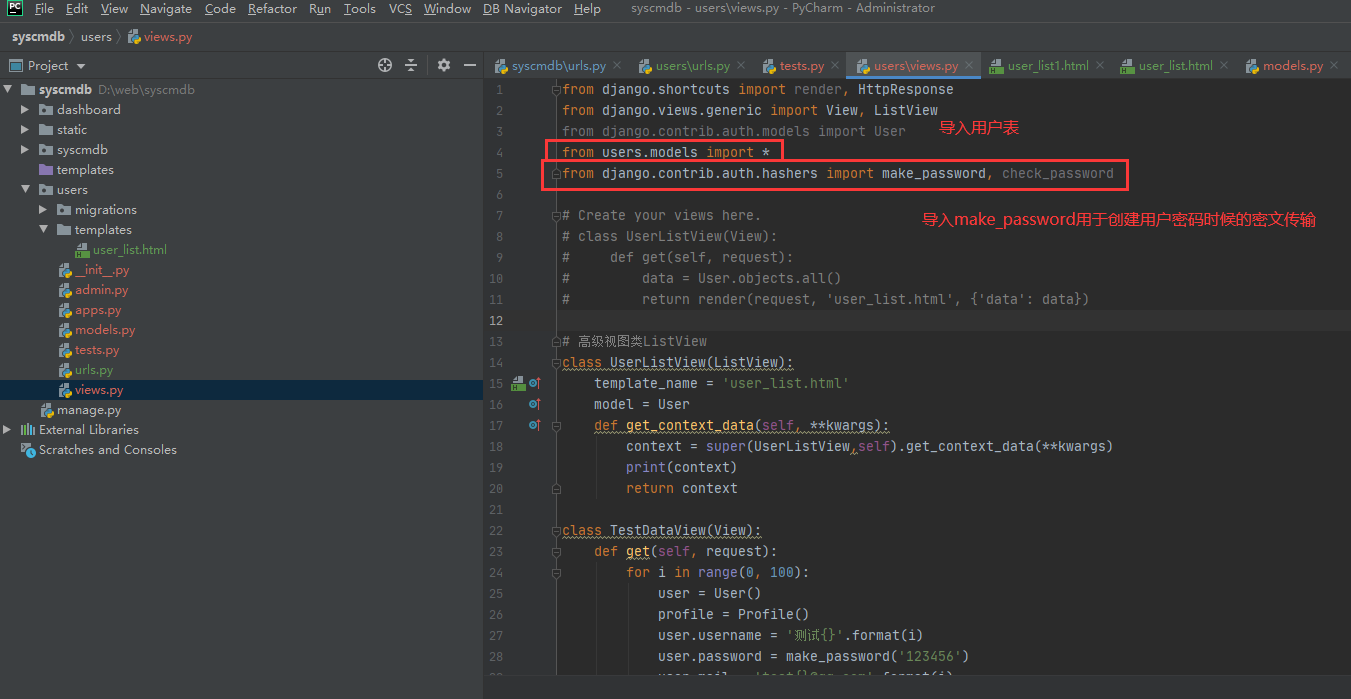
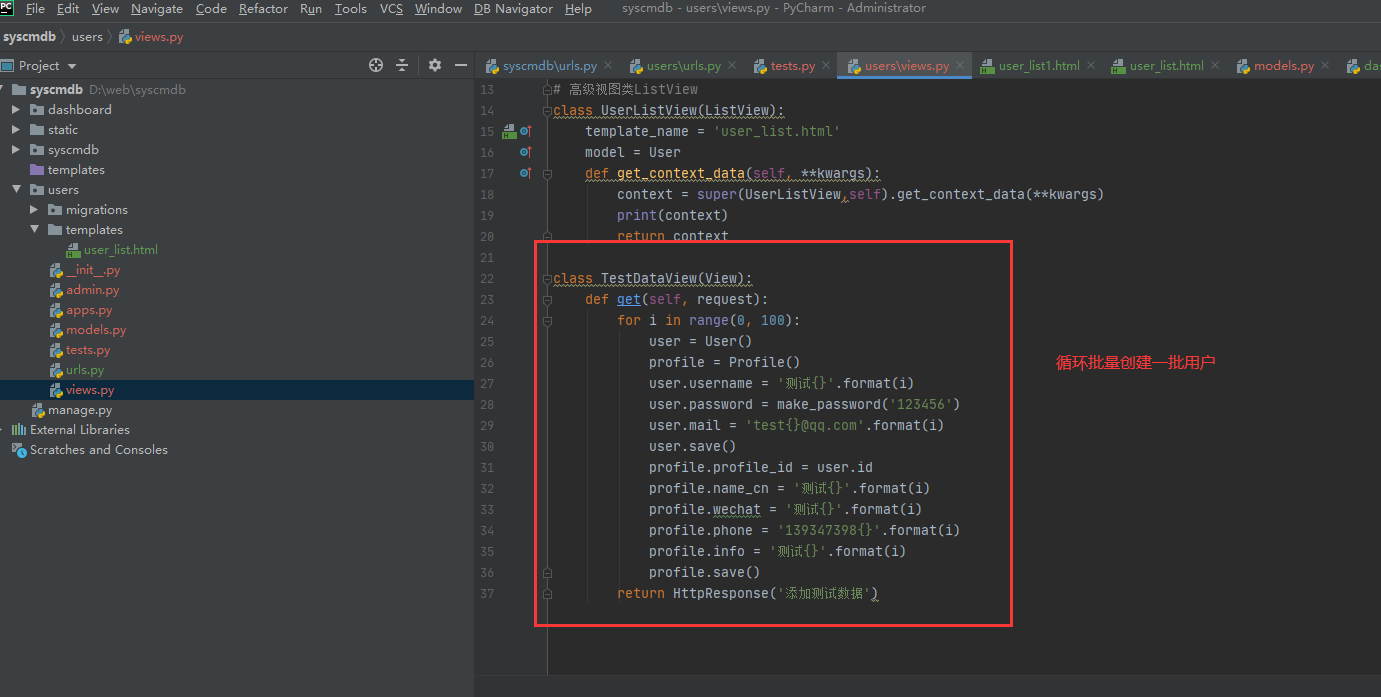
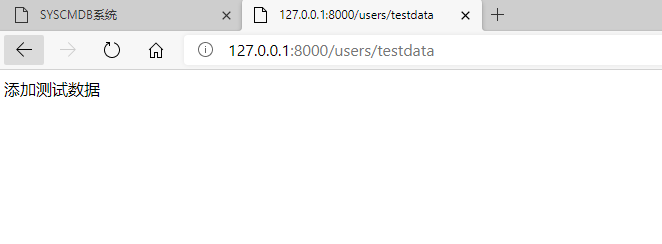
1 2 3 4 5 6 7 8 9 10 11 12 13 14 15 16 | class TestDataView(View): def get(self, request): for i in range(0, 100): user = User() profile = Profile() user.username = '测试{}'.format(i) user.password = make_password('123456') user.mail = 'test{}@qq.com'.format(i) user.save() profile.profile_id = user.id profile.name_cn = '测试{}'.format(i) profile.wechat = '测试{}'.format(i) profile.phone = '139347398{}'.format(i) profile.info = '测试{}'.format(i) profile.save() return HttpResponse('添加测试数据') |
访问web页面创建用户
MySQL查看创建了一批次测试用户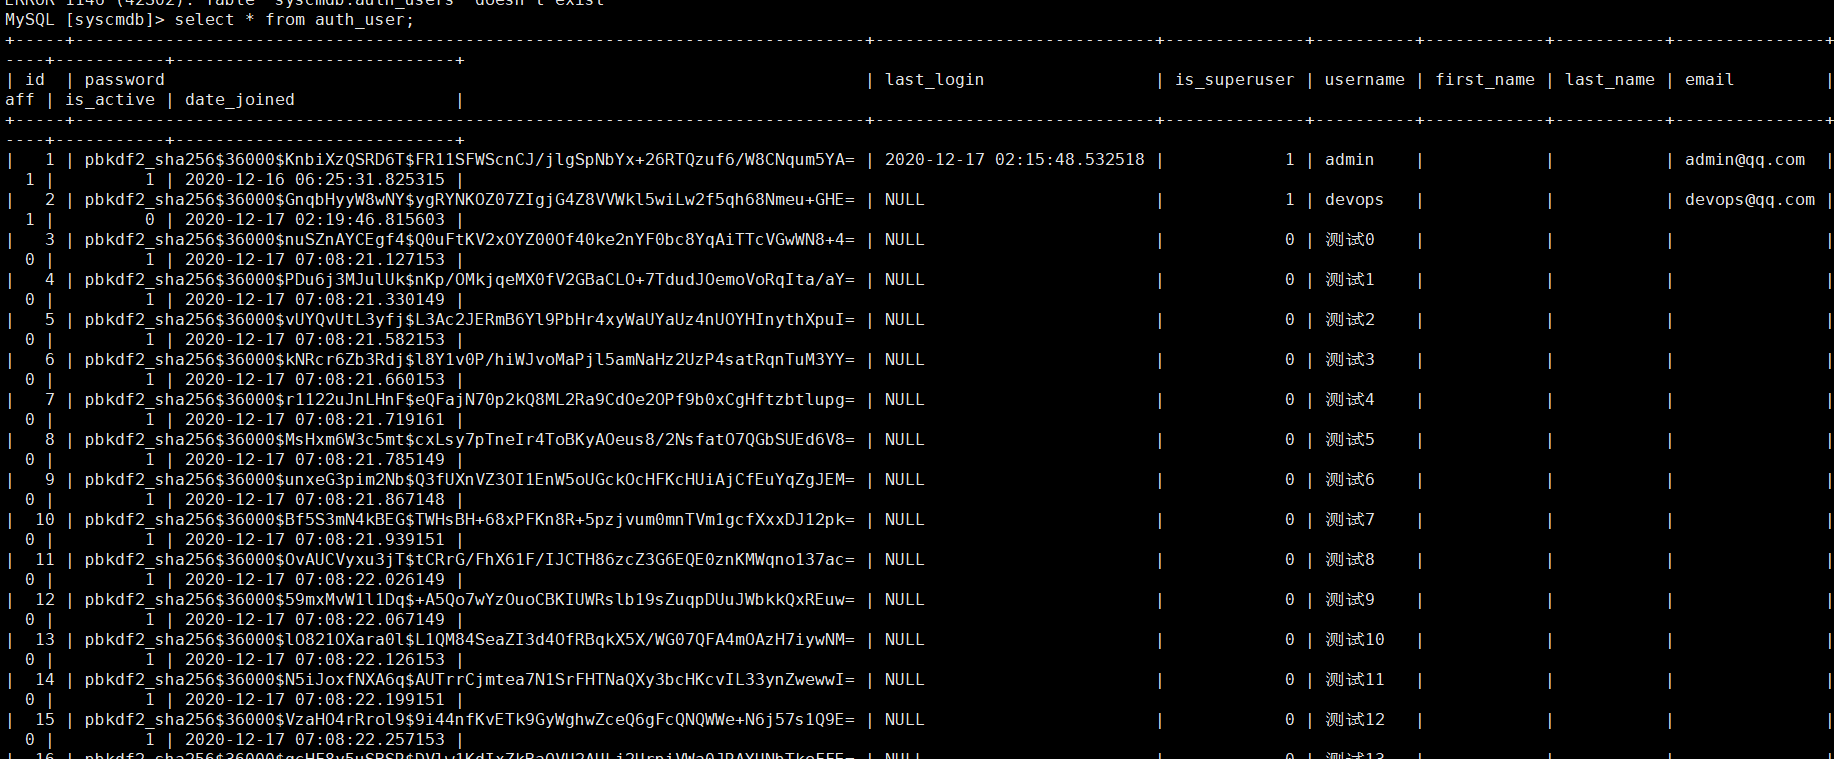
页面查看
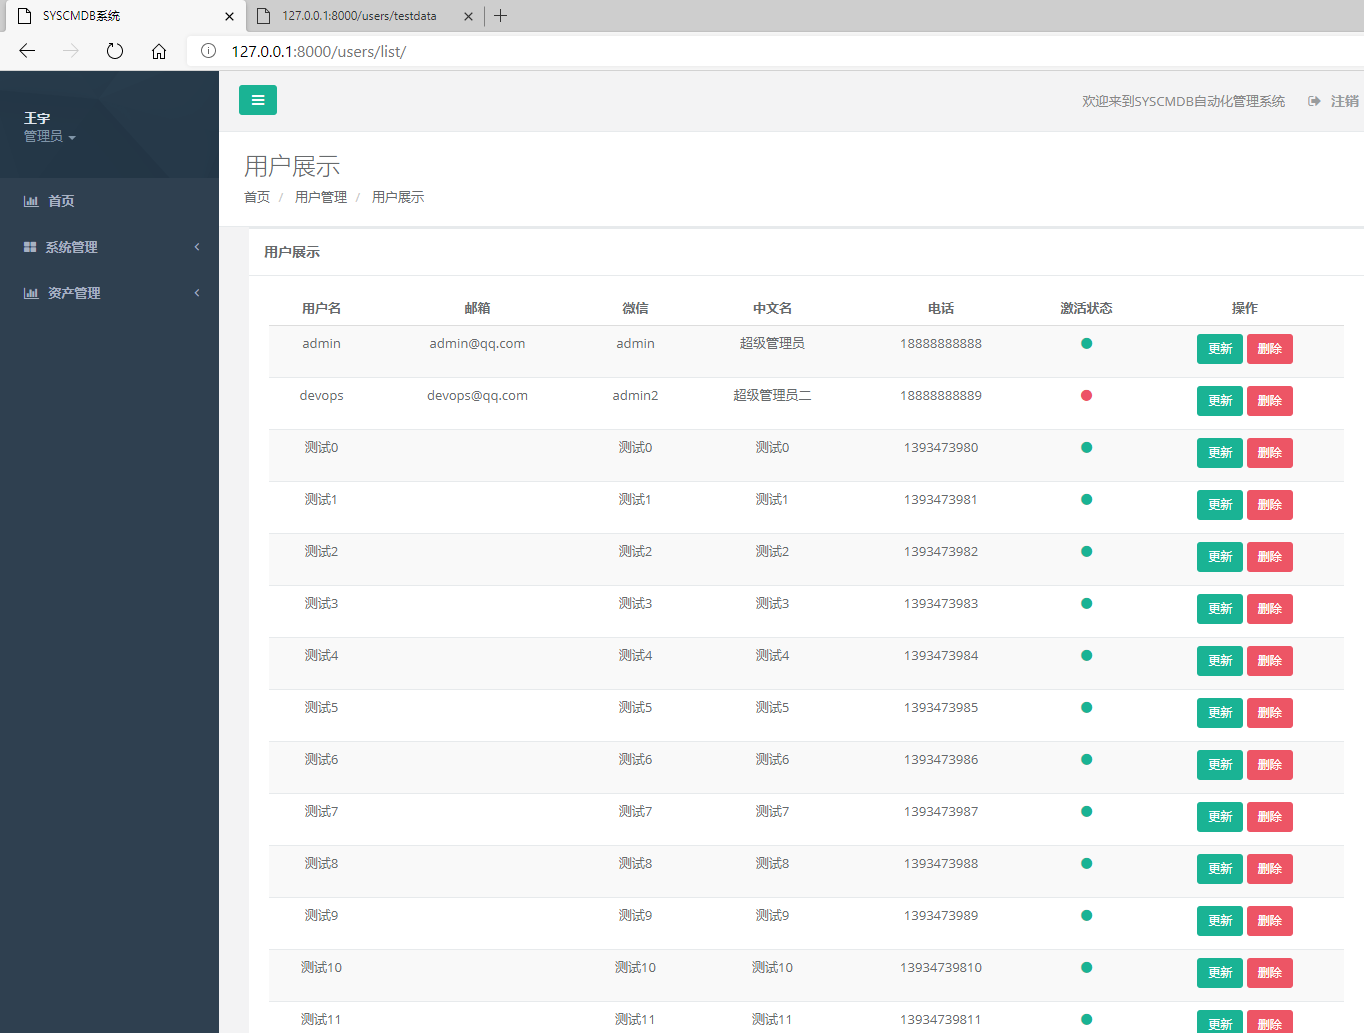
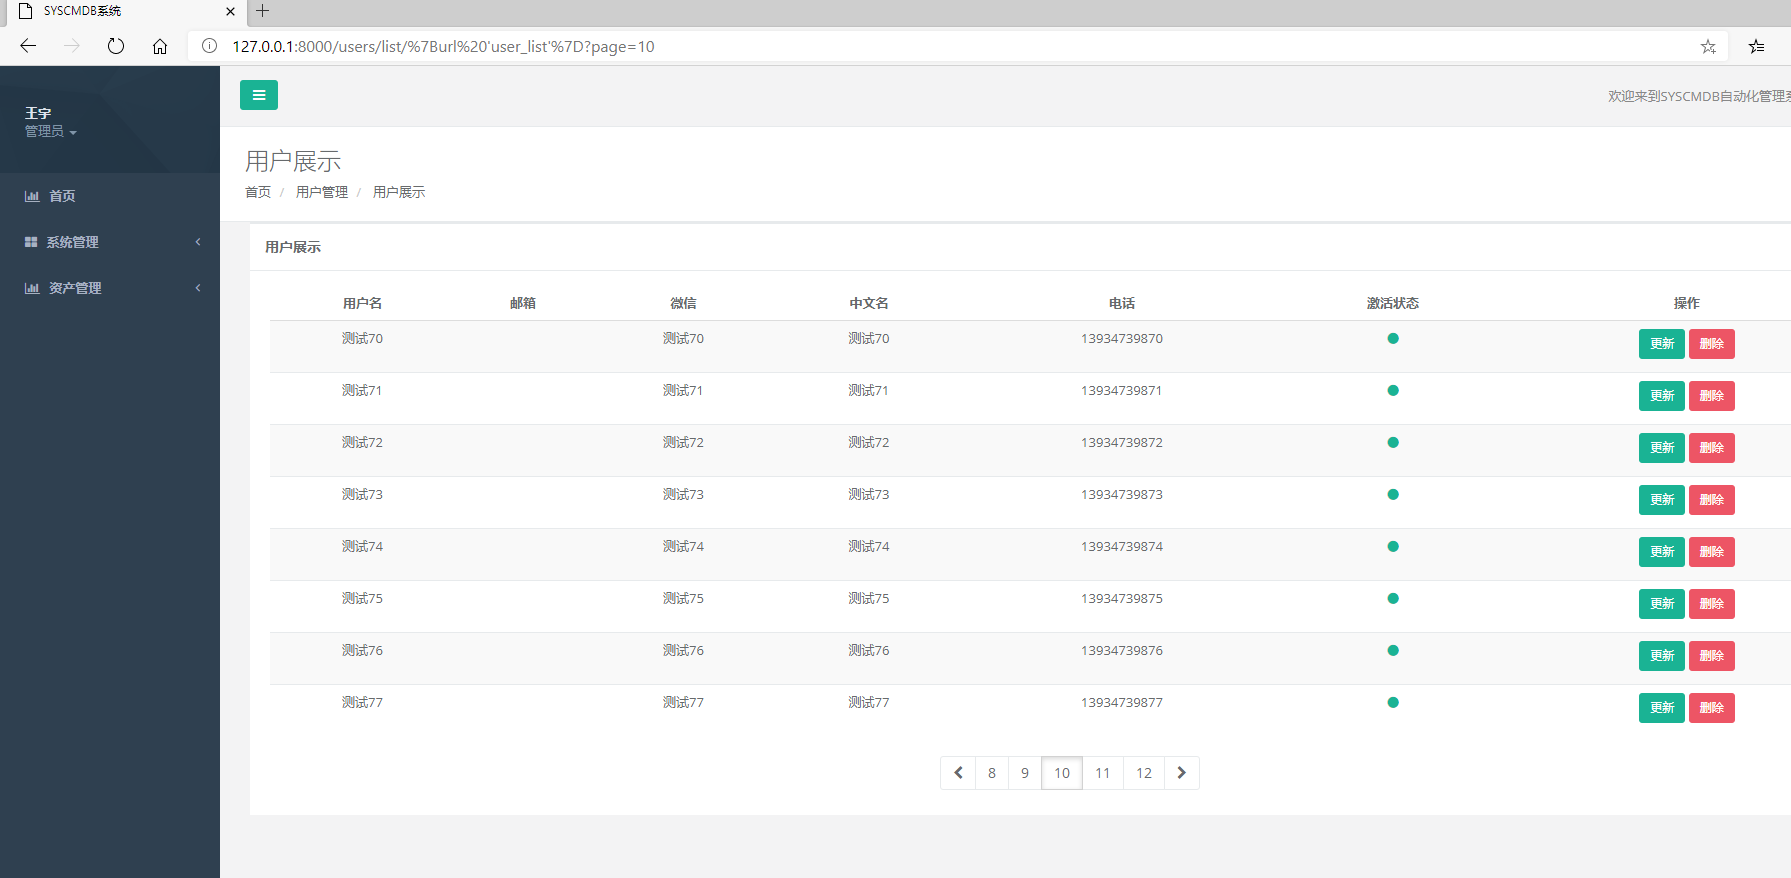
5,分页实现
以上用户会展示在同一个页面,需要进行分页处理
①通过高级视图ListView实现

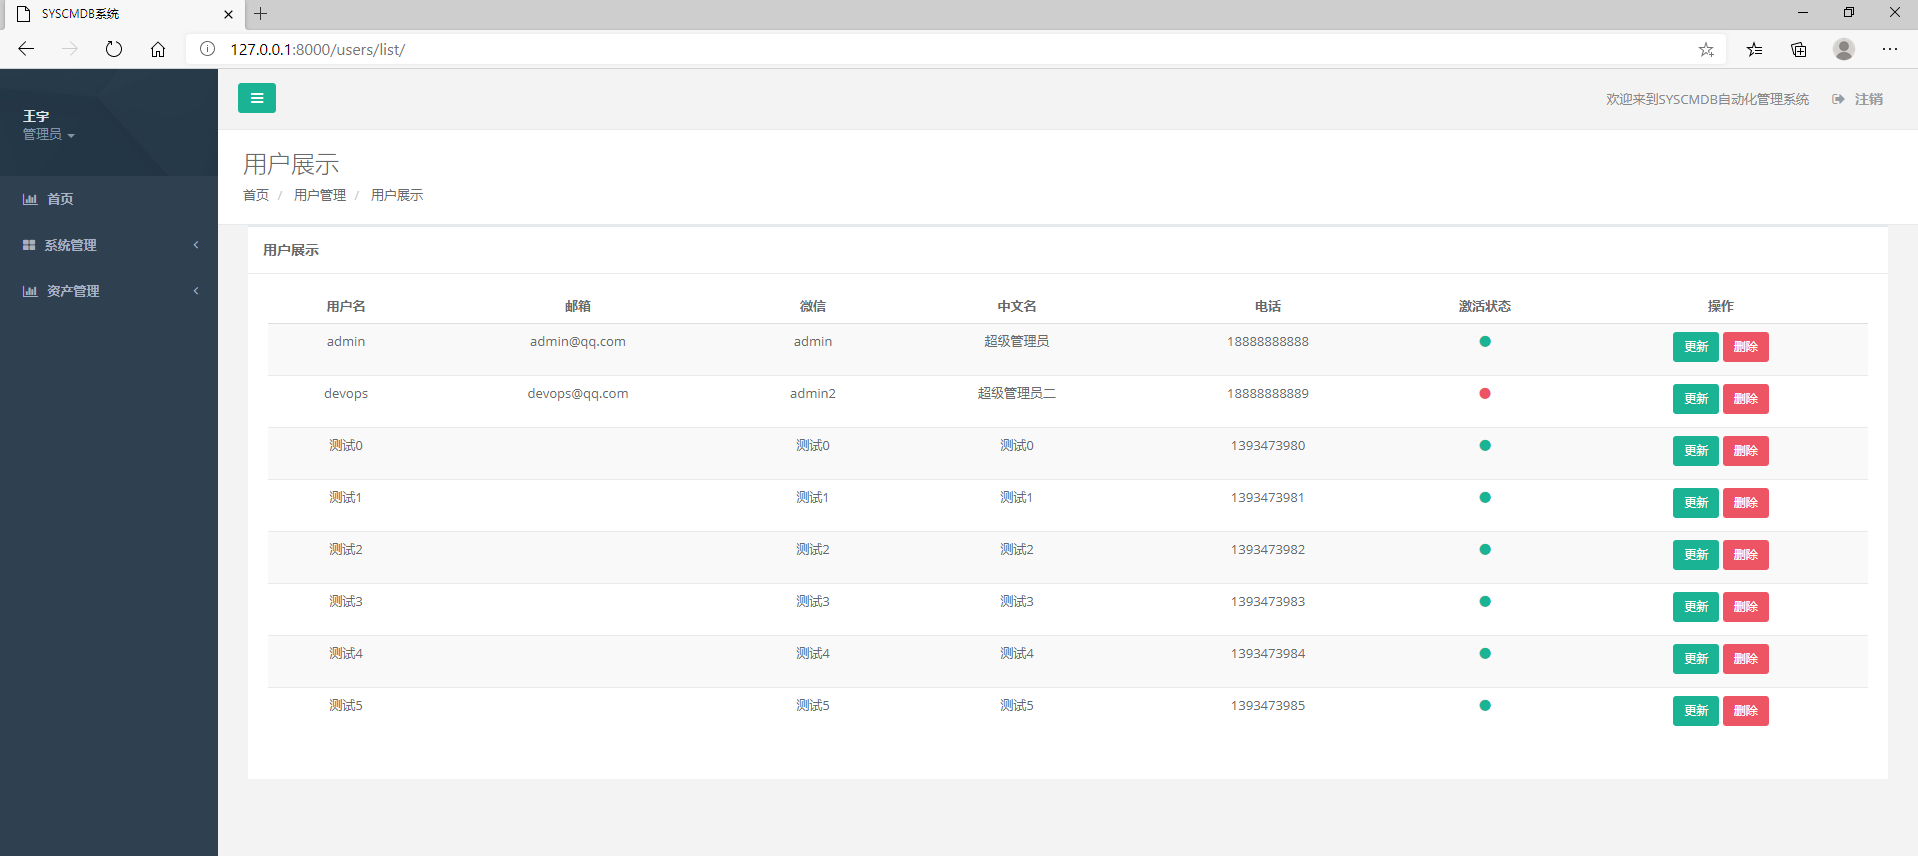
每页显示8条 页面只显示了第一页的八条
②页面显示按钮
1 2 3 4 5 6 7 8 | page_obj.has_previous 判断是否有上一页page_obj.previous_page_number 上一页的页面对象page_obj.number 当前也数page_obj.has_next 判断是否有下一页page_obj.next_page_number 下一页的页面对象paginator.num_pages 最大页数paginator.page_range 可迭代的总页数 |
在模板的table表后插入以下代码
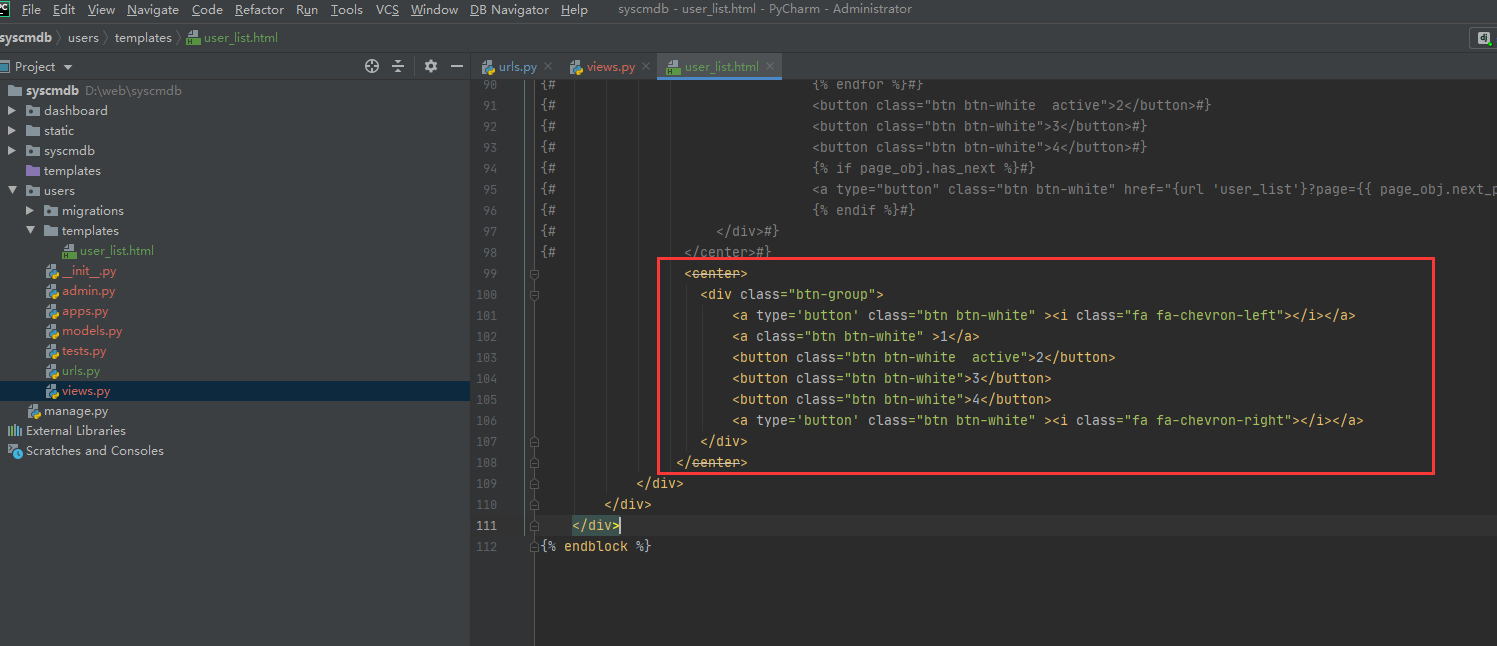
1 2 3 4 5 6 7 8 9 10 | <center> <div class="btn-group"> <a type='button' class="btn btn-white" ><i class="fa fa-chevron-left"></i></a> <a class="btn btn-white" >1</a> <button class="btn btn-white active">2</button> <button class="btn btn-white">3</button> <button class="btn btn-white">4</button> <a type='button' class="btn btn-white" ><i class="fa fa-chevron-right"></i></a> </div> </center> |
插入一个静态的按钮页
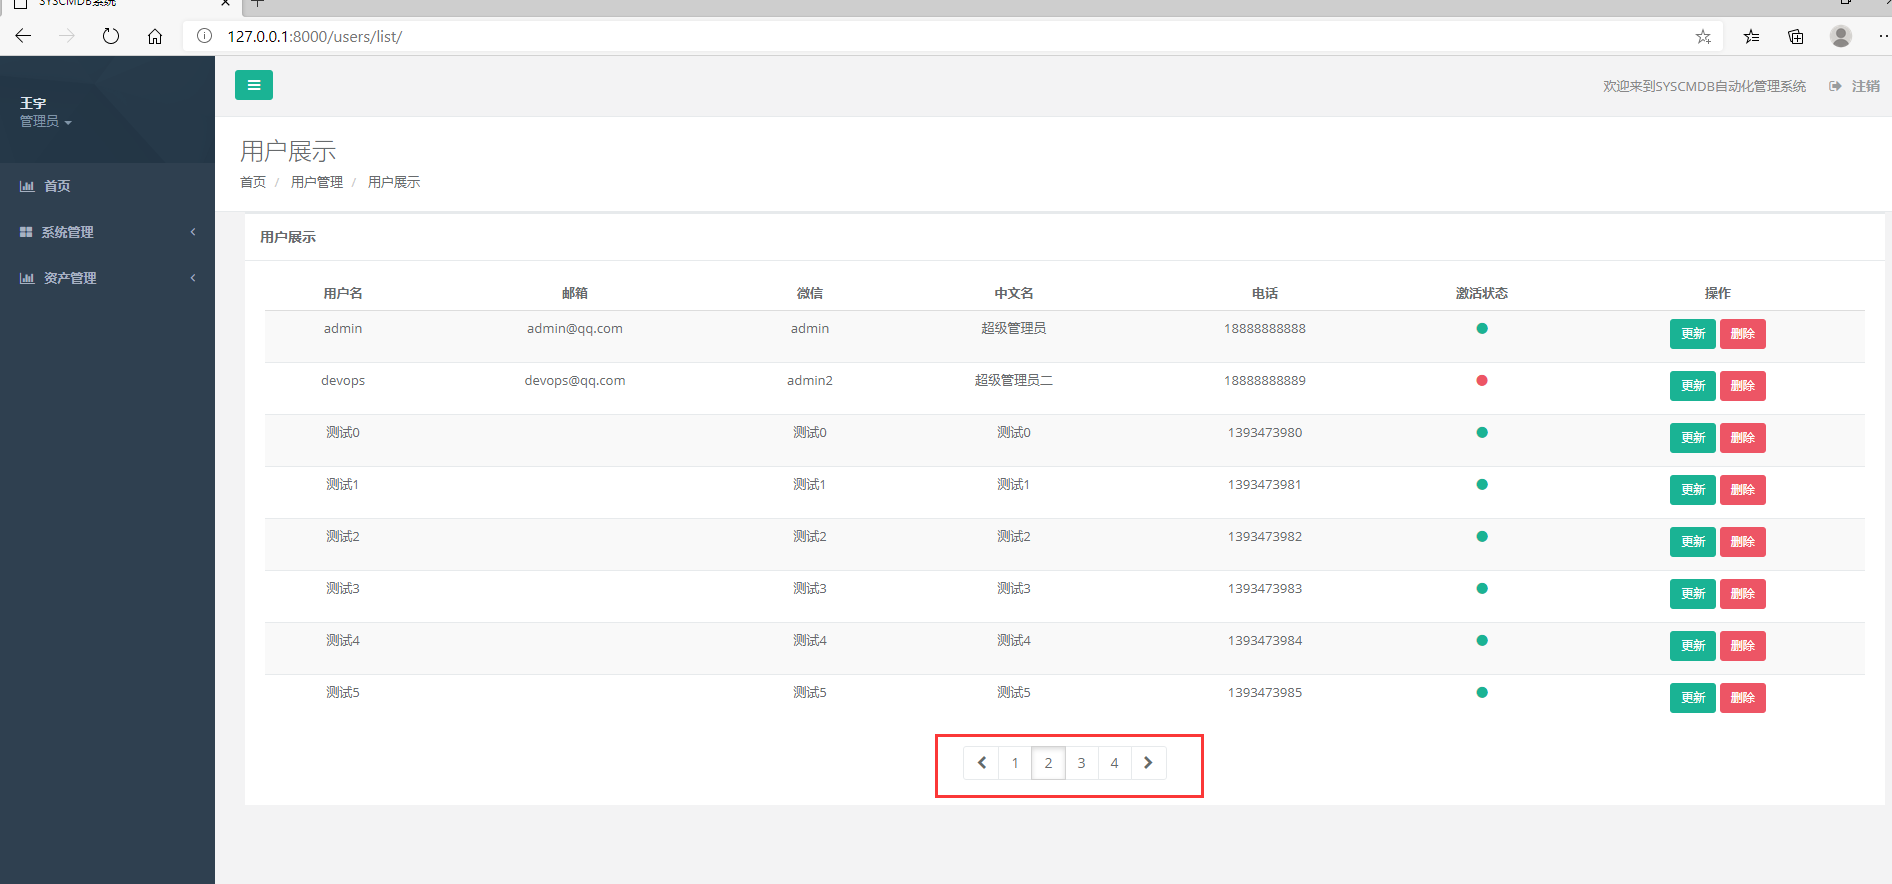
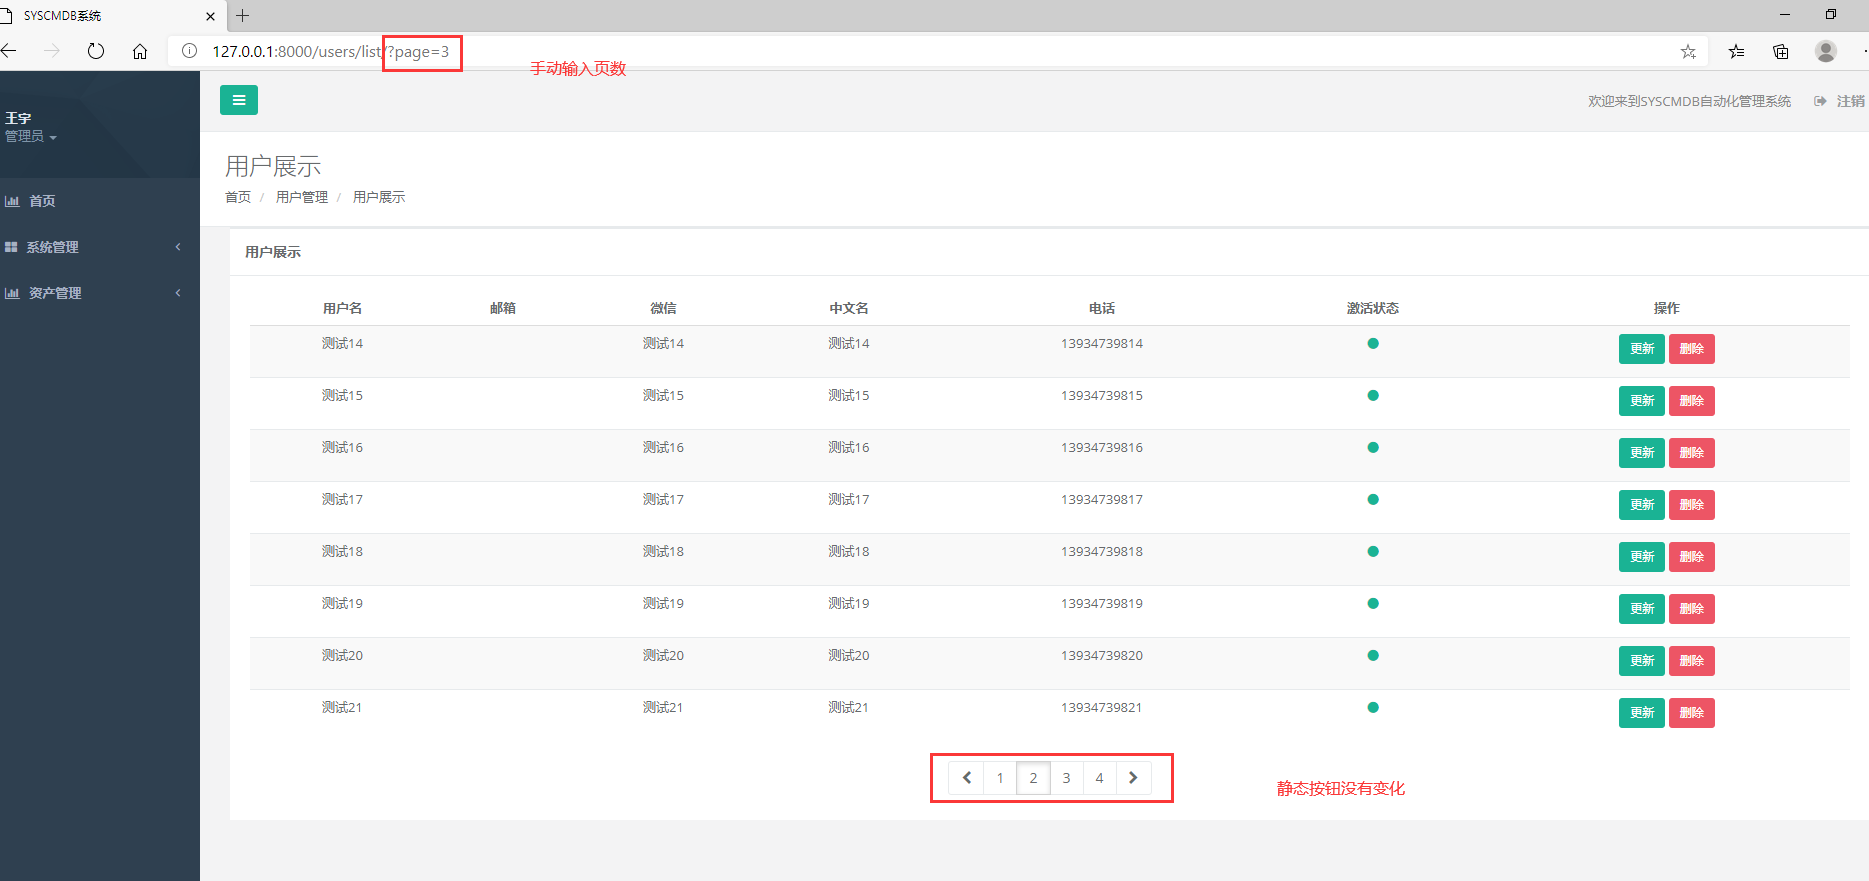
静态按钮暂时没有点击功能 但是页面可以通过手动输入页数来实现翻页
注意:需要代码paginate_by = 8才能实现分页 否则即使输入页数也会在一个页面显示所有用户
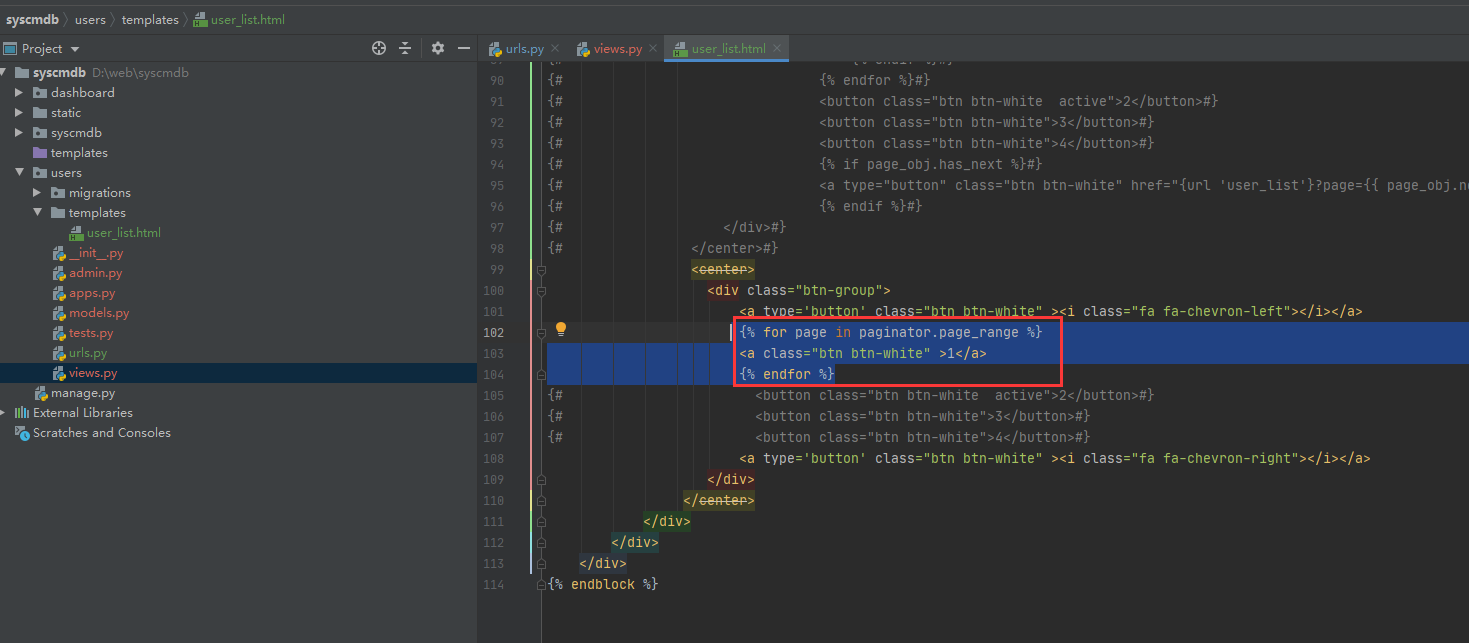
分页按钮保留一个即可 使用迭代来实现分页
遍历输出按钮
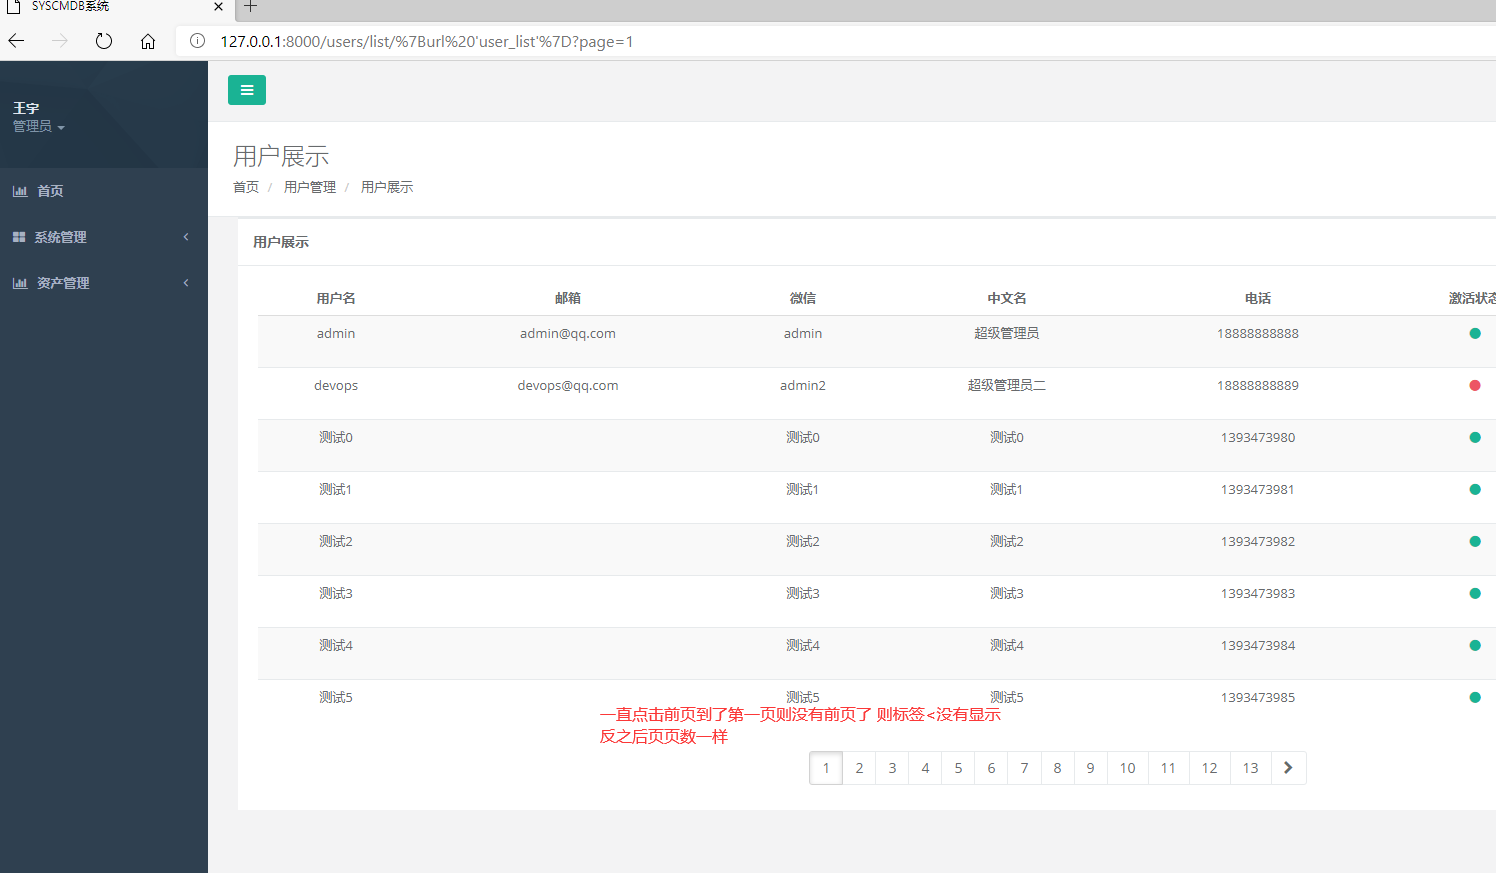
页面显示
显示页数

页面显示
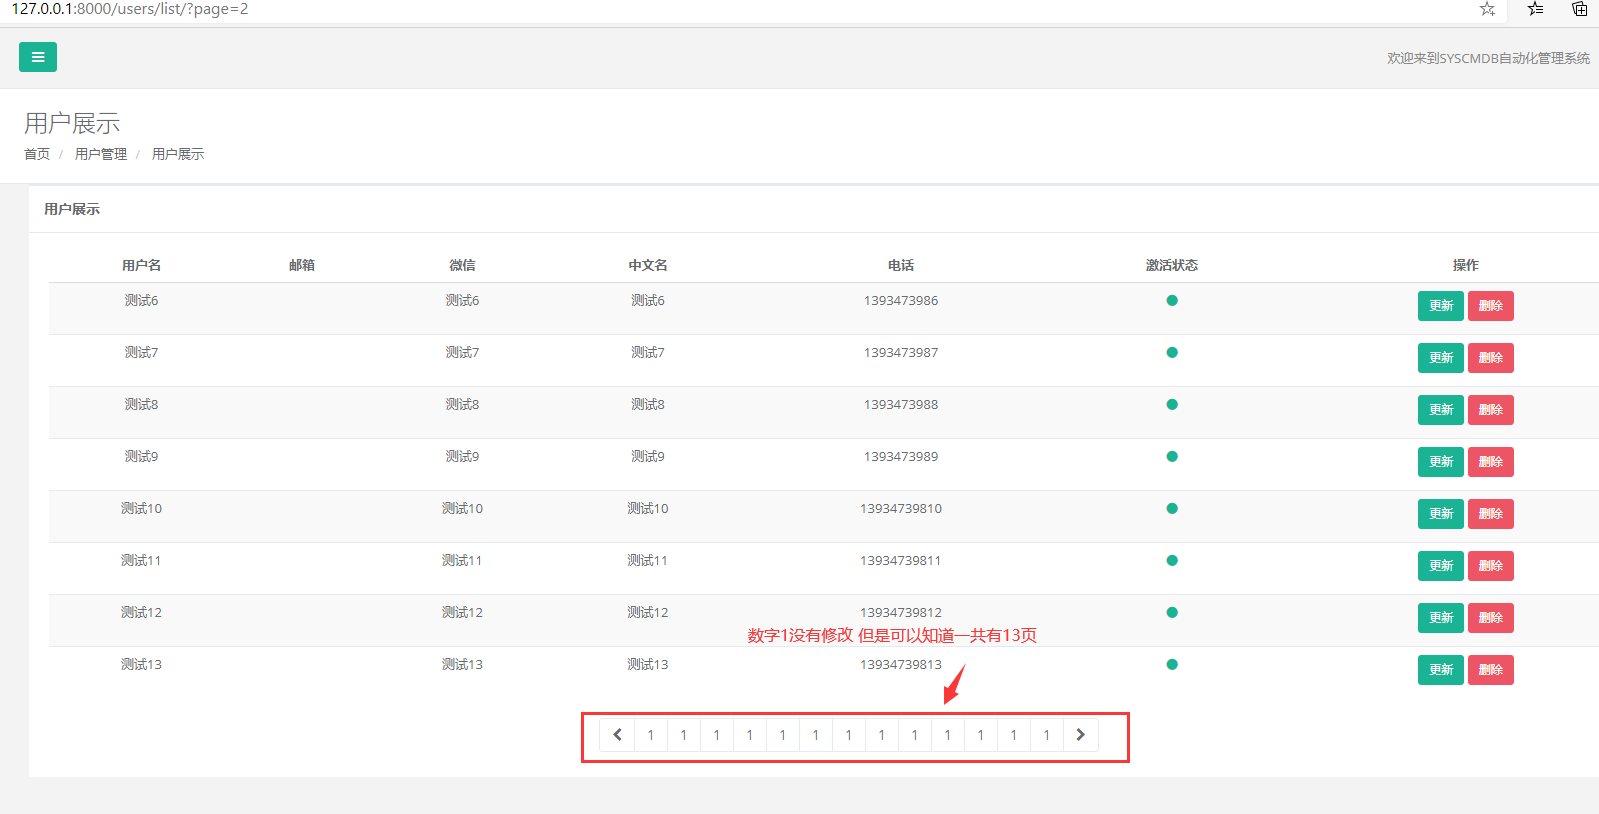
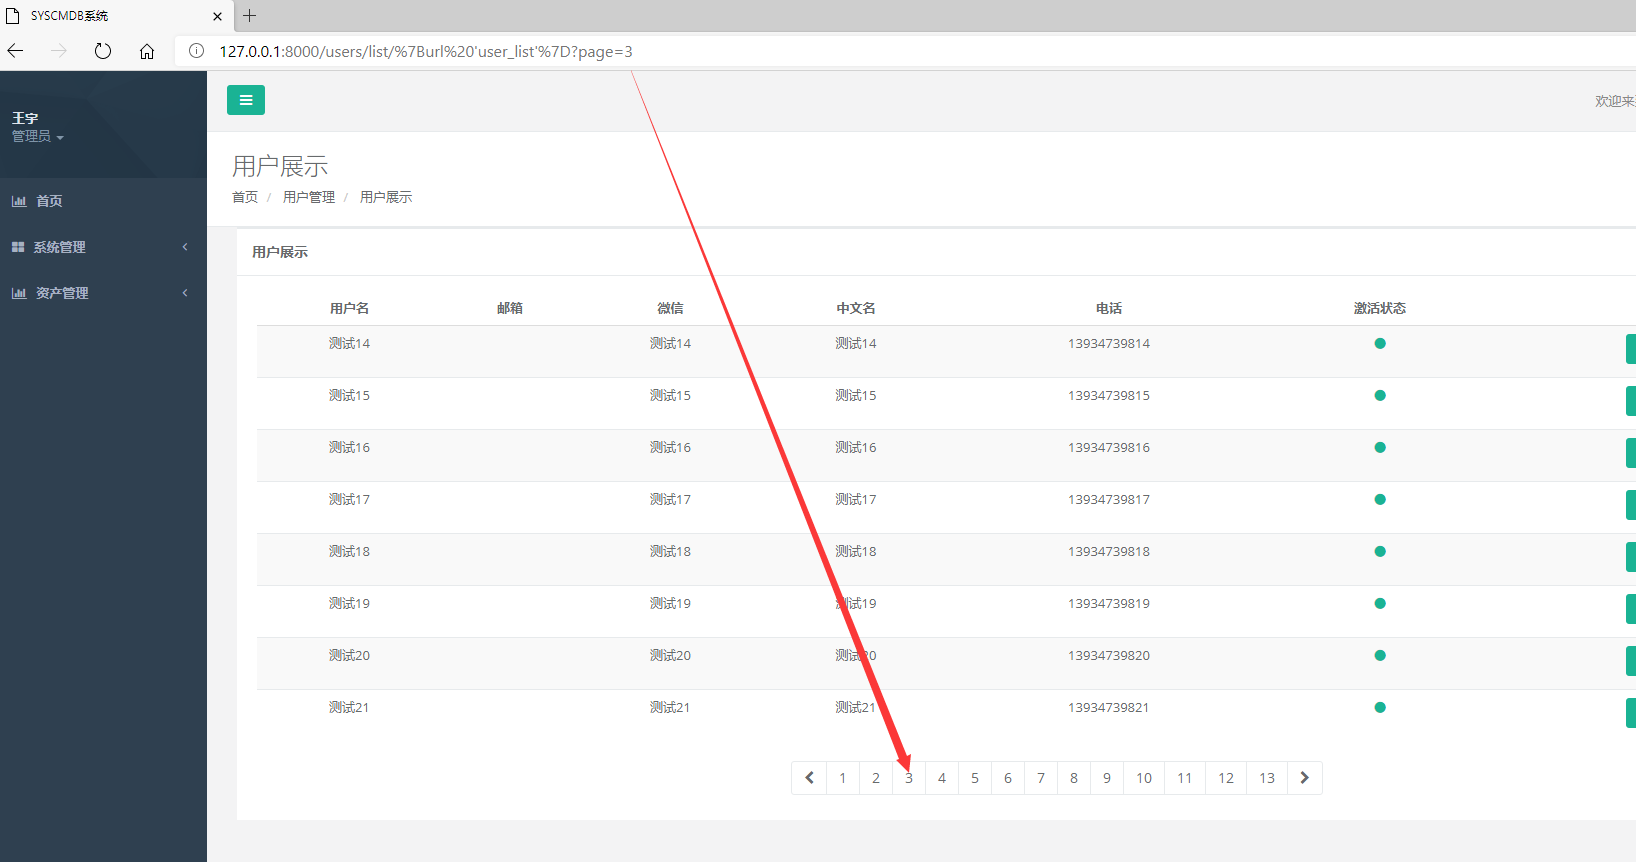
现在点击对应数字还没有对应的Url路径 所以点击无反应
修改模板
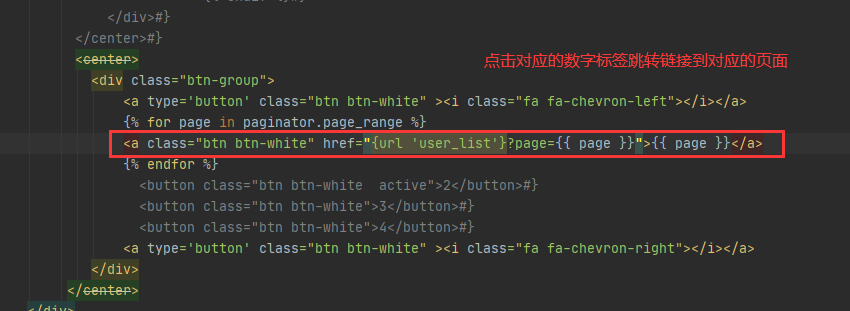
页面查看
现在可以点击对应页面查看不同页面对应的用户了 但是当前激活点击的标签没有高亮显示
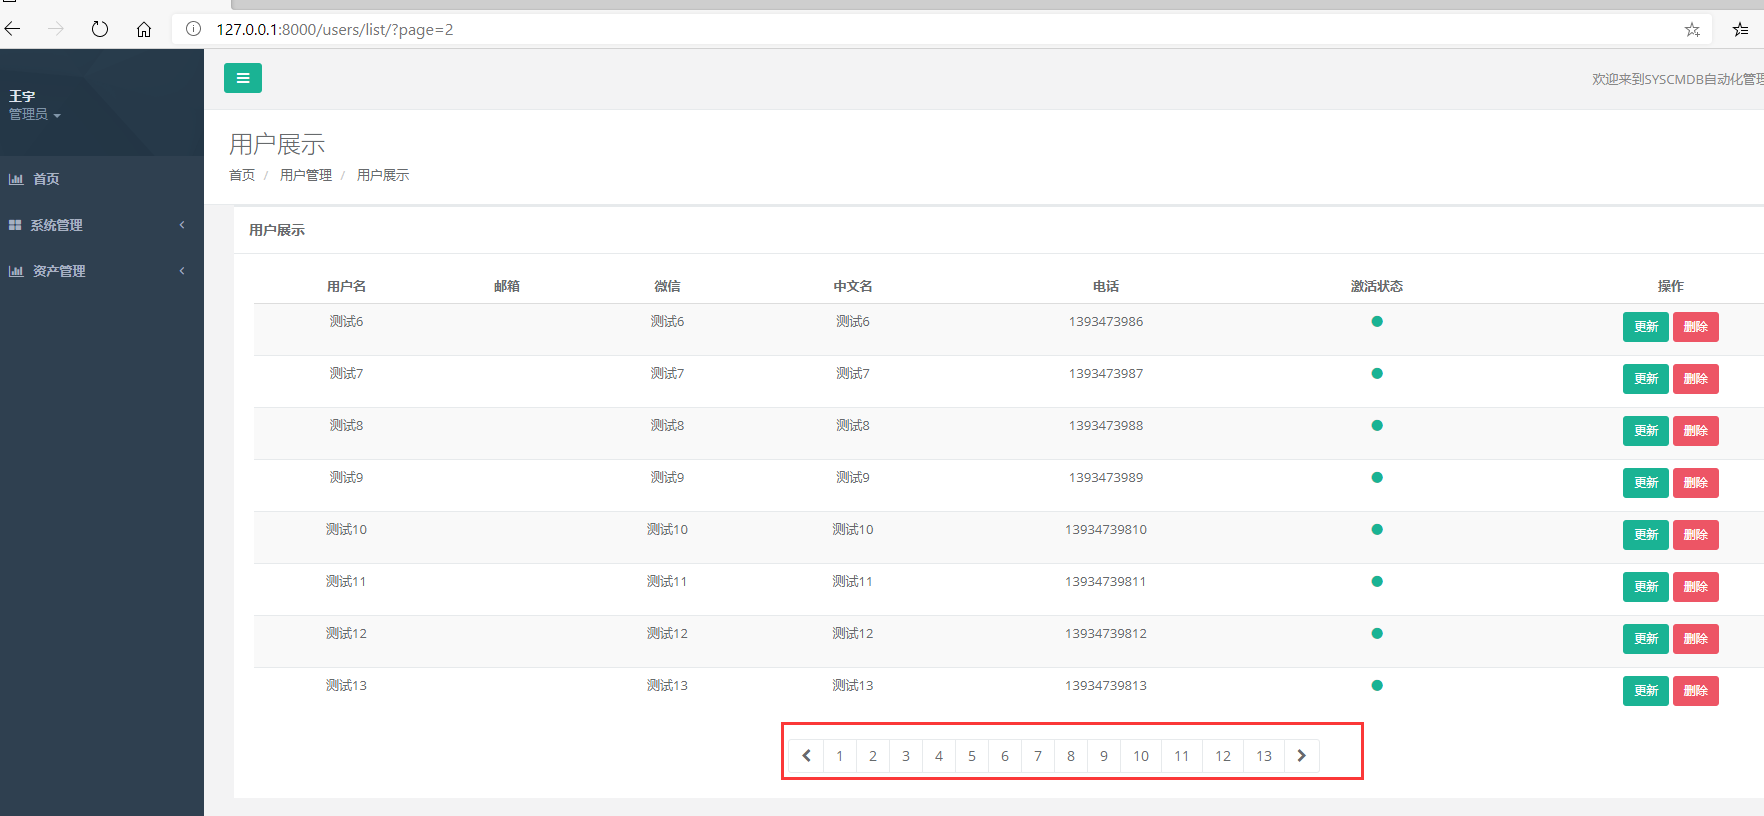
修改模板

1 2 3 4 5 | {% if page_obj.number == page%} <a class="btn btn-white active" href="{url 'user_list'}?page={{ page }}">{{ page }}</a> {% else %} <a class="btn btn-white" href="{url 'user_list'}?page={{ page }}">{{ page }}</a> {% endif %} |
页面高亮显示
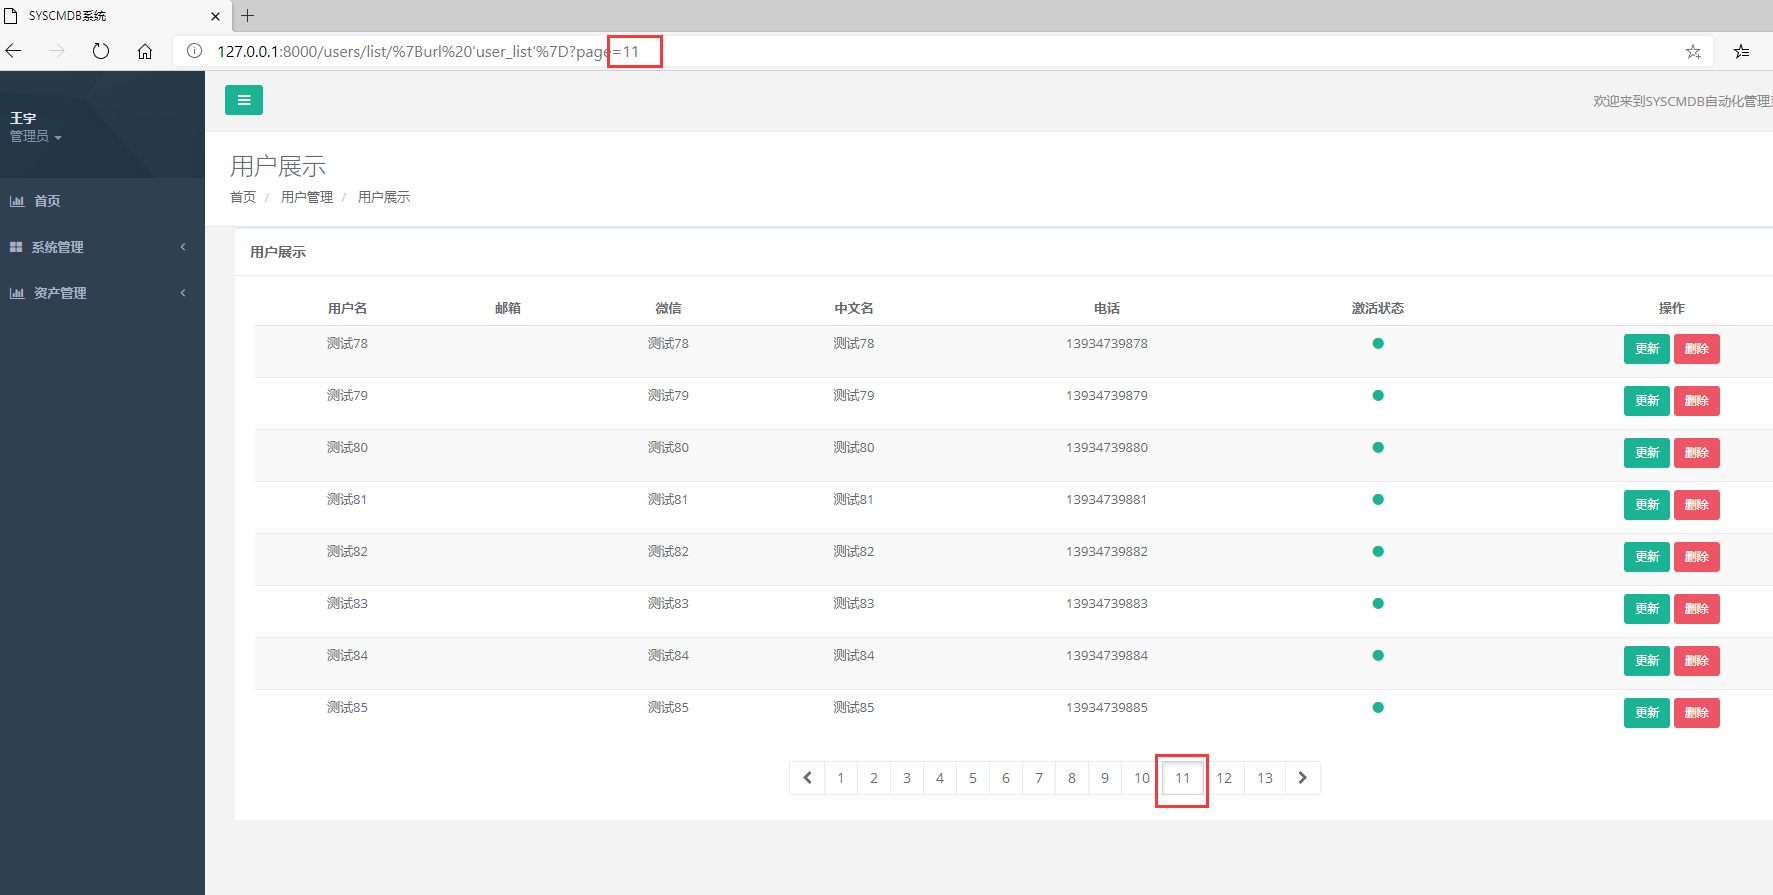
现在前页后页无法点击 通过判断是否有前页或者后页激活前页后页标签
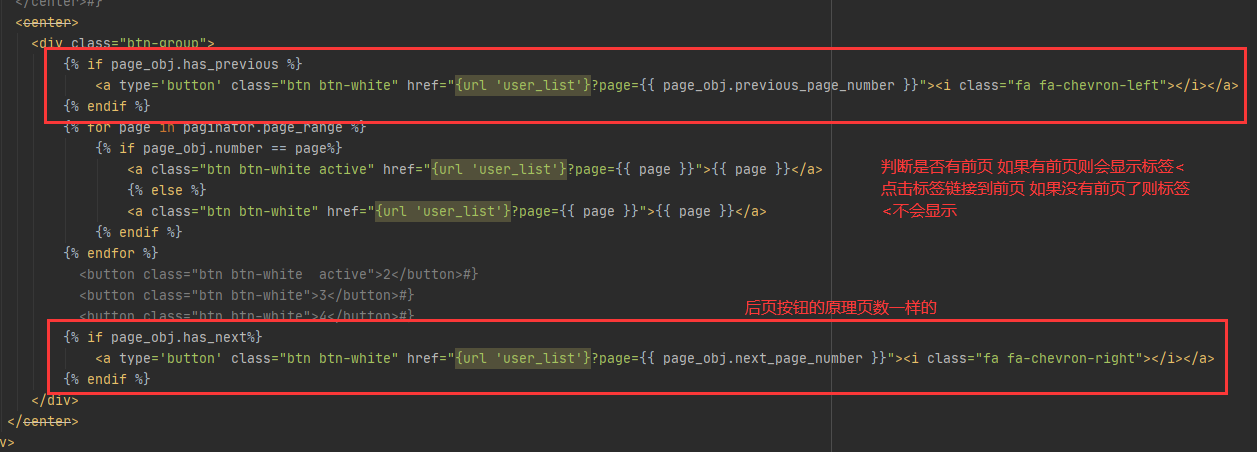
1 2 3 | {% if page_obj.has_previous %} <a type='button' class="btn btn-white" href="{url 'user_list'}?page={{ page_obj.previous_page_number }}"><i class="fa fa-chevron-left"></i></a> {% endif %} |
1 2 3 | {% if page_obj.has_next%} <a type='button' class="btn btn-white" href="{url 'user_list'}?page={{ page_obj.next_page_number }}"><i class="fa fa-chevron-right"></i></a> {% endif %} |
页面显示
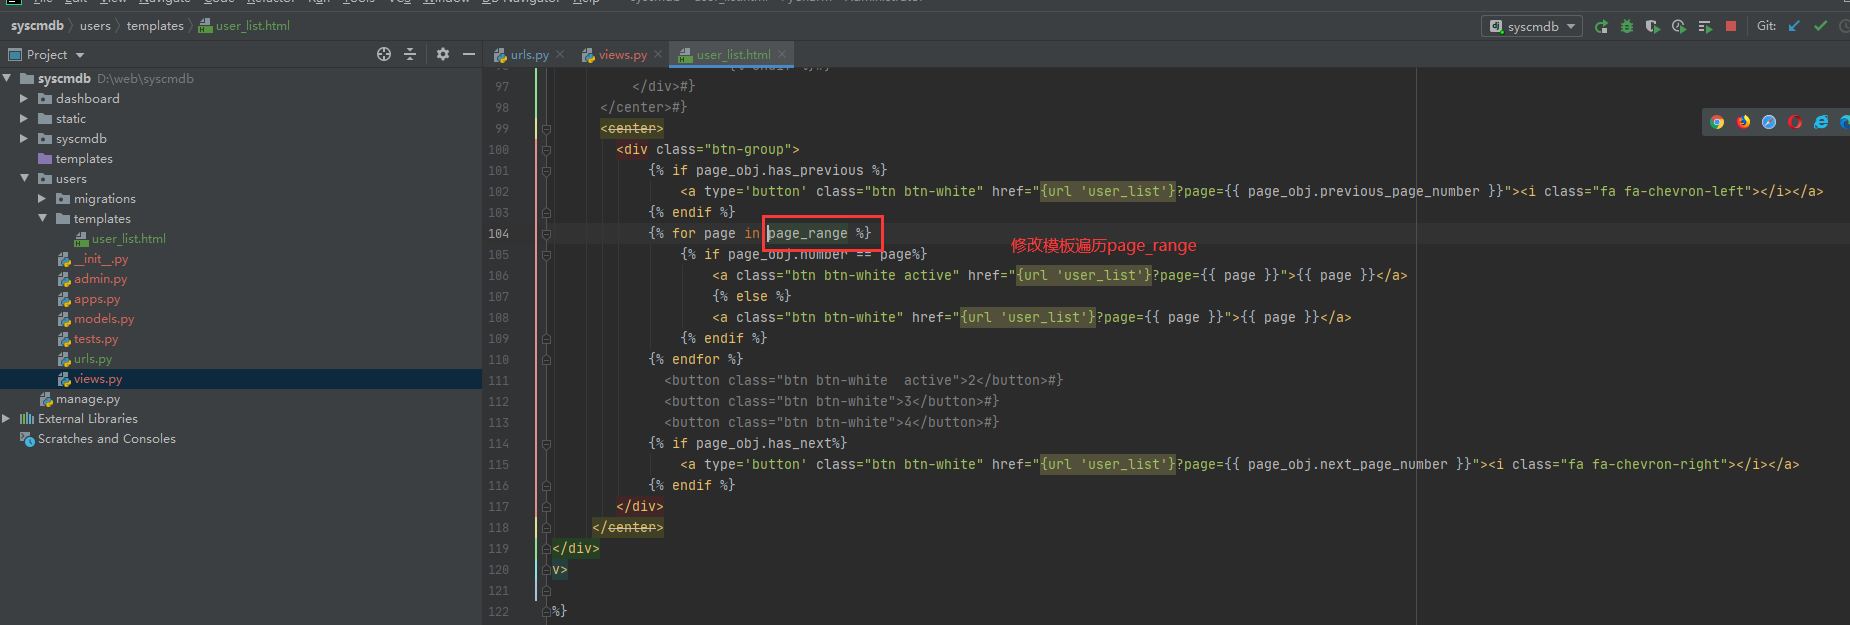
page_range在底部一次性显示所有的页面,下面通过重写page_range优化页数显示
修改视图
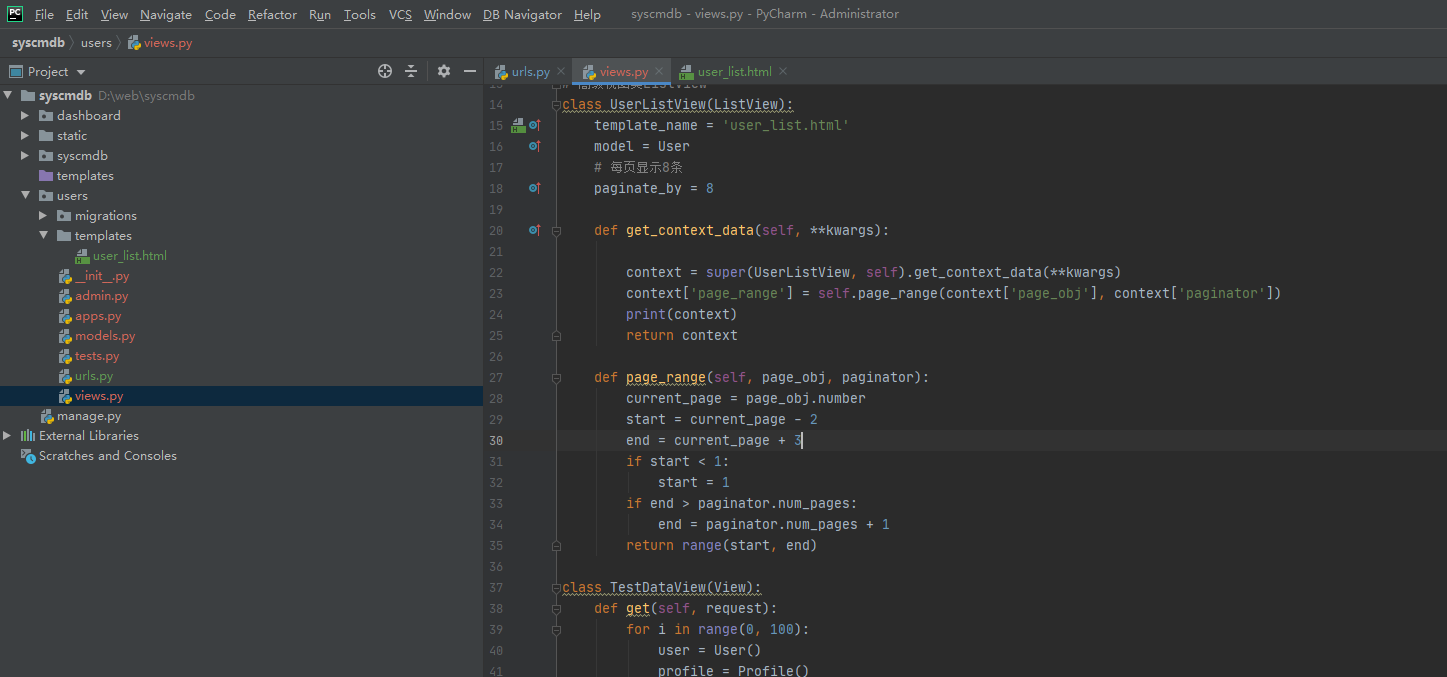
1 2 3 4 5 6 7 8 9 10 11 12 13 14 15 16 17 18 19 20 21 22 | class UserListView(ListView): template_name = 'user_list.html' model = User # 每页显示8条 paginate_by = 8 def get_context_data(self, **kwargs): context = super(UserListView, self).get_context_data(**kwargs) context['page_range'] = self.page_range(context['page_obj'], context['paginator']) print(context) return context def page_range(self, page_obj, paginator): current_page = page_obj.number start = current_page - 2 end = current_page + 3 if start < 1: start = 1 if end > paginator.num_pages: end = paginator.num_pages + 1 return range(start, end) |
修改模板
页面显示
注意:一般分页在前端实现
6,添加用户
①路由
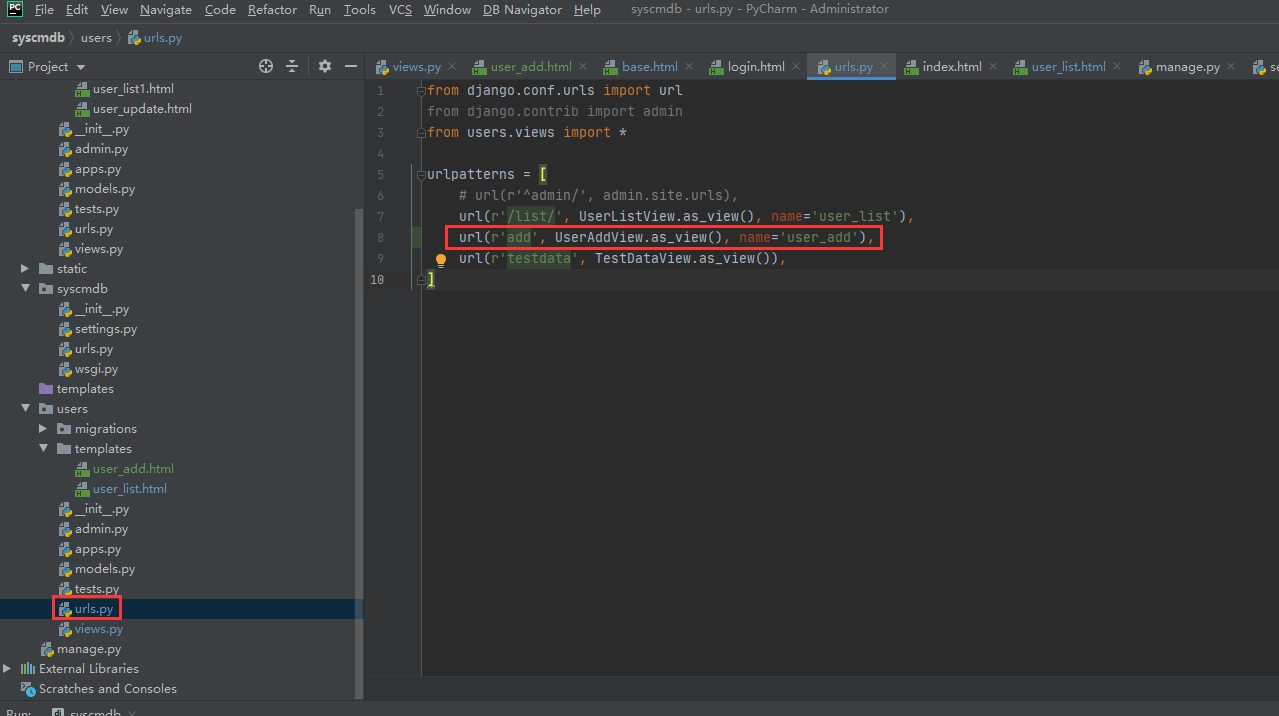
②视图
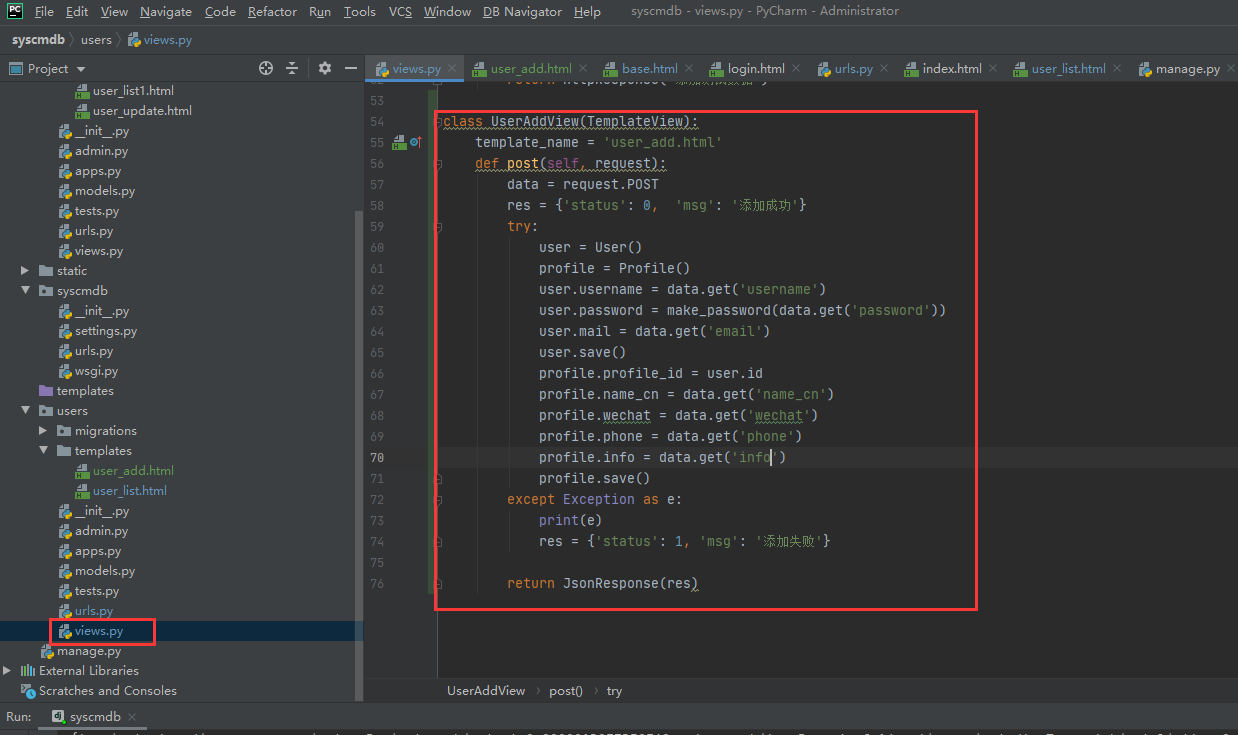
1 2 3 4 5 6 7 8 9 10 11 12 13 14 15 16 17 18 19 20 21 22 23 | class UserAddView(TemplateView): template_name = 'user_add.html' def post(self, request): data = request.POST res = {'status': 0, 'msg': '添加成功'} try: user = User() profile = Profile() user.username = data.get('username') user.password = make_password(data.get('password')) user.mail = data.get('email') user.save() profile.profile_id = user.id profile.name_cn = data.get('name_cn') profile.wechat = data.get('wechat') profile.phone = data.get('phone') profile.info = data.get('info') profile.save() except Exception as e: print(e) res = {'status': 1, 'msg': '添加失败'} return JsonResponse(res) |
③前端模板
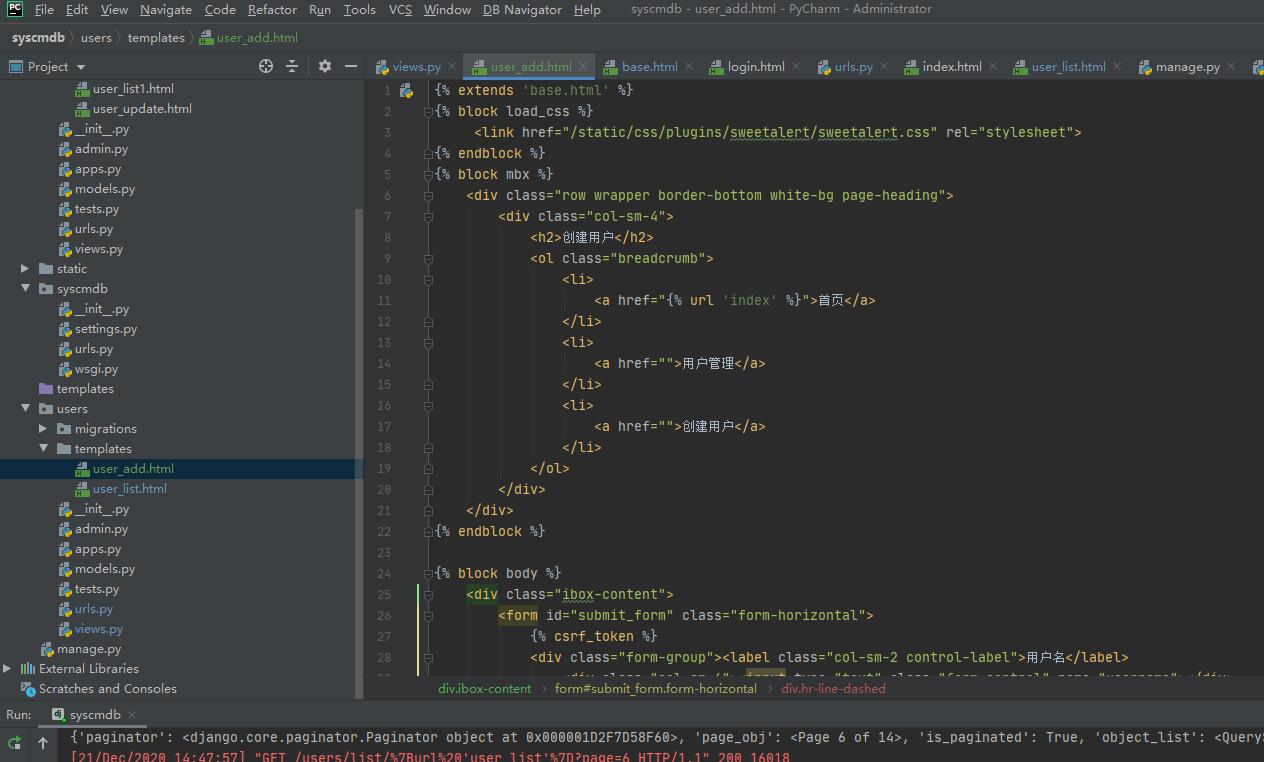
1 2 3 4 5 6 7 8 9 10 11 12 13 14 15 16 17 18 19 20 21 22 23 24 25 26 27 28 29 30 31 32 33 34 35 36 37 38 39 40 41 42 43 44 45 46 47 48 49 50 51 52 53 54 55 56 57 58 59 60 61 62 63 64 65 66 67 68 69 70 71 72 73 74 75 76 77 78 79 80 81 82 83 84 85 86 87 88 89 90 91 92 93 94 95 96 97 98 99 100 101 102 103 104 105 106 107 108 109 110 111 112 113 114 115 116 | {% extends 'base.html' %}{% block load_css %} <link href="/static/css/plugins/sweetalert/sweetalert.css" rel="stylesheet">{% endblock %}{% block mbx %} <div class="row wrapper border-bottom white-bg page-heading"> <div class="col-sm-4"> <h2>创建用户</h2> <ol class="breadcrumb"> <li> <a href="{% url 'index' %}">首页</a> </li> <li> <a href="">用户管理</a> </li> <li> <a href="">创建用户</a> </li> </ol> </div> </div>{% endblock %}{% block body %} <div class="ibox-content"> <form id="submit_form" class="form-horizontal"> {% csrf_token %} <div class="form-group"><label class="col-sm-2 control-label">用户名</label> <div class="col-sm-6"><input type="text" class="form-control" name="username"></div> </div> <div class="hr-line-dashed"></div> <div class="form-group"><label class="col-sm-2 control-label">中文名</label> <div class="col-sm-6"><input type="text" class="form-control" name="name_cn"></div> </div> <div class="hr-line-dashed"></div> <div class="form-group"><label class="col-sm-2 control-label">密码</label> <div class="col-sm-6"><input type="password" class="form-control" name="password"></div> </div> <div class="hr-line-dashed"></div> <div class="form-group"><label class="col-sm-2 control-label">邮箱</label> <div class="col-sm-6"><input type="email" class="form-control" name="email"></div> </div> <div class="hr-line-dashed"></div> <div class="form-group"><label class="col-sm-2 control-label">微信</label> <div class="col-sm-6"><input type="text" class="form-control" name="wechat"></div> </div> <div class="hr-line-dashed"></div> <div class="form-group"><label class="col-sm-2 control-label">电话</label> <div class="col-sm-6"><input type="text" class="form-control" name="phone"></div> </div> <div class="hr-line-dashed"></div> <div class="form-group"><label class="col-sm-2 control-label">简介信息</label> <div class="col-sm-6"><input type="text" class="form-control" name="info"></div> </div> <div class="hr-line-dashed"></div> <div class="form-group"> <div class="col-sm-4 col-sm-offset-2"> <a class="btn btn-white" type="submit" href="javascript:history.back(-1)">取消</a> <button class="btn btn-primary" type="submit">保存更改</button> </div> </div> </form> </div>{% endblock %}{% block load_js %} <script src="/static/js/plugins/validate/jquery.validate.js"></script> <script src="/static/js/plugins/validate/messages_zh.js"></script> <script src="/static/js/plugins/sweetalert/sweetalert.min.js"></script> <script> $(document).ready(function () { $("#submit_form").validate({ rules: { name_cn: { required: true }, username: { required: true }, email: { required: true }, password: { required: true }, phone: { required: true, minlength:11 }, wechat: { required: true } }, submitHandler: function () { var str = $('#submit_form').serialize(); $.post('{% url 'user_add' %}', str, function (res) { if (res.status == 0) { swal({ title: res.msg, type: 'success', confirmButtonText: "确定" }, function () { window.location.href = '{% url 'user_list' %}'; }); } else { swal({ title: res.msg, type: 'error', confirmButtonText: "确定" }); } }); } }); }); </script>{% endblock %} |
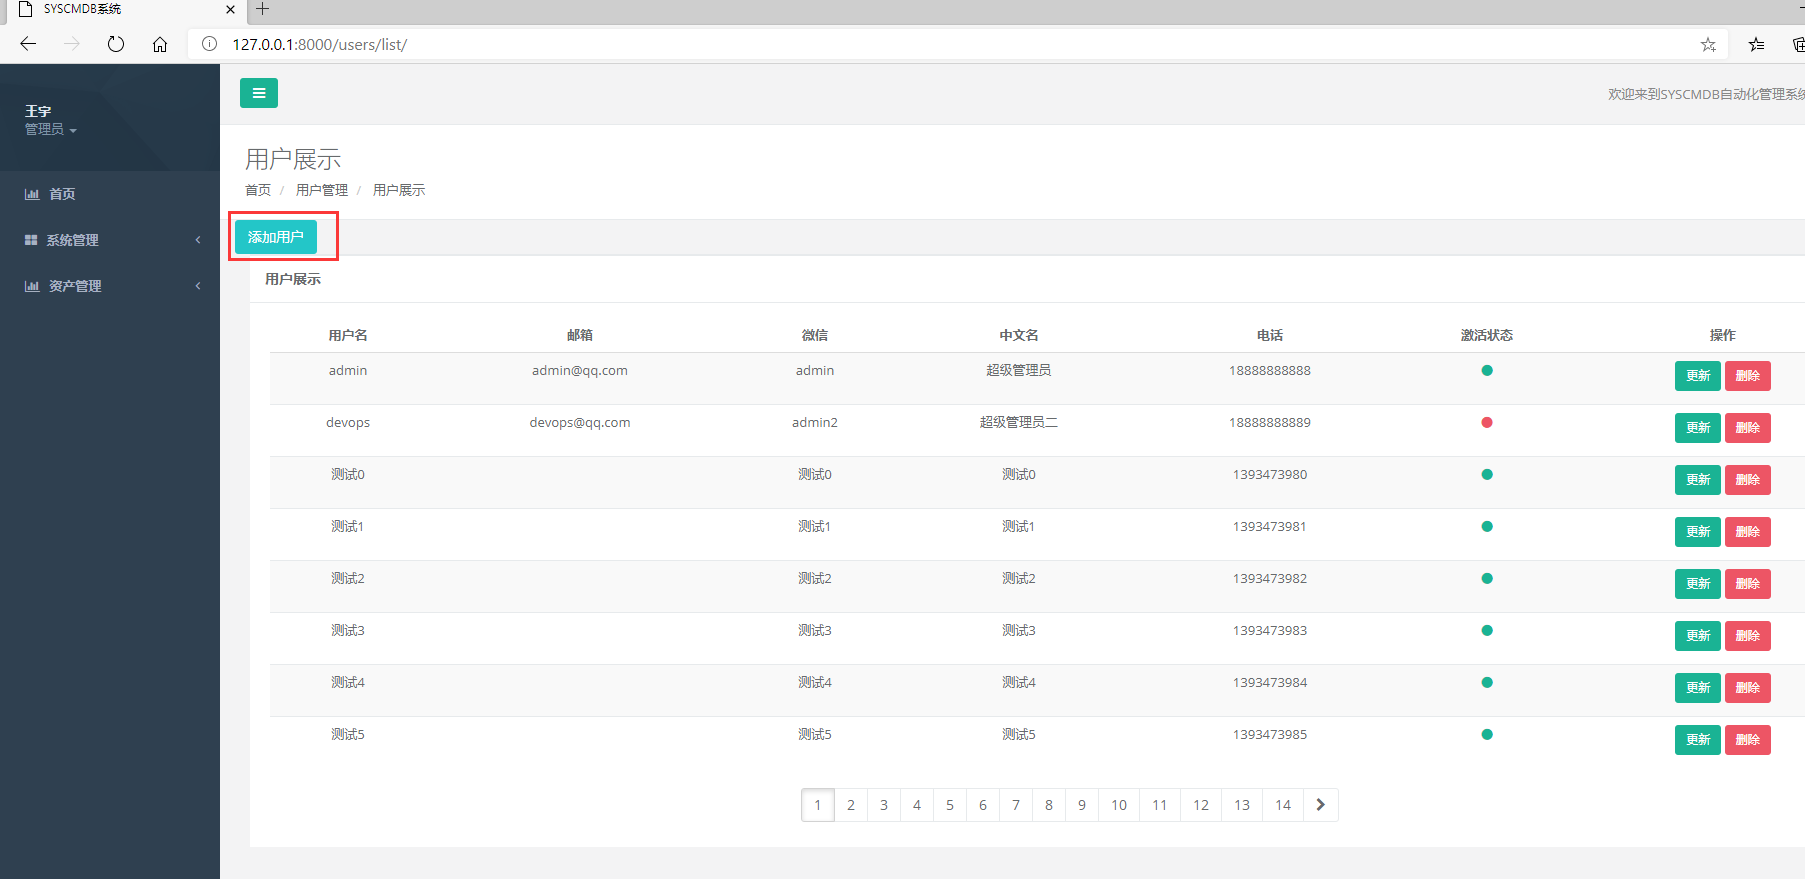
user_list增加一个添加用户的跳转按钮
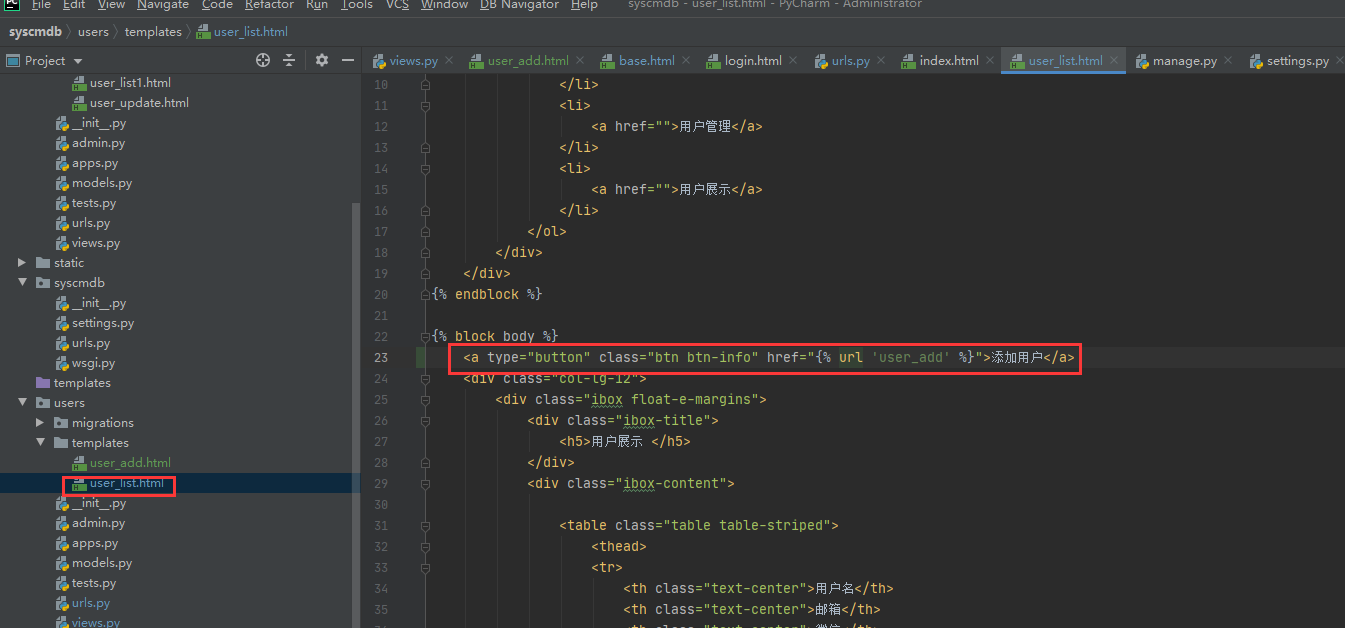
页面查看
点击后的添加用户页面
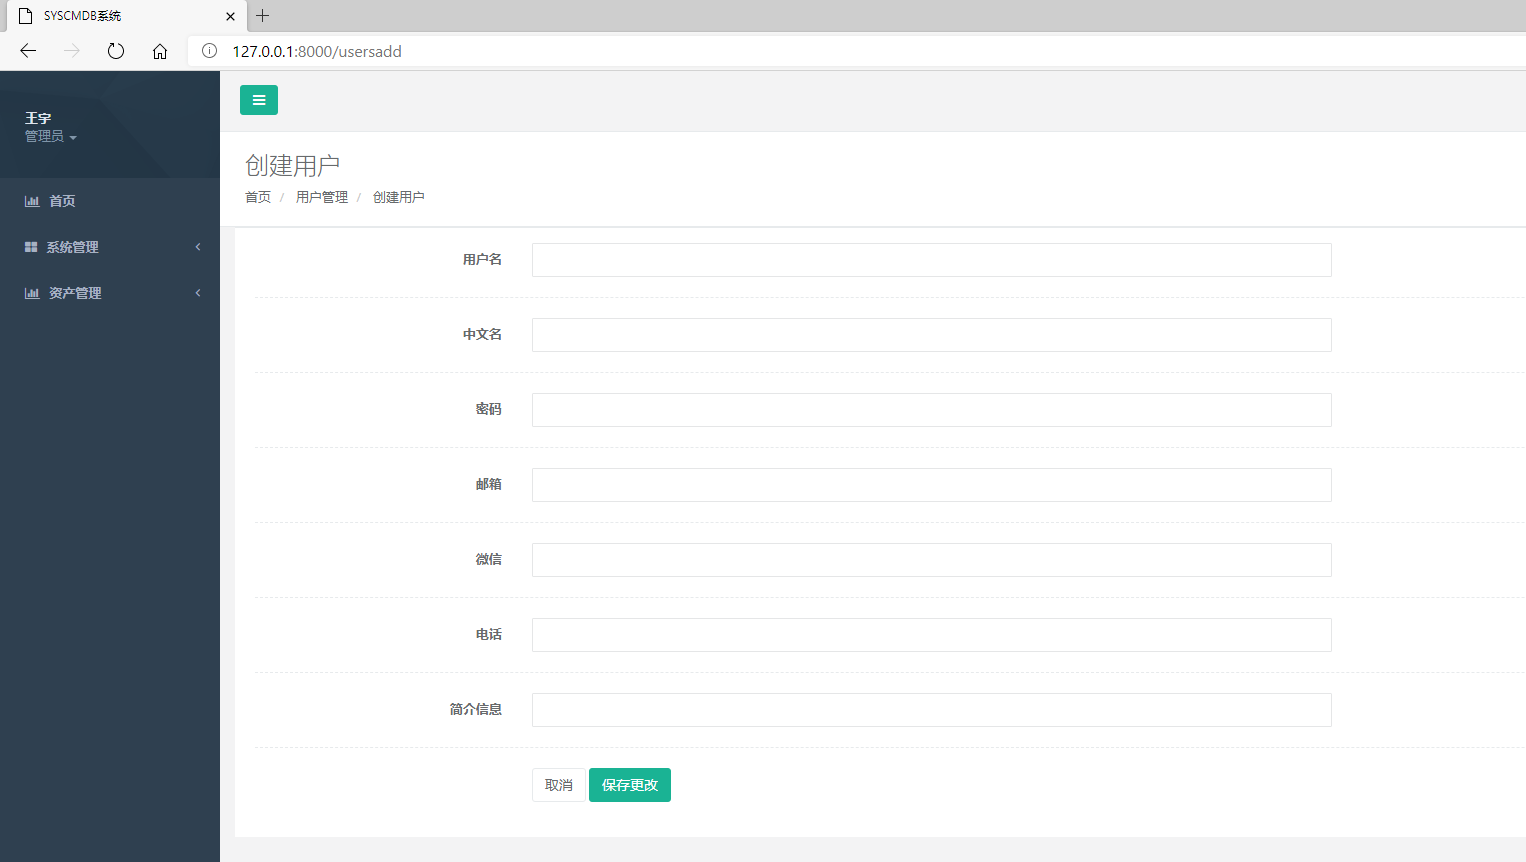
输入信息提交

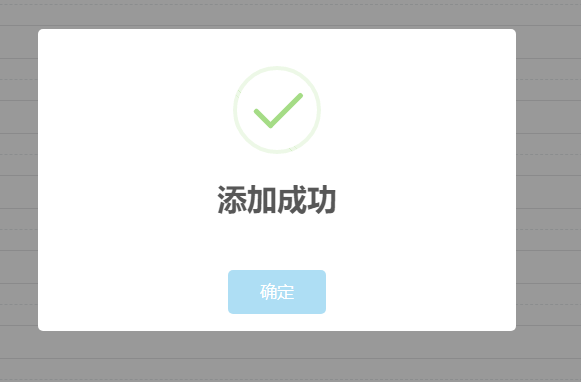
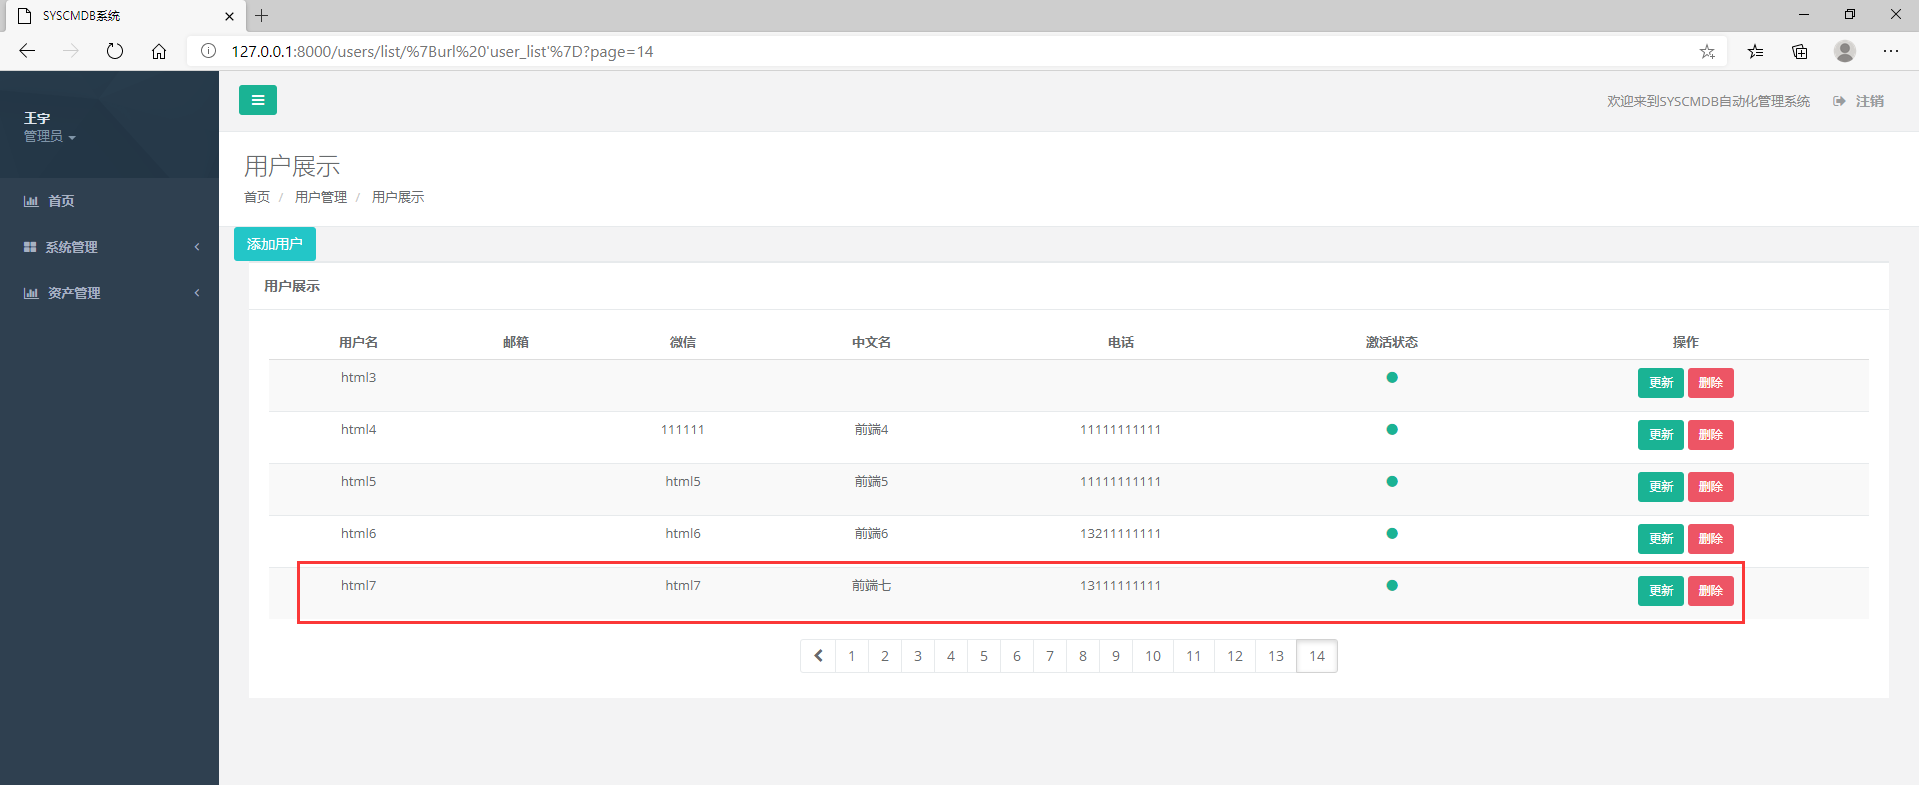
在用户列表最后一页
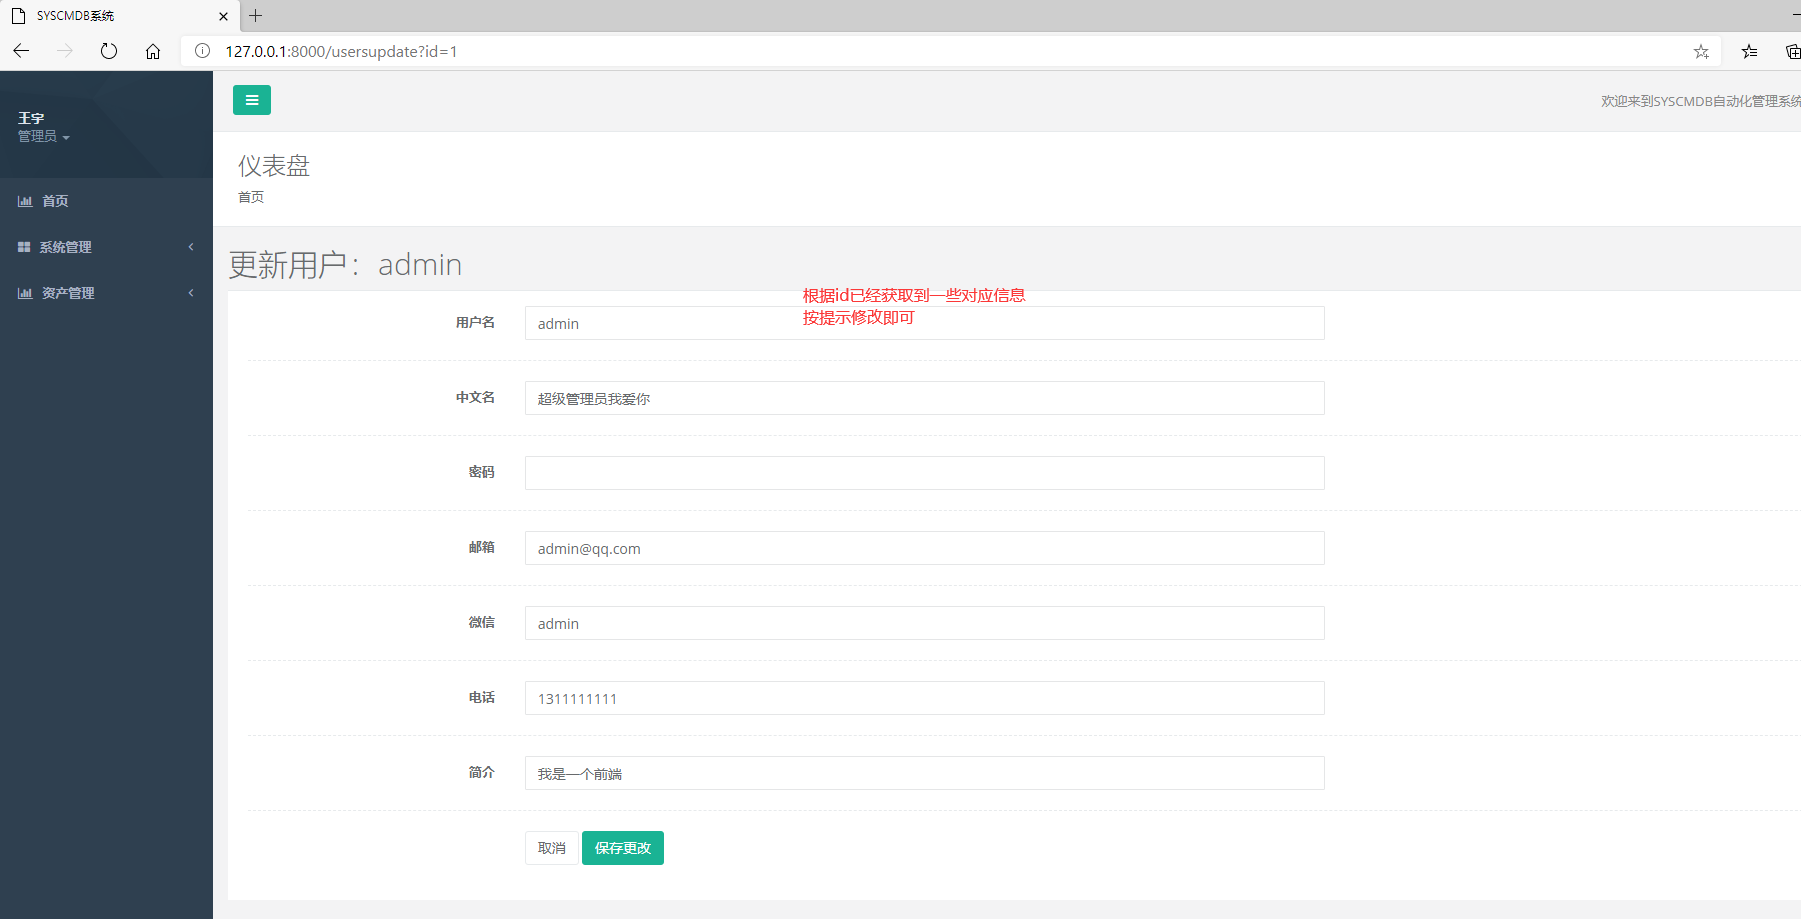
7,更新用户
①路由
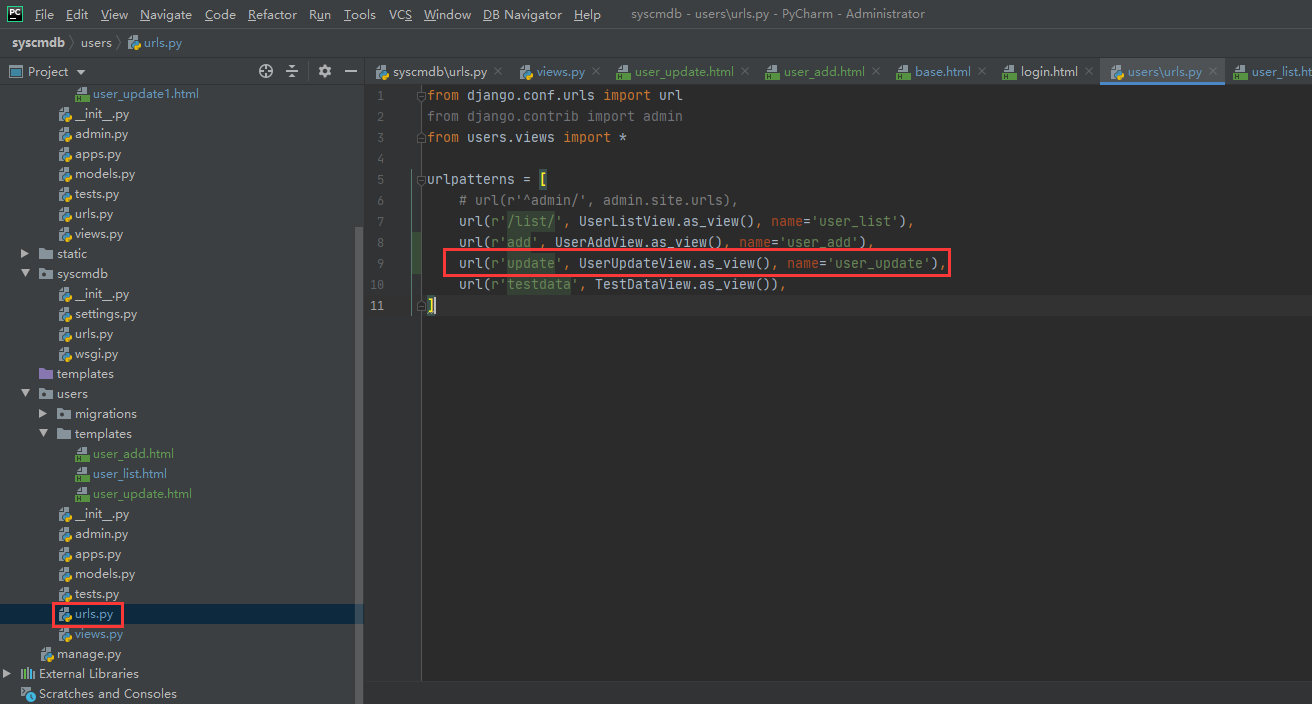
②视图
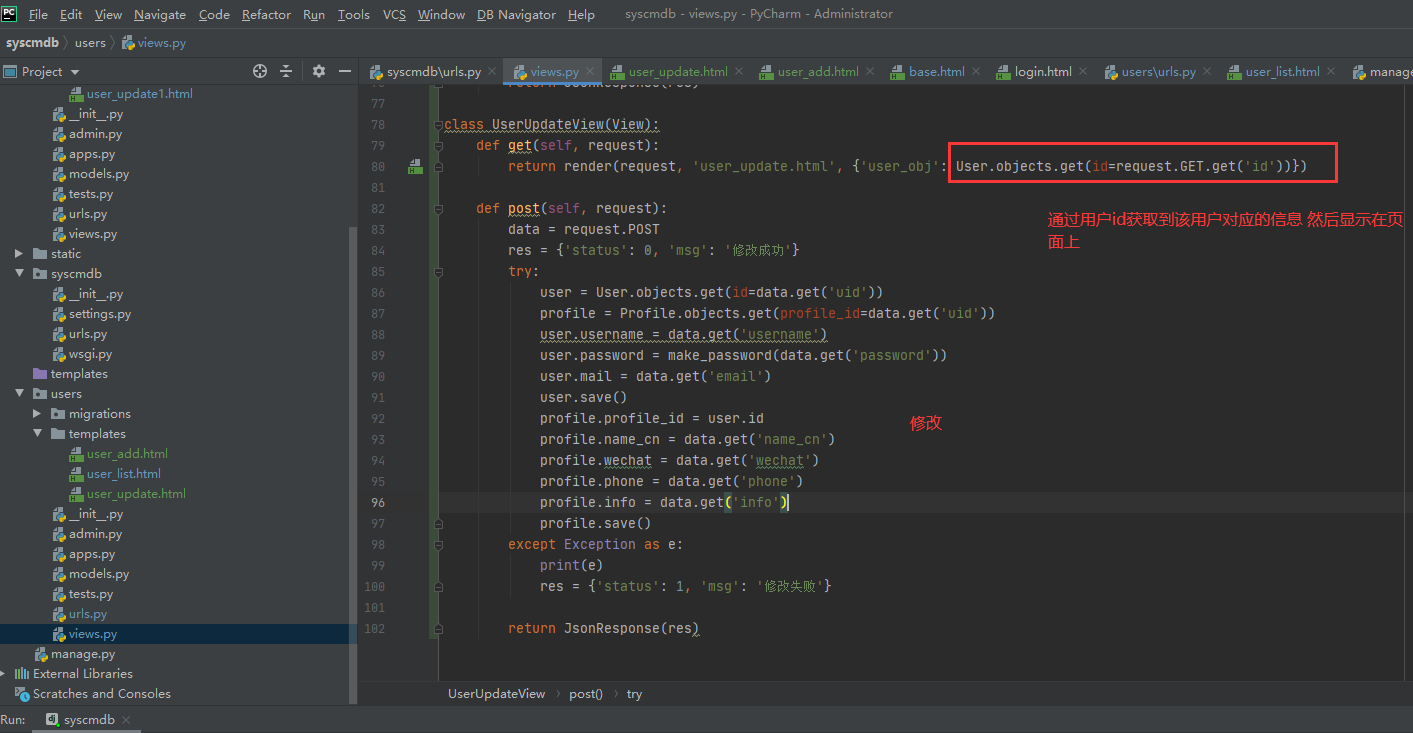
改视图由添加用户视图修改
1 2 3 4 5 6 7 8 9 10 11 12 13 14 15 16 17 18 19 20 21 22 23 24 25 | class UserUpdateView(View): def get(self, request): return render(request, 'user_update.html', {'user_obj': User.objects.get(id=request.GET.get('id'))}) def post(self, request): data = request.POST res = {'status': 0, 'msg': '修改成功'} try: user = User.objects.get(id=data.get('uid')) profile = Profile.objects.get(profile_id=data.get('uid')) user.username = data.get('username') user.password = make_password(data.get('password')) user.mail = data.get('email') user.save() profile.profile_id = user.id profile.name_cn = data.get('name_cn') profile.wechat = data.get('wechat') profile.phone = data.get('phone') profile.info = data.get('info') profile.save() except Exception as e: print(e) res = {'status': 1, 'msg': '修改失败'} return JsonResponse(res) |
③模板
user_list模板修改跳转链接
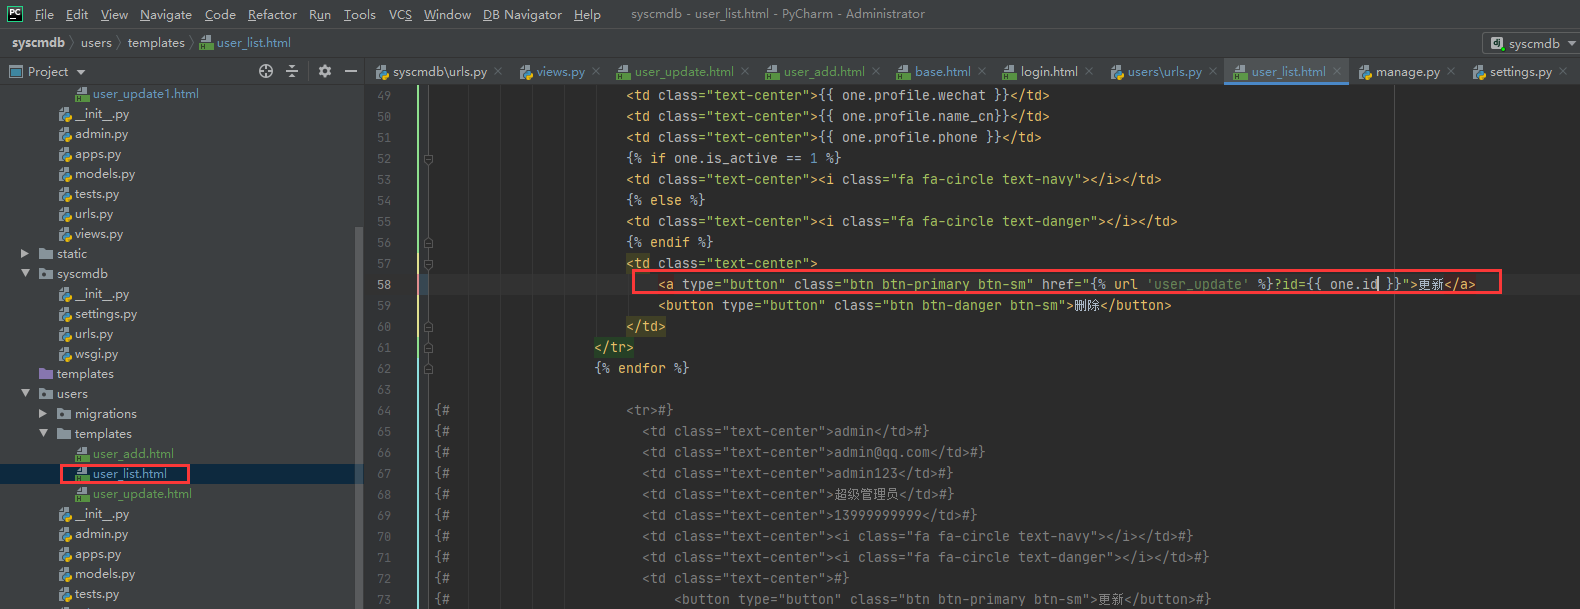
user_update.html模板 和user_add.html模板类似
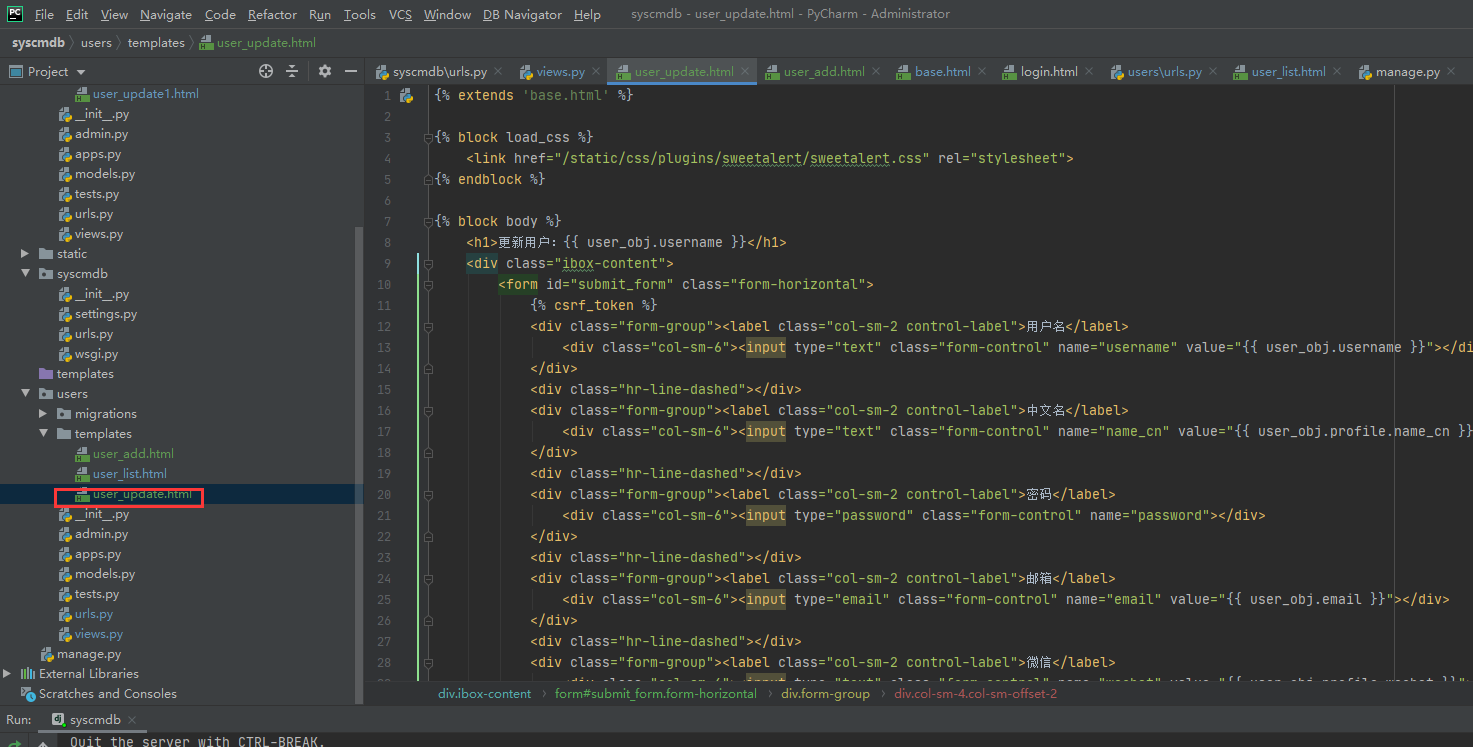
1 2 3 4 5 6 7 8 9 10 11 12 13 14 15 16 17 18 19 20 21 22 23 24 25 26 27 28 29 30 31 32 33 34 35 36 37 38 39 40 41 42 43 44 45 46 47 48 49 50 51 52 53 54 55 56 57 58 59 60 61 62 63 64 65 66 67 68 69 70 71 72 73 74 75 76 77 78 79 80 81 82 83 84 85 86 87 88 89 90 91 92 93 94 95 96 97 98 99 100 | {% extends 'base.html' %}{% block load_css %} <link href="/static/css/plugins/sweetalert/sweetalert.css" rel="stylesheet">{% endblock %}{% block body %} <h1>更新用户:{{ user_obj.username }}</h1> <div class="ibox-content"> <form id="submit_form" class="form-horizontal"> {% csrf_token %} <div class="form-group"><label class="col-sm-2 control-label">用户名</label> <div class="col-sm-6"><input type="text" class="form-control" name="username" value="{{ user_obj.username }}"></div> </div> <div class="hr-line-dashed"></div> <div class="form-group"><label class="col-sm-2 control-label">中文名</label> <div class="col-sm-6"><input type="text" class="form-control" name="name_cn" value="{{ user_obj.profile.name_cn }}"></div> </div> <div class="hr-line-dashed"></div> <div class="form-group"><label class="col-sm-2 control-label">密码</label> <div class="col-sm-6"><input type="password" class="form-control" name="password"></div> </div> <div class="hr-line-dashed"></div> <div class="form-group"><label class="col-sm-2 control-label">邮箱</label> <div class="col-sm-6"><input type="email" class="form-control" name="email" value="{{ user_obj.email }}"></div> </div> <div class="hr-line-dashed"></div> <div class="form-group"><label class="col-sm-2 control-label">微信</label> <div class="col-sm-6"><input type="text" class="form-control" name="wechat" value="{{ user_obj.profile.wechat }}"></div> </div> <div class="hr-line-dashed"></div> <div class="form-group"><label class="col-sm-2 control-label">电话</label> <div class="col-sm-6"><input type="text" class="form-control" name="phone" value="{{ user_obj.profile.phone }}"></div> </div> <div class="hr-line-dashed"></div> <div class="form-group"><label class="col-sm-2 control-label">简介</label> <div class="col-sm-6"><input type="text" class="form-control" name="info" value="{{ user_obj.profile.info }}"></div> </div> <div class="hr-line-dashed"></div> <div class="form-group"> <div class="col-sm-4 col-sm-offset-2"> <input type="hidden" value="{{ user_obj.id }}" name="uid"> <a class="btn btn-white" type="submit" href="javascript:history.back(-1)">取消</a> <button class="btn btn-primary" type="submit">保存更改</button> </div> </div> </form> </div>{% endblock %}{% block load_js %} <script src="/static/js/plugins/validate/jquery.validate.js"></script> <script src="/static/js/plugins/validate/messages_zh.js"></script> <script src="/static/js/plugins/sweetalert/sweetalert.min.js"></script> <script> $(document).ready(function () { $("#submit_form").validate({ rules: { name_cn: { required: true }, username: { required: true }, email: { required: true }, password: { required: true }, phone: { required: true }, wechat: { required: true } }, submitHandler: function () { var str = $('#submit_form').serialize(); $.post('{% url 'user_update' %}', str, function (res) { if (res.status == 0) { swal({ title: res.msg, type: 'success', confirmButtonText: "确定" }, function () { window.location.href = '{% url 'user_list' %}'; }); } else { swal({ title: res.msg, type: 'error', confirmButtonText: "确定" }); } }); } }); }); </script>{% endblock %} |
页面显示

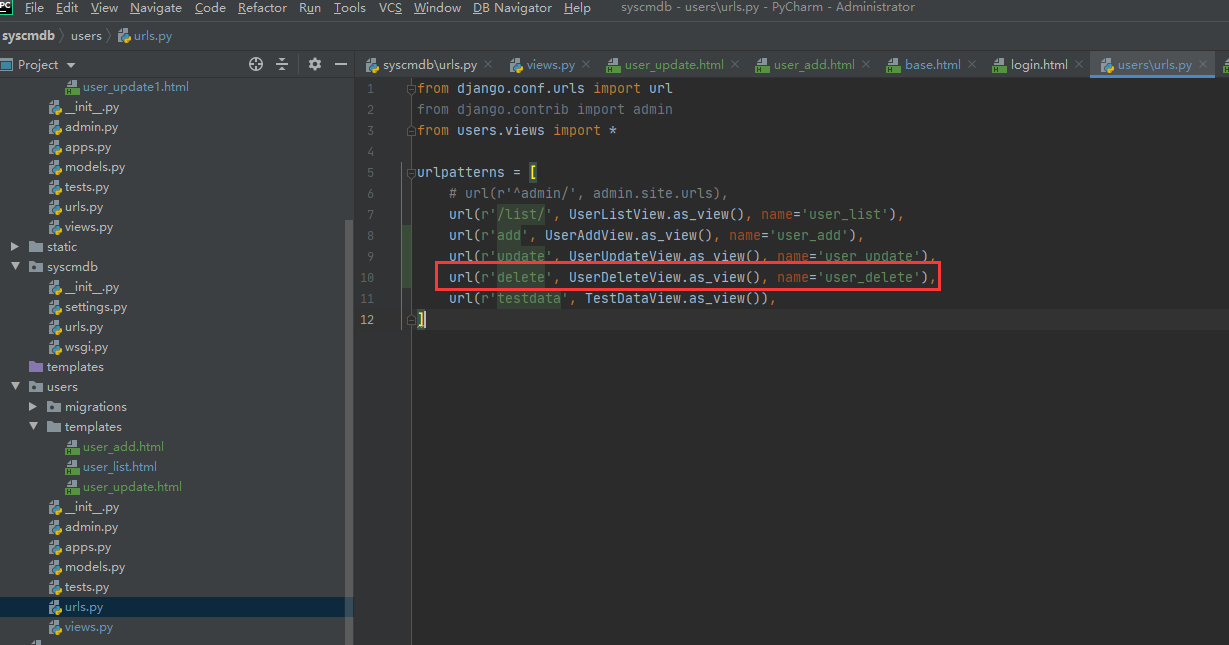
八,删除用户
①路由
②视图
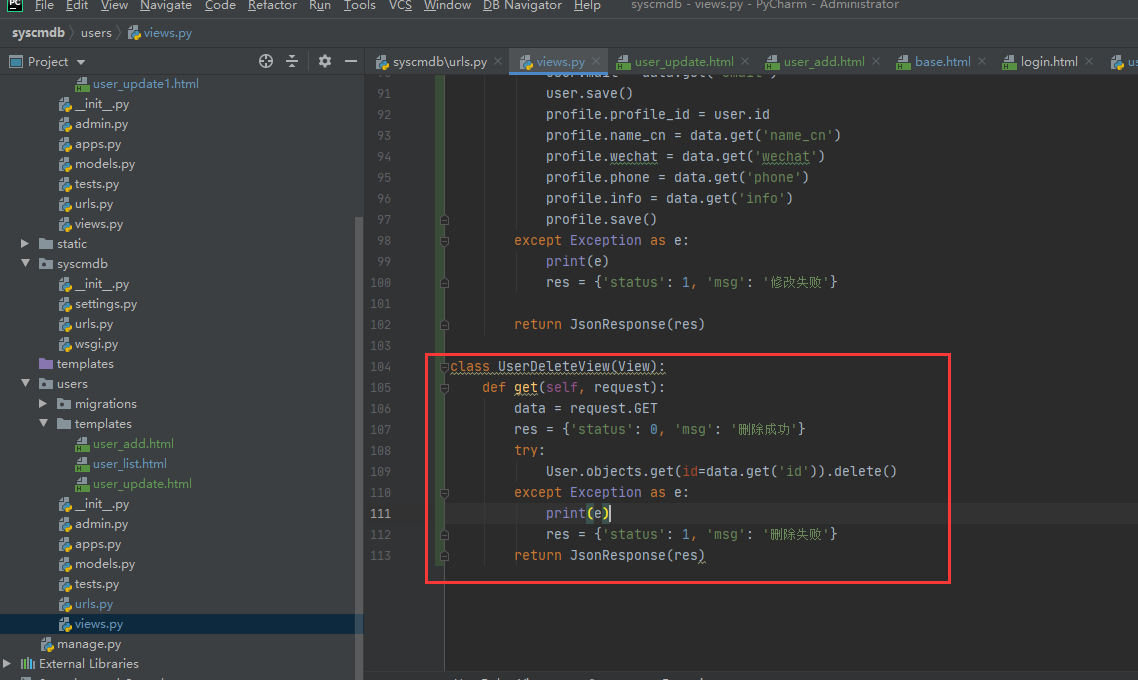
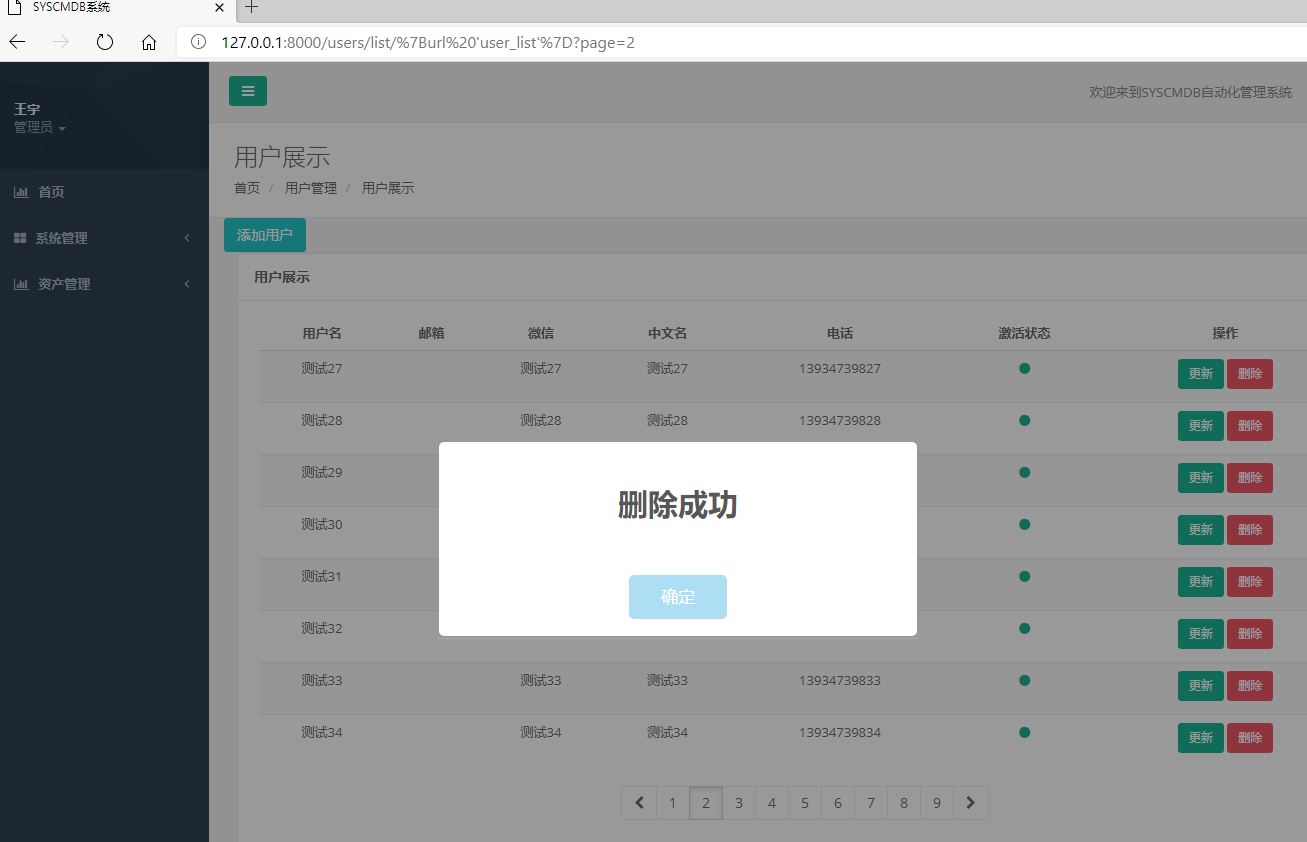
1 2 3 4 5 6 7 8 9 10 | class UserDeleteView(View): def get(self, request): data = request.GET res = {'status': 0, 'msg': '删除成功'} try: User.objects.get(id=data.get('id')).delete() except Exception as e: print(e) res = {'status': 1, 'msg': '删除失败'} return JsonResponse(res) |
③模板
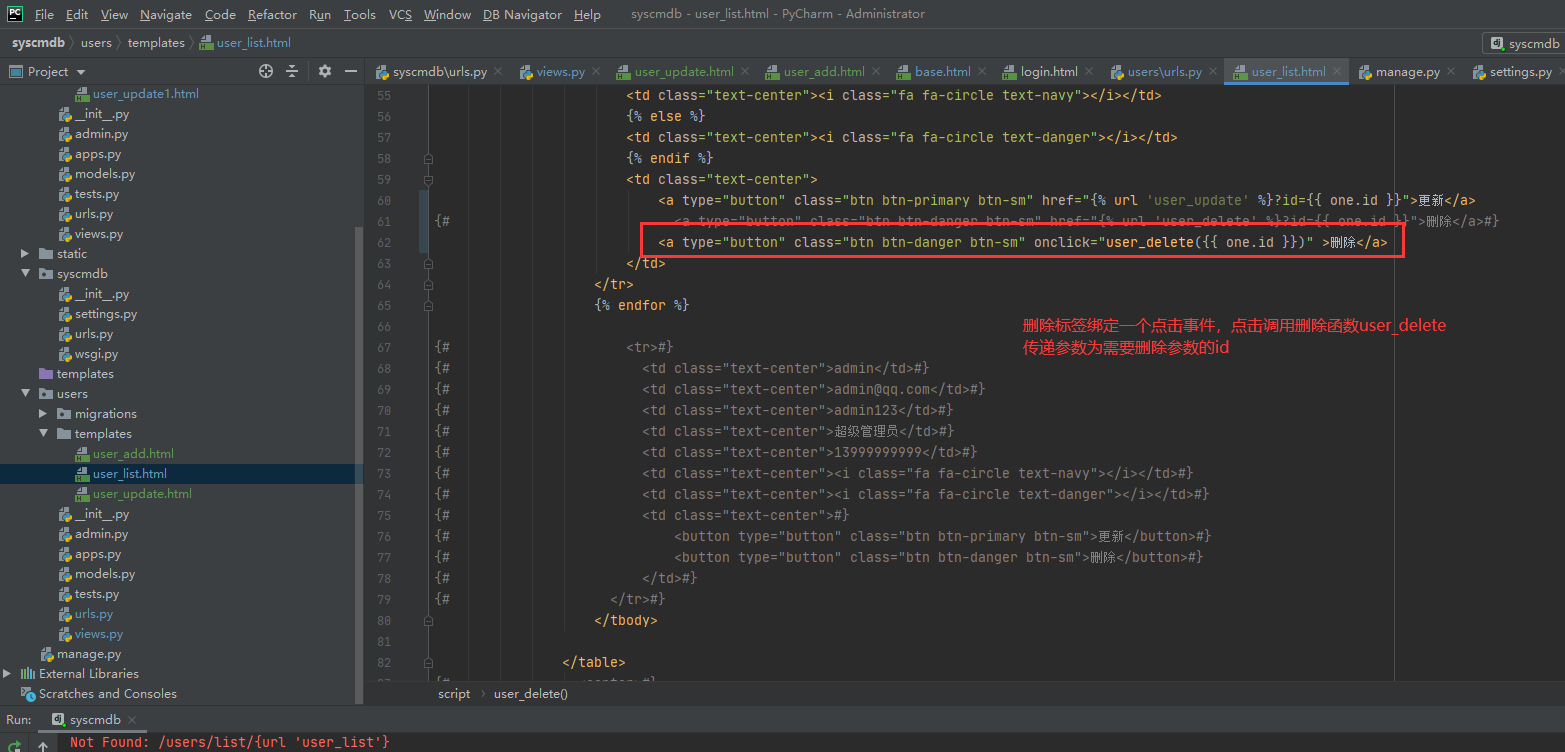
删除函数
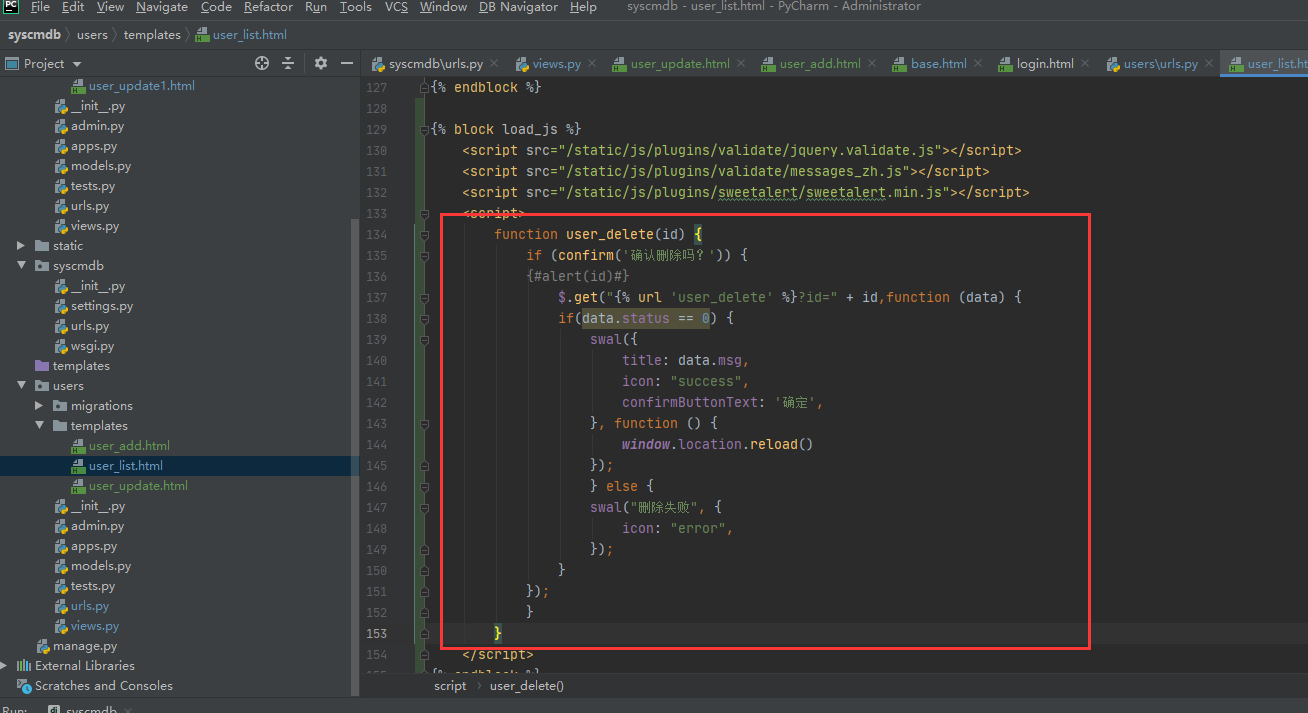
1 2 3 4 5 6 7 8 9 10 11 12 13 14 15 16 17 18 19 20 21 22 23 24 25 26 27 | {% block load_js %} <script src="/static/js/plugins/validate/jquery.validate.js"></script> <script src="/static/js/plugins/validate/messages_zh.js"></script> <script src="/static/js/plugins/sweetalert/sweetalert.min.js"></script> <script> function user_delete(id) { if (confirm('确认删除吗?')) { {#alert(id)#} $.get("{% url 'user_delete' %}?id=" + id,function (data) { if(data.status == 0) { swal({ title: data.msg, icon: "success", confirmButtonText: '确定', }, function () { window.location.reload() }); } else { swal("删除失败", { icon: "error", }); } }); } } </script>{% endblock %} |
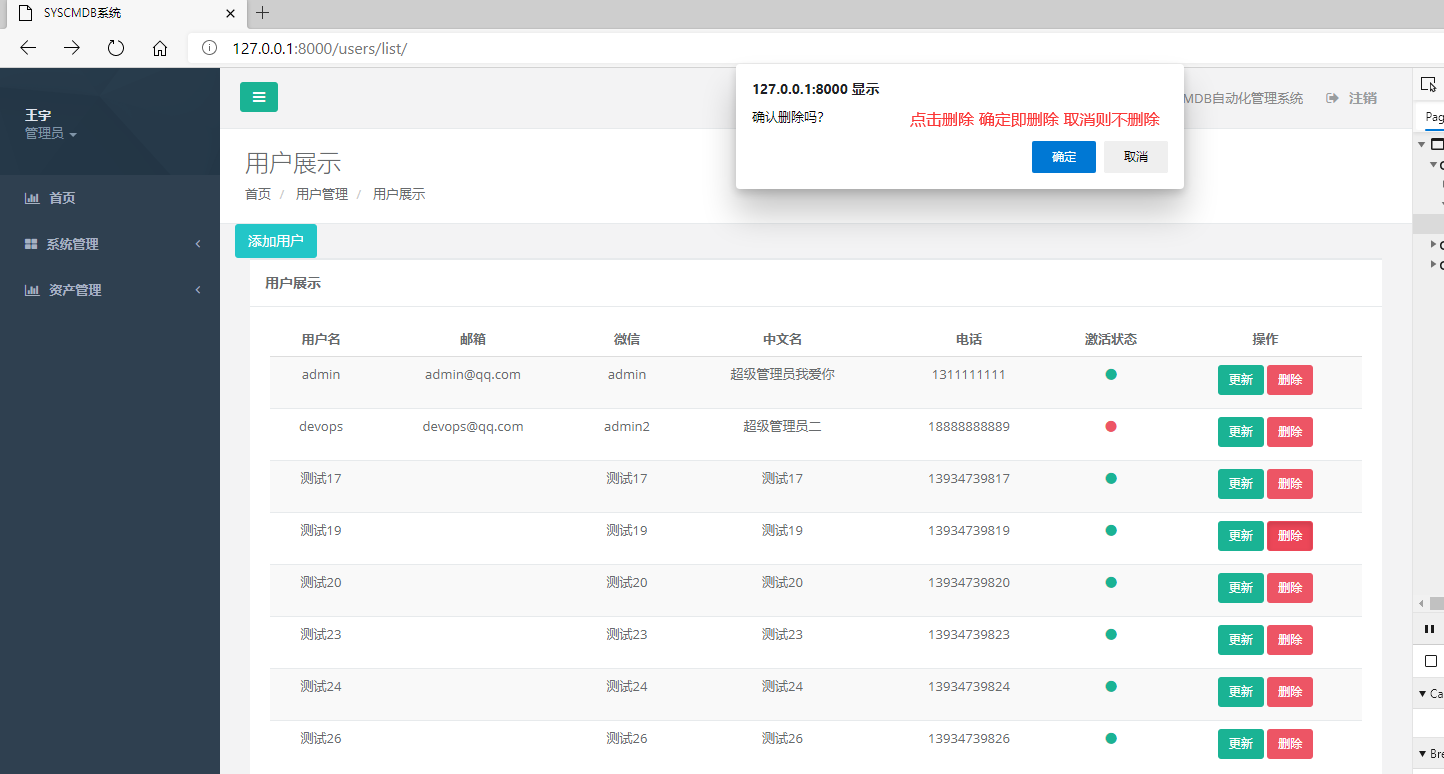
页面显示效果
9,禁用和启用用户
①路由

②视图
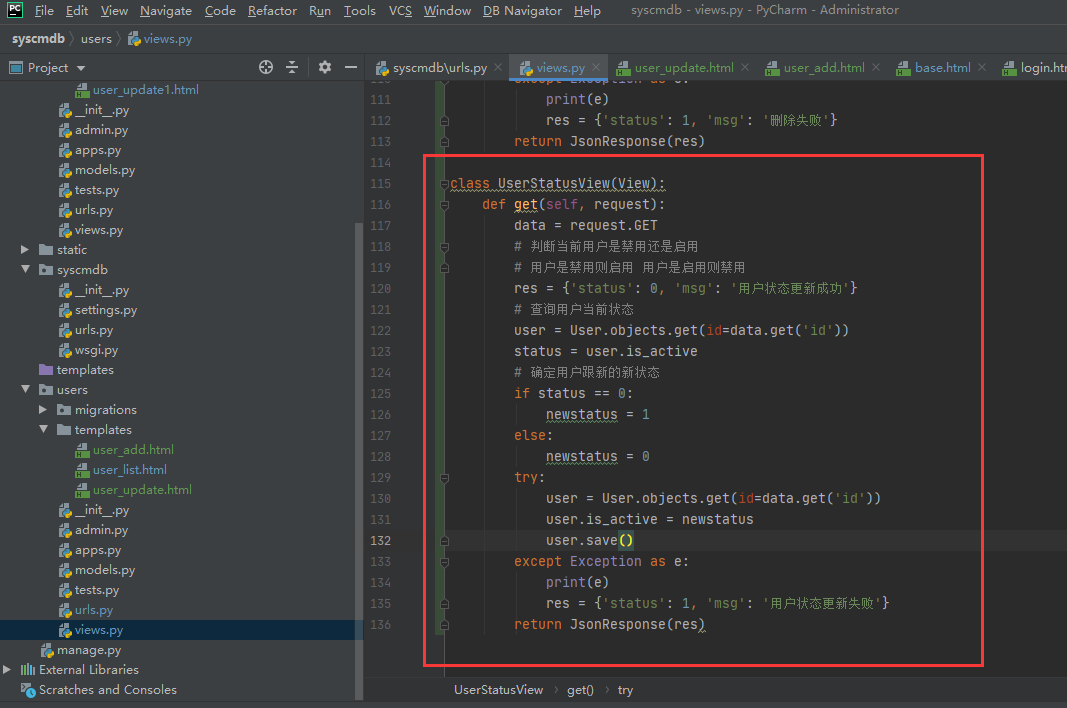
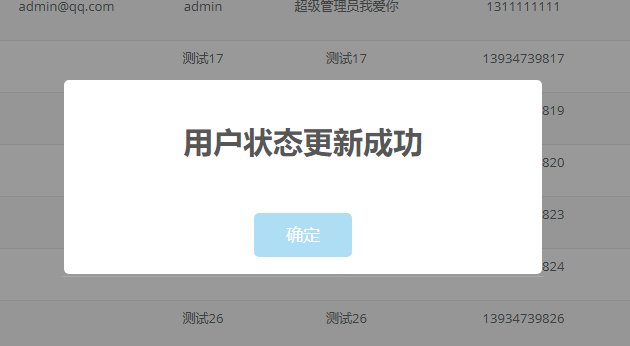
1 2 3 4 5 6 7 8 9 10 11 12 13 14 15 16 17 18 19 20 21 22 | class UserStatusView(View): def get(self, request): data = request.GET # 判断当前用户是禁用还是启用 # 用户是禁用则启用 用户是启用则禁用 res = {'status': 0, 'msg': '用户状态更新成功'} # 查询用户当前状态 user = User.objects.get(id=data.get('id')) status = user.is_active # 确定用户跟新的新状态 if status == 0: newstatus = 1 else: newstatus = 0 try: user = User.objects.get(id=data.get('id')) user.is_active = newstatus user.save() except Exception as e: print(e) res = {'status': 1, 'msg': '用户状态更新失败'} return JsonResponse(res) |
③模板
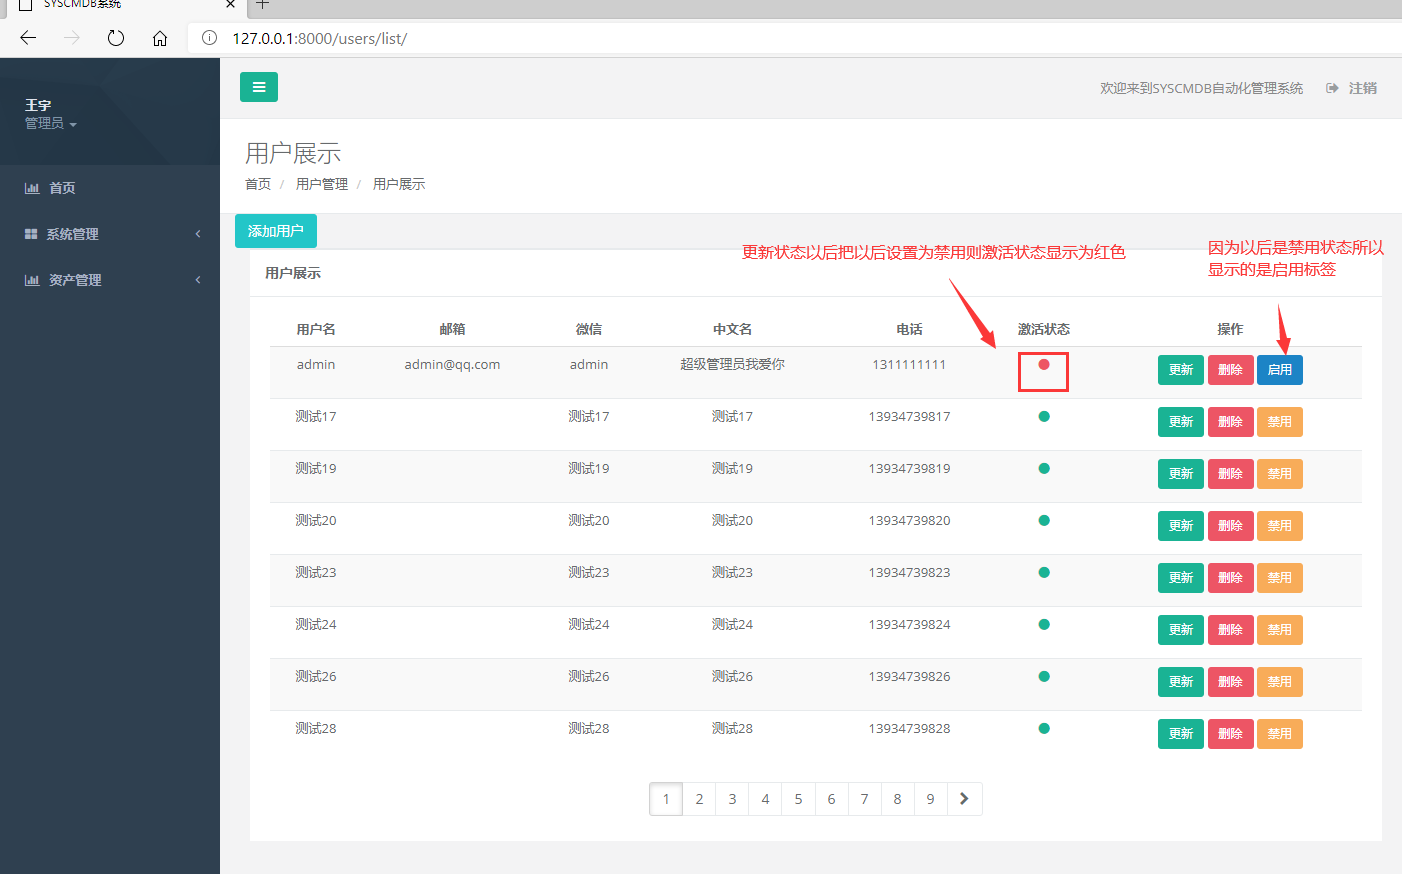
增加两个按钮,查询状态如果用户是启用状态则显示禁用按钮,如果用户是禁用状态则显示启用按钮
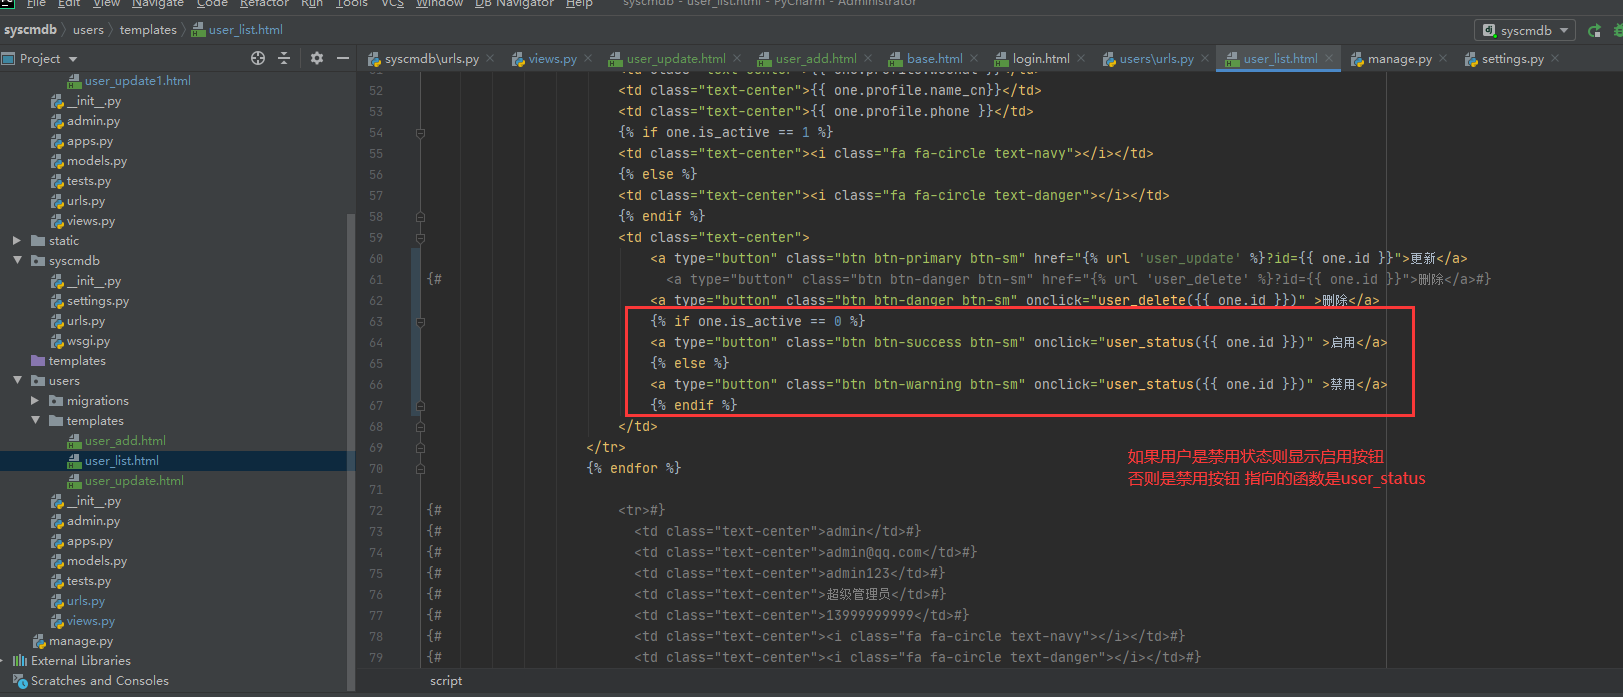
在<script>插入跟新状态函数
1 2 3 4 5 6 7 8 9 10 11 12 13 14 15 16 17 18 19 20 | function user_status(id) { $.get("{% url 'user_status' %}?id=" + id,function (data) { if(data.status == 0) { swal({ title: data.msg, icon: "success", confirmButtonText: '确定', }, function () { window.location.reload() }); } else { swal({ title: data.msg, icon: "error", confirmButtonText: '确定', },function () { }); } }); } |
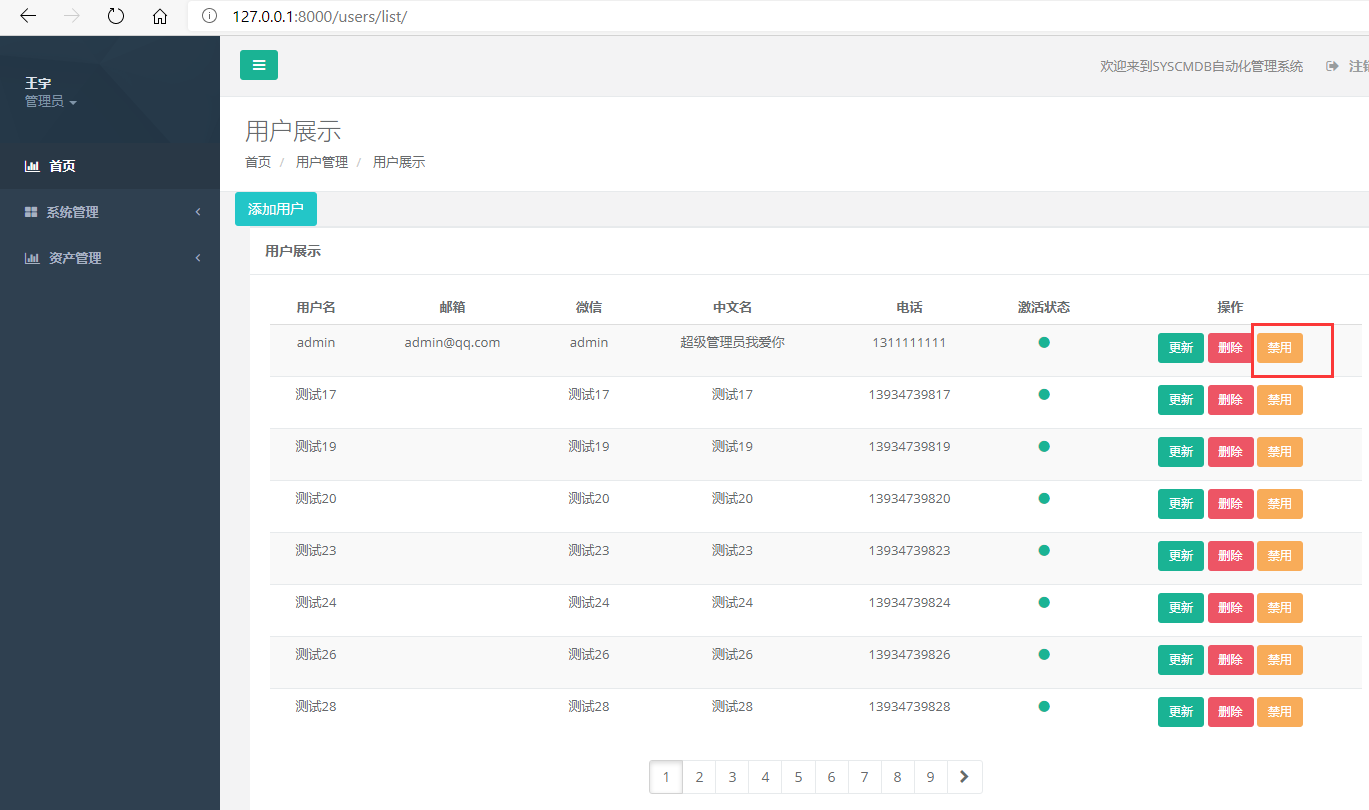
页面显示效果


【推荐】国内首个AI IDE,深度理解中文开发场景,立即下载体验Trae
【推荐】编程新体验,更懂你的AI,立即体验豆包MarsCode编程助手
【推荐】抖音旗下AI助手豆包,你的智能百科全书,全免费不限次数
【推荐】轻量又高性能的 SSH 工具 IShell:AI 加持,快人一步
· SQL Server 2025 AI相关能力初探
· Linux系列:如何用 C#调用 C方法造成内存泄露
· AI与.NET技术实操系列(二):开始使用ML.NET
· 记一次.NET内存居高不下排查解决与启示
· 探究高空视频全景AR技术的实现原理
· 阿里最新开源QwQ-32B,效果媲美deepseek-r1满血版,部署成本又又又降低了!
· AI编程工具终极对决:字节Trae VS Cursor,谁才是开发者新宠?
· 开源Multi-agent AI智能体框架aevatar.ai,欢迎大家贡献代码
· Manus重磅发布:全球首款通用AI代理技术深度解析与实战指南
· 被坑几百块钱后,我竟然真的恢复了删除的微信聊天记录!