

Heartbeat+DRBD+MySQL高可用方案
参考:https://www.cnblogs.com/gomysql/p/3674030.html
1,方案介绍
本方案采用Heartbeat双机热备软件来保证数据库的高稳定性和连续性,数据的一致性由DRBD这个工具来保证。默认情况下只有一台mysql在工作,当主mysql服务器出现问题后,系统将自动切换到备机上继续提供服务,当主数据库修复完毕,又将服务切回继续由主mysql提供服务。
2,方案优缺点
优点:安全性高、稳定性高、可用性高,出现故障自动切换。
缺点:只有一台服务器提供服务,成本相对较高,不方便扩展,可能会发生脑裂。
3,软件介绍
Heartbeat介绍
官方站点:http://linux-ha.org/wiki/Main_Page
heartbeat可以资源(VIP地址及程序服务)从一台有故障的服务器快速的转移到另一台正常的服务器提供服务,heartbeat和keepalived相似,heartbeat可以实现failover功能,但不能实现对后端的健康检查
heartbeat搭建参考:https://www.cnblogs.com/minseo/p/13322635.html
DRBD介绍
官方站点:http://www.drbd.org/
DRBD(DistributedReplicatedBlockDevice)是一个基于块设备级别在远程服务器直接同步和镜像数据的软件,用软件实现的、无共享的、服务器之间镜像块设备内容的存储复制解决方案。它可以实现在网络中两台服务器之间基于块设备级别的实时镜像或同步复制(两台服务器都写入成功)/异步复制(本地服务器写入成功),相当于网络的RAID1,由于是基于块设备(磁盘,LVM逻辑卷),在文件系统的底层,所以数据复制要比cp命令更快。DRBD已经被MySQL官方写入文档手册作为推荐的高可用的方案之一
DRBD搭建参考:https://www.cnblogs.com/minseo/p/13300398.html
4,方案拓扑

5,方案适用场景
适用于数据库访问量不太大,短期内访问量增长不会太快,对数据库可用性要求非常高的场景。
6,环境查看及规划
| 主机名 | ip | 系统 | DRBD磁盘 | heartbeat版本 |
| hdp3 | 192.168.1.101 | CentOS 7.5 | /dev/sdb | 3.0.6 |
| hdp4 | 192.168.1.102 | CentOS 7.5 | /dev/sdb | 3.0.6 |

7,软件安装及环境配置
首先设置好主机名及hosts
1 2 3 | # cat /etc/hosts192.168.1.101 hdp3192.168.1.102 hdp4 |
(1)安装DRBD
参考:https://www.cnblogs.com/minseo/p/13300398.html
安装过程不详述
查看配置文件
1 2 3 4 5 6 7 8 9 10 11 12 13 14 15 16 17 18 19 20 21 22 23 24 25 26 27 28 29 30 31 32 33 34 35 36 37 38 39 40 41 42 43 44 | # cat /etc/drbd.d/global_common.confglobal { usage-count yes; # minor-count dialog-refresh disable-ip-verification} common { protocol C; handlers { # These are EXAMPLE handlers only. # They may have severe implications, # like hard resetting the node under certain circumstances. # Be careful when chosing your poison. # pri-on-incon-degr "/usr/lib/drbd/notify-pri-on-incon-degr.sh; /usr/lib/drbd/notify-emergency-reboot.sh; echo b > /proc/sysrq-trigger ; reboot -f"; # pri-lost-after-sb "/usr/lib/drbd/notify-pri-lost-after-sb.sh; /usr/lib/drbd/notify-emergency-reboot.sh; echo b > /proc/sysrq-trigger ; reboot -f"; # local-io-error "/usr/lib/drbd/notify-io-error.sh; /usr/lib/drbd/notify-emergency-shutdown.sh; echo o > /proc/sysrq-trigger ; halt -f"; # fence-peer "/usr/lib/drbd/crm-fence-peer.sh"; # split-brain "/usr/lib/drbd/notify-split-brain.sh root"; # out-of-sync "/usr/lib/drbd/notify-out-of-sync.sh root"; # before-resync-target "/usr/lib/drbd/snapshot-resync-target-lvm.sh -p 15 -- -c 16k"; # after-resync-target /usr/lib/drbd/unsnapshot-resync-target-lvm.sh; } startup { wfc-timeout 240; degr-wfc-timeout 240; outdated-wfc-timeout 240; } disk { on-io-error detach; } net { cram-hmac-alg md5; shared-secret "testdrbd"; } syncer { rate 30M; }} |
1 2 3 4 5 6 7 8 9 10 11 12 13 14 15 16 17 18 | # cat /etc/drbd.d/r0.res resource r0 {on hdp3 { #这是Primary机器上的DRBD虚拟块设备,事先不要格式化 device /dev/drbd0; disk /dev/sdb; #DRBD监听的地址和端口。端口可以自己定义 address 192.168.1.101:7898; meta-disk internal; }on hdp4 { #这是Secondary机器上的DRBD虚拟块设备,事先不要格式化 device /dev/drbd0; disk /dev/sdb; address 192.168.1.102:7898; meta-disk internal; }} |
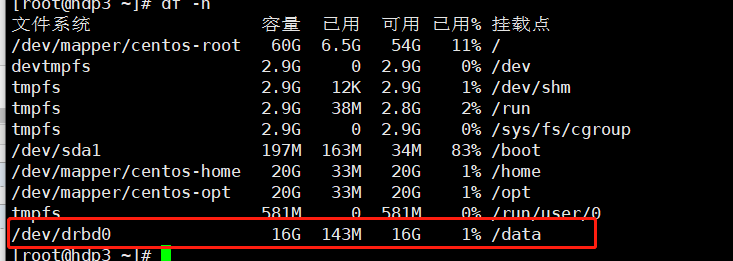
挂载目录为/data
(2)安装mysql
为了快速安装使用yum安装,两台主机均安装
安装参考:https://www.cnblogs.com/minseo/p/9045852.html
1 2 3 | wget http://dev.mysql.com/get/mysql-community-release-el7-5.noarch.rpmrpm -ivh mysql-community-release-el7-5.noarch.rpmyum install mysql-community-server |
修改配置
1 2 3 4 5 6 7 8 9 10 11 12 13 14 15 16 17 18 19 20 21 22 23 24 25 26 27 28 29 30 31 32 | # cat /etc/my.cnf# For advice on how to change settings please see# http://dev.mysql.com/doc/refman/5.6/en/server-configuration-defaults.html[mysqld]## Remove leading # and set to the amount of RAM for the most important data# cache in MySQL. Start at 70% of total RAM for dedicated server, else 10%.# innodb_buffer_pool_size = 128M## Remove leading # to turn on a very important data integrity option: logging# changes to the binary log between backups.# log_bin## Remove leading # to set options mainly useful for reporting servers.# The server defaults are faster for transactions and fast SELECTs.# Adjust sizes as needed, experiment to find the optimal values.# join_buffer_size = 128M# sort_buffer_size = 2M# read_rnd_buffer_size = 2Mdatadir=/data/mysqlsocket=/var/lib/mysql/mysql.sock# Disabling symbolic-links is recommended to prevent assorted security riskssymbolic-links=0# Recommended in standard MySQL setupsql_mode=NO_ENGINE_SUBSTITUTION,STRICT_TRANS_TABLES [mysqld_safe]log-error=/var/log/mysqld.logpid-file=/var/run/mysqld/mysqld.pid |
本次只修改是数据目录datadir=/data/mysql其他配置保存默认
注意:两台服务器上的mysql用户的uid和gid要一样。不然切换后会导致mysql数据目录的属主不正确而启动失败。
(3)安装heartbeat
安装参考:https://www.cnblogs.com/minseo/p/13322635.html
安装过程不详述
查看配置文件
1 2 3 | # sed '/#/d' /usr/local/heartbeat/etc/ha.d/authkeys auth 22 sha1 HI! |
1 2 3 4 5 6 7 8 9 10 11 12 13 14 15 16 | # sed '/#/d' /usr/local/heartbeat/etc/ha.d/ha.cfdebugfile /var/log/ha-debuglogfile /var/log/ha-loglogfacility local0keepalive 1deadtime 30warntime 10initdead 120udpport 694ucast eth0 192.168.1.102auto_failback offnode hdp3node hdp4ping 192.168.1.9respawn hacluster /usr/local/heartbeat/libexec/heartbeat/ipfailapiauth ipfail gid=haclient uid=hacluster |
创建drbd管理脚本(该脚本在老版本heartbeat自带,新版本需要创建)
1 2 3 4 5 6 7 8 9 10 11 12 13 14 15 16 17 18 19 20 21 22 23 24 25 26 27 28 29 30 31 32 33 34 35 36 37 38 39 40 41 42 43 44 45 46 47 48 49 50 51 52 53 54 55 56 57 58 59 60 61 62 63 64 65 66 67 68 69 70 71 72 73 74 75 76 77 78 79 80 81 82 83 84 85 86 87 88 89 90 91 92 93 94 95 96 97 98 99 100 101 102 103 104 105 106 107 108 109 110 111 112 113 114 115 116 117 118 119 120 121 122 123 124 125 126 127 128 129 130 131 132 133 134 | # cat /usr/local/heartbeat/etc/ha.d/resource.d/drbddisk #!/bin/bash## This script is inteded to be used as resource script by heartbeat## Copright 2003-2008 LINBIT Information Technologies# Philipp Reisner, Lars Ellenberg####DEFAULTFILE="/etc/default/drbd"DRBDADM="/sbin/drbdadm"if [ -f $DEFAULTFILE ]; then . $DEFAULTFILEfiif [ "$#" -eq 2 ]; then RES="$1" CMD="$2"else RES="all" CMD="$1"fi## EXIT CODES# since this is a "legacy heartbeat R1 resource agent" script,# exit codes actually do not matter that much as long as we conform to# http://wiki.linux-ha.org/HeartbeatResourceAgent# but it does not hurt to conform to lsb init-script exit codes,# where we can.# http://refspecs.linux-foundation.org/LSB_3.1.0/#LSB-Core-generic/LSB-Core-generic/iniscrptact.html####drbd_set_role_from_proc_drbd(){local outif ! test -e /proc/drbd; thenROLE="Unconfigured"returnfidev=$( $DRBDADM sh-dev $RES )minor=${dev#/dev/drbd}if [[ $minor = *[!0-9]* ]] ; then# sh-minor is only supported since drbd 8.3.1minor=$( $DRBDADM sh-minor $RES )fiif [[ -z $minor ]] || [[ $minor = *[!0-9]* ]] ; thenROLE=Unknownreturnfiif out=$(sed -ne "/^ *$minor: cs:/ { s/:/ /g; p; q; }" /proc/drbd); thenset -- $outROLE=${5%/**}: ${ROLE:=Unconfigured} # if it does not show upelseROLE=Unknownfi}case "$CMD" in start)# try several times, in case heartbeat deadtime# was smaller than drbd ping timetry=6while true; do$DRBDADM primary $RES && breaklet "--try" || exit 1 # LSB generic errorsleep 1done;; stop)# heartbeat (haresources mode) will retry failed stop# for a number of times in addition to this internal retry.try=3while true; do$DRBDADM secondary $RES && break# We used to lie here, and pretend success for anything != 11,# to avoid the reboot on failed stop recovery for "simple# config errors" and such. But that is incorrect.# Don't lie to your cluster manager.# And don't do config errors...let --try || exit 1 # LSB generic errorsleep 1done;; status)if [ "$RES" = "all" ]; then echo "A resource name is required for status inquiries." exit 10fiST=$( $DRBDADM role $RES )ROLE=${ST%/**}case $ROLE inPrimary|Secondary|Unconfigured)# expected;;*)# unexpected. whatever...# If we are unsure about the state of a resource, we need to# report it as possibly running, so heartbeat can, after failed# stop, do a recovery by reboot.# drbdsetup may fail for obscure reasons, e.g. if /var/lock/ is# suddenly readonly. So we retry by parsing /proc/drbd.drbd_set_role_from_proc_drbdesaccase $ROLE inPrimary)echo "running (Primary)"exit 0 # LSB status "service is OK";;Secondary|Unconfigured)echo "stopped ($ROLE)"exit 3 # LSB status "service is not running";;*)# NOTE the "running" in below message.# this is a "heartbeat" resource script,# the exit code is _ignored_.echo "cannot determine status, may be running ($ROLE)"exit 4 # LSB status "service status is unknown";;esac;; *)echo "Usage: drbddisk [resource] {start|stop|status}"exit 1;;esacexit 0 |
创建管理MySQL脚本
1 2 3 4 5 6 7 8 9 10 11 12 13 14 15 16 17 18 19 20 21 22 23 24 25 26 27 28 29 30 31 32 33 34 35 36 37 38 39 40 41 42 43 44 45 46 47 48 | # cat /usr/local/heartbeat/etc/ha.d/resource.d/mysql_heartbeat #!/bin/sh. /etc/init.d/functions[ $# -ne 1 ] && {echo "USAGE:{start|stop|restart}"exit 1}start(){if [ -e /var/run/mysqld/mysqld.pid ]then echo "MySQL is running."else /usr/sbin/mysqld --basedir=/usr --user=mysql --datadir=/data/mysql --plugin-dir=/usr/lib64/mysql/plugin --log-error=/var/log/mysqld.log --pid-file=/var/run/mysqld/mysqld.pid --socket=/var/lib/mysql/mysql.sock &>/dev/null & action "MySQL is starting" /bin/true exit 0fi}stop(){if [ -e /var/run/mysqld/mysqld.pid ]then /usr/bin/mysqladmin -uroot -S /var/lib/mysql/mysql.sock shutdown &>/dev/null action "MySQL is stoping" /bin/trueelse action "MySQL is stoping" /bin/false exit 1fi}restart(){ stop sleep 10 start}if [ "$1" == "start" ]then startelif [ "$1" == "stop" ]then stopelif [ "$1" == "restart" ]then restartelse echo "USAGE:{start|stop|restart}"fi |
heartbeat不能使用systemctl管理应用,测试该脚本可以使用参数start stop进行启动及停止测试
安装支持命令
1 | yum install -y psmisc |
不安装日志会提示没有fuser命令
haresources的配置(两台机器配置一样,不一样的是主机名)
1 2 | # cat /usr/local/heartbeat/etc/ha.d/haresources hdp3 IPaddr::192.168.1.100/24/eth0 drbddisk::r0 Filesystem::/dev/drbd0::/data::xfs mysql_heartbeat |
1 2 | # cat /usr/local/heartbeat/etc/ha.d/haresources hdp4 IPaddr::192.168.1.100/24/eth0 drbddisk::r0 Filesystem::/dev/drbd0::/data::xfs mysql_heartbeat |
启动测试
两台主机均启动heartbeat
1 | systemctl start heartbeat |
主服务器查看日志

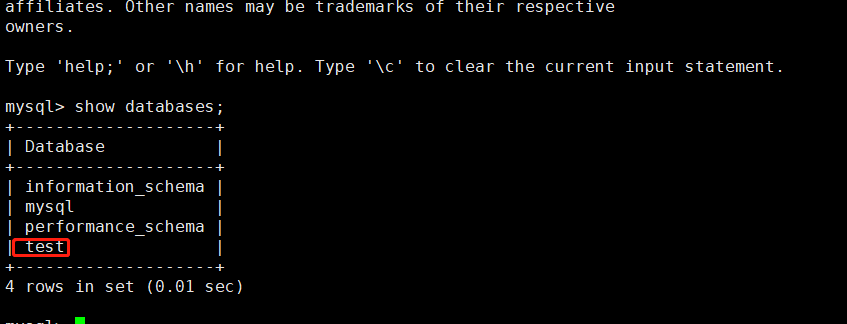
在主服务器创建一个测试数据库

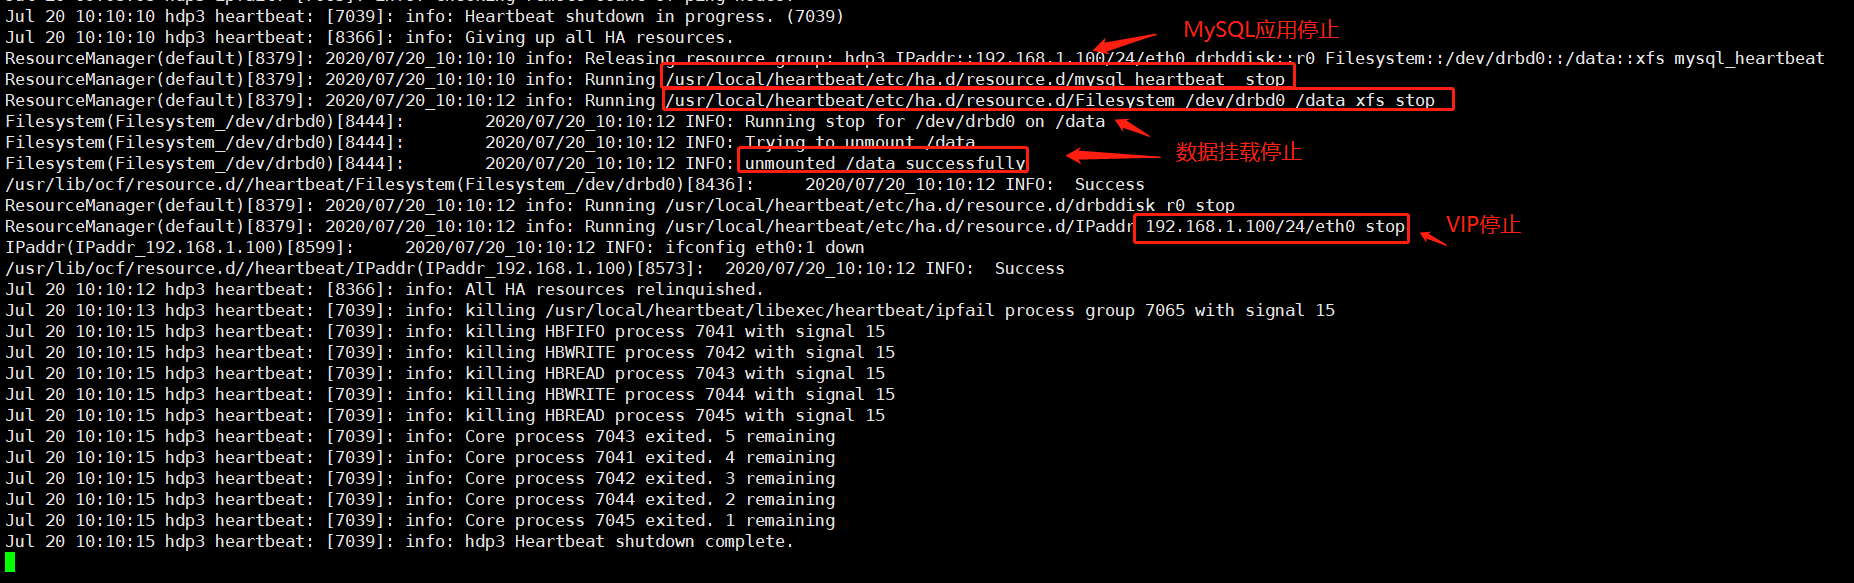
停止主服务器的heartbeat
查看主服务器日志
查看备服务器日志

查看数据库,有刚刚参加的库test
注意:heartbeat宕机或者是主服务器宕机可以自动切换,但是MySQL应用宕机无法自动切换,可以写一个脚本检测到MySQL有故障则停止heartbeat实现切换
1 2 3 4 5 6 7 8 9 | # cat check_mysql.sh #!/bin/bashwhile true do if [ `nmap 192.168.1.101 -p 3306|grep open|wc -l` -ne 1 ];then systemctl stop heartbeat fi sleep 5 done |


【推荐】国内首个AI IDE,深度理解中文开发场景,立即下载体验Trae
【推荐】编程新体验,更懂你的AI,立即体验豆包MarsCode编程助手
【推荐】抖音旗下AI助手豆包,你的智能百科全书,全免费不限次数
【推荐】轻量又高性能的 SSH 工具 IShell:AI 加持,快人一步
· SQL Server 2025 AI相关能力初探
· Linux系列:如何用 C#调用 C方法造成内存泄露
· AI与.NET技术实操系列(二):开始使用ML.NET
· 记一次.NET内存居高不下排查解决与启示
· 探究高空视频全景AR技术的实现原理
· 阿里最新开源QwQ-32B,效果媲美deepseek-r1满血版,部署成本又又又降低了!
· AI编程工具终极对决:字节Trae VS Cursor,谁才是开发者新宠?
· 开源Multi-agent AI智能体框架aevatar.ai,欢迎大家贡献代码
· Manus重磅发布:全球首款通用AI代理技术深度解析与实战指南
· 被坑几百块钱后,我竟然真的恢复了删除的微信聊天记录!