使用Docker和K8s搭建ELK日志收集系统
环境查看
# cat /etc/redhat-release
CentOS Linux release 7.5.1804 (Core)
[root@localhost elasticsearch]# uname -a
Linux localhost.localdomain 3.10.0-862.el7.x86_64 #1 SMP Fri Apr 20 16:44:24 UTC 2018 x86_64 x86_64 x86_64 GNU/Linux
[root@localhost elasticsearch]# docker info
Client:
 Debug Mode: false

Server:
 Containers: 1
  Running: 1
  Paused: 0
  Stopped: 0
 Images: 5
 Server Version: 19.03.8
 Storage Driver: overlay2
  Backing Filesystem: <unknown>
  Supports d_type: true
  Native Overlay Diff: true
 Logging Driver: json-file
 Cgroup Driver: cgroupfs
 Plugins:
  Volume: local
  Network: bridge host ipvlan macvlan null overlay
  Log: awslogs fluentd gcplogs gelf journald json-file local logentries splunk syslog
 Swarm: inactive
 Runtimes: runc
 Default Runtime: runc
 Init Binary: docker-init
 containerd version: 7ad184331fa3e55e52b890ea95e65ba581ae3429
 runc version: dc9208a3303feef5b3839f4323d9beb36df0a9dd
 init version: fec3683
 Security Options:
  seccomp
   Profile: default
 Kernel Version: 3.10.0-862.el7.x86_64
 Operating System: CentOS Linux 7 (Core)
 OSType: linux
 Architecture: x86_64
 CPUs: 1
 Total Memory: 5.67GiB
 Name: localhost.localdomain
 ID: PGGH:4IF4:TXUV:3CSM:LZZY:KVTA:FONM:WJIO:KVME:YYJJ:55IZ:WR7Q
 Docker Root Dir: /var/lib/docker
 Debug Mode: false
 Registry: https://index.docker.io/v1/
 Labels:
 Experimental: false
 Insecure Registries:
  192.168.1.11
  192.168.1.61
  127.0.0.0/8
 Registry Mirrors:
  https://7sl94zzz.mirror.aliyuncs.com/
 Live Restore Enabled: false
使用Docker搭建ELK日志收集系统
搭建单机日志收集系统
下载镜像
下载elasticsearch和kibana镜像
docker pull docker.elastic.co/elasticsearch/elasticsearch:6.6.2
docker pull docker.elastic.co/kibana/kibana:6.6.2
设置elasticsearch配置文件
# cat elasticsearch.yml
cluster.name: myes
#node.name: node-1
path.data: /usr/share/elasticsearch/data
#path.logs: /var/log/elasticsearch
bootstrap.memory_lock: false
network.host: 0.0.0.0
http.port: 9200
挂载数据目录需要事先创建,本次创建挂载目录与容器目录路径一致
mkdir -p /usr/share/elasticsearch/data/
启动elasticsearch
docker run -d --name elasticsearch -p 9200:9200 -p 9300:9300 -e "discovery.type=single-node" -v /nas/nas/scripts/docker_es_kibana/elasticsearch/elasticsearch.yml:/usr/share/elasticsearch/config/elasticsearch.yml -v /usr/share/elasticsearch/data:/usr/share/elasticsearch/data docker.elastic.co/elasticsearch/elasticsearch:6.6.2
参数解析
docker run -d #后台启动
--name elasticsearch #容器命名
-p 9200:9200 -p 9300:9300 #映射到主机的端口
-e "discovery.type=single-node" #设置环境为单node模式
-v /nas/nas/scripts/docker_es_kibana/elasticsearch/elasticsearch.yml:/usr/share/elasticsearch/config/elasticsearch.yml #挂载配置文件
-v /usr/share/elasticsearch/data:/usr/share/elasticsearch/data#挂载数据目录 docker.elastic.co/elasticsearch/elasticsearch:6.6.2#使用镜像启动
查看是否启动

访问测试
# curl 192.168.1.227:9200
{
  "name" : "4GGPsYy",
  "cluster_name" : "myes            ",
  "cluster_uuid" : "dIkPP_6JTOiOIK_3pFCYFg",
  "version" : {
    "number" : "6.6.2",
    "build_flavor" : "default",
    "build_type" : "tar",
    "build_hash" : "3bd3e59",
    "build_date" : "2019-03-06T15:16:26.864148Z",
    "build_snapshot" : false,
    "lucene_version" : "7.6.0",
    "minimum_wire_compatibility_version" : "5.6.0",
    "minimum_index_compatibility_version" : "5.0.0"
  },
  "tagline" : "You Know, for Search"
}
数据目录有对应数据
# tree /usr/share/elasticsearch/data/nodes/
/usr/share/elasticsearch/data/nodes/
└── 0
    ├── indices
    │   ├── H8PfvdGxQWqrKlbtUwNqQQ
    │   │   ├── 0
    │   │   │   ├── index
    │   │   │   │   ├── _0.cfe
    │   │   │   │   ├── _0.cfs
    │   │   │   │   ├── _0.si
    │   │   │   │   ├── segments_4
    │   │   │   │   └── write.lock
    │   │   │   ├── _state
    │   │   │   │   └── state-1.st
    │   │   │   └── translog
    │   │   │       ├── translog-1.ckp
    │   │   │       ├── translog-1.tlog
    │   │   │       ├── translog-2.ckp
    │   │   │       ├── translog-2.tlog
    │   │   │       ├── translog-3.ckp
    │   │   │       ├── translog-3.tlog
    │   │   │       ├── translog-4.tlog
    │   │   │       └── translog.ckp
    │   │   ├── 1
    │   │   │   ├── index
    │   │   │   │   ├── _0.cfe
    │   │   │   │   ├── _0.cfs
    │   │   │   │   ├── _0.si
    │   │   │   │   ├── segments_4
    │   │   │   │   └── write.lock
    │   │   │   ├── _state
    │   │   │   │   └── state-1.st
    │   │   │   └── translog
    │   │   │       ├── translog-1.ckp
    │   │   │       ├── translog-1.tlog
    │   │   │       ├── translog-2.ckp
    │   │   │       ├── translog-2.tlog
    │   │   │       ├── translog-3.ckp
    │   │   │       ├── translog-3.tlog
    │   │   │       ├── translog-4.tlog
    │   │   │       └── translog.ckp
    │   │   ├── 2
    │   │   │   ├── index
    │   │   │   │   ├── _0.cfe
    │   │   │   │   ├── _0.cfs
    │   │   │   │   ├── _0.si
    │   │   │   │   ├── segments_4
    │   │   │   │   └── write.lock
    │   │   │   ├── _state
    │   │   │   │   └── state-1.st
    │   │   │   └── translog
    │   │   │       ├── translog-1.ckp
    │   │   │       ├── translog-1.tlog
    │   │   │       ├── translog-2.ckp
    │   │   │       ├── translog-2.tlog
    │   │   │       ├── translog-3.ckp
    │   │   │       ├── translog-3.tlog
    │   │   │       ├── translog-4.tlog
    │   │   │       └── translog.ckp
    │   │   ├── 3
    │   │   │   ├── index
    │   │   │   │   ├── _0.cfe
    │   │   │   │   ├── _0.cfs
    │   │   │   │   ├── _0.si
    │   │   │   │   ├── segments_4
    │   │   │   │   └── write.lock
    │   │   │   ├── _state
    │   │   │   │   └── state-1.st
    │   │   │   └── translog
    │   │   │       ├── translog-1.ckp
    │   │   │       ├── translog-1.tlog
    │   │   │       ├── translog-2.ckp
    │   │   │       ├── translog-2.tlog
    │   │   │       ├── translog-3.ckp
    │   │   │       ├── translog-3.tlog
    │   │   │       ├── translog-4.tlog
    │   │   │       └── translog.ckp
    │   │   ├── 4
    │   │   │   ├── index
    │   │   │   │   ├── _0.cfe
    │   │   │   │   ├── _0.cfs
    │   │   │   │   ├── _0.si
    │   │   │   │   ├── _1.cfe
    │   │   │   │   ├── _1.cfs
    │   │   │   │   ├── _1.si
    │   │   │   │   ├── segments_4
    │   │   │   │   └── write.lock
    │   │   │   ├── _state
    │   │   │   │   └── state-1.st
    │   │   │   └── translog
    │   │   │       ├── translog-1.ckp
    │   │   │       ├── translog-1.tlog
    │   │   │       ├── translog-2.ckp
    │   │   │       ├── translog-2.tlog
    │   │   │       ├── translog-3.ckp
    │   │   │       ├── translog-3.tlog
    │   │   │       ├── translog-4.tlog
    │   │   │       └── translog.ckp
    │   │   └── _state
    │   │       └── state-9.st
    │   └── M7yC3_RVS86dex_vcGbHZw
    │       ├── 0
    │       │   ├── index
    │       │   │   ├── _0.cfe
    │       │   │   ├── _0.cfs
    │       │   │   ├── _0.si
    │       │   │   ├── _2.cfe
    │       │   │   ├── _2.cfs
    │       │   │   ├── _2.si
    │       │   │   ├── _4.cfe
    │       │   │   ├── _4.cfs
    │       │   │   ├── _4.si
    │       │   │   ├── _a.cfe
    │       │   │   ├── _a.cfs
    │       │   │   ├── _a.si
    │       │   │   ├── segments_6
    │       │   │   └── write.lock
    │       │   ├── _state
    │       │   │   └── state-1.st
    │       │   └── translog
    │       │       ├── translog-1.ckp
    │       │       ├── translog-1.tlog
    │       │       ├── translog-2.ckp
    │       │       ├── translog-2.tlog
    │       │       ├── translog-3.ckp
    │       │       ├── translog-3.tlog
    │       │       ├── translog-4.ckp
    │       │       ├── translog-4.tlog
    │       │       ├── translog-5.tlog
    │       │       └── translog.ckp
    │       └── _state
    │           └── state-7.st
    ├── node.lock
    └── _state
        ├── global-15.st
        └── node-1.st

31 directories, 103 files
启动kibana服务
设置kibana配置文件
# cat kibana.yml
server.port: 5601
server.host: "0.0.0.0"
elasticsearch.hosts: ["http://192.168.1.227:9200"]
kibana.index: ".kibana"
启动kibana服务容器
docker run -d --name kibana -p 5601:5601 -v /nas/nas/scripts/docker_es_kibana/kibana/kibana.yml:/usr/share/kibana/config/kibana.yml docker.elastic.co/kibana/kibana:6.6.2
参数解析
docker run -d#后台启动
--name kibana #定义容器名称
-p 5601:5601 #映射端口
-v /nas/nas/scripts/docker_es_kibana/kibana/kibana.yml:/usr/share/kibana/config/kibana.yml #挂载配置文件
docker.elastic.co/kibana/kibana:6.6.2 #使用kibana容器镜像
查看是否启动

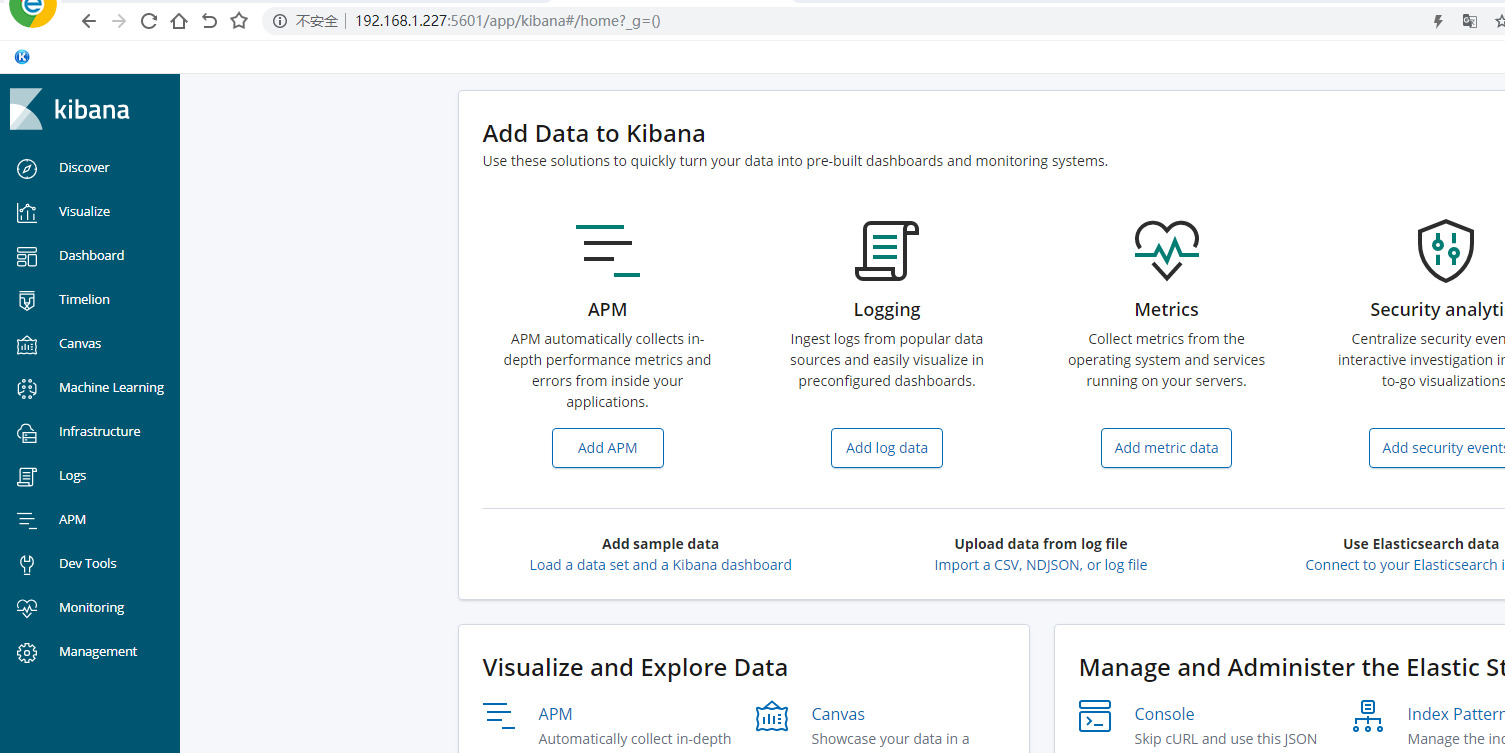
web页面访问测试
使用k8s搭建ELK日志收集系统
为搭建方便本次使用k8s搭建不挂载存储,使用私有化docker镜像仓库harbor
创建elasticsearch的yaml配置文件,使用有状态部署
# cat es-statefulset.yaml
apiVersion: apps/v1
kind: StatefulSet
metadata:
  labels:
    app: es
  name: es
spec:
  replicas: 1
  serviceName: "es"
  selector:
    matchLabels:
      app: es
  template:
    metadata:
      labels:
        app: es
    spec:
      imagePullSecrets:
      - name: registry-pull-secret
      containers:
      - image: 192.168.1.61/project/elasticsearch:6.6.2
        imagePullPolicy: Always
        name: elasticsearch
创建
kubectl apply -f es-statefulset.yaml
查看pod
# kubectl get pod -o wide
NAME                     READY   STATUS    RESTARTS   AGE   IP            NODE           NOMINATED NODE   READINESS GATES
es-0                     1/1     Running   0          16m   172.17.84.2   192.168.1.66   <none>           <none>
nginx-86c57db685-lfv7n   1/1     Running   1          16d   172.17.21.2   192.168.1.65   <none>           <none>
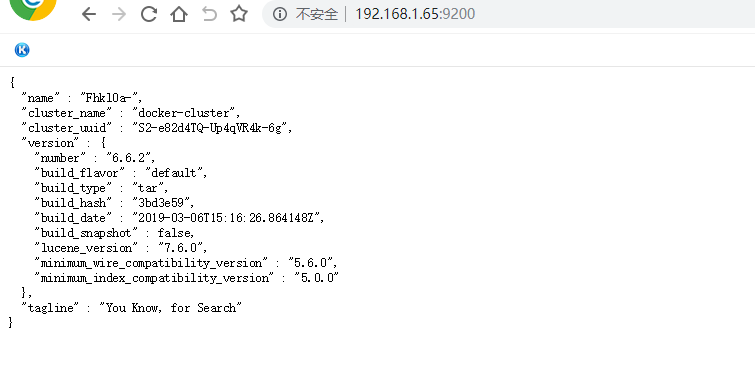
可以在node使用容器IP访问测试
# curl 172.17.84.2:9200
{
  "name" : "Fhkl0a-",
  "cluster_name" : "docker-cluster",
  "cluster_uuid" : "S2-e82d4TQ-Up4qVR4k-6g",
  "version" : {
    "number" : "6.6.2",
    "build_flavor" : "default",
    "build_type" : "tar",
    "build_hash" : "3bd3e59",
    "build_date" : "2019-03-06T15:16:26.864148Z",
    "build_snapshot" : false,
    "lucene_version" : "7.6.0",
    "minimum_wire_compatibility_version" : "5.6.0",
    "minimum_index_compatibility_version" : "5.0.0"
  },
  "tagline" : "You Know, for Search"
}
创建statefulset的内部svc
使用命令生成cluster的svc的yaml配置文件
kubectl create service clusterip es --clusterip="None" --tcp=9200:9200 --tcp=9300:9300 --dry-run -o yaml >es-cluster-svc.yaml
命令解析
kubectl create service clusterip es #创建一个cluster服务名字为es
--clusterip="None"  #clusterip为None即在内部使用域名访问
--tcp=9200:9200 --tcp=9300:9300#挂载端口
 --dry-run #不运行只检查命令是否正确
-o yaml#生成yaml配置文件
配置文件如下
# cat es-cluster-svc.yaml
apiVersion: v1
kind: Service
metadata:
  labels:
    app: es
  name: es
spec:
  clusterIP: None
  ports:
  - name: 9200-9200
    port: 9200
    protocol: TCP
    targetPort: 9200
  - name: 9300-9300
    port: 9300
    protocol: TCP
    targetPort: 9300
  selector:
    app: es
  type: ClusterIP
应用
kubectl apply -f es-cluster-svc.yaml
查看
创建一个busybox容器测试内部域名访问是否生效
Pod域名格式为${podname}.${serviceName}.${namespace}
这里pod名是es-0 serviceName是es 命名空间是默认命名空间default
注意:service服务名需要与serviceName对应一致否则会不通
kubectl run -i -t --rm busybox --image=busybox:1.28.4 --restart=Never

如果需要elasticsearch可以外部访问则需要创建一个nodeport service
使用命令生成yaml配置文件
kubectl create service nodeport es --tcp=9200:9200 --dry-run -o yaml >es-nodeport-svc.yaml
命令解析
kubectl create service nodeport es #创建一个nodeport的service对应的标签是es默认创建的service名也为es
--tcp=9200:9200 #port:targetport  port为servicr端口,targetport为pod即容器端口
--dry-run #只测试不运行
-o yaml #输出yaml
>es-nodeport-svc.yaml
原始文件为
apiVersion: v1
kind: Service
metadata:
  creationTimestamp: null
  labels:
    app: es
  name: es
spec:
  ports:
  - name: 9200-9200
    port: 9200
    protocol: TCP
    targetPort: 9200
  selector:
    app: es
  type: NodePort
status:
  loadBalancer: {}
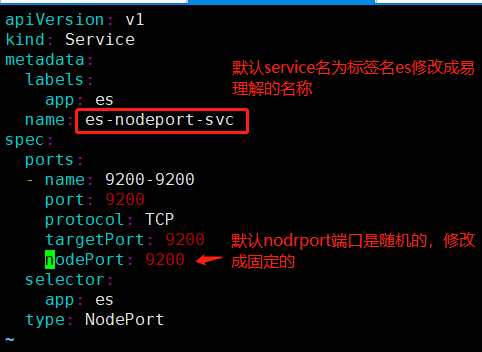
修改一下,去掉不必要的选项,修改以后如下
# cat es-nodeport-svc.yaml
apiVersion: v1
kind: Service
metadata:
  labels:
    app: es
  name: es-nodeport-svc
spec:
  ports:
  - name: 9200-9200
    port: 9200
    protocol: TCP
    targetPort: 9200
    nodePort: 9200
  selector:
    app: es
  type: NodePort
应用
kubectl apply -f es-nodeport-svc.yaml
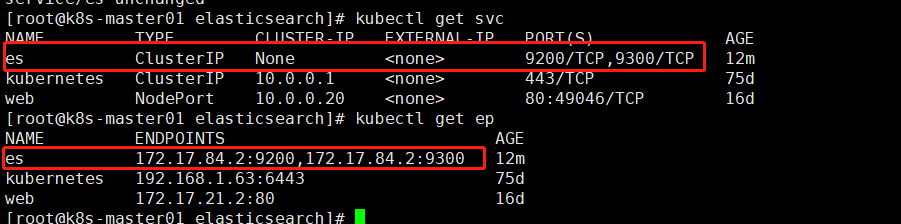
查看

使用任意node IP加端口即可访问
创建kibana服务
创建kibana配置文件,注意使用域名连接elasticsearech
# cat kibana.yml
server.port: 5601
server.host: "0.0.0.0"
elasticsearch.url: "http://es-0.es.default:9200"
kibana.index: ".kibana"
创建kibana配置configmap
kubectl create configmap kibana-config --from-file=kibana.yml
创建kibana的yaml配置文件
# cat kibana-deployment.yaml
apiVersion: apps/v1
kind: Deployment
metadata:
  labels:
    app: kibana
  name: kibana
spec:
  replicas: 1
  selector:
    matchLabels:
      app: kibana
  template:
    metadata:
      labels:
        app: kibana
    spec:
      imagePullSecrets:
      - name: registry-pull-secret
      containers:
      - image: 192.168.1.61/project/kibana:6.6.2
        imagePullPolicy: Always
        name: kibana
        volumeMounts:
        - name: kibana-config
          mountPath: /usr/share/kibana/config/kibana.yml
          subPath: kibana.yml
      volumes:
      - name: kibana-config
        configMap:
          name: kibana-config
应用
kubectl apply -f kibana-deployment.yaml
查看

使用命令创建kibana的service配置yaml文件
kubectl create service nodeport kibana --tcp=5601:5601 --dry-run -o yaml>kibana-nodeport-svc.yaml
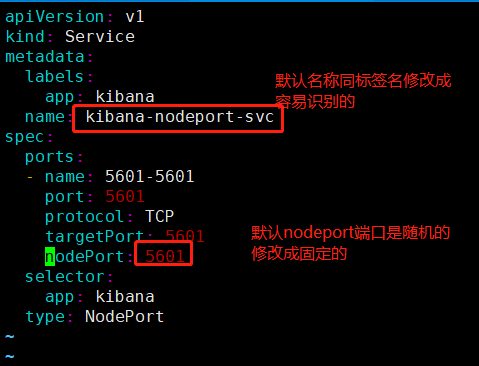
修改一下
# cat kibana-nodeport-svc.yaml
apiVersion: v1
kind: Service
metadata:
  labels:
    app: kibana
  name: kibana-nodeport-svc
spec:
  ports:
  - name: 5601-5601
    port: 5601
    protocol: TCP
    targetPort: 5601
    nodePort: 5601
  selector:
    app: kibana
  type: NodePort
应用
kubectl apply -f kibana-nodeport-svc.yaml
查看
# kubectl get svc kibana-nodeport-svc
NAME                  TYPE       CLUSTER-IP   EXTERNAL-IP   PORT(S)         AGE
kibana-nodeport-svc   NodePort   10.0.0.108   <none>        5601:5601/TCP   2m40s
[root@k8s-master01 kibana]# kubectl get ep kibana-nodeport-svc
NAME                  ENDPOINTS          AGE
kibana-nodeport-svc   172.17.84.4:5601   2m45s
web页面使用nodeip加端口访问


 浙公网安备 33010602011771号